Sweet & Sour Chicken Sliders with Pickled Cabbage – Your New Party Superstar!
Hey there, friend! Pull up a chair and let’s talk about the number one question I get asked: “Emily, what should I make for my party that will actually impress everyone?” You want something delicious, of course, but also something you can mostly make ahead so you’re not stuck in the kitchen while the fun happens. You need a crowd-pleaser that makes people’s eyes light up. Well, consider your search over.
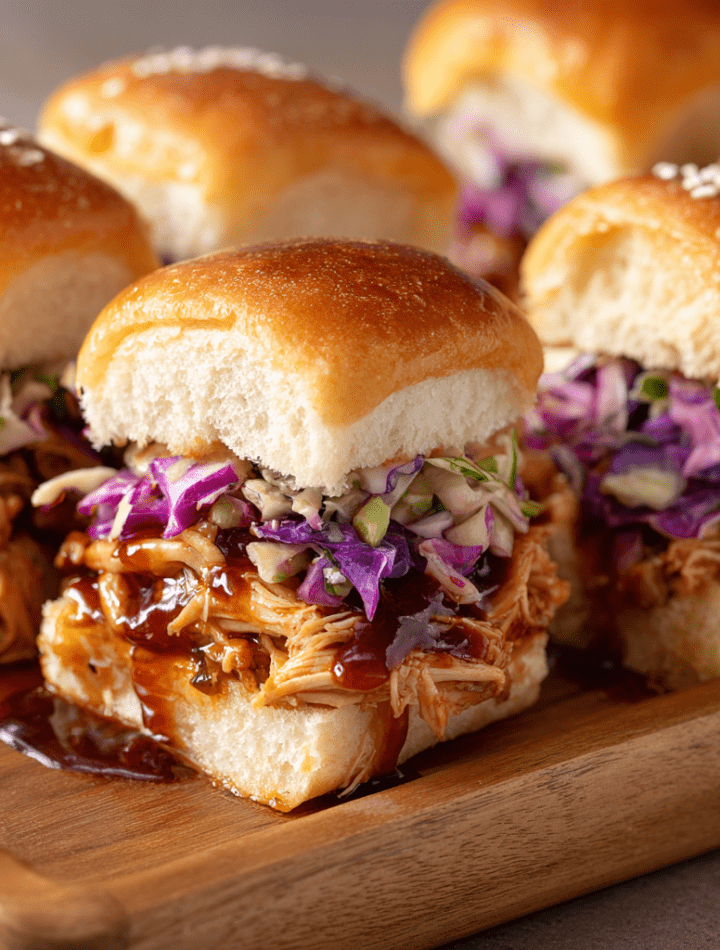
I’m about to introduce you to my secret weapon: Sweet & Sour Chicken Sliders with Pickled Cabbage. Imagine this: tender, juicy shredded chicken coated in a glossy, tangy-sweet sauce that’s just sticky enough. Now, top that with a quick-pickled cabbage that adds the most incredible CRUNCH and a bright, vinegary pop. Pile it all onto those irresistibly soft, slightly sweet Hawaiian rolls, give them a quick warm-up in the oven, and watch them disappear.
These sliders are the full package. They’re handheld happiness, perfect for game day, picnics, potlucks, or just a fun Friday night. They’re mini, they’re mighty, and they’re about to become your most-requested recipe. So, tie on your favorite apron (the messy one is always the best), and let’s make something incredibly tasty together!

The Slider That Started It All: A Beachside Revelation
This recipe wasn’t born in a fancy test kitchen. Nope! It came from a sun-soaked, sandy-toes kind of day. A few summers back, my friends and I planned a big beach picnic. I was put in charge of the “main dish,” and the pressure was on! I needed something that traveled well, could feed a crowd, and wouldn’t wilt in the sun.
I stared into my fridge and saw leftover rotisserie chicken and half a head of cabbage. I had a bottle of sweet & sour sauce (my not-so-secret weakness) and a bag of rolls. In a moment of “let’s just try it,” I tossed the chicken with the sauce, quick-pickled the cabbage with apple cider vinegar for some zing, and assembled these little guys. I threw the tray in the oven just to melt everything together… and the result was pure magic.
The second I pulled them out, that sweet, tangy aroma filled the kitchen. At the beach, they were the first thing gone. People were raving about the combo of warm, saucy chicken and the cool, crunchy cabbage. That day, surrounded by good friends, good laughs, and empty plates, I knew this happy kitchen accident was a total keeper. It’s a reminder that sometimes, the best recipes come from a little improvisation and a lot of love.
Gathering Your Flavor Crew: Ingredients & Insights
Here’s everything you’ll need to create this flavor party. Don’t stress about exact brands—this is about using what you have and what you love!
For the Sweet & Sour Chicken:
- 1.5 lbs cooked, shredded chicken: This is your shortcut to greatness! A store-bought rotisserie chicken is my go-to—it’s juicy, flavorful, and saves you SO much time. Feel free to use leftover baked or grilled chicken breasts or thighs. Chef’s Insight: A mix of white and dark meat gives you the best texture and flavor.
- 3/4 cup sweet & sour sauce: You can absolutely use a good-quality store-bought sauce here (I won’t tell!). But if you’re feeling crafty, my homemade sweet & sour sauce is just pineapple juice, vinegar, ketchup, brown sugar, and a splash of soy sauce simmered together. Substitution Tip: For a spicier kick, swap in a sriracha-based sweet chili sauce.
For the Quick-Pickled Cabbage:
- 2 cups shredded red or green cabbage: I love the vibrant purple hue of red cabbage, but green works perfectly! Use a mandoline or a sharp knife for thin, delicate shreds. Chef’s Insight: The finer you shred it, the quicker it pickles and the easier it is to eat on the slider.
- 1/4 cup apple cider vinegar: This is the “sour” to our pickle! Its fruity tang is perfect. White vinegar or rice vinegar are great substitutes.
- 1 tbsp sugar or honey: A little sweetness balances the vinegar’s sharpness. I often use honey for a more rounded flavor.
- 1/2 tsp salt: This helps draw moisture out of the cabbage, making it wonderfully limp and ready to soak up the brine.
- Optional add-ins: Thinly sliced red onion or a few slices of jalapeño take this slaw to the next level. Seriously, try the jalapeño for a sweet, sour, AND spicy situation!
For the Slider Assembly:
- 12 Hawaiian rolls: Their soft, pillowy texture and hint of sweetness are NON-NEGOTIABLE for this recipe. They’re the perfect vessel. If you need a substitute, any soft, sweet dinner roll will work.
- 2 tbsp melted butter: For brushing the tops. This gives the rolls that gorgeous, golden-brown, slightly crisp finish. Substitution Tip: Use olive oil or dairy-free butter for a dairy-free version.
- 1 tbsp sesame seeds (optional): A sprinkle of white or black sesame seeds adds a lovely visual pop and a tiny bit of nutty flavor. It’s the fancy chef touch that takes two seconds!
Let’s Build Some Sliders! Your Step-by-Step Guide
Ready to roll up your sleeves? This process is simple, fun, and oh-so-rewarding. Let’s do this step by step.
- Wake Up Your Chicken. In a medium mixing bowl, combine your shredded chicken and sweet & sour sauce. Use a rubber spatula or your hands (the best tools!) to toss until every single piece of chicken is lovingly coated in that glossy sauce. If your chicken is cold from the fridge, I like to warm this mixture gently in a skillet over low heat for 3-4 minutes. It makes the assembly easier and helps the flavors meld. Chef’s Hack: If using store-bought sauce, taste it first! Sometimes I add an extra squeeze of lime juice or pinch of red pepper flakes to tailor it to my mood.
- Create Your Crunchy Slaw. In a separate bowl, combine the shredded cabbage, apple cider vinegar, sugar (or honey), and salt. Now, get in there with your hands and massage it all together for about 30 seconds. You’ll feel the cabbage start to soften—that’s the salt and vinegar doing their magic! Let it sit for at least 15-20 minutes. You can absolutely do this step hours ahead. The longer it sits, the more flavorful and tender it becomes. Chef’s Commentary: I often double this part because people love grabbing extra slaw for their plates!
- Preheat and Prep Your Stage. Preheat your oven to 350°F (175°C). Take your whole sheet of Hawaiian rolls and, using a long serrated bread knife, carefully slice the entire block in half horizontally, creating a top “lid” and a bottom base. Place the bottom half on a baking sheet lined with parchment paper (for easy cleanup!). Pro Tip: Leaving them connected makes assembly lightning-fast and keeps all your fillings neatly contained.
- The Big Assembly. Spread the saucy chicken evenly over the bottom layer of rolls. Next, take your pickled cabbage and give it a gentle squeeze over the sink to drain any excess liquid (this keeps the rolls from getting soggy). Scatter the cabbage evenly over the chicken. Gently place the top half of the rolls back on.
- The Golden Finish. Brush the melted butter generously over the top of the rolls. Sprinkle with sesame seeds if you’re using them. This step is what makes them bakery-level beautiful!
- Warm, Melt, and Unite. Bake in your preheated oven for 8-10 minutes, just until the rolls are warm, the chicken is heated through, and the tops are golden and inviting. You’re not trying to cook anything, just marry all the flavors and textures together into one warm, happy package.
- The Grand Finale: Slicing & Serving. Remove the tray from the oven. Use that same long serrated knife to swiftly cut between each roll, creating 12 individual sliders. Transfer to a platter, watch the steam rise, and get ready for the applause!
How to Serve These Flavor Bombs
Presentation is part of the fun! I love piling these sliders high on a big, rustic wooden board or a bright, colorful platter. Tuck some extra pickled cabbage and a few lime wedges around the edges for a pop of color. For a true party vibe, serve them alongside a bowl of extra sweet & sour sauce or a creamy, cool dipping sauce like a sriracha mayo or a ginger-lime yogurt sauce.
What to serve with them? Keep it simple! A big, vibrant chopped salad, a bowl of salty potato chips, or some fresh fruit skewers are perfect companions. For a picnic, pack them in a container (once cooled slightly) and let people grab them on the go. They taste fantastic at room temperature, too!
Make It Your Own: Delicious Twists & Swaps
One of my favorite things about this recipe is its flexibility. Play with it! Here are some of my favorite variations:
- Spicy Pineapple Pulled Pork: Swap the chicken for shredded pulled pork. Mix the pork with sweet & sour sauce AND a half cup of crushed pineapple. Top with the slaw and a slice of fresh jalapeño. Fireworks!
- Teriyaki Turkey Sliders: Use shredded turkey or ground turkey sautéed with teriyaki sauce instead of sweet & sour. Top with the pickled cabbage and a drizzle of sriracha mayo.
- “No-Roll” Bowl Version (Gluten-Free): Turn this into a delicious bowl! Start with a base of rice or quinoa, pile on the sweet & sour chicken and pickled cabbage, and add toppings like sliced avocado, edamame, and extra green onions.
- Carolina BBQ Style: For a vinegar-based twist, toss the chicken with a Carolina-style mustard BBQ sauce. The tangy mustard pairs amazingly with the pickled cabbage.
- Vegan “No-Chicken” Slider: Use shredded jackfruit or a plant-based chicken alternative. Warm it in the sweet & sour sauce, and use vegan butter for brushing. It’s a huge hit with all my plant-based friends!
Chef Emily’s Kitchen Notes
This recipe has evolved from that first beach day! I’ve learned that a splash of toasted sesame oil in the chicken mixture adds incredible depth. Sometimes, I’ll add very thin slices of apple to the pickled cabbage for a sweet crunch. My husband loves when I mix a little mayo into the chicken to make it extra creamy.
The biggest lesson? Don’t skip the pickling time for the cabbage. That quick brine is what transforms it from boring shreds into a vibrant, crunchy condiment that cuts through the richness of the sauce. It’s the secret star! And honestly, the messier the assembly gets, the better the sliders taste. That’s my story, and I’m sticking to it.
Your Questions, Answered!
Q: Can I make these ahead of time?
A: Absolutely! You can shred the chicken, make the sauce, and pickle the cabbage up to 2 days in advance. Store them separately in the fridge. Assemble and bake the sliders just before serving for the best texture.
Q: My rolls got a bit soggy. What happened?
A: This usually means the pickled cabbage had too much liquid. Always give it a good squeeze after it pickles to drain the excess brine. Also, avoid assembling too far in advance before baking.
Q: Can I use something other than Hawaiian rolls?
A: You can, but the sweet, soft contrast is key. If you must substitute, look for the softest, sweetest dinner rolls you can find. Brioche slider buns are a great option.
Q: How do I store leftovers?
A: Store any leftover sliders in an airtight container in the fridge for up to 3 days. Reheat gently in the oven or toaster oven to re-crisp the rolls. They won’t be *as* perfect as fresh, but they’re still darn tasty!
Nutritional Snapshot (Per Slider)
Here’s a general breakdown for one slider, assuming all ingredients are used as listed. Remember, this is an estimate, and your exact numbers may vary based on specific brands and measurements.
- Calories: ~220 kcal
- Carbohydrates: 20g
- Protein: 14g
- Fat: 9g
- Sugar: 7g
- Sodium: 420mg
Dietary Note: This recipe is easily adaptable! Use dairy-free butter for a dairy-free version, and ensure your sauce and rolls align with any specific dietary needs (e.g., gluten-free rolls). It’s a fantastic, balanced bite of protein, carbs, and flavor!
Final Thoughts from My Kitchen to Yours
And there you have it, my friend—the full story of the slider that stole a beach picnic and countless hearts since. What I love most about this recipe isn’t just the taste (though, wow, the taste!), but the feeling it creates. It’s the feeling of gathering people you love around a table (or a picnic blanket), sharing food made with your own two hands, and watching smiles spread with every bite.
This is what Tasty Chow is all about: recipes that work, flavors that sing, and moments that become memories. So, I hope you give these sliders a try. Make them for your next get-together, or just for a treat-yourself Tuesday. Tag me if you do—I love seeing your kitchen creations!
Now, go forth and chow down! With love, butter, and a little bit of sweet & sour magic,
— Emily 🧑🍳