The Dip That Started a Food Frenzy in My Kitchen
Hey there, my fellow flavor fanatic! Let’s talk about party food for a second. You know the scene: a table laden with snacks, but there’s always that one dish. The one that creates a gravitational pull, surrounded by a happy crowd of chip-wielding friends. The one that disappears so fast you’re left wondering if you just imagined it was ever there.
Friends, meet that dish. Meet my legendary, always-requested, couldn’t-be-easier Texas Trash Dip.
Now, I know the name raises an eyebrow. “Trash” dip? It sounds like something you might whip up from the mysterious leftovers in the back of the fridge. But trust me, this dip is the absolute opposite of trash. It’s a treasure. A glorious, bubbling, molten-hot concoction of creamy cheeses, savory beans, and zesty taco seasoning that will make you the undisputed MVP of any gathering. It’s the dip that has my friends texting me, “Are you bringing *the dip*?” before they even ask what time the party starts.
This isn’t just a recipe; it’s a experience. It’s the ultimate comfort food in dip form, and today, I’m pulling back the curtain and giving you my no-fail, crowd-pleasing formula. So, preheat your ovens, grab your favorite mixing bowl, and let’s make a dip that’s guaranteed to leave everyone asking for the recipe.

A Dip, A Dream, and a Very Messy Apron
I’ll never forget the first time I encountered this dip. It wasn’t in a fancy restaurant or a culinary school workshop. Nope. It was at a rowdy, fun-filled Super Bowl party years ago, crammed into my friend Sarah’s apartment. The game was on, but the real action was in the kitchen, around a humble 9×9 baking dish.
I saw a swarm of people hovering, their tortilla chips diving in with a collective mission. Curious, I squeezed my way in and scooped up a still-bubbling bite. The moment that warm, cheesy, bean-y goodness hit my tongue, my eyes went wide. It was pure magic. I immediately found the hostess, who laughed and said, “Oh, that? That’s just Texas Trash Dip!” She scribbled the ingredients on a napkin, and the rest is history.
That napkin, now splattered with various sauces and safely tucked into my first recipe journal, was the start of a beautiful friendship. This dip has been with me through countless game days, potlucks, and “just because” Tuesday nights. It’s a recipe that proves the best food isn’t always the most complicated—it’s the food that brings people together, one gloriously messy chip-scoop at a time.
Gathering Your Flavor All-Stars
Here’s the beautiful part: this dip comes together with simple, humble ingredients. No fancy shopping required! Let’s break down what you’ll need and why each one is a superstar.
- 1 (8 oz) package cream cheese, softened: This is the lush, creamy backbone of our dip. Chef’s Tip: *Please* let it soften at room temperature for at least 30 minutes. This is non-negotiable for a smooth, lump-free dip! If you’re in a pinch, you can microwave it for 15-20 seconds on low power.
- 1 cup sour cream: It adds a delightful tang and loosens up the cream cheese for the perfect dippable texture.
- 1 (16 oz) can refried beans: This is the hearty, savory soul of the operation. I use traditional, but feel free to use black refried beans for a slightly different flavor and color!
- 1 packet taco seasoning: Our flavor powerhouse! It brings the zesty, Tex-Mex magic. You can use your favorite brand—mild, hot, or even a low-sodium version.
- 1 cup shredded cheddar cheese: For that classic, sharp, melty goodness. I love the bold color it adds, too.
- 1 cup shredded Monterey Jack cheese: The perfect melty partner for cheddar. Its mild, buttery flavor makes the cheese pull absolutely epic.
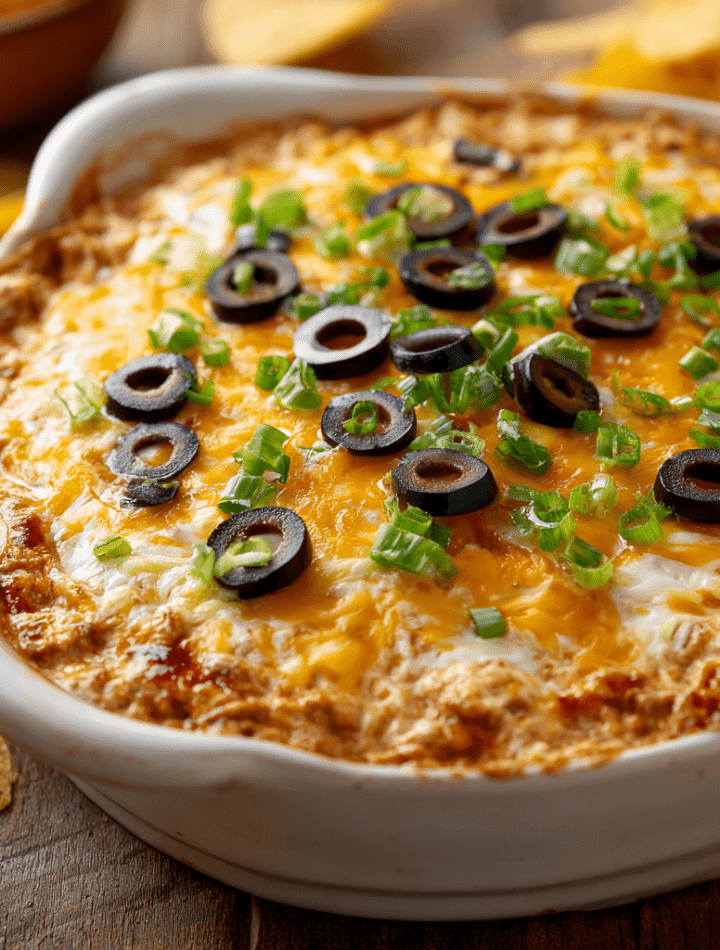
- 1/2 cup sliced black olives (optional): I’m team olive all the way! They add a briny, salty pop that cuts through the richness.
- 1/4 cup sliced green onions (optional): A fresh, sharp finish that makes the dip look gorgeous. Use both the green and white parts!
- Tortilla chips, for serving: The sturdy, salty vessel for all this deliciousness. Get the sturdy ones—they need to stand up to a hearty scoop!
Let’s Build the Ultimate Party Dip!
Ready to see how this all comes together? It’s so simple, you’ll have it memorized after one try. Let’s walk through it step-by-step.
- Preheat and Prep: First things first, get that oven preheating to a cozy 350°F (175°C). This gives your oven time to get perfectly toasty while we assemble our masterpiece. Grab an 8×8 or 9×9-inch baking dish—no need to grease it!
- The Creamy Base: In a large bowl, plop in your softened cream cheese and sour cream. Now, take a deep breath and get ready to mix! I love using a sturdy wooden spoon or a hand mixer on low for this. The goal is a smooth, creamy, and lump-free canvas. Chef’s Hack: If your cream cheese is still a little cool and fighting you, a quick 20-second zap in the microwave for the whole mixture can help loosen it up!
- Bring in the Flavor: Now, add the entire can of refried beans and that magical packet of taco seasoning. This is where the color and aroma really start to get exciting. Mix, mix, mix until everything is completely combined and you have a uniform, beautiful beige-pink color. Don’t be shy—make sure no streaks of plain cream cheese are left behind!
- Spread the Love: Transfer your deliciously creamy bean mixture into your baking dish. Use a spatula to spread it into a smooth, even layer, making sure you get it into all the corners. We’re building a perfect foundation for our cheesy blanket.
- The Cheesy Blanket: This is the best part. Take your shredded cheddar and Monterey Jack cheeses and sprinkle them evenly over the top. Cover every last inch! This cheesy layer is going to melt into a gorgeous, golden-brown crust that is simply irresistible.
- Bake to Bubbly Perfection: Carefully place your dish in the preheated oven. Now, for the hardest part: the wait! Bake for 20-25 minutes. You’re looking for the edges to be actively bubbling and the cheese on top to be completely melted, gooey, and maybe even just starting to get a few golden spots. Your kitchen will smell like a Tex-Mex paradise.
- The Grand Finale (Garnish!): Once it’s out of the oven, let it rest for just a minute or two—it’s molten hot! This is the time to sprinkle on your optional (but highly recommended) black olives and green onions. The fresh green and dark black look so pretty against the melted cheese and really take it to the next level.
How to Serve This Cheesy Masterpiece
Presentation is part of the fun! You’ve just created a show-stopping dip, so let’s serve it with style.
I always place the hot baking dish right onto a large wooden cutting board or a heat-safe trivet. This protects your table and makes it look intentional and rustic. Pile a big bowl of sturdy tortilla chips right next to it—I love a mix of white corn and blue corn chips for color.
But don’t stop at chips! This dip is incredibly versatile. Serve it with:
- Thick, sturdy potato chips
- Crispy bell pepper strips or carrot sticks for a low-carb option
- Warm, soft flour tortillas or pita bread, cut into triangles
- Even big, crunchy pieces of romaine lettuce for a “dip taco” situation!
The key is to serve it warm. The cheese is at its most glorious when it’s stretchy and molten. If it sits out for a while and starts to cool, no worries—a quick 60-second zap in the microwave will bring it right back to life!
Make It Your Own: Delicious Twists & Swaps
One of the best things about this Texas Trash Dip recipe is its flexibility. It’s a fantastic base for your own culinary creativity. Here are a few of my favorite ways to mix it up!
- The Spicy Fiesta: Kick up the heat! Use a spicy taco seasoning, add a 4-ounce can of diced green chiles (drained), or mix in a tablespoon of your favorite hot sauce into the base. Top with some pickled jalapeño slices before baking.
- The Meat Lover’s Dream: Brown half a pound of ground beef, turkey, or chorizo (drain the fat) and mix it right in with the bean and cream cheese mixture. It turns the dip into a heartier, meal-worthy snack.
- The “Seven-Layer” Shortcut: Pay homage to the classic 7-layer dip! After spreading the bean mixture, layer on: 1 cup of guacamole, then 1 cup of salsa (squeeze out excess liquid), then the cheeses. Bake as directed. The warm, cool, and creamy combo is unreal.
- The Lighter Dip: You can absolutely lighten this up without sacrificing flavor. Use Neufchâtel cheese (the lower-fat cousin of cream cheese), light sour cream, low-fat refried beans, and reduced-fat cheese. It’ll still be deliciously satisfying!
- The Rotel Twist: For a creamier, queso-style dip, stir in a 10-ounce can of diced tomatoes and green chiles (like Rotel), drained, into the base mixture. It adds a wonderful chunkiness and tang.
From My Kitchen to Yours: A Few Parting Thoughts
Over the years, this recipe has become a trusted old friend in my kitchen. It has never, ever let me down. I’ve made it for nervous first dates (it broke the ice!), for sad friends who needed comfort food, and for massive holiday parties where it was gone before I even got my coat off.
The funniest memory? The time I accidentally used cinnamon-sugar pita chips for dipping because I grabbed the wrong bag from the pantry. Surprisingly, the sweet and savory combo was a weirdly delicious hit! It just goes to show—don’t be afraid to play with your food. This dip is resilient and forgiving. It’s evolved from that scribbled napkin into a Tasty Chow staple, and I’m so thrilled to finally be sharing the official version with you.
Your Texas Trash Dip Questions, Answered!
I’ve gotten a lot of questions about this dip over the years. Here are the answers to the most common ones!
Q: Can I make this dip ahead of time?
A: Absolutely! You can assemble the dip completely (through the cheese layer), cover it tightly with plastic wrap, and refrigerate it for up to 24 hours. When you’re ready, just pop it in the preheated oven. You may need to add 5-10 extra minutes to the bake time since it’s going in cold.
Q: My dip turned out a bit watery. What happened?
A: This can happen if your sour cream has a lot of liquid (whey) separated in the container, or if you use a very watery salsa in a variation. To prevent this, give your sour cream a good stir before using. If you’re adding salsa or Rotel, be sure to drain off the excess liquid really well!
Q: Can I use block cheese instead of pre-shredded?
A: Yes, and I often do! Cheese you shred yourself from a block actually melts better because it doesn’t contain the anti-caking agents found in pre-shredded bags. It’s a simple upgrade for an even silkier texture.
Q: Is there a way to make this in a slow cooker?
A> For sure! It’s great for keeping the dip warm for hours. Just mix all the ingredients (except garnishes) in the slow cooker crock. Cook on LOW for 2-3 hours, stirring occasionally, until hot and bubbly. Then garnish and serve!

Texas Trash Dip Recipe : The Ultimate Cheesy Party Dip
- Total Time: 35 minutes
- Yield: 10 1x
Description
Despite its quirky name, Texas Trash Dip is a gooey, cheesy, flavor-packed casserole-style dip that always steals the show. Creamy refried beans, smooth cream cheese, tangy sour cream, and melted cheese all baked into one irresistible dish. It’s the perfect addition to any party table or game night. Make it once and watch it vanish in minutes!
Ingredients
1 (8 oz) package cream cheese, softened
1 cup sour cream
1 (16 oz) can refried beans
1 packet taco seasoning
1 cup shredded cheddar cheese
1 cup shredded Monterey Jack cheese
1/2 cup sliced black olives (optional)
1/4 cup sliced green onions (optional)
Tortilla chips, for serving
Instructions
Preheat oven to 350°F (175°C).
In a large bowl, mix cream cheese, sour cream, refried beans, and taco seasoning until smooth.
Spread mixture evenly in a baking dish (8×8 or 9×9 inches).
Sprinkle cheddar and Monterey Jack cheeses over the top.
Bake for 20–25 minutes, until hot and bubbly.
Garnish with black olives and green onions, if using.
Serve warm with tortilla chips.
- Prep Time: 10 minutes
- Cook Time: 25 minutes
Nutrition
- Calories: 230 / Serving
- Sodium: 500mg / Serving
- Fat: 18g / Serving
- Saturated Fat: 10g / Serving
- Carbohydrates: 9g / Serving
- Fiber: 2g / Serving
- Protein: 7g / Serving
A Quick Peek at the Nutrition
I’m all about balance! While this is definitely an indulgent, celebratory dip, it’s helpful to know what you’re enjoying. This nutritional info is per serving (assuming 10 servings and using full-fat ingredients) and is an estimate. Using lighter ingredients, as suggested in the variations, will lower these numbers.
- Calories: ~230 kcal
- Fat: 18g
- Saturated Fat: 10g
- Carbohydrates: 9g
- Fiber: 2g
- Sugar: 1g
- Protein: 7g
- Sodium: ~500mg
Remember, this is a dip meant for sharing! A little goes a long way in terms of flavor, so enjoy it as part of a spread with lots of veggie options too.
Your New Go-To Party Hero
And there you have it! My heart, soul, and a whole lot of cheese, baked into one perfect dish. This Texas Trash Dip is more than just a recipe—it’s a conversation starter, a crowd-pleaser, and a guaranteed way to make any occasion a little more special.
It’s proof that the best food doesn’t have to be fussy. It’s about big flavors, simple ingredients, and the joy of sharing something truly delicious with the people you love. So the next time you’re headed to a potluck, hosting game night, or just need a seriously satisfying snack, you know what to do.
I’d love to hear how your dip turns out! Tag me on social @TastyChow with your cheesy, bubbly creations. Now, go forth and make a dip that disappears!
With a full heart and a hungry belly,
— Emily