Tiramisu Frappuccino: Your Iced Coffee Dessert Dream Come True
Hey there, friend! Emily here, apron a little dusty from a morning of recipe testing, but oh so excited to pull up a virtual stool and chat with you about one of my all-time favorite creations. Have you ever had one of those days where you’re standing in line at a café, staring at the menu, and you just can’t decide? Do you want the rich, coffee-kissed delight of a tiramisu? Or the frosty, soul-reviving jolt of an iced coffee beverage? My brain, being the forever hungry and slightly indecisive organ it is, always shouts: “WHY NOT BOTH?!”
And that, my fellow flavor-chaser, is how this glorious Tiramisu Frappuccino was born in my kitchen. This isn’t just a drink; it’s a dessert you can sip through a straw. It’s a cloud of creamy, coffee-infused bliss that tastes like the lovechild of your favorite Italian dessert and that fancy coffee shop treat you splurge on. The best part? You can make it in about five minutes flat, with no fancy equipment needed beyond a blender. It’s packed with layers of flavor—deep espresso, sweet caramel, indulgent chocolate, and a whisper of hazelnut. Topped with a mountain of whipped cream and a snowstorm of cocoa powder, it’s pure happiness in a glass. So, let’s ditch the café line and make some magic together. Your blender is waiting!

A Tale of Two Cravings: My Tiramisu Frappuccino “Aha!” Moment
This recipe has a little story, as the best ones often do. It was a sweltering summer afternoon, the kind where even the fan just seems to be blowing hot air around. I’d promised my niece we’d bake together, and her request was my classic, no-fail tiramisu. As much as I adore making it, the thought of turning on the oven and whipping eggs in that heat felt… heroic. But a promise is a promise!
We got it done, laughing and licking spoons, and as we put the finished masterpiece in the fridge to set, I looked longingly at the bowl of leftover espresso. I was parched, dreaming of something icy. In that moment, my gaze darted from the cooling tiramisu to the espresso to the blender. It was like a cartoon lightbulb clicked on above my head. What if I blended those flavors into a frosty drink? A drinkable tiramisu! We threw some ice, milk, a splash of that espresso, and a few other pantry staples into the blender. The result was an instant family legend. My niece declared it “even better than the cake,” and I knew I had to perfect it and share it with you. Sometimes, the best recipes come from a little desperation and a lot of love!
Gathering Your Flavor Squad: The Ingredients
Here’s everything you need to build this masterpiece. I’ve included my little chef notes for each one because knowing your ingredients is the first step to cooking (or blending!) with confidence.
- 1 cup ice: The foundation of our frosty texture. For an extra coffee punch, try freezing leftover brewed coffee into ice cubes! It prevents dilution as you blend.
- ¼ cup coffee, cooled: Brew it strong! I use a dark roast for depth. Day-old coffee works perfectly here—no waste! Chef’s Insight: Chilled espresso from a machine is heaven, but strong brewed coffee is totally winner.
- ½ cup whole milk: This gives us that lush, creamy body that mimics tiramisu’s mascarpone richness. Substitution Tip: Any milk or creamy alternative works! Oat milk adds a lovely sweetness, almond milk keeps it light, and for supreme decadence, try half-and-half.
- 2 tbsp caramel sauce: This is our secret weapon for that deep, buttery sweetness. It adds a complex flavor that plain sugar just can’t match.
- 2 tbsp chocolate syrup: Because what’s tiramisu without chocolate? It blends right into the drink for an all-over mocha vibe.
- 2 tsp espresso powder: This is our flavor booster pack! It intensifies the coffee taste without adding more liquid. A must-have for true coffee lovers.
- ½ tsp cocoa powder: Unsweetened, please! It adds a subtle bitter-chocolate depth that balances all the sweetness.
- 1 tbsp vanilla syrup: A hint of vanilla rounds out all the edges. Use store-bought or make your own simple syrup with a vanilla bean.
- 1 tsp hazelnut extract: The “chef’s kiss” flavor. It gives that sophisticated, nutty note that makes this drink taste truly special. Don’t skip it! If you must, almond extract is a good backup.
- Whipped cream for topping: Go big or go home! This is the “mascarpone layer” of our drinkable dessert. Use canned, homemade, or even a dollop of cool whip.
- Cocoa powder for dusting: The final, iconic touch. A fine-mesh sieve gives you that gorgeous, professional-looking dusting.
Let’s Build Some Magic: Step-by-Step Instructions
Ready? Let’s fire up that blender! I’m walking you through each step with my favorite tips to ensure perfection.
- The Ice Goes First. Toss that cup of ice into your blender pitcher. Starting with the ice on the bottom helps the blades grab it and start crushing immediately, leading to a smoother blend. Chef Hack: If your blender sometimes leaves icy chunks, give it a quick pulse 3-4 times before you blend continuously.
- Pour in the Liquids. Add your cooled coffee and milk right over the ice. This helps start the mixing process even before you hit the button.
- Add All Your Flavor Friends. Now, in go the caramel sauce, chocolate syrup, espresso powder, cocoa powder, vanilla syrup, and that magical hazelnut extract. Don’t worry about being neat—it’s all going to get blended into oblivion anyway! Pro Tip: To easily get every last drop of sticky syrup out of your measuring spoons, give them a quick rinse with the milk or coffee as you add it to the blender.
- Blend Until Dreamy. Pop the lid on securely (sounds obvious, but trust me, I’ve created chocolate-kitchen-wall-art before by forgetting!). Blend on high for about 45 seconds to 1 minute. You’re looking for a completely smooth, thick, and pourable consistency. It should look like a creamy coffee milkshake. If it’s too thick, add a tiny splash more milk. Too thin? Add another handful of ice.
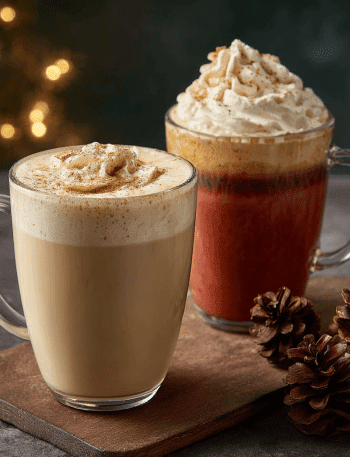
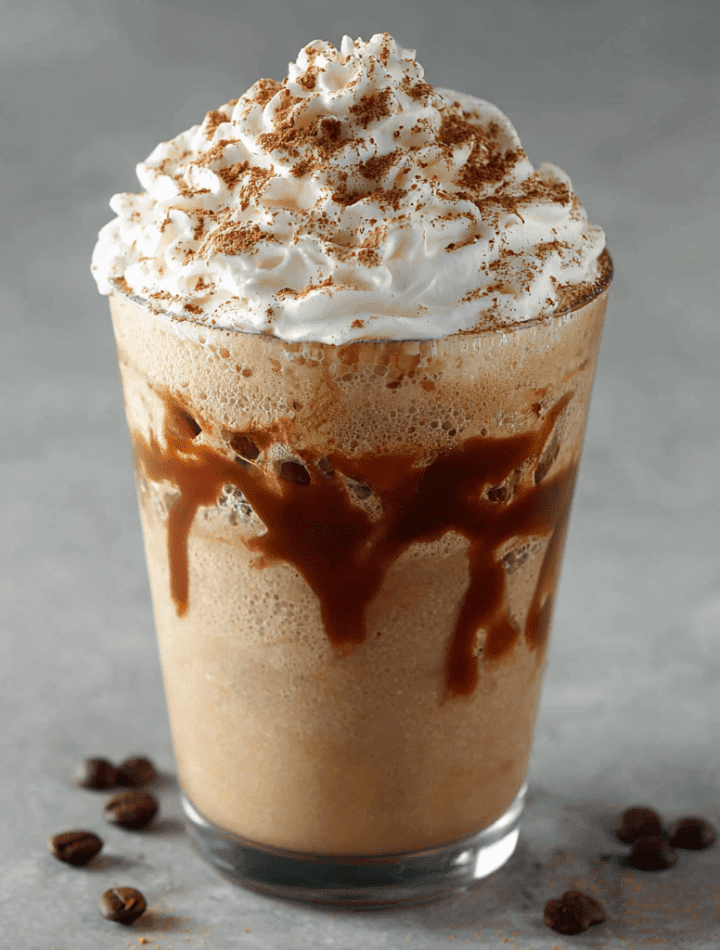
- The Grand Pour. Grab your favorite glass—a clear mason jar or a tall tumbler shows off those gorgeous layers of foam and cream. Pour your Frappuccino in, leaving just a little room at the top for our crowning glory.
- Top It Like a Pro. Pile on that whipped cream generously! Then, for the finishing touch, take a small pinch of cocoa powder between your fingers and, holding it high above the glass, gently rub your fingers together to let it snow evenly over the cream. Alternatively, use a fine-mesh strainer for a super-even dusting. This makes all the difference!
Serving Your Masterpiece: Let’s Make It an Event
This drink is a star all on its own, but why not make it the centerpiece of a little moment of joy? Here’s how I love to serve it:
First, presentation is key. A fancy reusable straw or a long-handled spoon is perfect for digging into the whipped cream. For a true tiramisu experience, you could even add a small, crisp ladyfinger cookie on the side for dipping! If I’m making these for friends on a backyard picnic, I’ll pre-blend a big batch and keep it in an insulated pitcher, letting everyone top their own glasses with cream and cocoa. It’s also the perfect after-dinner dessert drink instead of a heavy cake. Pair it with good conversation, a sunny patio, or a great book. It’s a treat that turns an ordinary afternoon into a tiny celebration.
Make It Your Own: Delicious Recipe Variations
Once you’ve mastered the classic, the blender is your playground! Here are some of my favorite twists:
- The Salty Bourbon Caramel Twist: Swap the caramel sauce for a salted caramel version. Add just a tiny splash (½ teaspoon) of bourbon to the blender for a grown-up, incredibly complex flavor. (Omit for a non-alcoholic version, it’s still amazing!).
- Vegan & Dairy-Free Delight: Super easy! Use oat milk or coconut milk (the creamy canned kind), vegan caramel and chocolate syrups, and coconut whipped cream. The hazelnut extract is already plant-based, so you’re golden.
- Cookies & Cream Remix: Add 2-3 broken-up chocolate sandwich cookies (like Oreos) to the blender with the other ingredients. You’ll get a chunky, cookies-and-cream texture that’s absolutely divine.
- Mocha Mint Madness: Replace the hazelnut extract with ½ teaspoon of peppermint extract. It’s like a frosty, coffee-based thin mint cookie in a glass. Perfect for the holidays!
- Protein-Packed Power Start: Turn this into a breakfast-worthy shake. Add a scoop of vanilla or chocolate protein powder and a tablespoon of chia seeds. It’s indulgent tasting but will fuel your morning.
Chef Emily’s Notes & Kitchen Confessions
This recipe has become my go-to for last-minute guests and “I need a pick-me-up” afternoons. It’s evolved from that first desperate experiment into something I make almost weekly! I’ve learned that the quality of your caramel sauce makes a huge difference—splurge on the good stuff or make a quick batch at home. My funniest fail? The time I accidentally used hot coffee, not cooled. It melted all the ice instantly and I ended up with a lukewarm, sad soup. We laughed, dumped it, and started over. The lesson? Patience, grasshopper. Let that coffee cool. Also, my blender has become my best friend—I named him “Blendy.” Don’t tell the other appliances.
Your Questions, Answered: FAQs & Troubleshooting
Q: My drink turned out too sweet/not sweet enough. How can I fix that?
A: No problem! Taste is personal. For less sweetness, reduce the caramel and vanilla syrups by half a tablespoon each. For more sweetness, add an extra tablespoon of caramel or a pinch of granulated sugar to the blender. You’re the boss of your blender!
Q: I don’t have espresso powder. What can I use?
A> You have options! Use ½ cup of strong brewed coffee instead of ¼ cup, and omit the extra milk if you want to keep the thickness. Or, you can use a shot of chilled espresso from a machine. The powder just gives a more concentrated flavor punch.
Q: My Frappuccino is too thin/watery. What happened?
A> This usually means the ice wasn’t enough or wasn’t crushed fully. Next time, ensure you’re using a full, packed cup of ice. Also, make sure your coffee is completely cold before using. Warm liquid is the enemy of a frosty texture!
Q: Can I make this ahead of time?
A> You can blend it and store it in the freezer for up to an hour, but give it a good shake or quick re-blend before serving as it will separate. I highly recommend making it fresh for the best texture and froth!
Nutritional Information (A Chef’s Perspective)
Alright, let’s talk real talk. This is a dessert drink, a treat meant to be savored and enjoyed. One serving (made with whole milk and standard syrups) comes in around 310 calories. It has about 32g of sugar (primarily from the syrups—you can use sugar-free versions to lower this), 14g of fat, and roughly 80mg of caffeine (like a small cup of coffee). I’m all about balance. I enjoy this as a weekend treat or a special dessert, not an everyday drink. To lighten it up, use skim milk, sugar-free syrups, and go light on the whipped cream topping. But remember, food—and drink!—is about joy, too. Sometimes, you just need the real deal, and that’s perfectly wonderful.
Final Sips & Happy Blending!
Well, my friend, there you have it—my heart (and my blender’s) recipe for the ultimate Tiramisu Frappuccino. I hope this brings a little spark of delicious joy to your day. The kitchen should be a place of fun, experimentation, and creating things that make you and the people you love say “Mmmm.” This drink definitely fits the bill.
I’d love to hear how yours turns out! Did you add a twist? Did it make your afternoon a little brighter? Tag me on social or leave a comment over on Tasty Chow—seeing your creations is my absolute favorite thing. Now, go grab that blender, make a little mess, and enjoy every last creamy, coffee-infused sip. You deserve it.
Until next time, keep chasing flavor!
— Emily 🥄☕