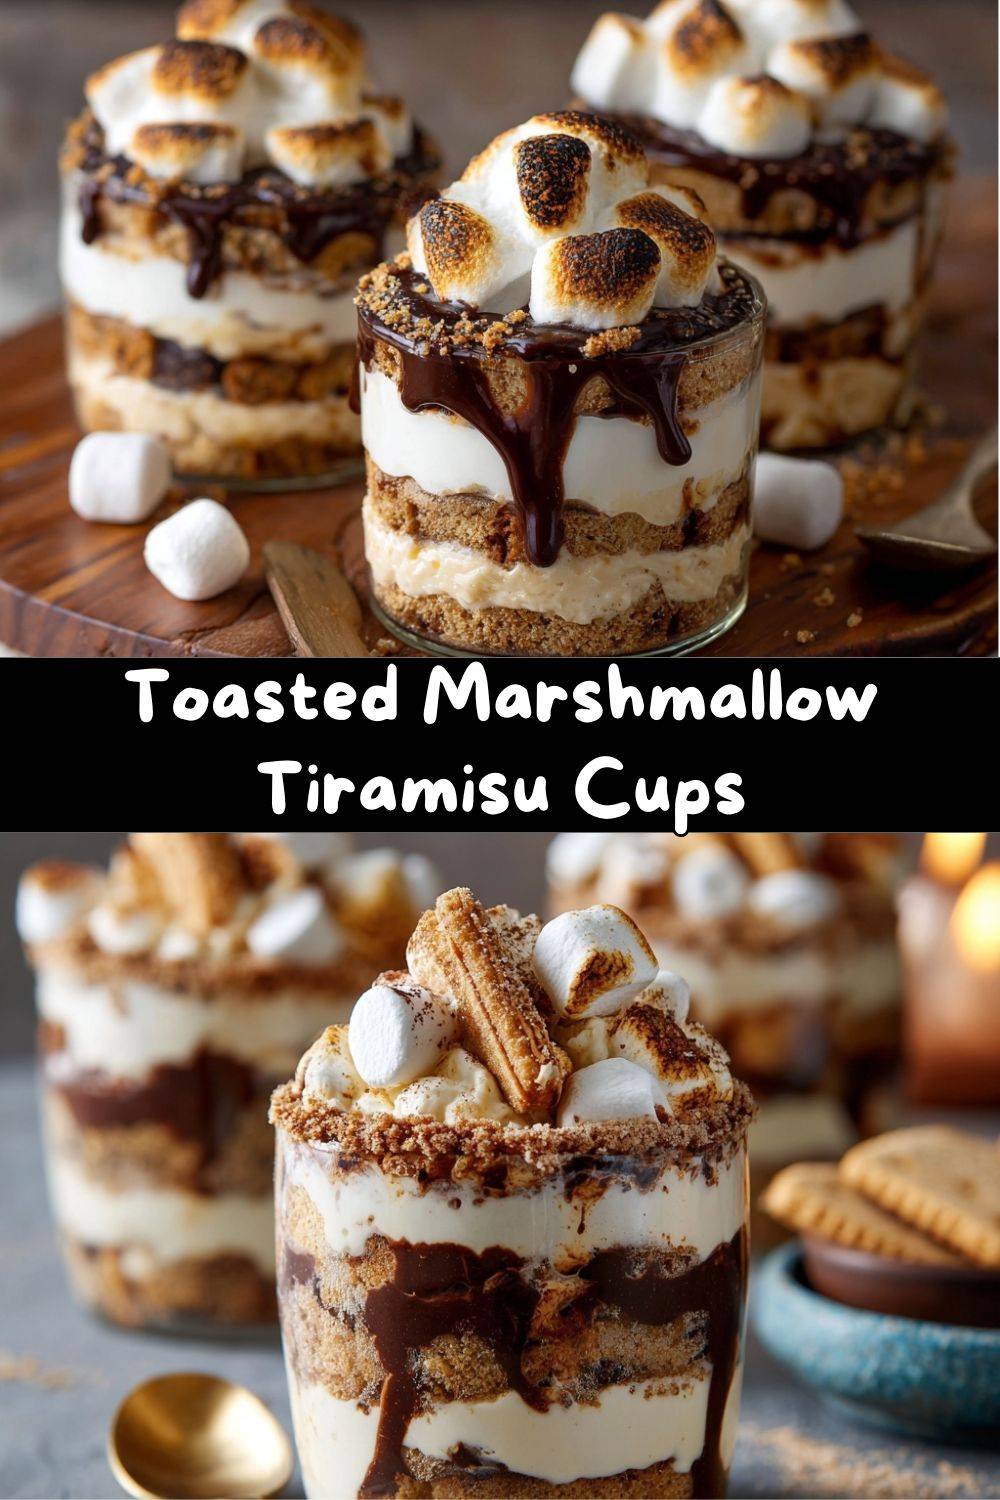
Toasted Marshmallow Tiramisu Cups: Your New Favorite No-Bake Treat
Hey there, friend! Pull up a chair and imagine this: the cozy crackle of a fireplace, a plush blanket, and the unmistakable, magical scent of toasting marshmallows. Now, imagine capturing that exact feeling in a dessert cup—no campfire required. That’s the delicious daydream behind these Toasted Marshmallow Tiramisu Cups.
I’m Emily, and if you’ve been around Tasty Chow before, you know I live for recipes that turn simple, joyful flavors into something a little bit special. We’re taking the classic, elegant structure of a tiramisu—those lovely layers of coffee-dipped cookies and creamy filling—and giving it a full-on, fun-loving, s’mores-inspired makeover. Out goes the espresso, in comes the sweet vanilla and crunchy graham. Instead of a dusting of chocolate, we get a pillow of marshmallow cream, kissed with a torch until it’s golden and toasty.
The best part? This is a seriously easy, no-bake dessert that comes together in about 20 minutes of active time. It’s perfect for those times when you want to whip up something impressive without turning on the oven, whether it’s for a holiday party, a potluck where you want to be the hero, or just a Tuesday night that deserves a sweet celebration. So, let’s trade the hiking boots for fuzzy socks and create some indoor campfire magic together. Trust me, your spoon is ready for this adventure.
A Story by Firelight (and Flashlight)
This recipe was born from a failed camping trip and a stubborn sweet tooth. A few years back, my friends and I planned this epic autumn camping weekend to see the fall colors. We had visions of crisp air, stunning views, and, of course, a legendary s’mores session. Mother Nature had other plans. It poured. Not a gentle drizzle, but a “we’re-building-an-ark” kind of downpour.
We ended up crammed in my tiny cabin, damp and slightly defeated, craving the comfort of those unrealized s’mores. I started raiding the pantry: a sleeve of graham crackers from who-knows-when, a jar of marshmallow fluff, some leftover ladyfingers from a baking experiment. In a moment of “what if?” I started layering things in mugs. A quick toast with my crème brûlée torch (a kitchen gadget I firmly believe everyone should own for pure joy purposes) and… magic. We stood around the kitchen island, spoons clinking against glass cups, the rain drumming on the roof, and agreed it was better than any campfire. It was our cozy, delicious consolation prize. Now, it’s a reminder that sometimes the best memories—and recipes—come from perfectly imperfect moments.
Gathering Your Flavor Crew
Here’s your shopping list for this no-bake dream. I’ve added my little chef notes to help you understand the “why” behind each ingredient and give you some easy swaps!
- 1 package ladyfingers (savoiardi): These dry, finger-shaped cookies are the backbone of traditional tiramisu. They’re perfect because they hold their structure when dipped but still soak up flavor. Chef’s Insight: Don’t sub with soft sponge cake—it’ll get mushy!
- ½ cup whole milk + 1 tsp pure vanilla extract: This is our quick “dipping syrup.” The milk adds moisture, the vanilla adds warmth. Sub Tip: For a richer flavor, use half-and-half. For a non-dairy version, unsweetened almond or oat milk works great.
- 1 jar (about 7 oz) marshmallow creme (fluff): The star of the show! This gives us that unmistakable marshmallow flavor and a wonderfully gooey texture. Chef’s Insight: To make scooping easier, lightly spray your spoon or spatula with cooking spray.
- 8 oz mascarpone cheese, softened: This Italian cream cheese is luxuriously rich and smooth, with a slight tang that balances the sweet marshmallow. Sub Tip: In a pinch, you can use full-fat cream cheese, but let it get super soft and whip it well to avoid lumps.
- ½ cup heavy cream: We’re whipping this to lighten the mascarpone mixture. Chef’s Insight: Ensure your cream and bowl are very cold for the best, fluffiest peaks.
- 2 tbsp powdered sugar: Just a touch to sweeten the whipped cream. It dissolves instantly, so no graininess!
- 1 cup crushed graham crackers: Our “campfire crust” layer! It adds that essential s’mores crunch and a hint of honey. Chef’s Insight: Crush them finely but not into dust—you want a little texture.
- Unsweetened cocoa powder (for dusting): A light snowfall of cocoa on top adds a bitter contrast that makes all the sweet flavors pop. It’s the elegant finishing touch.
- Mini marshmallows (optional, for topping): For the ultimate toasted look and an extra marshmallow-y bite! These are totally optional but so fun.
Let’s Build Some Magic: Step-by-Step
Okay, team! Let’s get our hands (or rather, our spoons) dirty. This is where the fun happens. Read through once, then let’s go!
- The Dip: In a shallow bowl or pie plate, stir together the milk and vanilla extract. Working with one ladyfinger at a time, quickly dip each side into the milk mixture. I mean quickly—just 1-2 seconds per side. You want them moistened, not soaked and soggy. They should still feel firm in the center. This is the #1 tip for perfect texture! Lay them on a plate as you go.
- The Whip: In a large, chilled bowl, pour in the heavy cream and powdered sugar. Using a hand mixer or stand mixer with the whisk attachment, whip on medium-high speed until you get beautiful, soft peaks. That means when you lift the beaters, the cream forms a peak that gently curls over at the tip. Don’t go to stiff peaks—it can make the final cream a bit grainy. Set aside.
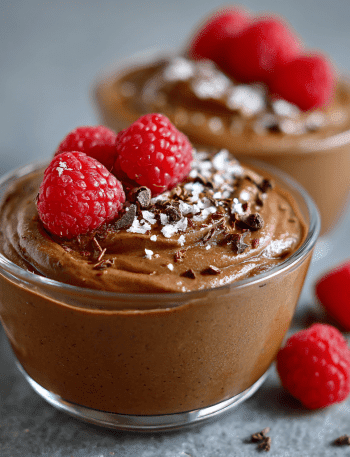
- The Creamy Dream: In another bowl, beat the softened mascarpone cheese with a spatula or mixer on low until it’s completely smooth and lump-free. This is key! Now, gently fold in the entire jar of marshmallow creme until mostly combined. Then, add about a third of your whipped cream to the mascarpone mixture and fold vigorously to lighten it up. Finally, gently fold in the remaining whipped cream until you have a uniform, fluffy, cloud-like cream. Little Chef Hack: Folding (a gentle cut-and-scoop motion) keeps the air in the whipped cream, making your dessert light as a feather.
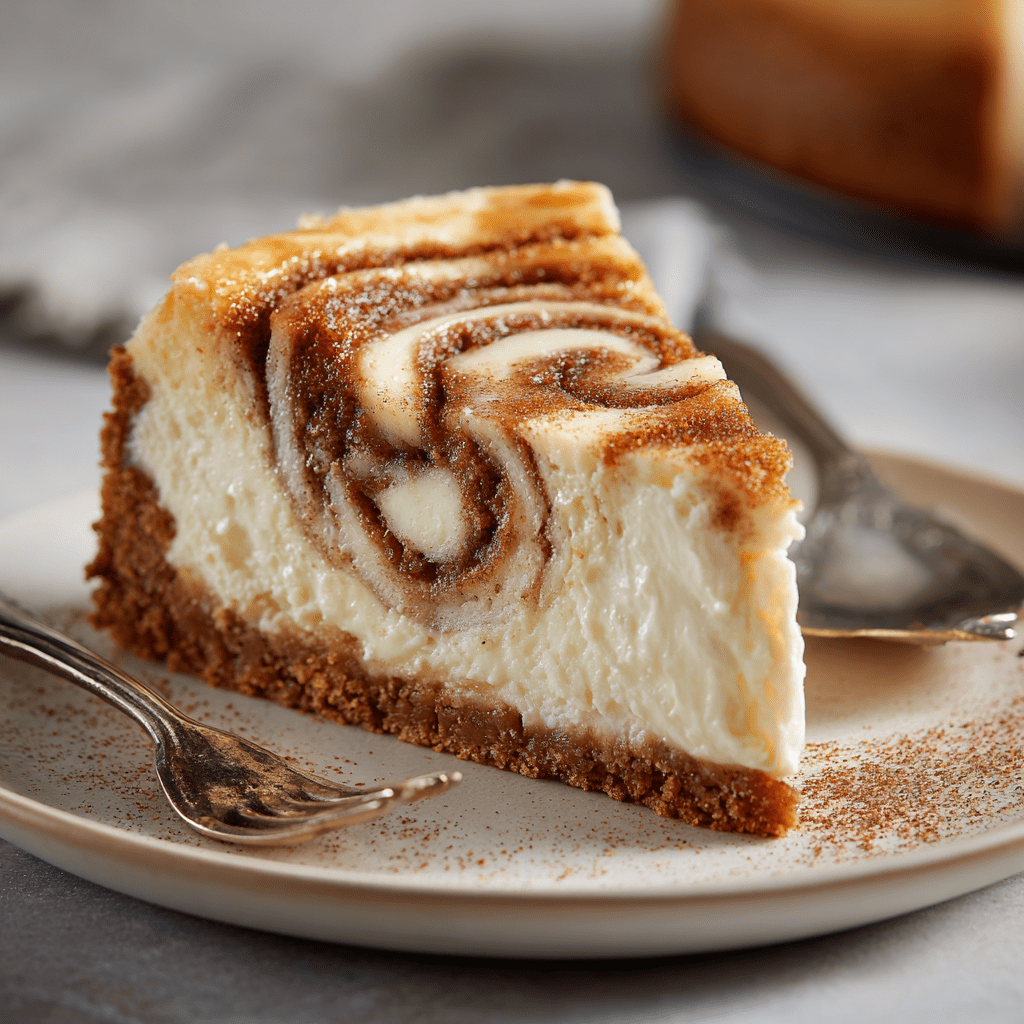
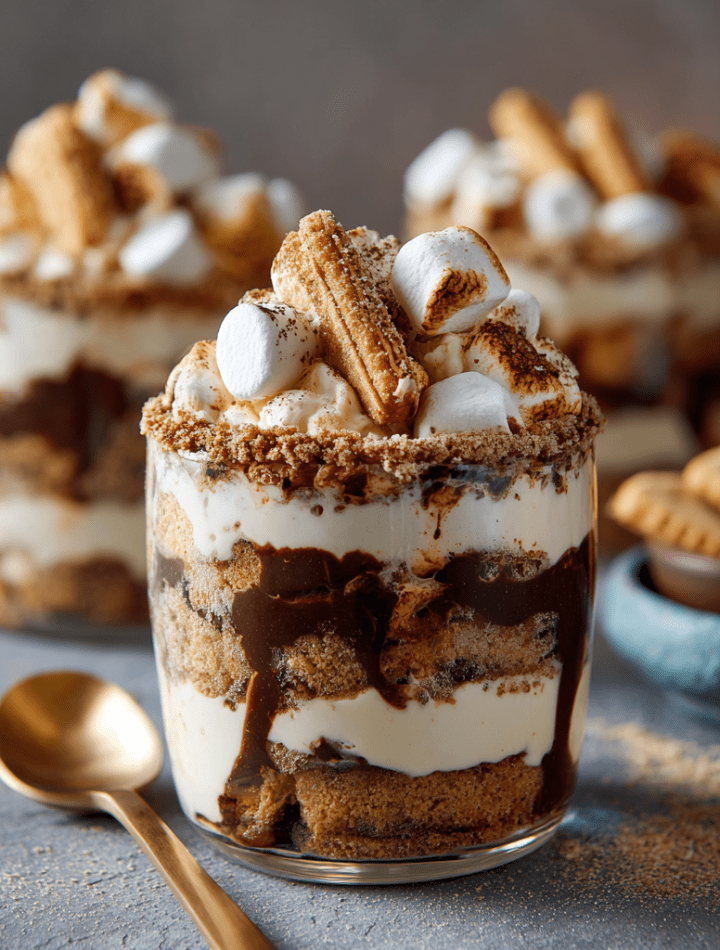
- The Layering Party: Grab your serving glasses—clear parfait glasses, coupe glasses, or even sturdy mugs work wonderfully. Break your dipped ladyfingers to fit the bottom of each glass in a single layer. Now, spoon or pipe a layer of the marshmallow mascarpone cream over the cookies. Sprinkle a generous layer of crushed graham crackers over the cream. Repeat! I usually do two full cycles: ladyfingers, cream, graham. Finish with a final, beautiful dome of the cream on top.
- The Toasty Finale: If using, scatter a few mini marshmallows on top of the final cream layer. Now, for the showstopper: using a kitchen torch, gently wave the flame over the surface until the cream (and marshmallows) are golden brown and blistered in spots. Safety first! Keep the torch moving and don’t let it linger in one spot. If you don’t have a torch, no worries! You can pop them under your oven’s broiler for 60-90 seconds—WATCH THEM LIKE A HAWK.
- The Chill: Give each cup a light dusting of cocoa powder through a fine-mesh sieve. Then, cover loosely and refrigerate for at least 2 hours, but ideally 4 or overnight. This chill time is non-negotiable—it lets the layers settle, the flavors marry, and the texture become absolutely perfect.
How to Serve These Showstoppers
Presentation is part of the fun! I love serving these in clear glasses so everyone can see the gorgeous layers—it’s part of the experience. Right before serving, you can add one last tiny flourish: a single whole graham cracker square perched on the rim, or a light second dusting of cocoa.
These cups are rich, so a smaller serving is often perfect. Pair them with a cup of strong coffee to balance the sweetness, or a glass of cold milk for total nostalgia. They’re fantastic as a sit-down dessert for a dinner party, but they also shine on a dessert buffet—just line them up on a tray and watch them disappear first!
Make It Your Own: Fun Twists & Swaps
Love the base recipe? Let’s play! Here are a few ways to mix it up.
- Chocolate Lover’s Dream: Add 2 tablespoons of unsweetened cocoa powder or melted and cooled chocolate to the mascarpone mixture. You can also use chocolate graham crackers for the crunch layer.
- Salted Caramel Swirl: Before adding the final cream layer, drizzle a tablespoon of good-quality salted caramel sauce over the graham cracker layer. The sweet-salty combo is unreal.
- Peanut Butter Cup: Swirl ¼ cup of creamy peanut butter into the mascarpone filling. Use chocolate-dipped graham crackers or even crushed peanut butter cookies for the crunchy layer.
- Pumpkin Spice for Fall: Mix ½ cup of pumpkin puree and a teaspoon of pumpkin pie spice into the mascarpone filling. Dip the ladyfingers in a mixture of milk and a tablespoon of maple syrup.
- Dietary Swaps: Gluten-Free: Use gluten-free ladyfingers (check labels!) and gluten-free graham crackers. Dairy-Free: Use dairy-free cream cheese and coconut cream (the solid part from a can of full-fat coconut milk) in place of mascarpone and heavy cream.
Emily’s Kitchen Notes
This recipe has become a staple in my house, especially during the holiday rush. Over the years, I’ve learned a few things: First, the longer it chills, the better it gets—the flavors really deepen. I once forgot a batch in the fridge for 24 hours and it was arguably the best one yet! Second, don’t stress about perfect layers. Some of the most charming cups are the ones where the layers swirl together a bit. It’s a dessert, not a architecture project! Finally, the kitchen torch is a gateway gadget. Once you have it, you’ll find yourself “toasting” the tops of oatmeal, browning meringue, and yes, making actual s’mores on your patio in January. No regrets.
Your Questions, Answered!
Q: Can I make this ahead of time?
A: Absolutely! In fact, I encourage it. These cups can be assembled (including toasting) and kept covered in the fridge for up to 24 hours before serving. The graham cracker layer may soften slightly, but it will still be delicious.
Q: What can I use if I don’t have a kitchen torch?
A: Your oven’s broiler is a great stand-in. Place the cups on a baking sheet and broil on high for 60-90 seconds, watching constantly until toasted. You can also simply skip the toasting—the flavor will still be amazing, just sprinkle with extra mini marshmallows for looks.
Q: My mascarpone mixture is lumpy. What did I do wrong?
A: This usually means the mascarpone was too cold when you started. Make sure it’s softened at room temperature for at least 30 minutes. If you have small lumps, you can try pressing the mixture through a fine-mesh sieve with a spatula to smooth it out.
Q: Can I use regular marshmallows instead of marshmallow creme?
A: It’s tricky. You’d need to melt them down with a touch of liquid to get a spreadable consistency, which adds steps. The creme is really the most reliable and easiest method for that perfect texture and flavor.
Nutritional Information*
*Please note: These are estimates provided for informational purposes based on a third-party calculator and specific brands used. Values can vary greatly.
Per serving (1 cup, assumes 6 servings):
Calories: ~340 | Total Fat: 22g | Saturated Fat: 13g | Cholesterol: 70mg | Sodium: 120mg | Total Carbohydrates: 30g | Dietary Fiber: 0.5g | Sugars: 18g | Protein: 4g
This is a decadent dessert, meant to be savored and enjoyed. The richness comes from the high-quality dairy (mascarpone and cream), which provides the luxurious mouthfeel we love. For a lighter version, you could use reduced-fat mascarpone and whip chilled evaporated milk instead of heavy cream, though the texture will be slightly less rich.
Final Thoughts from My Kitchen to Yours
And there you have it! My heartfelt, slightly-toasty take on a dessert mashup that never fails to make people smile. Food, to me, is about more than just ingredients—it’s about the feeling a recipe creates. I hope these Toasted Marshmallow Tiramisu Cups bring a little bit of campfire coziness and a whole lot of joy to your table.