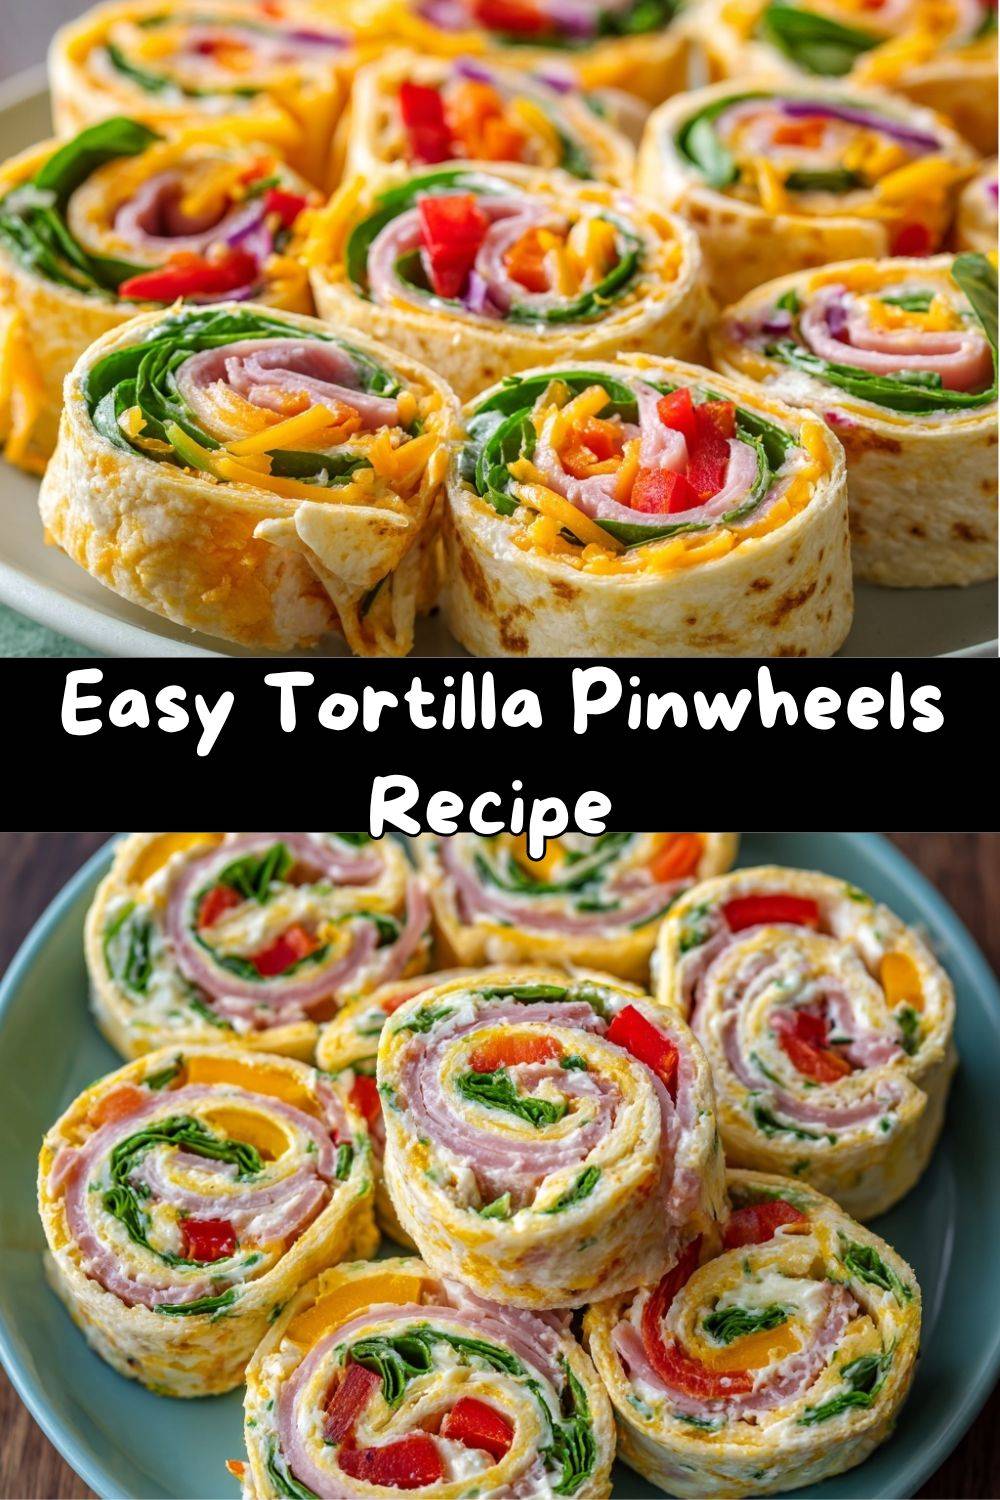
Tortilla Pinwheels: Your New Secret Weapon for Fun, Flavorful Snacking
Hey there, friend! Pull up a stool and let’s chat. Have you ever been in that situation? You’ve got people coming over in, oh, about an hour, the game is about to start, and you need something to serve that screams “I’ve got this together” without actually having to spend all day in the kitchen. Or maybe you’re just looking for a lunchbox hero that won’t get soggy or a snack that’s actually exciting to eat. I’ve been there more times than I can count.
That’s exactly why I’m so deeply, madly in love with Tortilla Pinwheels. These colorful, swirly bites are the ultimate kitchen hack. They look like you fussed for hours, but secretly, they come together in minutes. They’re a blank canvas for your favorite flavors, a vehicle for veggies, and guaranteed to disappear from any platter you put them on. Think of them as the cooler, more organized cousin of a sandwich—all the deliciousness, rolled up into one perfect, poppable bite.
In my world, food should be fun, flavorful, and totally stress-free. This recipe is all three. Whether you’re feeding a hungry crowd, prepping for a week of easy lunches, or just treating yourself to something tasty, these pinwheels are the answer. So, grab your favorite tortillas and that block of cream cheese that’s been chilling in the fridge, and let’s make something delicious together. I promise, once you see how easy and versatile these are, you’ll be making them on repeat!
The Pinwheel That Started It All: A Grandma’s Kitchen Lesson
My obsession with rolled-up food probably started in my grandma’s kitchen, though her version was a bit… doughier. She’d make these incredible cinnamon rolls from scratch, and I’d sit on the counter, fascinated as she spread the butter and sugar, then rolled the whole massive sheet of dough into a tight log. The magic, she’d tell me with a wink, was in the roll. “You gotta keep it tight, Em, or all the good stuff falls out.”
Years later, standing in my first post-culinary-school apartment with friends on the way and exactly zero fancy ingredients, I had a flashback. What if I applied Grandma’s “tight roll” philosophy to something quicker? I had tortillas, some leftover grilled chicken, a sad-looking bell pepper, and a tub of cream cheese. I mixed the cream cheese with some smoked paprika (chef’s instinct!), layered everything on a tortilla, gave it a firm roll, and sliced. The moment those first pinwheels hit the plate, I knew. This was it. It was that same feeling of creating something special from simple parts, but fast enough for real life. Every time I make them now, I think of her. It’s a less messy, savory tribute to the queen of the kitchen roll.
Gathering Your Pinwheel Players: It’s All About Texture & Flavor
Here’s where the fun begins! Think of your tortilla as a canvas. We’re building layers of creamy, crunchy, savory, and fresh. Here’s what you’ll need, plus my chef-y insights to make them truly yours.
- 4 large flour tortillas (burrito-size): The foundation! I prefer the plain, soft flour kind for their flexibility. Chef’s Tip: Give them a quick 10-second warm-up in a dry skillet or microwave—just until pliable. This prevents tragic cracking when you roll.
- 8 oz cream cheese, softened: This is your glue and your creamy dream. SOFTENED IS NON-NEGOTIABLE. Leave it on the counter for a good hour, or microwave in 10-second bursts. A lumpy, cold block will tear your tortilla. Substitution: For a lighter touch, use Neufchâtel or a whipped cream cheese spread.
- 1 tsp ranch seasoning or Italian herbs: The flavor bomb! This little addition transforms plain cream cheese. I adore the tangy zip of ranch powder, but dried Italian herbs (oregano, basil, thyme) work beautifully for a more Mediterranean vibe.
- 1/2 cup shredded cheddar cheese: Because more cheese is always the answer. It adds a sharp, melty-in-your-mouth quality. Get Creative: Swap for pepper jack for heat, mozzarella for meltiness, or even crumbled feta for a salty punch.
- 8 slices deli ham or turkey: The hearty layer. I look for thicker-sliced (“deli shaved” or “off-the-bone” style) for better texture. Pro Move: Pat the slices dry with a paper towel to prevent a soggy tortilla.
- 1 cup baby spinach: Our fresh, green layer. It adds color, nutrients, and a lovely mild flavor. Swap it: Arugula adds a peppery kick, or use thinly sliced romaine for ultimate crunch.
- 1/2 red bell pepper & 1/2 yellow bell pepper, thinly sliced: The CRUNCH and COLOR! I use a mandoline or a very sharp knife to get paper-thin strips that roll easily. This is where your pinwheels start to look like confetti.
- Optional extras: Think of this as your playground. Thin cucumber strips (seeds removed) add a cool crispness. Shredded carrots bring sweetness. Sliced green onions, black olives, or even a drizzle of pesto or sriracha in the cream cheese are all fair game!
Let’s Roll! Your Step-by-Step Guide to Pinwheel Perfection
Ready to build? Follow these steps, and you’ll have perfect, sliceable logs every single time. I’m talking you through it like you’re right here in my kitchen with me!
- Whip Your Base: In a medium bowl, take your gloriously softened cream cheese and add your chosen seasoning (ranch powder or herbs). Use a hand mixer or a sturdy spatula to beat it until it’s completely smooth and spreadable. This takes about 30 seconds. Chef’s Hack: If you’re adding any wet ingredients like hot sauce, add them now so your base isn’t too runny.
- Prep Your Station: Lay out your four tortillas on a clean work surface. I like to give them that quick warm-up I mentioned earlier. Have all your fillings—cheese, meat, spinach, peppers—prepped and within arm’s reach. We’re building an assembly line!
- Spread & Layer with Love: Using an offset spatula or the back of a spoon, spread a generous, even layer of the cream cheese mixture over the entire surface of each tortilla, going right to the edges. This “glue” is what holds everything together. Now, sprinkle the shredded cheddar evenly over the cream cheese. Next, lay down your ham or turkey slices in a single layer, slightly overlapping. Scatter the baby spinach leaves, then artfully arrange your bell pepper strips (and any other veggies). Key Tip: Avoid overloading the very center line of the tortilla; keep the filling more towards one half for easier rolling.
- The All-Important Roll: Channel your inner sushi chef! Starting at the side closest to you, gently but firmly lift the edge of the tortilla and begin rolling it over the fillings, tucking them in as you go. Keep the roll tight, using your fingers to press the ingredients back in if they try to escape. Continue rolling until you have a complete log. Don’t Panic: If a little filling pokes out the ends, just tuck it back in. It doesn’t have to be perfect.
- Chill for Sharp Slices: This is the step you DO NOT SKIP. Individually wrap each tortilla log tightly in plastic wrap. Think of it as putting them in a cozy, tight sleeping bag. Refrigerate for at least 1 hour, but ideally 2-3. This firms up the cream cheese, melds the flavors, and makes the log rock-solid for clean, beautiful slices.
- Slice & Reveal the Magic: Unwrap your chilled logs. Using a very sharp serrated knife, trim off the messy ends (chef’s snack!). Then, slice the log into 1-inch thick pinwheels. Wipe your knife clean between slices for the prettiest presentation. Arrange them on a platter and watch everyone’s eyes light up!
Plating Your Pinwheel Masterpiece
Presentation is half the fun! Don’t just dump these beauties in a bowl. A little styling goes a long way.
For a party, I love using a large circular platter or a rustic wooden board. Arrange the pinwheels in a sunburst pattern or concentric circles, maybe with a small bowl of dipping sauce in the center. Speaking of dips—these are fantastic with a side of ranch, marinara, chipotle mayo, or even a simple salsa for dipping.
For a lunchbox or picnic, nestle them into a container with some grapes, cherry tomatoes, or pickle spears to keep them from sliding around. They’re sturdy travelers! If you’re serving them as part of a bigger spread, pair them with other finger foods like meatballs, fruit skewers, or a big, colorful salad. The contrast in colors from the peppers and spinach makes them the star of any table.
Mix It Up! 5 Flavor Twists to Try
The basic formula is your playground. Once you’ve mastered the classic, try one of these delicious spins!
- The Pizza Party: Mix 1 tbsp tomato paste and 1/2 tsp dried oregano into the cream cheese. Layer with sliced pepperoni, mozzarella cheese, and a sprinkle of finely chopped black olives. Serve with warm marinara for dipping.
- The Garden Veggie (Vegetarian): Skip the meat! Add shredded carrots, very thinly sliced cucumber, sprouts, and avocado slices (add these right before slicing to prevent browning). A smear of hummus under the cream cheese is divine.
- The Southwest Fiesta: Mix 1/2 tsp cumin and 1/4 tsp chili powder into the cream cheese. Use smoked turkey or chicken, pepper jack cheese, add a layer of canned black beans (rinsed and patted dry), and corn kernels. A dash of hot sauce is a must!
- The Everything Bagel: Stir 1 tbsp of everything bagel seasoning into the cream cheese. Use thin slices of smoked salmon (or turkey for a cheaper version), red onion slivers, and capers. This is brunch perfection.
- The Greek Gyro: Mix 1 tbsp of lemon zest and 1 tsp dried dill into the cream cheese. Layer with thinly sliced grilled chicken or lamb, chopped romaine, diced tomatoes, and a sprinkle of crumbled feta. Tzatziki for dipping, please!
Chef Emily’s Kitchen Confidential
This recipe has been my trusty sidekick for years, and it’s evolved in the funniest ways. I once tried to make a “dessert pinwheel” with Nutella and strawberries for a baby shower. Let’s just say it was a delicious, albeit very messy, learning experience—tortillas and juicy berries are not long-term friends unless you eat them immediately!
The biggest lesson? The chill time is truly your best friend. I’ve tried to rush it when I’m impatient, and you end up with sad, squished pinwheels instead of clean spirals. Be patient, let the fridge work its magic, and you’ll be rewarded. Also, don’t be afraid of the ends you cut off. Those are the cook’s treat—a little ragged, packed with flavor, and the perfect snack while you arrange the pretty ones for your guests.
Pinwheel Problems? Solved!
Q: My tortilla cracked when I tried to roll it! What did I do wrong?
A: This is usually a two-part issue. First, your tortillas might be too cold or old. Warm them up! Second, your cream cheese might not be soft enough. It should spread like very soft butter. If cracks happen, just roll it as best you can—the chilling will often hide minor cracks.
Q: Can I make these ahead of time?
A: ABSOLUTELY. That’s one of their best features! You can make the whole recipe, slice them, and store them in a single layer in an airtight container in the fridge for up to 24 hours. They might sweat a tiny bit, but they’ll still taste amazing.
Q: Why are my pinwheels falling apart when I slice them?
A: You likely didn’t chill them long enough, or your knife isn’t sharp. A dull knife mashes the log instead of slicing it. A serrated knife, sawed gently back and forth, is the perfect tool for the job. And remember: tight roll + long chill = perfect slices.
Q: Can I use low-carb or gluten-free tortillas?
A> You bet! Just be aware that some alternative tortillas (like coconut or certain gluten-free brands) can be less flexible. Warm them gently and handle with a little more care during rolling. They work great for dietary needs!
A Quick Bite on Nutrition
Let’s keep it real: these are a fun, occasional treat or party food. Each pinwheel (based on the classic recipe) is a flavorful little package with about 55 calories, 3g of fat, 4g of carbs, and 2g of protein. The beauty is you control the ingredients! To lighten them up, use low-fat cream cheese, load up on the spinach and peppers, and choose a lean turkey breast. To add protein, consider adding a layer of mashed beans or extra meat. They’re a fantastic way to sneak in veggies for kids (and adults!), and because they’re portion-controlled as little bites, it’s easier to enjoy them mindfully. As with all my recipes, my philosophy is to enjoy good food, made with real ingredients, in the company of people you love.
Your Turn to Roll!
And there you have it, my friend! Everything I know about creating the most delightful, crowd-pleasing tortilla pinwheels. From my grandma’s kitchen to yours, this recipe is more than just a snack—it’s a tool for easy entertaining, a solution for hectic weeks, and a reminder that the most satisfying food is often the simplest to make.
I hope you feel inspired to grab some tortillas and get creative. Throw in your favorite leftovers, clean out the veggie drawer, and make this recipe your own. Then, I’d love to hear about it! Did your kids gobble them up? Did your friends ask for the recipe at the potluck? That’s my favorite part.
Now, go forth and roll with confidence. Happy cooking, and as always, chow down!
— Emily 🧑🍳