Your New Favorite Holiday Side: Traditional Sage & Onion Stuffing
Hey there, my fellow food lovers! 👋 Emily from Tasty Chow here. Is there any scent in the world that screams “holidays” more than the smell of onions and celery sizzling in butter, with that earthy, warm aroma of sage floating through the house? I’m getting cozy just thinking about it. If your heart does a little happy dance at the thought of a golden-brown, buttery, herb-packed stuffing sitting proudly next to the turkey, then my friend, you are in the absolute right place.
Today, we’re diving headfirst into the world of Traditional Bread Stuffing. This isn’t just a side dish; it’s a memory on a plate. It’s the dish that everyone secretly hopes there will be leftovers of, the one that soaks up gravy like a dream, and the comforting constant on a table full of fancy new recipes. We’re talking about a classic for a reason: it’s simple, soul-satisfying, and absolutely delicious.
I know the holidays can be stressful. Between coordinating family schedules and making sure the turkey isn’t dry, the last thing you need is a finicky recipe. That’s why I love this one. It’s forgiving, flexible, and feels like a warm hug from your kitchen. So, tie on your favorite messy apron (I’ll be wearing mine!), and let’s make a stuffing that’s so good, it might just steal the show.
A Wooden Spoon and a Whole Lot of Love: My Stuffing Story
My love affair with stuffing started not in a culinary school, but in my Grandma Eleanor’s tiny, warm, and always wonderfully chaotic kitchen. Thanksgiving morning was a sacred event. While the Macy’s parade played on the small TV in the corner, my job was to tear the massive loaves of day-old bread into uneven chunks. Grandma would hum old tunes as she diced the onions, never crying—she swore placing a piece of bread on your head stopped the tears, and you know what? It always worked for her!
The best part was the tasting. She’d hand me the wooden spoon after she’d mixed in the broth and say, “What does it need, Emmy?” I’d take a solemn bite of the uncooked, mushy mixture and declare it needed “more pepper!” or “more summer savings!” (I meant savory, but the name stuck). It was in that kitchen I learned that cooking isn’t just about precision; it’s about feeling. It’s about tasting and adjusting and pouring a little bit of your own story into the bowl. This recipe is my homage to her—to those worn-out spoons, the scent of sage, and the belief that the best meals are made with love and a dash of happy chaos.

Gathering Your Cast of Characters: The Ingredients
Simple ingredients make magic together. Here’s what you’ll need and my little chef-y insights on each one.
- 10 cups day-old bread cubes (white or sourdough): This is the foundation! Stale bread is key because it soaks up the broth and butter without turning into a complete mush. Chef’s Tip: If your bread is too fresh, cube it and toast it on a sheet pan in a 300°F oven for 15-20 minutes to dry it out. Sourdough adds a lovely tangy complexity, but classic white sandwich bread is pure nostalgia.
- 1 cup (2 sticks) unsalted butter: This is where the rich, luxurious flavor comes from. Using unsalted lets you control the sodium level. Substitution: For a richer flavor, use half butter and half schmaltz (rendered chicken fat).
- 1 large onion, diced: Sweetness and savoriness all in one. Yellow onions are perfect here for their balanced flavor.
- 3–4 celery stalks, diced: Don’t skip the celery! It provides a crucial crunch and a bright, earthy flavor that cuts through the richness.
- 2 teaspoons dried sage (or 1 tablespoon fresh): The star of the show! Sage and poultry are a match made in heaven. Dried is more potent, so you use less. If using fresh, chop it finely. Chef’s Insight: Rubbing dried sage between your palms before adding it wakes up its oils and releases more flavor.
- 1 teaspoon dried thyme: The supporting actor that adds a subtle, warm, lemony depth.
- Salt and freshly ground black pepper, to taste: Season in layers! Season your veg while sautéing and then again when you mix everything together.
- 2½–3 cups chicken or vegetable broth: This brings it all together. Use a good-quality broth for the best flavor. Substitution: Turkey broth is fantastic if you have it! The amount can vary based on your bread, so add it gradually.
- 2 large eggs, beaten (optional): This is your binding agent. It gives the stuffing a more cohesive, slightly denser texture. I often skip it for a more rustic, loose stuffing, but it’s great if you prefer firm slices.
- Fresh parsley, for garnish (optional): A little pop of color and fresh flavor at the end never hurt anybody!
Let’s Get Cooking: Building the Perfect Stuffing
Okay, team! Let’s transform these simple ingredients into holiday gold. Follow these steps, and you really can’t go wrong.
- Preheat and Prep: Fire up your oven to 350°F (175°C). Take a moment to grease your favorite large baking dish (a 9×13 inch works great) with a little butter or non-stick spray. This little step ensures you get those beautiful, crispy edges that everyone fights over. Chef’s Hack: If you’re making this ahead, you can prep everything up to the baking step, cover it, and refrigerate it. Just add 10-15 minutes to the covered baking time if it’s going into the oven cold.
- Sauté the Aromatics: In a large skillet or Dutch oven, melt your 1 cup of butter over medium heat. Once it’s foaming slightly, add your diced onion and celery. Now, here’s the secret: don’t rush this! We’re not looking for color, we’re looking for softness and sweetness. Sauté them for a good 8-10 minutes until the onions are translucent and the celery has lost its raw bite. Your kitchen should already smell incredible.
- Bloom the Herbs: Stir in the dried sage, thyme, salt, and pepper. Let them cook in the butter for just 30 seconds to 1 minute. This process, called “blooming,” unlocks the full potential of dried herbs and toasts their flavors, making them infinitely more powerful and aromatic.
- The Big Combine: In the largest bowl you own (I’m not kidding, go big!), combine your 10 cups of bread cubes and the entire contents of your skillet—butter, veggies, and all those herby juices. Use a sturdy spoon or, better yet, your clean hands to toss everything together. Make sure every piece of bread gets glistened with that buttery, herby goodness.
- Moisten the Mixture: Now, slowly pour in your 2½ cups of broth. Start by adding about 2 cups, then toss. Add the remaining ½ cup and toss again. The goal is moist, not soggy. You want the bread to be soft and damp but not swimming in liquid. If it still seems dry, add a bit more broth, a quarter cup at a time. If you’re using the beaten eggs, drizzle them over the mixture now and toss thoroughly to combine.
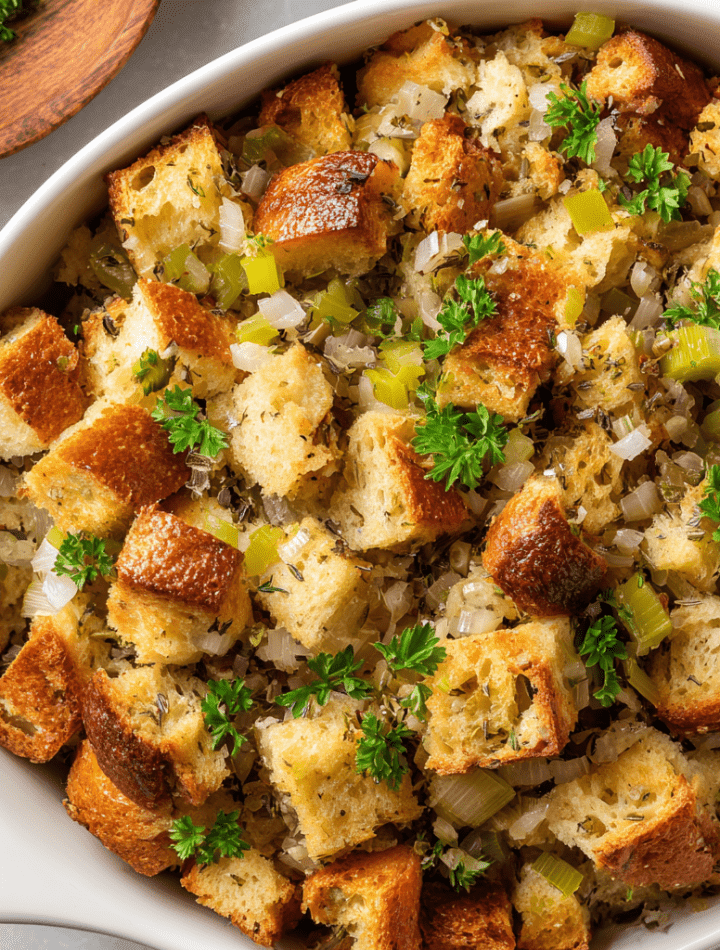
- Bake to Perfection: Carefully transfer your stuffing mixture into your prepared baking dish and spread it out evenly. Cover it tightly with aluminum foil and pop it in the preheated oven. Bake covered for 30 minutes. This steams the stuffing, cooking it through and heating it evenly.
- Crisp the Top: After 30 minutes, remove the foil (watch out for the steam!). This is where the magic happens. Return the dish to the oven, uncovered, for another 15-20 minutes, or until the top is golden brown, crispy, and beautiful. The edges will be delightfully crunchy!
- Garnish and Serve: Once out of the oven, let it rest for 5-10 minutes. This allows it to set a bit, making it easier to scoop. If you’re feeling fancy, sprinkle with some chopped fresh parsley for a burst of color. Then, serve it up with a giant spoon and watch it disappear!
How to Serve Your Masterpiece
This stuffing is the ultimate team player on the holiday table. Of course, it’s a natural best friend to roast turkey and a river of rich gravy. But let’s think outside the turkey pan for a second!
I love serving it in a beautiful, rustic ceramic dish so everyone can see that gorgeous golden-brown top. For a fun family-style option, you can bake and serve it right in a seasoned cast-iron skillet—it keeps it warm for ages!
It’s also incredible alongside a simple roast chicken any night of the week, or as a bed for your favorite pork chops. And let’s be real: the best way to serve leftover stuffing is fried in a patty with a fried egg on top for breakfast the next day. You’re welcome.
Make It Your Own: Delicious Recipe Variations
Once you’ve mastered the classic, feel free to get creative! Here are a few of my favorite twists:
- Sausage & Apple: Brown 1 lb of mild Italian sausage (casings removed) in the skillet before adding your butter. Remove the sausage, leaving the drippings, and proceed with the recipe. Stir in the cooked sausage and 1 ½ cups of diced sweet apples (like Honeycrisp or Fuji) with the bread cubes.
- Wild Mushroom & Rosemary: Swap the sage for 1 tablespoon of fresh chopped rosemary. Sauté 8 oz of chopped wild mushrooms (cremini, shiitake, oyster) with the onions and celery for an incredible umami, earthy flavor.
- Gluten-Free & Vegan: Easily done! Use 10 cups of your favorite sturdy gluten-free bread cubes. Substitute the butter for vegan butter or olive oil, and use veggie broth. A “flax egg” (1 tbsp ground flaxseed mixed with 3 tbsp water per egg) can replace the eggs for binding.
- Oyster Stuffing (A Classic Twist): For a traditional East Coast variation, fold in 1 pint of shucked oysters, chopped, along with their liquor, when you add the broth. It sounds fancy, but it’s surprisingly easy and adds a beautiful briny flavor.
- Cornbread Stuffing: Replace the white bread cubes with 10 cups of stale, cubed cornbread for a slightly sweet, Southern-inspired delight. It’s a game-changer!
Chef Emily’s Notes & Kitchen Confessions
This recipe has evolved so much from my grandma’s original! I’ve learned a few things along the way. First, I once, in a huge hurry, used fresh bread. Big mistake. It turned into a bread-pudding-gone-wrong situation. Always use stale bread!
Secondly, taste your mixture before it goes in the oven! This is the most important step. Take a small spoonful. Does it taste seasoned enough? Does it need more herbs? More pepper? This is your chance to be the boss and make it perfect for your palate.
And finally, have fun with it! The best family recipes are the ones that get a little messy and are made with a whole lot of love. Don’t stress about perfection.
Stuffing SOS: Your Questions, Answered
Q: Can I make this stuffing ahead of time?
A: Absolutely! Assemble the stuffing completely (through step 5) up to 24 hours in advance. Keep it covered tightly in the refrigerator. When you’re ready, bake it straight from the fridge, adding an extra 10-15 minutes to the covered baking time.
Q: My stuffing came out too dry/crumbly. What happened?
A: This usually means it needed a bit more broth or fat. Next time, ensure you’re using the full amount of butter and add broth until the mixture feels moist to the touch. The bread should feel soft and saturated, like a well-wrung-out sponge.
Q: My stuffing came out too wet/mushy. How can I fix it?
A: Oh no! This is often from using bread that wasn’t dry enough or adding too much broth. You can salvage it by spreading it on a sheet pan and popping it back into the oven for 10-15 minutes to evaporate some of the excess moisture and crisp it up.
Q: What’s the difference between stuffing and dressing?
A: Traditionally, “stuffing” is cooked inside the bird, and “dressing” is baked separately in a dish. For food safety and more even cooking, I’m a huge fan of baking it separately as a dressing. It gets crispier edges and there’s no risk of undercooking!
Traditional Bread Stuffing
- Total Time: 1 hour 10 minutes
- Yield: 8 - 10 1x
Description
Classic, comforting, and timeless—this traditional bread stuffing is a holiday essential. Loaded with sautéed onions, crisp celery, and earthy sage, every bite tastes like home. It’s simple, satisfying, and exactly what your turkey (or gravy) has been waiting for.
Ingredients
10 cups day-old bread cubes (white or sourdough)
1 cup unsalted butter
1 large onion, diced
3–4 celery stalks, diced
2 teaspoons dried sage (or 1 tablespoon fresh)
1 teaspoon dried thyme
Salt and pepper, to taste
2½–3 cups chicken or vegetable broth
2 large eggs, beaten (for binding, optional)
Fresh parsley, for garnish (optional)
Instructions
Preheat oven to 350°F (175°C). Grease a large baking dish.
In a large skillet, melt butter over medium heat. Sauté onion and celery until soft, about 8–10 minutes.
Stir in sage, thyme, salt, and pepper.
In a large bowl, combine bread cubes and sautéed mixture.
Pour in broth gradually, stirring until bread is moist but not soggy. Add beaten eggs if using.
Transfer to prepared dish. Cover with foil and bake for 30 minutes. Uncover and bake an additional 15–20 minutes until golden on top.
Garnish with fresh parsley before serving, if desired.
- Prep Time: 20 minutes
- Cook Time: 40 minutes
Nutrition
- Calories: 250 / Serving
- Sugar: 3g / Serving
- Sodium: 450mg / Serving
- Fat: 12g / Serving
- Saturated Fat: 7g / Serving
- Carbohydrates: 45mg / Serving
- Protein: 6g / Serving
Nutritional Information*
*Please note: This is an estimate for informational purposes only. Calculations will vary based on specific ingredients used.
Per serving (based on 10 servings):
Calories: ~250 | Total Fat: 12g | Saturated Fat: 7g | Trans Fat: 0g | Cholesterol: 45mg | Sodium: 450mg | Total Carbohydrates: 28g | Dietary Fiber: 2g | Sugars: 3g | Protein: 6g
While this is a indulgent holiday side, it’s made with real, whole ingredients. The celery and onions provide vitamins and fiber, and using a good-quality broth adds protein. Enjoy it as part of a balanced holiday feast!
Final Thoughts from My Kitchen to Yours
Well, there you have it! My ultimate guide to a Traditional Bread Stuffing that’s sure to become a new favorite on your table. This recipe is more than just a list of ingredients; it’s a tradition starter. It’s about the joy of creating something with your hands that brings people together, the stories shared over seconds, and the simple, profound comfort of a dish made with love.
I hope this recipe gives you the confidence to make something incredible and the inspiration to create your own kitchen memories. If you make it (and I really hope you do!), please tag me @TastyChow on social media so I can see your beautiful creations! Now, go forth and bake. And remember, the secret ingredient is always, always joy.
With love and a full belly,
Emily