Dip Into Romance: Your Ultimate Guide to Chocolate-Covered Strawberries
Hey there, my fellow flavor-chaser! Valentine’s Day is just around the corner, and if your heart is set on creating something sweet, stunning, and straight from the heart, you’ve landed in the perfect spot. Forget the overpriced, sometimes-sad bouquets from the grocery store. We’re about to craft the most decadent, beautiful, and downright delicious Chocolate-Covered Strawberries you’ve ever sunk your teeth into.
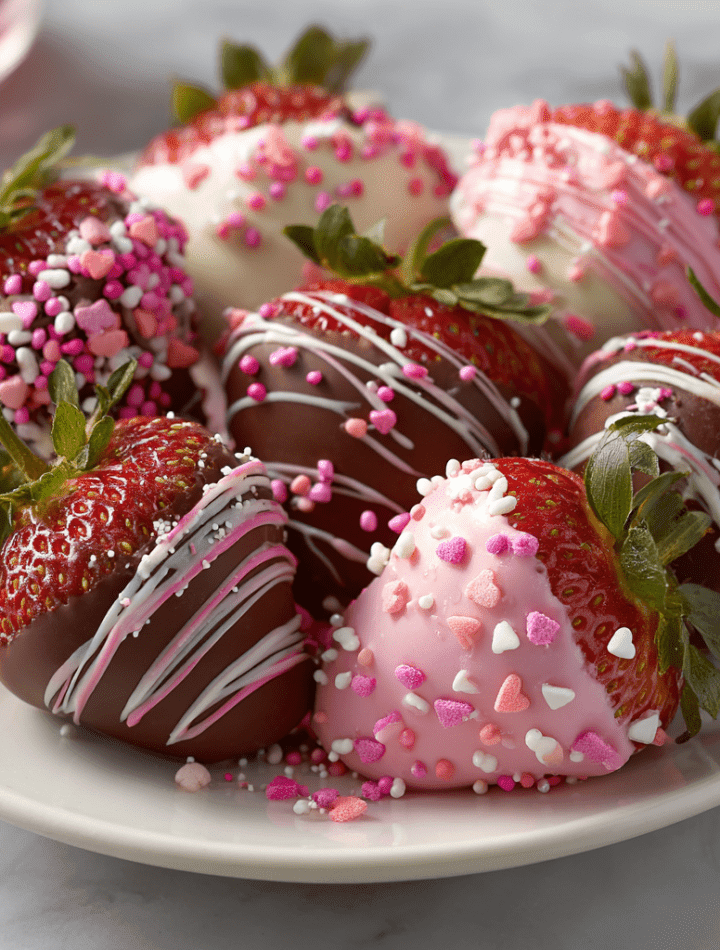
Picture this: plump, juicy strawberries, hand-dipped in a waterfall of silky, rich milk chocolate. Half of them then get a gorgeous, blush-pink coat of candy melts, because a little extra glam never hurt anybody. We’re talking elegant drizzles, a confetti of adorable heart sprinkles, and that satisfying *snap* when you bite through a perfectly tempered chocolate shell to the sweet berry beneath. This, my friend, is the ultimate edible love letter.
And the best part? They are SO. EASY. I’m not just saying that. Whether you’re a kitchen newbie or a seasoned pro, this is one of those recipes that makes you look like a total rockstar with minimal effort. You don’t need any fancy equipment, just a hungry heart and a willingness to get a little chocolate on your fingers (which, let’s be honest, is half the fun). So, tie on that apron—the messy one is always the most loved—and let’s make something incredibly delicious, together.

A Sweet Start: My First (Slightly Melty) Valentine
My love affair with these chocolate-dipped jewels started way before culinary school, in my grandma’s warm, always-smelling-like-something-good kitchen. I was about ten, and I decided, with the unwavering confidence of a child, that I was going to make my parents the most spectacular Valentine’s Day gift. My budget? Two dollars and a pocketful of determination.
I convinced Grandma to let me use her Baker’s chocolate and the strawberries she was saving for shortcake. My technique was… enthusiastic. Let’s just say the double-boiler was a foreign concept, and my “tempering” involved zapping the chocolate until it was smoking and seizing up into a grainy mess. I added water to thin it out (a cardinal sin I now know!), creating a strange chocolate soup. My strawberries were more “chocolate-dripped” than “dipped,” and my decorating involved an entire bottle of rainbow sprinkles. They were a lopsided, melty, glorious disaster. But you know what? My parents’ faces lit up like I’d presented them with a five-course meal from a Michelin-starred chef. That’s the magic of this recipe. It’s not about perfection; it’s about the love and the story you mix in with every ingredient.
Gathering Your Sweet Supplies
Here’s your shopping list for sweet success! This is where we build our flavor foundation. A quick note: quality matters here, but so does simplicity. Don’t stress about finding the world’s most expensive chocolate—just use what you love to eat!
- 1 lb Fresh Strawberries: Look for berries that are bright red, firm, and have a vibrant green cap. Size matters! Medium to large berries are easier to dip and make a more impressive treat. Chef’s Insight: Give them a gentle sniff—the sweetest berries will have the most beautiful aroma.
- 1 cup Milk or Dark Chocolate Chips (or Melting Wafers): This is your rich, classic base. I adore the depth of a good dark chocolate, but milk chocolate is always a crowd-pleaser. Pro Tip: Melting wafers (like Ghirardelli or Guittard) are formulated to melt smoothly and set with a beautiful snap, making them foolproof for beginners!
- 1 cup Pink Candy Melts: These are the secret to that gorgeous, opaque, pastel pink coating. They melt like a dream and hold their color beautifully. Substitution Tip: Not a fan of candy melts? Use white chocolate chips and mix in a drop or two of oil-based pink food coloring!
- 1–2 tsp Coconut Oil (Optional): This little powerhouse is my favorite kitchen hack. Adding a tiny bit to your melting chocolate or candy melts thins them out just enough for a smoother, more professional-looking drip and a shinier finish. Chef’s Insight: If you don’t have coconut oil, you can use a tiny dab of vegetable shortening, but coconut oil is my go-to for a hint of neutral sweetness.
- Heart Sprinkles, Colored Icing, or Melted White Chocolate for Decorating: This is where your personality shines! Raid your baking cupboard. Those leftover sprinkles from Christmas cookies? Perfect. A squeeze tube of red icing? Amazing. This is your chance to play!
Let’s Get Dipping: Your Foolproof Step-by-Step Guide
Ready for the fun part? Let’s transform these simple ingredients into edible works of art. I’ll walk you through every step with my favorite chef hacks to ensure your berries are nothing short of spectacular.
- Prep Your Station & Berries. Line a baking sheet with parchment paper. This is non-negotiable for easy cleanup and preventing sticky disasters! Now, take your strawberries and give them a good rinse. Here’s the most important tip I can give you: PAT THEM COMPLETELY DRY WITH A PAPER TOWEL. Any lingering water will cause your beautiful chocolate to seize up and become a clumpy mess. I let mine air-dry for a few extra minutes just to be safe. A dry berry is a happy, dippable berry!
- Melt the Milk Chocolate. Pour your milk or dark chocolate chips into a microwave-safe bowl. Heat them in the microwave in 30-second intervals at 50% power. After each interval, take the bowl out and give it a good stir. Why 50% power? It gently coaxes the chocolate into melting without scorching it. We’re going for smooth and glossy, not burnt and bitter. Once it’s mostly melted, you can stir until the last few chips dissolve. If you’re using it, stir in that teaspoon of coconut oil now—watch how it magically makes the chocolate more fluid!
- First Dip: The Chocolate Lovers. Holding a strawberry by its stem (your natural, built-in handle!), dip it into the melted milk chocolate. Swirl it gently to coat it about two-thirds or three-quarters of the way up. Let the excess chocolate drip back into the bowl. Place your beautifully coated berry on the parchment-lined tray. Repeat with about half of your strawberries.
- Melt the Pink Candy Coating. Wash and dry that bowl, or grab a new one! Melt your pink candy melts using the exact same method: 30-second bursts at 50% power, stirring in between. These melts can be a bit thicker, so if they seem a little stubborn, that second teaspoon of coconut oil is your best friend. Stir it in until it’s perfectly smooth and dippable.
- Second Dip: Pretty in Pink. Now, grab the remaining dry strawberries and give them their pink moment! Dip them into the melted candy coating just like you did with the chocolate, and place them on the tray alongside their chocolaty siblings.
- The Grand Decoration! This is where the magic happens and your berries go from “wow” to “WOW!” Before the coatings set, grab your sprinkles and gently press them onto the wet chocolate. For the drizzles, you can use a piping bag with a tiny tip, or my favorite lazy-chef hack: a zip-top bag with a tiny corner snipped off. Drizzle the leftover melted chocolate over the pink berries, and the leftover pink melts over the chocolate berries. Get creative with zig-zags, swirls, or simple lines. There are no rules here, only deliciousness.
- The Big Chill. Carefully transfer your tray of finished masterpieces to the refrigerator. Let them chill for 15-20 minutes, or until the coatings are completely firm to the touch. This sets the chocolate and makes them ready for devouring (or gifting!).
How to Serve Your Strawberry Showstoppers
You’ve created something beautiful, so let’s present it with the same love you put into making them! Plating is part of the fun.
For a simple, elegant look, arrange them on a beautiful white platter or a rustic wooden board. You can even place them in pretty paper candy cups for a classic bakery-style feel. If you’re creating a gift, a clear cellophane bag tied with a gorgeous ribbon makes the most heartfelt present. Nestle them into a gift box lined with tissue paper for an extra-special surprise.
Thinking beyond the box? Serve these berries alongside a glass of bubbly Prosecco or a rich Cabernet Sauvignon for the adults. For a full dessert spread, pair them with a cheese plate—the sweet and salty combo is divine—or a few other bite-sized treats like meringues or shortbread cookies. However you choose to serve them, do it with a proud smile!
Make It Your Own: Delicious Recipe Twists
Once you’ve mastered the classic, the flavor world is your oyster! Here are a few of my favorite ways to mix things up.
- The “Everything Bagel” Berry: For a truly decadent treat, after dipping in chocolate, roll the wet end in a mix of crushed pretzels and toffee bits for a sweet-and-salty crunch. You can also use finely chopped nuts or toasted coconut.
- White Chocolate Dream: Swap the milk chocolate for white chocolate and dip away! You can leave them pure white for an elegant look, or drizzle them with dark chocolate for a tuxedo effect.
- Orange Zest Zing: Add a teaspoon of fresh orange zest to your melted dark chocolate. The combination of dark chocolate and orange is a timeless, sophisticated flavor pairing that will wow any foodie.
- Vegan & Dairy-Free Delight: No problem! Use beautiful, plump organic strawberries, dairy-free dark chocolate chips, and check that your candy melts are vegan (many are!). Your plant-based Valentine will be so touched.
- Mocha Madness: Stir a half teaspoon of instant espresso powder into your melted dark chocolate. It won’t make it taste like coffee, but it will deepen the chocolate flavor into something incredibly rich and complex.
Chef Emily’s Kitchen Confidential
This recipe has been my trusty sidekick for years, from those early, messy attempts to the polished berries I make today. The biggest lesson? Embrace the imperfections! A berry with a slightly lopsided coat or a wild drizzle has more character. One year, my then-boyfriend (now husband) tried to “help” and ended up with a pink candy melt handprint on his favorite shirt. We still laugh about it. The mess is part of the memory. Don’t be afraid to double the batch, either. They disappear faster than you can say “more, please,” and having a few extra for quality control (a.k.a. the cook’s reward) is always a good idea.
Your Questions, Answered!
Let’s tackle a few common hiccups before they happen, so you can dip with confidence.
Q: My chocolate got thick and clumpy when I melted it! What happened?
A: Ah, you’ve encountered “seized” chocolate! This usually happens if a tiny drop of water or steam got into the mix. Don’t panic! You can sometimes save it by vigorously stirring in a teaspoon of coconut oil or shortening until it smooths out. If it’s a lost cause, just start over—it happens to the best of us!
Q: How far in advance can I make these?
A: For the absolute best texture and flavor, I recommend making them the same day you plan to serve them. However, you can make them up to 24 hours in advance. Store them in a single layer in an airtight container in the fridge. Let them sit at room temperature for 5-10 minutes before serving for the best taste.
Q: Why are my strawberries “sweating” after I take them out of the fridge?
A> This is condensation! It happens when the cold berries hit warm, humid air. It’s totally normal and doesn’t affect the taste, though it can slightly dull the shine of the chocolate. To minimize it, place them in a container before chilling and let the container come to room temperature before opening it.
Q: Can I use frozen strawberries?
A> I don’t recommend it, friend. Frozen berries become too soft and watery when they thaw, which will make your chocolate coating slide right off and create a soupy mess. Fresh is definitely best for this recipe.
A Note on Nutrition & Enjoyment
Let’s be real: this is a treat, and it’s meant to be enjoyed wholeheartedly! But here’s a little breakdown per berry (approximate, as your decorations may vary) so you can indulge mindfully. Each glorious chocolate-covered strawberry comes in at around 120 calories, with about 10g of sugar, 7g of fat, and 14g of carbs.
The beautiful thing is, you’re starting with a whole, real fruit. Strawberries are packed with Vitamin C, fiber, and antioxidants. So while the chocolate and candy coating are the indulgent part, you’re still getting a dose of nature’s goodness. My philosophy? Food is about joy and connection. So savor every single bite of these beautiful berries without an ounce of guilt. You made them with love, and that’s the most nourishing ingredient of all.
Prep Time: 20 mins | Chill Time: 20 mins | Total Time: 40 mins | Yields: 12 strawberries
Your Sweet Finale
And there you have it! You are now a certified Chocolate-Covered Strawberry expert. You’ve learned the secrets to a smooth dip, the joy of creative decorating, and the heart behind this simple, stunning treat.
I hope this recipe brings as much laughter and sweetness to your kitchen as it has to mine over the years. Remember, the very best dishes are the ones made with a generous sprinkle of joy and shared with people you love. So whether you’re surprising your significant other, treating your galentines, or simply celebrating yourself, you’ve created something truly special.
With a full heart and a happy, chocolate-smeared apron,
— Emily