Let’s Bake Some Love!
Hey there, friend! Emily here, from my flour-dusted kitchen to yours. Is there anything better than the smell of chocolate cookies baking? I think not. And when February rolls around, with its chilly days and heart-filled windows, my mind goes straight to one thing: baking something that feels like a giant, delicious hug.
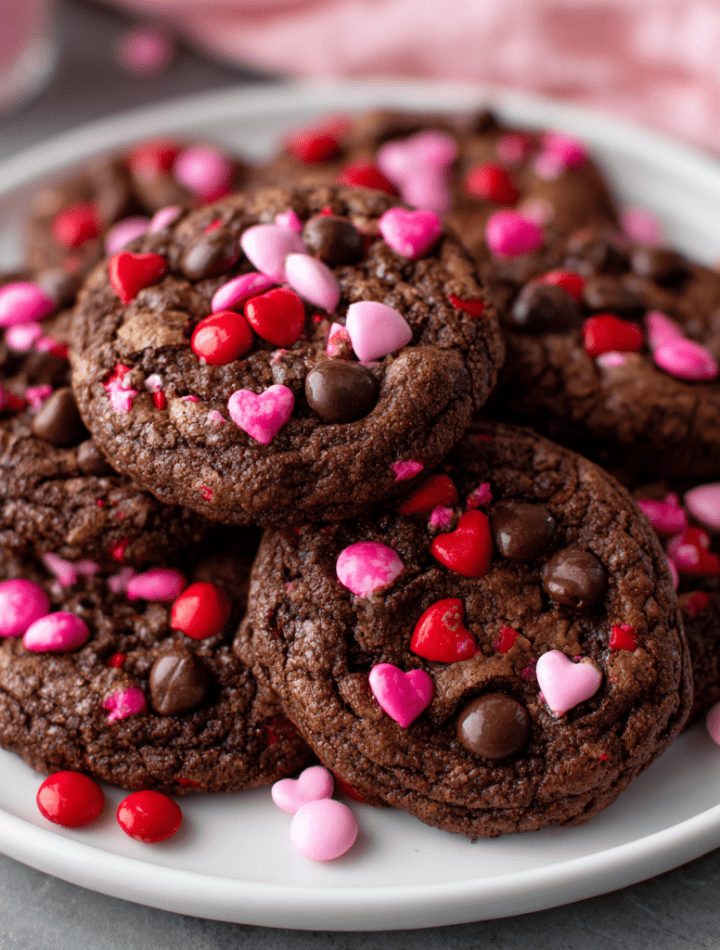
These aren’t just any cookies. These Valentine’s Chocolate M&M Cookies are little edible Valentines. Imagine a cookie that’s soft and fudgy like a brownie, chewy around the edges, and packed with joyful pops of pink and red candy in every single bite. They’re the cookies you’ll want to pile high on a plate for your sweetheart, pack up for your kid’s classroom party (hello, MVP parent status!), or simply bake just for you—because you deserve a treat, too!
This recipe is my love letter to easy, joyful baking. No fussy techniques, no weird ingredients. Just straightforward, soul-warming goodness that promises a kitchen full of happy smells and an even happier belly. So, tie on that apron (the messy one is always the best), grab your favorite mixing bowl, and let’s make something delicious that’s absolutely brimming with love.

The Cookie Jar of My Heart
My obsession with a perfect chocolate cookie started, like so many of my best food memories, at my Grandma Mae’s house. Her kitchen was tiny, with yellow countertops and a radio always tuned to the oldies station. But her cookie jar—a plump, ceramic pig with a cheerful smile—was a portal to pure magic.
Every Valentine’s Day, that pig would be filled not with store-bought cards, but with her legendary chocolate drop cookies. They were crackly on top, impossibly soft inside, and studded with the season’s pastel-colored M&Ms. To my 8-year-old self, those colors were pure treasure. I’d sit at her Formica table, carefully picking out all the red and pink ones first, saving them for the final, glorious bite.
She’d wink and say, “The red ones taste the sweetest, you know.” I believed her completely. This recipe is my grown-up tribute to those afternoons. I’ve tinkered with the ratios, added an extra kiss of cocoa, and perfected the bake time for that ideal chew. But the spirit—the fun, the color, the simple act of making something sweet for the people you love—is all Grandma Mae. Every time I press those extra M&Ms on top, I think of her, and I hope these cookies become part of your story, too.
Your Cookie Crew: Ingredients & Insights
Gathering your ingredients is the first step to cookie success! Here’s exactly what you’ll need and why each one is a star player. I’ve also added my favorite swaps so you can bake with what you’ve got.
- 1 cup (2 sticks) unsalted butter, softened – This is the foundation of our rich, tender cookie. Softened is key! It should give slightly when pressed, not be melted or rock-hard. Pro Chef Tip: Forgot to soften it? Cut sticks into tablespoons, microwave for 5-second bursts until pliable, but not glossy.
- ¾ cup brown sugar & ½ cup granulated sugar – The dynamic duo! Brown sugar brings moistness and that deep, molasses-y chew. Granulated sugar helps with spread and a slight crisp at the edges. Using both is the secret to perfect texture.
- 2 large eggs – Our binders and leaveners. They add structure and richness. Make sure they’re at room temperature to blend seamlessly with the butter and prevent a greasy dough.
- 1 tsp vanilla extract – The flavor enhancer! It rounds out the chocolate and makes everything taste more “bakery-style.” Use pure vanilla if you have it—it makes a difference.
- 1¾ cups all-purpose flour – The main structure. Spoon and level your flour into the measuring cup to avoid packing it in, which can lead to dry cookies.
- ½ cup unsweetened cocoa powder – The chocolate heart of the cookie! I use natural unsweetened cocoa for a classic, rich flavor. Don’t use hot chocolate mix!
- 1 tsp baking soda – Our rising agent. It reacts with the brown sugar’s acidity to give the cookies a lovely lift and that slightly crackly top.
- ½ tsp salt – The flavor superhero! Salt makes the chocolate taste more chocolatey and balances all the sweetness. Never skip it.
- 1 cup Valentine M&Ms (plus extra for topping) – The festive confetti! The seasonal pinks, reds, and whites make these so special. Reserve a handful to press on top for that picture-perfect look.
- ½ cup chocolate chips (optional for extra gooeyness) – Because more chocolate is always a good idea. This creates melty pockets of joy. Use semi-sweet, milk, or even dark chocolate chips based on your preference.
Let’s Get Baking: Step-by-Step Magic
Ready? Let’s do this! Follow these steps, and you’ll be a cookie hero in no time. I’ve tucked my favorite kitchen hacks right in here with you.
- Preheat & Prep. Preheat your oven to 350°F (175°C). Line your baking sheets with parchment paper. This is my #1 non-negotiable tip! It prevents sticking, ensures even browning, and makes cleanup a dream. No parchment? A silicone baking mat works great too.
- Cream the Butter & Sugars. In a large bowl, beat the softened butter, brown sugar, and granulated sugar together with a hand mixer or stand mixer fitted with the paddle attachment. Beat on medium speed for 2-3 minutes until the mixture is light, fluffy, and pale in color. This step incorporates air, which is crucial for texture. Don’t rush it! It should look almost like a smooth, spreadable frosting.
- Add Eggs & Vanilla. Beat in the eggs, one at a time, making sure each is fully incorporated before adding the next. Then beat in the vanilla. The mixture might look a little curdled at this point—that’s totally okay! It will all come together when we add the dry ingredients.
- Whisk the Dry Team. In a separate medium bowl, whisk together the flour, cocoa powder, baking soda, and salt. Whisking is important! It evenly distributes the baking soda and cocoa so you don’t get bitter pockets in your cookies.
- Combine Wet & Dry. With your mixer on low speed, gradually add the dry ingredients to the wet ingredients. Mix until *just combined* and no dry streaks of flour remain. A little flour on the sides of the bowl is fine. Overmixing at this stage can lead to tough cookies—we want tender!
- The Fun Part: Fold in the Goodies! Using a sturdy spatula, gently fold in the 1 cup of Valentine M&Ms and the chocolate chips (if using). Fold until they’re evenly distributed. The dough will be thick and glorious.
- Scoop & Decorate. Using a medium cookie scoop (about 1.5 tablespoons), portion the dough onto your prepared baking sheets, leaving about 2 inches between each for spreading. Now, take those reserved M&Ms and press a few onto the top of each dough ball. This guarantees every cookie is Instagram-ready right out of the oven.
- Bake to Perfection. Bake for 9-11 minutes. The cookies will look puffy and soft in the middle, with the edges just set. They might seem underdone, but TRUST ME. This is the secret to a soft, chewy center. They will continue to cook on the hot baking sheet.
- The Cool Down. Let the cookies cool on the baking sheet for 5 full minutes. This allows them to set enough to move without falling apart. Then, transfer them to a wire rack to cool completely. The hardest part? Waiting to eat one!
How to Serve Your Masterpiece
Presentation is part of the fun! Here are a few ways to make these cookies shine:
For a simple, homey vibe, stack them high on a vintage cake stand or your favorite rustic wooden board. Tuck a few extra M&Ms around the base for a cute touch.
Gifting? These cookies are the ultimate edible Valentine. Bag them up in clear cellophane bags tied with a red and white baker’s twine. You can even punch a hole in a cute gift tag with a sweet note. For a classroom party, lay them out in a single layer in a large, lidded container—they’ll be the first treat to disappear!
And of course, the ultimate serving suggestion: serve them slightly warm with a cold glass of milk for dunking. The melty chocolate chips and soft center paired with icy milk? That’s pure happiness on a plate.
Make Them Your Own: Delicious Twists
Love the base recipe? Let’s play! Here are a few fun ways to switch things up:
- Peanut Butter Paradise: Replace the chocolate chips with ½ cup of peanut butter chips. The combination of chocolate, peanut butter, and candy shells is legendary.
- Mint Chocolate Chip: Swap the vanilla extract for ½ teaspoon of peppermint extract and use dark chocolate chips. It’s like a Thin Mint in cookie form—so refreshing!
- Double Chocolate Cherry: Add ½ cup of dried tart cherries along with the M&Ms. The chewy, tangy fruit cuts through the richness beautifully.
- “Everything but the…” Cookie: Feeling wild? Fold in a mix of ½ cup white chocolate chips, ½ cup chopped pretzel pieces, and ½ cup toasted pecans along with the M&Ms. Sweet, salty, crunchy perfection.
- Gluten-Free & Dairy-Free Friendly: Use a 1:1 gluten-free all-purpose flour blend. Swap the butter for a high-quality plant-based butter stick (not spread from a tub) and use dairy-free chocolate chips. The recipe is wonderfully adaptable!
Emily’s Kitchen Notes
This recipe has been my Valentine’s staple for years, and it’s evolved with every batch. I used to bake them for a full 12 minutes, chasing a “set” look, only to find they hardened up as they cooled. The 9-11 minute sweet spot was a game-changer discovered during a slightly distracted bake session while my dog was begging for a bite—a happy accident!
A funny truth? I am hopeless at making perfectly round cookies. Mine always have personality—some are bigger, some have more M&Ms cascading off the side. I’ve decided that’s part of their charm. They’re homemade, not factory-made, and that’s what makes them special. So don’t stress about uniformity. Embrace the delicious chaos!
Your Questions, Answered!
Q: My cookies spread too much and got flat. What happened?
A: This is usually a butter or flour issue. First, make sure your butter was *softened*, not melted. Second, double-check your flour measurement—did you scoop directly from the bag? That can pack in too much flour, but if you accidentally used too little, that will cause spread. Lastly, make sure your baking soda is fresh!
Q: Can I make the dough ahead of time?
A: Absolutely! You can scoop the dough balls onto a parchment-lined plate or sheet, freeze until solid, then transfer to a freezer bag for up to 3 months. Bake straight from frozen, adding 1-2 minutes to the bake time. This is my secret for fresh cookies anytime!
Q: My cookies are cakey, not chewy. Why?
A> Cakey cookies often come from over-measuring the flour (again, spoon and level is key!) or overmixing the dough once the flour is added. Mix until just combined. Also, ensure you’re using brown sugar—it’s essential for moisture and chew.
Q: How do I store them to keep them soft?
A> Once completely cool, store them in an airtight container at room temperature. For ultimate softness, I add a piece of plain bread to the container. The cookies will draw moisture from the bread, staying soft for days (the bread will get hard—just swap it out).
Nutritional Info (For the Curious Cook!)
Okay, let’s be real—we’re here for a celebratory treat! But I know some folks like to keep track, so here’s a general breakdown per cookie (based on a yield of 24, using all ingredients including chocolate chips). Remember, these are estimates as ingredients can vary.
Calories: ~190 | Total Fat: 10g | Saturated Fat: 6g | Cholesterol: 35mg | Sodium: 110mg | Total Carbohydrates: 24g | Dietary Fiber: 1g | Sugars: 15g | Protein: 2g
Prep Time: 15 minutes | Bake Time: 10 minutes per batch | Total Time: 25 minutes (plus cooling) | Makes: About 24 delicious cookies
Final Thoughts from My Kitchen to Yours
And there you have it, friend! My all-time favorite, heart-filled, smile-inducing Valentine’s cookie recipe. I hope your kitchen fills with the incredible aroma of chocolate and your heart fills with the joy of making something truly wonderful.
Remember, baking is about the experience as much as the result. The spilled flour, the lick of the spoon, the laughter as you try to keep little hands (or your own!) from snatching dough—that’s the real magic. These cookies are just the delicious bonus.
So, from my Tasty Chow family to yours, I wish you a Valentine’s season filled with love, laughter, and perfectly chewy cookies. Now, go chow down!
With love and a full cookie jar,
Emily