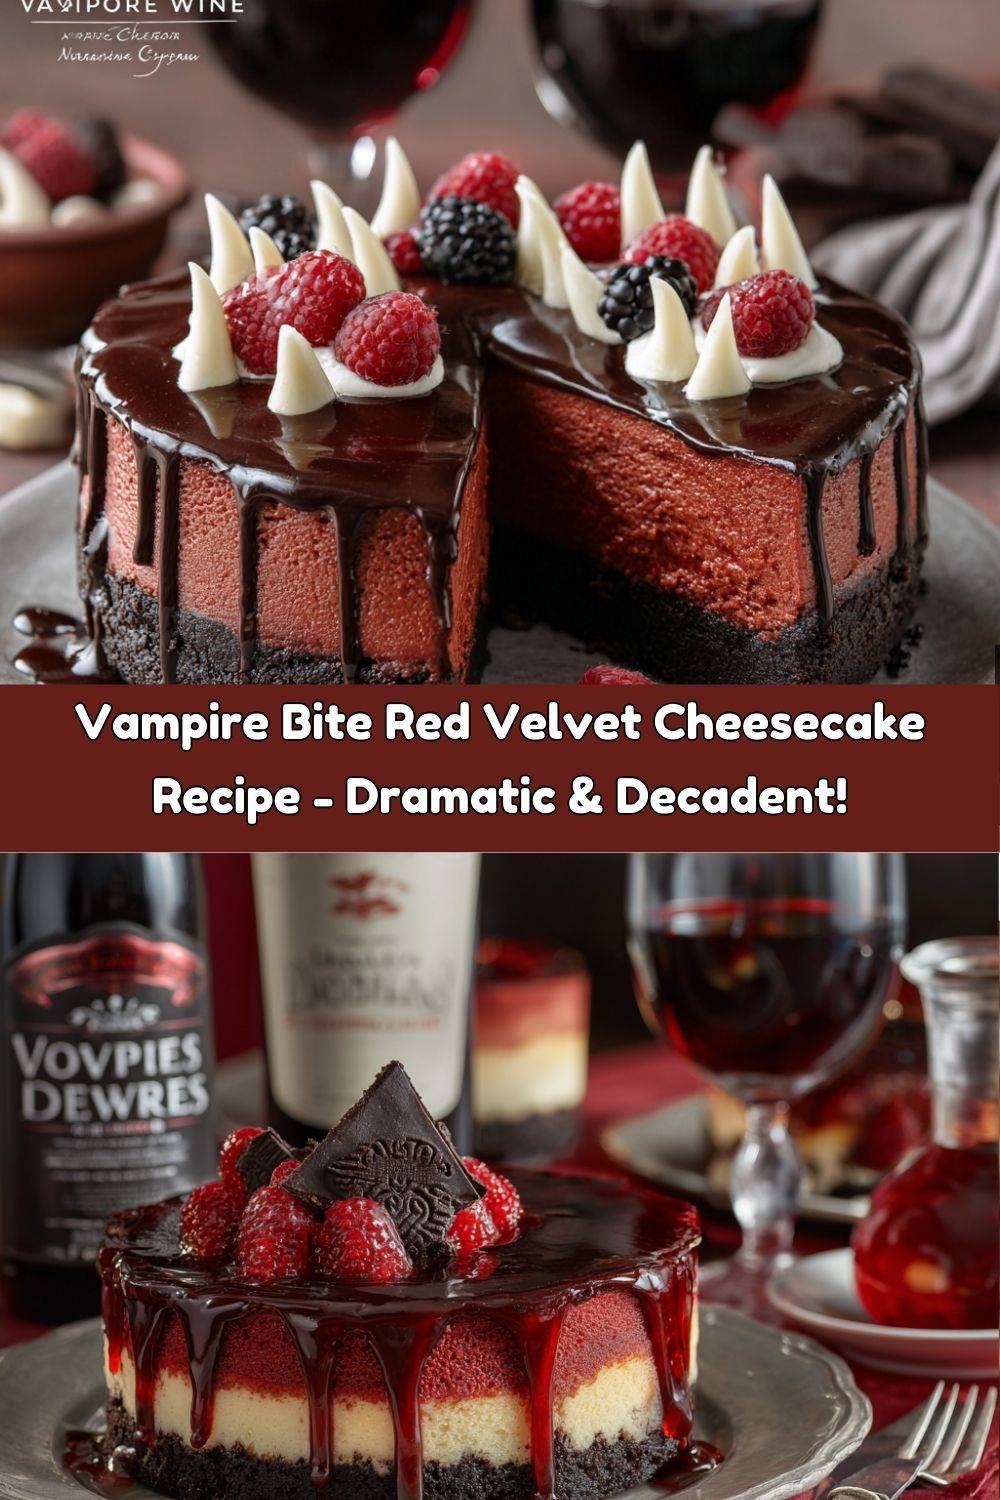
Vampire Bite Red Velvet Cheesecake: Your New Obsession
When Decadence Gets a Little Dangerous…
Hey, my fearless foodie friends! 👋 Chef Emily here, ready to lure you into the deliciously dark side of dessert. Picture this: a cheesecake so sinfully rich, so stunningly red, it practically whispers tales of midnight cravings and forbidden bites. This isn’t just any cheesecake – this is my Vampire Bite Red Velvet Cheesecake, doubled for maximum impact and dripping with gothic glamour. Imagine sinking your fork through a cloak of glossy dark chocolate “blood” sauce into a velvety, blood-red interior bursting with deep cocoa flavor and that signature red velvet tang. It’s dramatic. It’s decadent. It’s the kind of showstopper that makes people gasp before they even take a bite. Whether you’re hosting a spooky soiree, celebrating a dark-academia book club, or just treating yourself (because Tuesday deserves drama too), this cheesecake is your ultimate wingman… or should I say, fangman? Grab your apron – the one that’s seen some battles – and let’s conjure up some kitchen magic that’s equal parts elegant and eerie. Trust me, one slice of this crimson beauty, and you’ll be love-bitten for life. Let’s make something wickedly good!
A Midnight Craving & A Crimson Dream
This beast of a beauty actually hatched during one of my infamous “midnight kitchen experiments.” Picture it: Halloween week, pouring rain, and a serious craving hit – not just for cheesecake, but for that specific nostalgic *zing* of my grandma’s red velvet cake. Grandma Mae’s version was legendary, baked in her trusty chipped porcelain pan, always served with a dollop of gossip and a twinkle in her eye. She’d say, “Life’s too short for beige food, Em!” That night, fueled by nostalgia and maybe one too many espresso shots, I wondered: what if I merged her iconic red velvet magic with the luxurious, silky depth of a New York-style cheesecake? And then, because it was practically Halloween, my inner goth kid piped up: “Make it look like it bit back.” Cue the dark chocolate “blood” drizzle and the hunt for the perfect edible fangs (white chocolate chips to the rescue!). The first test run? Let’s just say my kitchen looked like a crime scene (red gel coloring is NO JOKE), but the taste? Pure, decadent nostalgia with a thrillingly modern, dramatic twist. Grandma Mae would have absolutely approved of the mess and adored the drama.
Gathering Your Potion Ingredients (Serves 24!)
Don’t panic at the quantities – we’re feeding a coven! Use room temp ingredients (especially cream cheese and eggs) for the smoothest, dreamiest filling. Here’s your spellbook:
- Crust:
- 3 cups chocolate cookie crumbs: Oreos (creme filling included!) are my MVP. Pulse them yourself for freshness! Chef’s Swap: Gluten-free chocolate cookies work perfectly too.
- ½ cup melted butter: The glue! Unsalted is best so you control the salt. Chef’s Insight: A pinch of salt in the crust balances the sweet filling beautifully.
- Filling (The Heart of the Beast):
- 48 oz (6 blocks) cream cheese, softened: FULL FAT is non-negotiable for that lush texture. Let it sit out for at least 2 hours. Chef’s Tip: Cut it into chunks to speed up softening.
- 2 cups granulated sugar: Sweetens the deal. Chef’s Note: Don’t reduce this; sugar helps structure.
- 6 large eggs, room temp: Adds richness and sets the custard. Cold eggs can cause lumps! Add them one at a time.
- 2 tsp pure vanilla extract: The flavor backbone. Use the good stuff!
- ½ cup cocoa powder (Dutch-processed preferred): Gives that deep, rich red velvet chocolate base. Dutch-process has a smoother, darker flavor.
- 2 tbsp buttermilk: The secret for tenderness! Chef’s Swap: No buttermilk? Mix 2 tbsp milk + ½ tsp lemon juice/vinegar, let sit 5 mins.
- 2 tsp white vinegar: Enhances the classic red velvet tang and helps activate the cocoa. Don’t skip it!
- Red gel food coloring (as bold as you dare!): KEY! Gel is concentrated and won’t thin your batter like liquid. Start with 1-2 tsp, add until it’s vampirically vibrant! Chef’s Warning: This stuff stains!
- Topping (The “Bite”):
- 1 cup dark chocolate sauce: Homemade or quality store-bought for that “blood” drizzle. Warm it slightly for easier pouring.
- Optional: Red berry coulis or seedless raspberry jam: For extra “blood” splatter or bite marks! Thinned jam works great.
- White chocolate chips or fangs: For decoration! You can melt white chocolate and pipe little fang shapes onto parchment, chill, then place.
Conjuring Your Masterpiece: Step-by-Step
- Preheat & Prep: Fire up your oven to 325°F (165°C). Grab TWO 9-inch springform pans. Chef’s Non-Negotiable: Wrap the *outside* bottoms and sides tightly with heavy-duty aluminum foil to prevent water bath leaks. Trust me, soggy crusts are tragic! Lightly grease the inside pans.
- Crust Alchemy: Blitz your cookies into fine crumbs (a food processor is fastest). Mix crumbs with melted butter until it resembles wet sand. Divide evenly between pans. Press FIRMLY and evenly into the bottoms and about 1-inch up the sides. Use a flat-bottomed cup for perfect packing! Bake for 8 minutes. Let cool COMPLETELY on a rack. Reduce oven temp to 300°F (150°C) while you make filling. Chef’s Hack: Par-baking sets the crust so it won’t get soggy!
- Silky Filling Ritual: In a *large* bowl (stand mixer ideal!), beat softened cream cheese on medium-low until perfectly smooth and lump-free (1-2 mins). Scrape bowl! Gradually add sugar, beat until creamy. CRITICAL: Add eggs ONE AT A TIME, beating just until yellow disappears after each. Over-beating eggs = cracks! Scrape bowl constantly. Beat in vanilla.
- Red Velvet Transformation: Sift cocoa powder over the mixture (prevents lumps!). Add buttermilk and vinegar. Beat on low JUST until combined. Now, the magic! Add your red gel coloring. Start with 1 tsp, beat, and assess. You want a deep, dramatic RED (think vampire cloak, not pink!). I usually use 2-3 tsp. Beat JUST until uniform. Chef’s Tip: Stop the mixer, scrape the bottom – hidden uncolored patches lurk there!
- Bake with Care (The Water Bath is Key!): Divide batter evenly between cooled crusts. Smooth tops. Place pans inside a large roasting pan. Pour HOT water into the roasting pan until it comes halfway up the sides of the springforms. This gentle steam bath prevents cracks and ensures even, creamy cooking! CAREFULLY place in oven. Bake for 55-65 minutes. The edges should look set, but the center should still have a slight, gentle wobble (like jello) – it will firm up chilling. Chef’s Watch-Out: Don’t open the oven for at least 45 mins!
- The Long Chill (Patience, Padawan!): Turn off oven. Crack the door open slightly and let cheesecakes cool inside for 1 hour. This gradual cooling prevents shocking and cracking. Remove from oven/water bath, cool completely on wire rack (about 2 hours). THEN, cover loosely (to prevent condensation drips) and refrigerate for AT LEAST 4 hours, but preferably overnight. This sets the texture perfectly. Chef’s Mantra: Good cheesecake can’t be rushed!
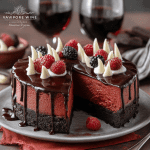
- Unleash the Drama (Decorate!): Carefully run a thin knife around the inner edges of the pans before unclipping the springs. Transfer cheesecakes to serving plates. Warm chocolate sauce slightly. Pour generously over the top, letting it dramatically drip down the sides. For the “bite”: Dip a spoon lightly in the berry coulis/jam and flick/spatter it onto the chocolate, or use a spoon to create small “bite mark” indents and fill with the red sauce. Artfully place white chocolate fangs or chips. Chef’s Flair: Dust lightly with edible black glitter or cocoa powder for extra mystique!
Serving Your Sinister Slice
Presentation is everything with this gothic beauty! Serve chilled. Use a large, sharp knife dipped in hot water (and wiped dry) for each slice to get those clean, sharp cuts through the deep red and dark chocolate layers. Plate on simple black or stark white plates to let the colors pop. A small drizzle of extra “blood” (berry sauce) on the plate underneath the slice adds flair. Pair with a strong cup of black coffee, a glass of chilled red dessert wine (like a Brachetto d’Acqui), or just savor the pure, decadent silence of a truly satisfied sweet tooth. It’s rich, so small slices are totally acceptable (but rarely practiced!).
Bite-Sized Twists & Dietary Swaps
Make this vamp your own!
- Gluten-Free Coven: Use certified GF chocolate cookies for the crust. Ensure cocoa powder is GF.
- Berry Bloodbath: Swirl 1/2 cup seedless raspberry jam into the batter before baking for a marbled effect and extra fruity tang.
- Mini Monsters: Use a muffin tin lined with parchment liners. Make mini crusts, fill 3/4 full. Bake 20-25 mins. Perfect for parties!
- Espresso Bite: Add 1-2 tbsp instant espresso powder dissolved in 1 tsp hot water to the filling for a mocha undertone.
- Dairy Darkness (Partial): Use dairy-free cream cheese and plant-based butter. Note: Texture might be slightly less firm. Buttermilk sub: use plant milk + vinegar.
Emily’s Kitchen Confessions & Evolution
Oh, the tales this recipe could tell! Version 1.0 involved me accidentally using an ENTIRE bottle of liquid red food coloring (rookie mistake!) – let’s just say my hands looked like I’d committed actual culinary crimes for days, and the cheesecake tasted vaguely chemical. Gel coloring was the game-changer! The “blood” sauce also evolved. I started with a simple ganache, but found a good quality, slightly thinner dark chocolate sauce gave that perfect dramatic drip without overpowering. The biggest lesson? Patience. That overnight chill? Non-negotiable. Trying to rush it once for a last-minute party resulted in a delicious but slightly weepy vampire. Now, I embrace the slow magic. And the fangs? Pure whimsy born from leftover white chocolate and a late-night “what if?” moment. They make everyone smile before the first bite even hits!
Vampire Bite FAQ: Slaying Common Problems
Q: Help! My cheesecake cracked! What happened?
A: Don’t panic! Cracks happen, often due to: Over-beating the eggs (incorporates too much air), temperature shock (cooling too fast), or over-baking. The water bath is your best defense. If it cracks, cover it gloriously with chocolate sauce! No one will know.
Q: Can I use liquid food coloring instead of gel?
A: I strongly advise against it. Liquid coloring adds too much moisture, thinning the batter and potentially affecting texture and baking time. You’d need SO much to get a deep red, which can impart a bitter taste. Gel is concentrated, vibrant, and doesn’t mess with the chemistry. Worth the buy!
Q: How far ahead can I make this?
A: This cheesecake is a dream for prepping! The filling sets best after a full 24 hours in the fridge. Bake it up to 2 days ahead. Add the chocolate sauce and decorations the day you plan to serve it for the freshest look. Leftovers (ha!) keep covered in the fridge for up to 5 days.
Q: My center is still super jiggly after the bake time. Is it done?
A: Remember the jiggle test! It should have a *slight* wobble in the very center (about the size of a quarter) when you gently nudge the pan. It firms up drastically during chilling. If the edges are puffed and set but the center wobbles like waves, it’s likely done. Over-baking leads to dryness and cracks. Trust the process and the chill!
Nutritional Info (Per Sinful Slice)
Prep time: 30 mins | Chill time: 4+ hours (Overnight best!) | Cook time: 1 hour
Calories: ~420 kcal | Fat: 31g | Carbohydrates: 32g | Sugar: 26g | Protein: 7g | Sodium: 225mg
Note: Nutritional info is an estimate based on specific ingredients used. Values can vary.
Vampire Bite Red Velvet Cheesecake
- Total Time: 5+ hours
- Yield: 24 1x
Description
Sink your fangs into this sinister yet stunning red velvet cheesecake—rich, blood-red, and cloaked in dark chocolate. Doubled for a crowd, this devilishly decadent dessert delivers bold cocoa flavor with a silky finish, all drizzled in dramatic “blood” sauce. One bite, and you’ll be love-bitten for life.
Ingredients
Crust:
3 cups chocolate cookie crumbs
½ cup melted butter
Filling:
48 oz cream cheese, softened
2 cups sugar
6 large eggs
2 tsp vanilla extract
½ cup cocoa powder (preferably Dutch-processed)
2 tbsp buttermilk (for a tender texture)
2 tsp white vinegar (enhances red velvet tang)
Red gel food coloring (as bold as you dare)
Topping:
1 cup dark chocolate sauce (store-bought or homemade)
Optional: red berry coulis or raspberry jam for an extra “bite” effect
White chocolate chips or fangs for decoration
Instructions
Preheat oven to 325°F (165°C).
Mix cookie crumbs with melted butter, press into two springform pans. Bake for 8 minutes. Cool.
Beat cream cheese and sugar until smooth. Add eggs one at a time.
Mix in vanilla, cocoa powder, buttermilk, vinegar, and red food coloring until fully blended.
Pour into pans and smooth the tops.
Bake for 55–65 minutes or until centers are just set. Cool completely, then chill for 4+ hours or overnight.
Drizzle with dark chocolate sauce and add a few drops of berry coulis or jam for a “blood bite” effect. Decorate with white chocolate “fangs” or swirl in more sauce for drama.
- Prep Time: 30 minutes
- Chill Time: 4+ hours
- Cook Time: 1 hour
Nutrition
- Calories: 420 / serving
- Sugar: 26g / serving
- Sodium: 225mg / serving
- Fat: 31g / serving
- Carbohydrates: 32g / serving
- Protein: 7g / serving
Final Thoughts
This Vampire Bite Red Velvet Cheesecake isn’t just dessert—it’s pure edible theater. From the moment that deep crimson filling meets its glossy chocolate “blood” drizzle, you’ve got a centerpiece that stuns before anyone even takes a bite. And once they do? The tangy red velvet meets silky cheesecake, the chocolate sauce drips dramatically, and suddenly you’re the hero of the night.
Whether it’s gracing a Halloween buffet, starring in a gothic dinner party, or simply adding a little midnight drama to a random Tuesday, this cheesecake proves that baking can be bold, playful, and a touch mysterious. So embrace the mess, wear the red food coloring stains like battle scars, and serve it with a wink. After all, the best bites are the ones that leave a little mark. 🦇❤️