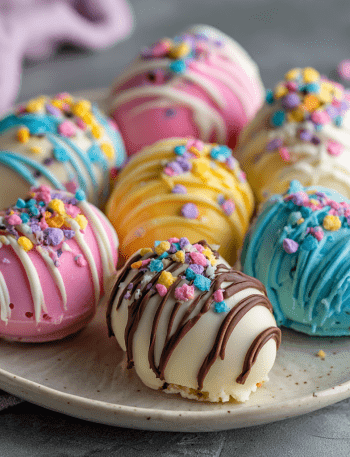
Let’s Make Some Little Bites of Heaven: White Chocolate Truffles
Hey there, my fellow flavor fanatic! Come on in, grab an apron, and let’s get a little messy. Is there anything more wonderfully indulgent than biting into a perfectly smooth, melt-in-your-mouth truffle? That moment when the delicate chocolate shell gives way to an impossibly creamy, rich center… pure bliss. I’m talking about the kind of homemade treat that feels fancy enough for a special occasion but is secretly so simple to make that you’ll want to whip up a batch just because it’s Tuesday.
Today, we’re diving into my recipe for White Chocolate Truffles. These aren’t just any truffles; they’re little puffs of cloud-like sweetness, a blank canvas for your wildest flavor dreams. Whether you’re a baking newbie or a seasoned pro, this recipe is your new best friend. We’re going to walk through each step together, and I’ll share all my favorite chef hacks to ensure your truffles are nothing short of spectacular. So, preheat your enthusiasm (not your oven—no baking required here!), and let’s create something deliciously magical.
A Snowy Day & A Sweet Discovery
I’ll never forget the first time I truly fell in love with white chocolate. It was a blustery winter day during my first year of culinary school in Chicago. Snow was piling up outside the dorm window, and a few of us were stuck inside, feeling a little homesick. My friend, Maria, from Switzerland, decided we needed a pick-me-up. With just a handful of ingredients she’d smuggled from the pastry lab—good chocolate, some cream, and a tiny bottle of almond extract—she showed us how to make the most incredible truffles I’d ever tasted.
We huddled around our tiny kitchenette, rolling the soft ganache into lopsided balls, laughing as chocolate ended up on our noses. There was no fancy tempering or perfect decorations, just a bunch of friends sharing something made with love. That’s the magic of this recipe. It’s not about perfection; it’s about the joy of creating and sharing something sweet. Every time I make these truffles, I’m transported back to that cozy kitchen, reminded that the best recipes are the ones that make memories.
Gathering Your Truffle Toolkit: The Ingredients
Here’s everything you’ll need to make about two dozen little bites of joy. Using high-quality ingredients is the secret handshake to incredible truffles!
- 12 oz high-quality white chocolate, chopped: This is the star! Don’t use chips; they have stabilizers that can prevent a smooth melt. Look for a bar you’d enjoy eating on its own. I love Ghirardelli or Baker’s brands for a great balance of quality and availability.
- ½ cup heavy cream: Also called heavy whipping cream. This is what creates the lush, creamy ganache center. For a richer flavor, you can substitute with ¼ cup heavy cream and ¼ cup full-fat coconut milk.
- 1 tbsp unsalted butter, room temp: This little pat of butter adds an extra layer of richness and a gorgeous sheen to your ganache. If you only have salted, it’s okay—just skip the added pinch of salt later.
- ½ tsp vanilla extract or almond extract: Vanilla is a classic, but almond is my personal favorite—it adds a beautiful, sophisticated depth that complements the white chocolate perfectly.
- Pinch of salt: Trust me, this is non-negotiable! Salt is the wingman that makes the sweetness pop and prevents the truffles from tasting one-dimensional.
- 8 oz white chocolate or white candy melts, melted (for coating): For the coating, you have a choice! Real chocolate will give you a richer flavor, but candy melts are more forgiving and easier to work with for dipping, as they set harder and don’t require tempering.
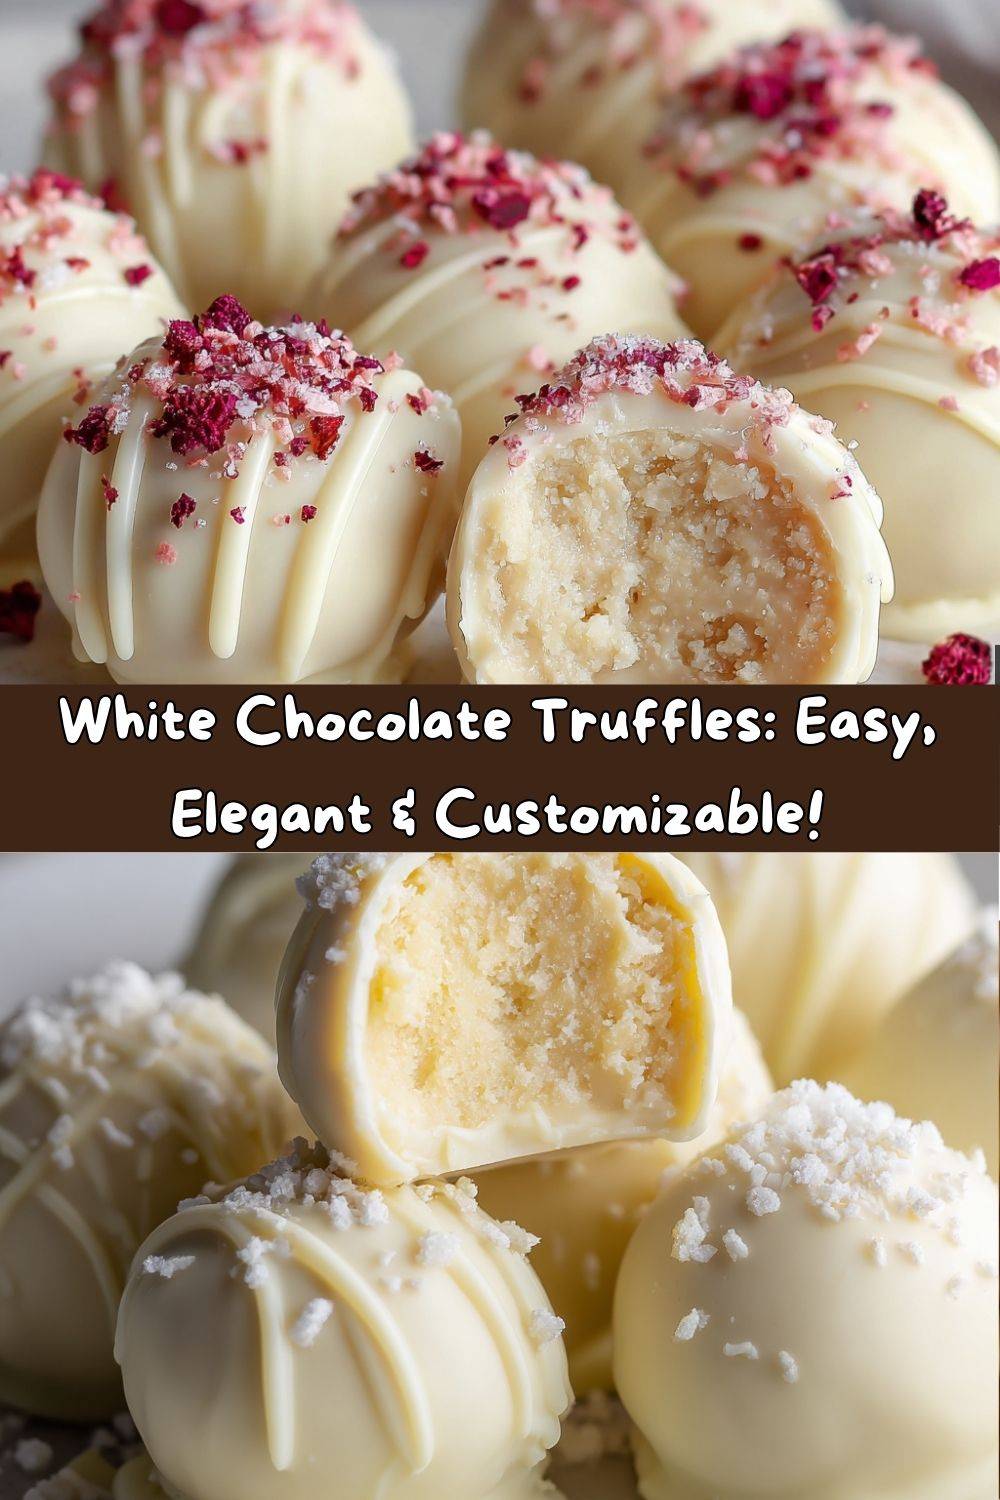
- Optional toppings: This is where you get to play! Think crushed freeze-dried raspberries, matcha powder, shredded coconut, finely chopped pistachios, or a drizzle of dark chocolate.
Crafting Your Creamy Masterpieces: Step-by-Step
Alright, friends! Let’s transform these simple ingredients into elegance. Follow these steps, and read my little commentary—it’s like I’m right there with you, guiding your spoon!
- Make the Ganache Filling: Place your finely chopped white chocolate in a medium heatproof bowl. In a small saucepan, heat the heavy cream and butter over medium heat. You’re not trying to boil it alive! Just heat it until you see tiny bubbles form around the edges—this is called scalding. Chef’s Hack: If you’re nervous about burning the cream, do this in the microwave in 20-second bursts. Immediately pour the hot cream mixture over the chopped chocolate. Let it sit for a full 2-3 minutes. This quiet time allows the heat to gently melt the chocolate. Now, starting in the center, slowly whisk until the mixture becomes a smooth, velvety pool of goodness. Whisk in your extract and that all-important pinch of salt.
- Chill Out: Cover the bowl with plastic wrap, pressing the wrap directly onto the surface of the ganache. This prevents a yucky skin from forming. Now, tuck it into the refrigerator to firm up. This will take at least 2 hours, but I often let it go overnight. You’ll know it’s ready when it’s firm enough to scoop and holds its shape.
- Shape the Truffles: Line a baking sheet with parchment paper. Using a small cookie scoop (a melon baller or even a teaspoon works too!), portion out the ganache. The key to round truffles without a mess? Work quickly with cold hands! I like to rinse my hands under cold water and dry them thoroughly every few truffles. Roll each portion between your palms into a neat 1-inch ball. If the ganache gets too soft and sticky, just pop the baking sheet back into the fridge for 10 minutes. Place all your little balls on the prepared tray and give them another 20-minute chill session. This second chill is crucial for a clean dip later!
- The Big Coat: Melt your coating chocolate or candy melts in short bursts in the microwave, stirring well between each burst, until completely smooth. Now, for the fun part! Drop a truffle center into the melted chocolate. Use a fork or a specialty dipping tool to roll it around, then lift it out, gently tapping the fork on the edge of the bowl to let the excess chocolate drip off. Chef’s Hack: If using a fork, slide the bottom of the truffle onto the parchment paper, then use a toothpick to gently push it off the fork for a perfect little “foot.” If you’re adding sprinkles or toppings, do it immediately after placing each truffle on the parchment—the chocolate sets fast!
- Set & Serve: Let the truffles set completely at room temperature. If you’re impatient (like me!), you can refrigerate them for 15 minutes to speed things up. Once set, they’re ready to devour!
How to Serve These Elegant Bites
Presentation is part of the fun! You’ve made these beautiful truffles, now let’s show them off. For a simple yet stunning look, place them in petite paper candy cups. You can find these in brilliant colors or classic gold and silver at any craft store. Arrange them on a beautiful platter or tiered stand for a real wow factor at your next party.
Thinking of gifts? Nothing says “I love you” like homemade treats. Tuck a few into a small gift box lined with colorful tissue paper or pack them into a elegant glass jar tied with a ribbon. They make the most thoughtful and impressive hostess gift, holiday present, or just-because surprise. Pair them with a cup of hot coffee, a glass of champagne, or a cold glass of milk for the ultimate treat-yourself moment.
Get Creative: Flavor Twists & Swaps
Ready to make this recipe your own? Here are a few of my favorite riffs on the classic!
- Peppermint White Chocolate: Add ¼ tsp peppermint extract (not mint—it’s different!) to the ganache. Coat in the white chocolate and immediately sprinkle with crushed candy canes. Perfect for the holidays!
- Lemon Zest Lift: Stir the finely grated zest of one large lemon into the warm ganache. The bright, citrusy notes cut through the sweetness beautifully. Roll the finished truffles in some dehydrated lemon powder or yellow sanding sugar.
- Gingerbread Spice: Whisk ½ tsp ground cinnamon, ¼ tsp ground ginger, and a pinch of nutmeg and cloves into the warm ganache. For coating, use dark chocolate instead of white and dust with a little cinnamon sugar.
- Boozy Bliss: For the grown-ups! Once the ganache has cooled slightly (so the alcohol doesn’t evaporate), stir in 1 tablespoon of your favorite liqueur. Amaretto, Grand Marnier, Bailey’s, or even a raspberry liqueur are all fantastic choices.
- Dairy-Free Delight: Use a high-quality dairy-free white chocolate bar and substitute the heavy cream with full-fat canned coconut milk. Use coconut oil instead of butter. It works like a dream!
Chef Emily’s Notes from My Kitchen to Yours
This recipe has been a work in progress since that snowy day in Chicago. I’ve learned a few things the hard way so you don’t have to! First, the great chocolate meltdown of 2015: I once tried to rush the melting process by boiling the cream and seized the chocolate into a grainy mess. Low and slow is the only way to go, friends.
These truffles have also taught me the beauty of imperfection. Your first batch might not be perfectly round. Your coating might have a little swirl from the fork. That’s okay! They will still taste incredible. Cooking is about the love you put in, not Pinterest-perfect results. Every time I make these, I tweak something—a new extract, a different topping. I encourage you to do the same and make this recipe your own.
Your Truffle Questions, Answered!
Q: My ganache is too soft and won’t hold its shape. What happened?
A: This usually means it needs more chilling time. Pop it back in the fridge! If it’s been hours and it’s still soft, your ratio might be off—perhaps the chocolate wasn’t measured correctly, or the cream was a bit light. You can salvage it by rolling the sticky balls and then freezing them solid before dipping.
Q: Why is my melted chocolate for dipping so thick and clumpy?
A: This is likely seized chocolate, often caused by a single drop of water or steam getting into the melting chocolate. To fix it, try stirring in a tiny amount of neutral oil (like vegetable or coconut oil) one teaspoon at a time until it smooths out. For next time, ensure all your tools are completely dry.
Q: Can I freeze these truffles?
A: Absolutely! They freeze beautifully. Place them in a single layer on a parchment-lined tray to freeze solid, then transfer to an airtight container or freezer bag. They’ll keep for up to 2 months. Thaw in the refrigerator overnight.
Q: How long do they last stored at room temperature?
A: Because of the dairy in the ganache, I recommend storing them in an airtight container in the refrigerator for up to 2 weeks. Let them come to room temperature for about 15 minutes before serving for the best texture and flavor.

White Chocolate Truffles
- Total Time: 2 hrs 20 minutes
- Yield: 24 Truffles 1x
Description
These dreamy truffles are soft on the inside with a creamy white chocolate ganache, coated in a delicate chocolate shell. They’re easy to make, beautiful to present, and feel like little bites of luxury.
Ingredients
12 oz white chocolate (high-quality, chopped)
½ cup heavy cream
1 tbsp unsalted butter
½ tsp vanilla extract or almond extract
Pinch of salt
For Coating:
8 oz white chocolate or white candy melts, melted
Optional toppings: powdered sugar, crushed freeze-dried berries, shredded coconut, or edible glitter
Instructions
Make ganache filling
In a saucepan, heat heavy cream and butter until just simmering. Remove from heat and pour over chopped white chocolate. Let sit 1–2 minutes, then stir until smooth. Add vanilla and salt.
Chill
Cover and refrigerate the ganache for 1–2 hours or until firm enough to scoop.
Shape truffles
Scoop and roll mixture into 1-inch balls. Place on a lined tray and chill again for 20 minutes to firm up.
Coat
Melt coating chocolate. Dip each truffle into the chocolate using a fork or dipping tool, then place on parchment. Decorate immediately with desired toppings.
Set & serve
Let truffles set at room temperature or refrigerate for faster setting. Store in an airtight container in a cool place.
Flavor Twists
Peppermint White Chocolate: Add ¼ tsp peppermint extract to the ganache
Lemon Zest Lift: Stir in 1 tsp lemon zest for a citrusy contrast
Gingerbread Spice: Add ½ tsp cinnamon + a pinch of nutmeg
Boozy Bliss: Add 1 tbsp white chocolate liqueur or amaretto
- Prep Time: 20 minutes
- Chill Time: 2 hrs
Nutrition
- Calories: 130 / Truffle
- Fat: 9g / Truffle
- Carbohydrates: 12g / Truffle
- Protein: 1g / Truffle
A Quick Note on Nutrition
Let’s be real—these are a treat, and that’s exactly what they should be! Enjoyed in moderation, they are a wonderful way to satisfy a sweet craving. The estimated nutritional information per truffle (assuming a yield of 24) is approximately 130 calories, 9g of fat, 12g of carbohydrates, and 1g of protein.
Remember, this is just an estimate and can vary based on the specific brands of ingredients you use and the size of your truffles. The primary ingredients are chocolate and cream, providing a source of quick energy and fat. For those with dietary concerns, remember the variations above for dairy-free options! The key is to savor each delicious bite mindfully.
You Did It! Now, Share the Sweetness.
Look at you, you magnificent truffle-making wizard! You’ve just created something beautiful, delicious, and straight from the heart. I hope you feel a huge sense of pride and maybe even a little chocolate on your fingers—the true badge of honor in my kitchen.
The best part about this recipe, beyond the incredible taste, is the joy of sharing. Wrap a few up for a friend who needs a smile, bring them to your next potluck, or simply hide them in the back of the fridge for your own secret stash (I won’t tell!). Thank you for spending time in my kitchen corner today. I loved being your guide through this sweet adventure.
Now, I’d love to hear from you! Did you try a crazy new topping? Did your kids love rolling the balls? Tag me on social @tastychow so I can see your gorgeous creations. Until next time, keep chasing flavor and cooking with love.
— Emily 🥄