Your Coffee’s New Best Friend: Homemade Caramel Brûlée Syrup
Hey there, friend! Let’s have a little heart-to-heart over a virtual cup of coffee. I don’t know about you, but my day doesn’t truly start until I’ve wrapped my hands around a warm mug. That first sip is a moment of pure, unadulterated bliss. But sometimes, plain old coffee needs a little jazz hands, you know? It needs a swirl of something magical, something that transforms your morning ritual into a full-blown celebration.
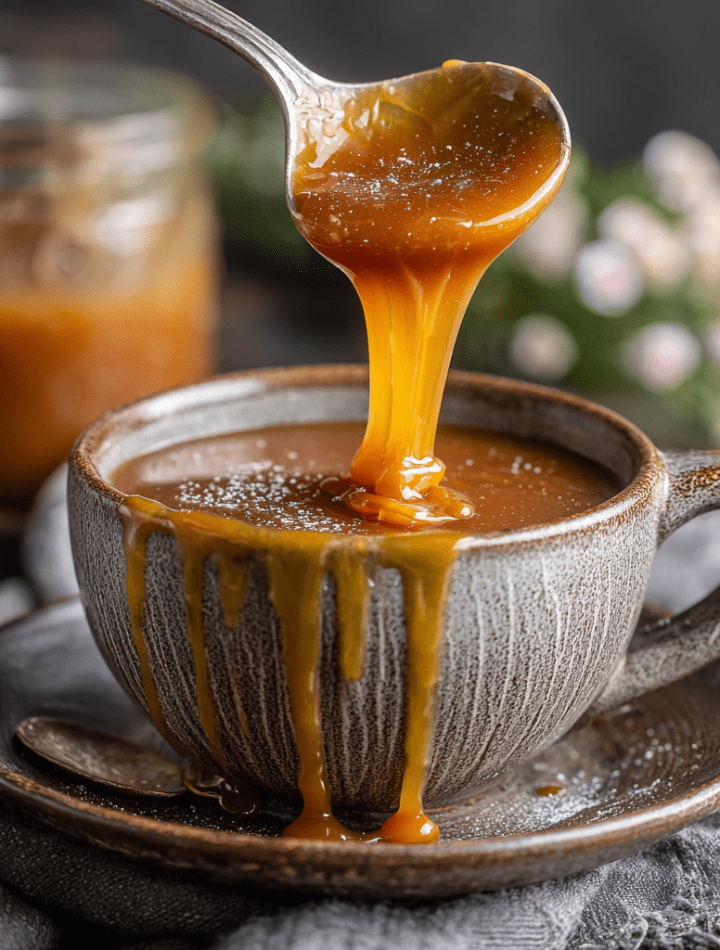
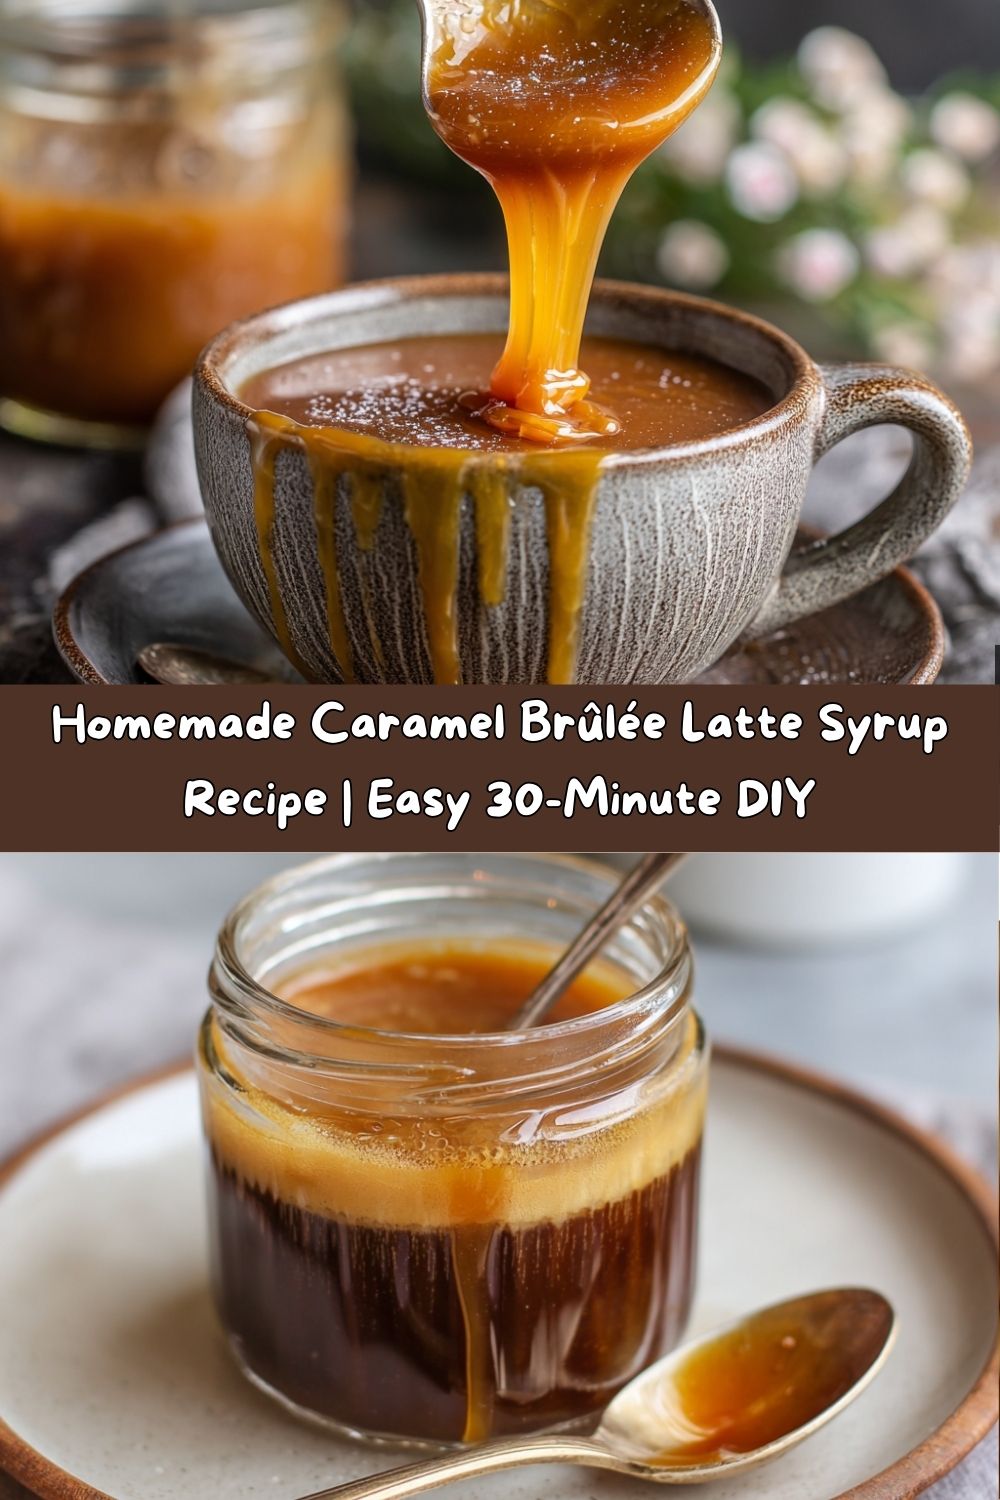
That’s where this glorious, liquid gold comes in. We’re ditching the store-bought bottles filled with unpronounceable ingredients and making our very own Caramel Brûlée Latte Syrup right in our kitchens. Imagine the deep, toasty flavor of caramelized sugar, the rich creaminess of sweetened condensed milk, and just a hint of sea salt to make it all sing. It’s the taste of your favorite coffee shop’s most indulgent seasonal drink, but you can make a whole jar for a fraction of the price.
This syrup isn’t just for lattes, though. Oh no. This is your secret weapon for drizzling over ice cream, glazing cakes, spiking your oatmeal, or even stirring into a cozy cup of hot chocolate. It’s silky, rich, and sweet with just the right touch of salt—it tastes like the holidays in a jar and comes together in under 30 minutes. Once you make it, I promise, you’ll wonder how you ever lived without it. So grab your favorite saucepan, and let’s make something delicious together!
The Day My Kitchen Smelled Like a Parisian Café
This recipe always takes me back to my first tiny apartment after culinary school. My kitchen was so small you could practically stir a pot on the stove while sitting on the couch! I was broke, deeply in love with fancy coffee drinks, and utterly horrified by how much my daily caramel latte habit was costing me.
One crisp autumn Sunday, I decided enough was enough. I was going to crack the code. I remember the scent of brown sugar starting to melt in my trusty, slightly dented saucepan. It was a risky experiment—I’d burned more than my fair share of sugar in school. But as the sugary, buttery aroma began to fill my entire apartment, I knew I was on to something. When I finally stirred in the vanilla and took that first taste off the spoon? Pure magic. It was even better than the coffee shop version. I immediately texted my best friend, “You have to try this!”, and I’ve been tweaking and sharing it ever since. It’s a recipe born from necessity, perfected with love, and now, I’m so excited to share it with you.
Gathering Your Delicious Ingredients
Part of the beauty of this recipe is its simplicity. You only need a handful of pantry staples to create something truly spectacular. Here’s what you’ll need:
- ½ cup brown sugar: I prefer dark brown sugar for its deeper molasses flavor, which gives us that classic, almost toffee-like caramel base. Light brown sugar works perfectly too! Chef’s Insight: The molasses in the brown sugar is what gives this syrup its beautiful, deep color and complex flavor, so don’t be tempted to swap it for white granulated sugar.
- 1 cup water: This is going to help us create a syrup consistency and smooth everything out after the sugar caramelizes.
- 1 (14 oz) can sweetened condensed milk: This is the secret weapon, my friend! It adds an incredible creaminess and body that you just can’t get with regular milk and sugar. It’s the heart of the “brûlée” flavor. Substitution Tip: For a dairy-free version, you can use canned coconut cream (the full-fat, thick kind) and add extra sugar to taste. It will have a slight coconut flavor, but it’s delicious!
- 2 tsp vanilla extract: Use the real stuff! It adds a warm, fragrant depth that makes the whole syrup taste more luxurious. Chef’s Hack: If you have a vanilla bean pod, split it and scrape the seeds into the syrup at the very end for an extra-special touch.
- ½ tsp salt: I use fine sea salt. Trust me on this—the salt doesn’t make it taste salty; it makes it taste more caramel. It balances the sweetness and highlights all the other flavors. Fun Twist: If you’re a salted caramel fanatic like me, feel free to bump this up to ¾ tsp for a more pronounced salty kick.
Brewing Up Magic: Let’s Make the Syrup!
Don’t let the word “caramel” intimidate you. This is a forgiving and fast process. Just stay present with it, and you’ll have a perfect syrup every single time.
- Caramelize the sugar: Place your brown sugar in a medium, heavy-bottomed saucepan over medium heat. Let it sit for a minute until you just start to see the edges melt. Now, reduce the heat to low and start stirring constantly with a wooden spoon or heatproof spatula. You’re looking for the sugar to fully melt and form little clumps before smoothing out into a thick, bubbling liquid. This should take about 3-5 minutes. Chef’s Tip: Keep the heat low and steady to avoid burning the sugar. If it starts to smoke, you’ve gone too far! Just wipe out the pot and start again.
- Add water & milk: Here comes the fun part! Very carefully and slowly, pour in the room-temperature water. The caramel will immediately seize up and harden around your spoon—this is totally normal and exactly what’s supposed to happen! Don’t panic. Just keep stirring. Now, add the entire can of sweetened condensed milk. Increase the heat back to medium.
- Simmer to perfection: Keep stirring! You’re now coaxing all those hardened caramel bits to dissolve back into the liquid. Continue stirring until the mixture is completely smooth and unified. Once it starts to gently bubble, reduce the heat just a touch to maintain a gentle simmer (a few bubbles breaking the surface—not a rolling boil). Let it simmer for 10 minutes, stirring occasionally. This step is crucial as it thickens the syrup slightly and allows the flavors to meld beautifully. Chef’s Hack: If you see any stubborn bits of caramel that won’t dissolve, don’t worry. We’ll strain them out later!
- Finish with flavor: Remove the saucepan from the heat. Stir in the vanilla extract and salt. The vanilla will sizzle a bit and smell amazing—that’s how you know it’s working!
- Strain and cool: For an ultra-silky, professional-grade syrup, pour the mixture through a fine-mesh sieve into a heatproof bowl or liquid measuring cup. This will catch any little undissolved sugar crystals that might have formed. Let the syrup cool completely at room temperature. It will continue to thicken as it cools.
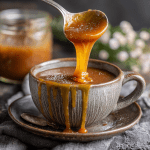
- Store: Once cool, transfer your gorgeous homemade caramel brûlée syrup into a clean glass jar or bottle with a lid. It will keep happily in the refrigerator for up to 2 weeks.
How to Enjoy Your Liquid Gold
Okay, the hard part is over (and it wasn’t even hard!). Now for the best part: devouring it. Here are my favorite ways to use this syrup:
The Classic Caramel Brûlée Latte: This is what we came for! Add 1-2 tablespoons (or more, I don’t judge!) of syrup to your mug. Pull a shot of espresso or pour in ½ cup of strong brewed coffee. Stir to combine. Heat and froth ¾ cup of milk of your choice (whole milk makes it extra decadent) and pour it over the coffee. Top with a dollop of whipped cream and an extra drizzle of syrup. Heaven.
The Iced Version: Same concept, but pour your coffee and syrup over a glass full of ice before adding cold milk. So refreshing!
Dessert Drizzle: Warm the syrup slightly and pour it over vanilla ice cream, cheesecake, bread pudding, or sliced apples. It’s also incredible swirled into yogurt or oatmeal.
Cocktail Hour: Shake a tablespoon of syrup with vodka or bourbon and a splash of cream for a decadent after-dinner drink. You’re welcome.
Get Creative! Fun Flavor Twists
Once you’ve mastered the base recipe, the world is your oyster! Here are a few ways to mix it up:
- Bourbon Caramel Brûlée: Stir in 1-2 tablespoons of good bourbon along with the vanilla for a wonderfully warm, adult-only version.
- Coconut Caramel: Use coconut cream instead of sweetened condensed milk and add a ¼ teaspoon of coconut extract. Perfect for tropical iced lattes.
- Spiced Chai Caramel: Add ½ teaspoon of cinnamon, ¼ teaspoon of ginger, and a pinch of cardamom and cloves when you add the sweetened condensed milk. It’s like fall in a bottle.
- Maple Kissed: Replace half of the brown sugar with real maple syrup for a deeper, woodsy sweetness.
- Sugar-Free Option: Use a brown sugar substitute like Swerve Brown and a sugar-free sweetened condensed milk alternative. The cooking process will be the same!
From My Messy Apron to Yours: Chef’s Notes
This recipe has evolved so much since that first tiny apartment experiment. I’ve learned that the key is patience—don’t rush the caramelization step. I also once, in a huge hurry, added cold milk directly to the hot caramel and ended up with a seized, grainy mess that took forever to clean. Lesson learned: always let your liquids come to room temp! Now, I always leave my can of milk and measuring cup of water on the counter while I prep everything else. It’s these little kitchen hacks that make all the difference. This syrup has also become my go-to holiday gift. I pour it into little swing-top bottles, tie a ribbon around them, and voilà—instant happy mail for all my foodie friends.
Your Questions, Answered!
Q: My sugar clumped up really hard when I added the water. Did I mess it up?
A: Not at all! This is 100% normal. The drastic temperature change causes the sugar to harden immediately. Just keep stirring over medium heat, and those clumps will slowly but surely dissolve back into the liquid, creating a smooth syrup. Patience is key here.
Q: Why did my syrup turn out grainy?
A: Graininess is usually caused by sugar crystals that didn’t dissolve. This can happen if you stir too vigorously when the sugar is first melting (which can cause crystals to form on the sides of the pan) or if you didn’t simmer it long enough. Next time, try gently brushing down the sides of the pan with a wet pastry brush during the first stage to prevent crystals. And don’t skip the straining step—it’s your best defense against graininess!
Q: Can I double this recipe?
A: Absolutely! Just use a larger saucepan to give the mixture plenty of room to bubble. The cooking times will remain roughly the same.
Q: How long does it really last?
A: Because of the high sugar content, it’s a great preservative. Stored in a completely clean, airtight container in the fridge, it should easily last two weeks. Always use a clean spoon to scoop it out to prevent introducing bacteria.
Caramel Brûlée Latte Syrup
- Total Time: 30 minutes
- Yield: 12 1x
Description
Silky, rich, and sweet with just the right touch of salt—this homemade caramel brûlée syrup will instantly elevate your coffee, lattes, or even desserts. It tastes like the holidays in a jar and comes together in under 30 minutes. Once you make it, you’ll wonder how you ever lived without it.
Ingredients
½ cup brown sugar
1 cup water
1 (14 oz) can sweetened condensed milk
2 tsp vanilla extract
½ tsp salt
Instructions
Caramelize sugar: Heat brown sugar in a saucepan over medium heat until it just starts to melt. Reduce heat to low, stirring until fully melted.
Add water & milk: Carefully pour in water (the caramel will seize, that’s normal). Stir in sweetened condensed milk. Increase heat to medium and stir until caramel remelts.
Simmer: Keep mixture at a gentle simmer (don’t let it boil over) for 10 minutes, stirring occasionally.
Finish: Remove from heat, stir in vanilla and salt. Strain through a fine mesh sieve.
Cool & store: Let cool completely before transferring to a jar. Store in fridge up to 2 weeks.
- Prep Time: 5 minutes
- Cook Time: 25 minutes
Nutrition
- Calories: 100 / Serving
- Sugar: 20g / Serving
- Fat: 2g / Serving
- Carbohydrates: 20g / Serving
- Protein: 2g / Serving
A Quick Note on Nutrition
Let’s be real—this is a treat syrup, not a health food! But making it at home means you control the ingredients, avoiding the corn syrups and artificial flavors found in many store-bought versions. This nutritional information is an estimate per 2-tablespoon serving:
Calories: ~100 | Protein: 2g | Fat: 2g | Carbohydrates: 20g | Fiber: 0g | Sugar: 20g
Remember, a little goes a long way in adding incredible flavor. It’s all about mindful indulgence and savoring the moment!
You’ve Got This!
See? I told you it was easy. You are now the proud creator of the most delicious, versatile coffee syrup that will make your mornings (and dessert times) infinitely more joyful. There’s something so satisfying about making something this good from scratch. It’s a small act of self-care that pays off every single time you use it.
I truly hope this recipe becomes a beloved staple in your kitchen, just like it is in mine. If you make it (and you absolutely should!), I’d love to see your creation. Tag me on social @TastyChow with your caramel masterpieces. Now, go forth and enjoy your well-deserved, incredibly delicious coffee break. You’ve earned it!
With love and a full mug,
Emily