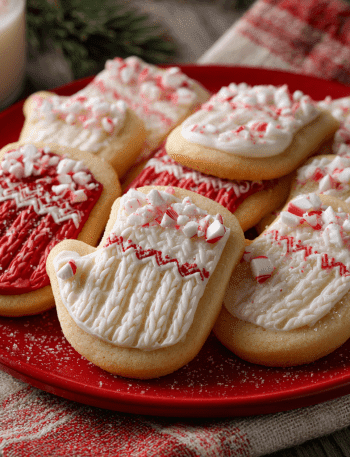
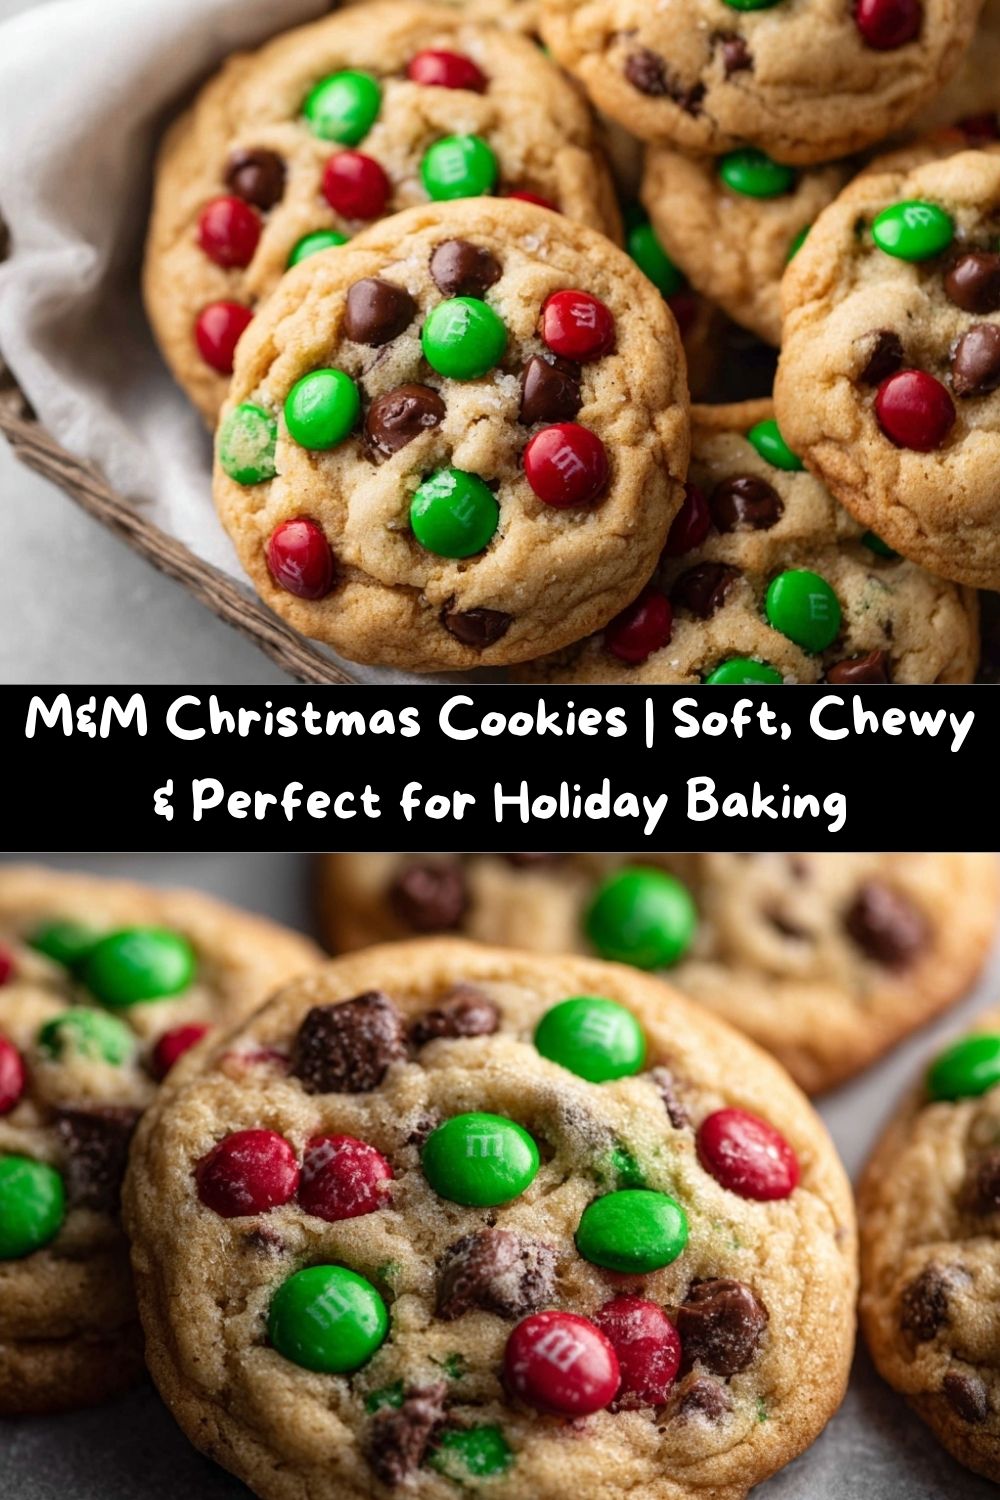
Your New Favorite Holiday Tradition: M&M Christmas Cookies
Hey there, my festive friend! Can you smell it? That magical, unmistakable scent of butter, sugar, and joy wafting from the oven? It’s the smell of childhood Christmases, of cookie swaps with friends, and of leaving a little something special out for Santa. And right at the heart of that beautiful aroma? These utterly irresistible, gloriously chewy, and totally festive M&M Christmas Cookies.
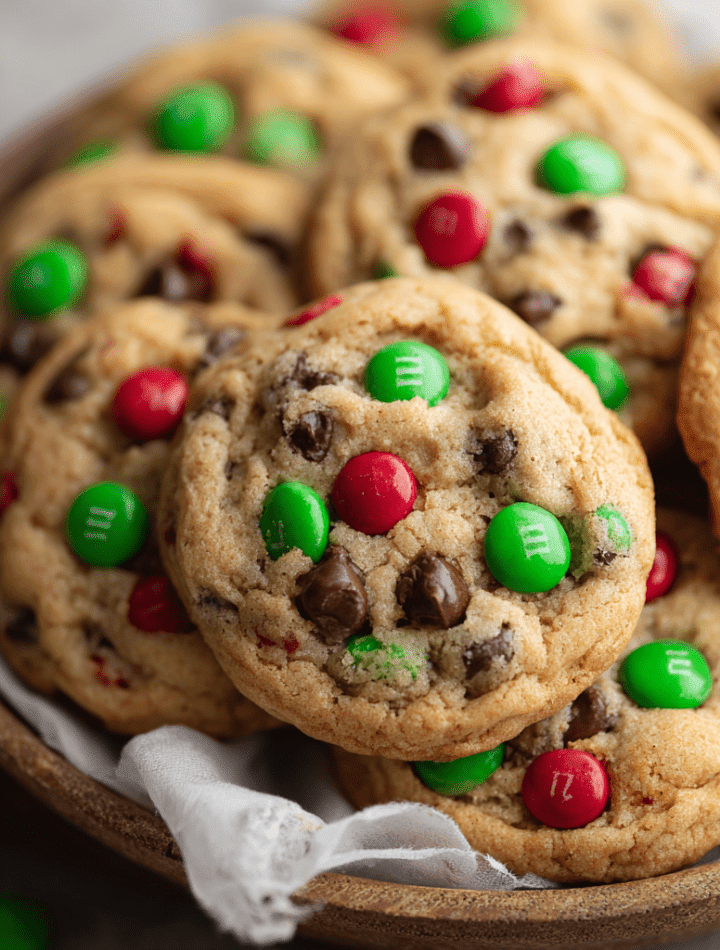
Listen, I’ve baked my way through more cookies than I can count—from delicate French macarons to intricate gingerbread houses. But sometimes, the recipe that wins everyone’s heart is the simplest, most joyful one. These cookies are exactly that. They’re the cookie you dream about all year. We’re talking a buttery, soft, and chewy base that practically melts in your mouth, packed with pools of melty semi-sweet chocolate and those iconic, colorful red and green M&M’s that just scream holiday cheer.
I developed this recipe to be your go-to, your never-fail, your “wow, these are amazing!” secret weapon. They come together in one bowl (mostly!), don’t require any fancy chilling time, and bake up into perfect, puffy-yet-chewy circles of happiness. Whether you’re a baking newbie or a seasoned pro, these cookies are your ticket to becoming the holiday hero. So, tie on that apron, put on your favorite Christmas playlist, and let’s make some magic together. Your kitchen is about to become the happiest place on earth.
A Spoonful of Nostalgia: Why These Cookies Feel Like Home
Every time I press those last few M&M’s into a warm cookie, I’m instantly eight years old again, standing on a wobbly wooden stool in my grandma’s kitchen. The counter would be dusted with a blizzard of flour, and she’d let me have the very important job of “Quality Control” for the M&M’s bag (a job I took very seriously).
We didn’t have a fancy stand mixer; it was her trusty old hand-crank beater and a big yellow bowl. She’d always “accidentally” drop a little extra dough into my mouth, her eyes twinkling. The best part, though, was the artistry. She’d let me carefully place the M&M’s on top of each dough ball, creating colorful patterns. “We’re making them pretty for Santa, Em,” she’d say. To this day, I can’t separate the taste of these cookies from the feeling of her floured hand on my shoulder and the sound of Perry Como crooning from the radio. This recipe is my homage to her—to the simple, powerful magic of butter, sugar, and love.
Gathering Your Cookie Crew: The Ingredients
Before we start creaming and mixing, let’s get familiar with our all-star cast of characters. Using simple, quality ingredients is the secret to a truly spectacular cookie. Here’s what you’ll need:
- 2¼ cups All-Purpose Flour: This is the backbone of our cookie, giving it that perfect structure. For a slightly softer cookie, you can swap in 2 cups of all-purpose and ¼ cup of bread flour—the higher protein creates a chewier texture!
- 1 tsp Baking Soda: Our leavening agent! This is what gives the cookies their lovely rise and that perfect, slightly craggy top. Make sure yours is fresh for the best lift.
- 1 cup Salted Sweet Cream Butter, softened: Ah, butter. The heart and soul of any great cookie. I use salted butter because I love the way the salt enhances all the other flavors and balances the sweetness. Pro Chef Tip: “Softened” is key! It should be cool to the touch but leave a slight indent when you press it. About 30-60 minutes out of the fridge should do it. Don’t microwave it to soften it—it can melt unevenly and change the cookie’s texture.
- ¾ cup Light Brown Sugar & ½ cup Granulated Sugar: This dynamic duo is non-negotiable. The brown sugar brings molasses-y moisture and chew, while the white sugar helps with spread and crispness. Together, they create cookie perfection.
- 2 tsp Vanilla Extract: Don’t be shy! A generous pour of good vanilla adds a warm, complex flavor base. If you have vanilla bean paste, a teaspoon of that would be divine here.
- 1 large Egg: Our binder! It brings everything together and adds richness. Make sure it’s at room temperature to blend seamlessly into the creamed butter and sugar.
- 1 cup Semi-Sweet Chocolate Chips: I love the rich, not-too-sweet flavor of semi-sweet here. It’s the perfect partner for the sweeter M&M’s. Feel free to use milk chocolate or dark chocolate chips if that’s your jam!
- 1 cup Red and Green M&M’s: The star of the show! These bring the festive color and that classic candy-coated crunch. I like to save a handful to press on top of the dough balls right before baking so they look extra pretty.
Let’s Get Baking: The Step-by-Step Magic
Okay, team! It’s go-time. This is where the fun begins. Follow these steps, and you’ll have a kitchen that smells like a North Pole bakery in no time.
- Preheat and Prep. First things first, get that oven preheating to a cozy 350°F (175°C). This ensures it’s perfectly hot and ready when your cookie dough is. Line your baking sheets with parchment paper. This little hack is a game-changer—it prevents sticking, promotes even browning, and makes cleanup an absolute dream. No parchment? A silicone baking mat works wonders too.
- Whisk the Dry Goods. In a small to medium bowl, grab a whisk and give your flour and baking soda a good, thorough mix. We’re not just combining here; we’re aerating the flour and making sure the baking soda is evenly distributed. This prevents little bitter pockets of baking soda in your finished cookies. Set this bowl aside.
- Cream the Butter & Sugars. Now, in a large mixing bowl, we’re going to cream together the softened butter, brown sugar, and granulated sugar. If you’re using a stand mixer, use the paddle attachment on medium speed. If you’re going old-school with a hand mixer, that works perfectly! Beat them for a good 2-3 minutes, until the mixture becomes noticeably lighter in color and fluffy. You want to see those sugar crystals working their way through the butter, creating tiny air pockets that will help our cookies rise. This step is crucial for texture, so don’t rush it!
- Incorporate the Wet Ingredients. Scrape down the sides of the bowl with a spatula to make sure everything is incorporated. Now, add the vanilla extract and the room-temperature egg. Mix on medium speed just until the egg is fully blended in and the mixture looks smooth and creamy. It might look a little curdled at first, but it will come together—promise!
- Bring It All Together. Time to add our dry ingredients! Turn your mixer down to low speed and gradually add the flour mixture. Mix just until the flour disappears. A few dry streaks are okay—we’re about to finish it by hand. Chef’s Golden Rule: Over-mixing at this stage develops the gluten in the flour and can lead to tough cookies. We want tender, chewy cookies, so be gentle!
- The Grand Finale: Mix-Ins! Take the bowl off the mixer. Sprinkle in the chocolate chips and most of your M&M’s (remember to save some for the tops!). Now, use a sturdy spatula or wooden spoon to fold everything together. This ensures all those colorful, chocolatey goodies are evenly distributed without over-working the dough.
- Scoop and Decorate. Using a tablespoon-sized cookie scoop (or a regular spoon), portion out the dough into balls. Roll them gently in your hands to smooth them out, then place them about 2 inches apart on your prepared baking sheet. They need a little room to spread their wings! Now, take those reserved M&M’s and press a few onto the top of each dough ball. This makes them look professionally decorated and extra festive.
- Bake to Perfection. Pop the baking sheet into your preheated oven and bake for 9-11 minutes. Now, here’s the most important tip: DO NOT OVERBAKE. The cookies are done when the edges are set and just starting to turn a light golden brown, but the centers still look soft, puffy, and slightly underdone. They will continue to cook on the hot baking sheet once you pull them out.
- The Cool Down. When you take the cookies out of the oven, let them cool right on the baking sheet for a full 2 minutes. This allows them to set up so they don’t fall apart when you move them. Then, carefully transfer them to a wire rack to cool completely. This step ensures the bottom doesn’t get soggy. Try to resist eating one straight from the pan… though I won’t judge if you can’t!
How to Serve These Stars of the Show
You’ve created edible works of art, so let’s show them off! For a classic holiday cookie platter, I love stacking these M&M cookies in a tall, beautiful tower on a rustic wooden board or a festive ceramic plate. Tuck in a few sprigs of fresh rosemary or a couple of cinnamon sticks for a gorgeous, aromatic touch.
Feeling extra? Serve them warm with a cold glass of milk for the ultimate nostalgic experience. Or, take them over the top by sandwiching a scoop of vanilla bean ice cream between two cookies for an epic holiday ice cream sandwich. For your cookie swap, package them in clear cellophane bags tied with a big red ribbon—they make the most heartfelt homemade gift. And of course, don’t forget to leave a few out for Santa with a tall glass of milk. We want to make sure he knows he’s at the right house!
Mix It Up! Fun Recipe Variations
One of the best things about this base recipe is how incredibly adaptable it is! Feel like getting creative? Here are some of my favorite twists:
- Peppermint Crunch: Swap the chocolate chips for 1 cup of white chocolate chips and fold in ½ cup of crushed candy canes. The peppermint is so refreshing and festive!
- Triple Chocolate Indulgence: For the ultimate chocolate lover, replace ¼ cup of the flour with unsweetened cocoa powder and use all chocolate chips (no M&M’s). You can even use dark chocolate M&M’s for a double-chocolate hit.
- Festive Funfetti: Add ½ cup of holiday sprinkles along with the M&M’s for an extra burst of color and crunch in every single bite.
- Nutty Buddy: Fold in ¾ cup of your favorite chopped nuts—toasted pecans or walnuts add a wonderful buttery crunch that pairs beautifully with the chocolate.
- Gluten-Free & Dairy-Free Friendly: You can easily make this recipe for friends with dietary needs! Use a 1:1 gluten-free flour blend, your favorite plant-based butter sticks, and ensure your chocolate chips and M&M’s are certified dairy-free.
Chef Emily’s Kitchen Confidential
This recipe has been my trusty sidekick for over a decade, but it’s had its own little journey. There was the infamous “Great Flat Cookie Incident of 2015” when I used melted butter in a rush (lesson learned: softened is best!). And the time I accidentally used salt instead of sugar… let’s not talk about that. The beauty of baking is that even the “failures” are learning experiences (and often still taste pretty good).
Over the years, I’ve found that letting the dough rest for just 15-20 minutes before scooping (if you have the patience!) results in a slightly thicker, chewier cookie. But honestly, the no-chill version is what makes this recipe so perfect for those last-minute “I NEED COOKIES NOW” holiday moments. It’s a forgiving, joyful recipe, just like the spirit of the season.
Your Cookie Questions, Answered!
I’ve gotten thousands of questions on this recipe over the years. Here are the most common ones to help you bake with confidence:
- Why are my cookies spreading too much? This is usually a temperature issue! Your butter was likely too warm or even melted. Another culprit could be an old baking soda that’s lost its potency. Always make sure your butter is just softened and your baking soda is fresh.
- Can I make the dough ahead of time? Absolutely! You can scoop the dough balls, freeze them on a baking sheet, and then transfer them to a freezer bag. When a cookie craving strikes, just bake them straight from the freezer, adding 1-2 minutes to the baking time.
- My cookies are cakey, not chewy. What happened? This often means there was too much flour. The most common way this happens is by scooping the flour directly with the measuring cup, which packs it in. For perfect results, fluff your flour with a spoon, then spoon it into your measuring cup, and level it off with a knife.
- Can I use a different type of M&M? Of course! The mini M&M’s distribute color beautifully throughout. The peanut or peanut butter M&M’s add a great texture and flavor. Feel free to use any seasonal color mix you find!
Nutritional Information (Because Balance is Key!)
Let’s be real, we’re here for a good time, not a long time, especially during the holidays! But I know many of you like to keep track, so here’s a general breakdown. Remember, this is an estimate and can vary based on your specific ingredients.
Per Cookie (approx. 1 of 30):
Calories: ~160 | Total Fat: 8g | Saturated Fat: 5g | Cholesterol: 20mg | Sodium: 85mg | Total Carbohydrates: 21g | Dietary Fiber: 1g | Total Sugars: 14g | Protein: 2g
My philosophy? Enjoy every single bite mindfully and joyfully. Food is fuel, but it’s also celebration, memory, and love. So share these cookies, savor them with your favorite people, and don’t sweat the small stuff. The joy they bring is the best ingredient of all.
Final Thoughts from My Kitchen to Yours
Well, my friend, we’ve done it. We’ve taken a handful of simple ingredients and spun them into pure, unadulterated holiday magic. These M&M Christmas Cookies are more than just a treat; they’re a tradition in the making. They’re the smile on your kid’s face when they get to press the M&M’s, the compliment from your mother-in-law at the family party, the quiet moment of peace with a warm cookie and a cup of tea after a long day of holiday chaos.
I am so grateful you chose to spend this time in the kitchen with me. Sharing these recipes and stories is my absolute favorite thing in the world. Now, I’d love to hear from you! Did you add a special twist? Did your house smell incredible? Tag me on social @TastyChow or leave a comment below—seeing your creations truly makes my day.
From my messy, flour-dusted kitchen to yours, happy baking and happy holidays!
With love and a full cookie jar,
Emily