Your New Favorite Holiday Cookie Is Here!
Hey there, my fellow food lover! Is there anything that captures the pure, unadulterated joy of the holiday season quite like the combination of chocolate and peppermint? It’s the flavor of cozy sweaters, twinkling lights, and that happy, contented sigh you let out after the first sip of a rich hot cocoa. And today, my friend, we are bottling up all that magic and baking it into one incredible, melt-in-your-mouth, can’t-eat-just-one treat: my Ultimate Chocolate Peppermint Cookies.
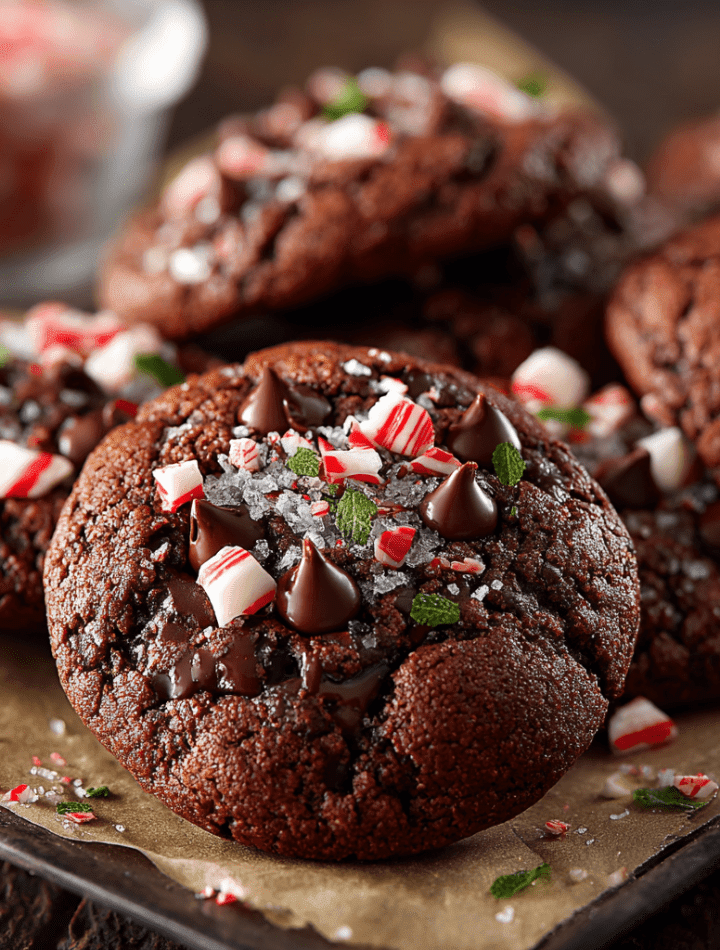
Imagine this: a cookie that’s deeply, intensely chocolatey, with a fudgy, chewy center and just-set edges. Now, picture biting into it and discovering a cool, refreshing burst of peppermint and little pockets of melted chocolate, all finished with a delightful crunch from sparkling candy bits. These cookies are the rockstars of any holiday cookie tin, the showstoppers on your dessert tray, and the perfect companion for a quiet moment by the fire. They’re festive, they’re fun, and I promise, they’re so easy to make. So, tie on your favorite apron (the messy one is always the best!), and let’s make your kitchen smell like a holiday dream.

A Sweet (and Sticky) Christmas Memory
These cookies always take me right back to my grandma’s kitchen, specifically the Christmas I was seven. My mission, which I had chosen to accept, was to be the Official Candy Cane Unwrapper for her famous peppermint bark. Let’s just say it did not go as planned. Instead of neatly unwrapping, I became a tiny, sugar-fueled demolition expert, smashing candy canes with a rolling pin while sending a flurry of red-and-white shrapnel all over her linoleum floor. We were finding peppermint bits in places you wouldn’t believe until Easter! But you know what? Grandma just laughed, swept up the big pieces, and we baked the rest into a batch of her brownie cookies. That first bite—the rich chocolate, the cool peppermint, the sugary crunch—was a revelation. It tasted like joy, a little bit of chaos, and a whole lot of love. That’s the spirit I bake into every single batch of these cookies.
Gathering Your Cookie Crew: The Ingredients
Before we start, let’s get acquainted with our all-star cast of ingredients. Using simple, quality components is the secret to a truly unforgettable cookie!
- 1 cup all-purpose flour: The trusty foundation of our cookie. For a slightly denser, chewier cookie, you can swap it 1:1 with bread flour!
- ½ cup cocoa powder: This is where the deep chocolate flavor comes from. Use natural, unsweetened cocoa powder for that classic, almost brownie-like taste. Dutch-process will work but will result in a darker, milder-flavored cookie.
- ½ tsp baking soda & ¼ tsp baking powder: Our dynamic leavening duo! The combination gives us the perfect lift and that delightful chewy-yet-tender crumb.
- ½ cup unsalted butter, softened: The key to richness and that perfect soft texture. “Softened” means it should give slightly when you press it, but not be oily or melted. Pro tip: if you forget to take it out, you can quickly soften butter by grating it with a cheese grater!
- ¾ cup brown sugar & ¼ cup granulated sugar: Brown sugar brings moisture and a deep, molasses-like warmth, while granulated sugar helps with spreading and crispness. This combo is cookie perfection.
- 1 large egg: Our binding agent, bringing everything together and adding structure.
- 1 tsp vanilla extract & ½ tsp peppermint extract: Vanilla is the warm, floral backdrop that makes the chocolate sing. The peppermint extract is potent, so a little goes a long way to give us that cool, festive kick without tasting like toothpaste!
- ½ cup chocolate chips: I use semi-sweet to balance the sweetness, but dark chocolate would be divine here too. Feel free to chop up a bar for melty, irregular pockets!
- ¼ cup crushed peppermint candy: The festive finale! I use candy canes or starlight mints for that iconic red-and-white sparkle and satisfying crunch.
Let’s Get Baking: The Step-by-Step Magic
Okay, team! It’s time to turn these beautiful ingredients into cookie magic. Follow these steps, and you’ll be a peppermint pro in no time.
- Preheat and Prep: First things first, preheat your oven to 350°F (175°C). This is non-negotiable for even baking! Line your baking sheets with parchment paper. This little hack prevents sticking and makes cleanup an absolute dream. No parchment? A silicone baking mat works wonders too.
- Whisk the Dry Team: In a medium bowl, grab your whisk and give the flour, cocoa powder, baking soda, and baking powder a good, thorough whisking. We’re not just mixing; we’re aerating the flour and making sure those leaveners are evenly distributed. This is the secret to a consistent, perfectly-risen cookie, so no lazy stirring!
- Cream the Butter & Sugars: In a separate, larger bowl, it’s time to cream together your softened butter, brown sugar, and granulated sugar. Use an electric mixer on medium speed for about 2-3 minutes. You’re done when the mixture turns pale, light, and fluffy. This step is crucial—it incorporates air into the dough, which is what gives our cookies that wonderful texture.
- Incorporate the Wet Ingredients: Beat in the egg, vanilla extract, and that all-important peppermint extract. Mix just until the egg is fully incorporated and the mixture looks smooth. Scrape down the sides of the bowl with a spatula to make sure everything is getting to know each other.
- Combine Wet & Dry: Now, with your mixer on low speed, gradually add the dry ingredients to the wet mixture. I like to add it in two or three batches to avoid a floury kitchen explosion! Mix just until the last streaks of flour disappear. Overmixing at this stage can lead to tough cookies, and we want tender, fudgy goodness.
- The Fun Part: Folding! Switch to a sturdy spatula for this part. Gently fold in the chocolate chips and the crushed peppermint candy. Be sure to save a small handful of the peppermint bits for pressing on top of the dough balls right before baking—this makes them look extra professional and festive!
- Scoop and Place: Using a tablespoon-sized cookie scoop or a regular spoon, portion the dough into balls. Roll them gently between your palms and place them about 2 inches apart on your prepared baking sheets. They need a little room to spread and become the beautiful cookies they’re destined to be.
- Bake to Perfection: Pop those trays into your preheated oven and bake for 9-11 minutes. The cookies are done when the edges look set, but the centers still appear soft, puffy, and slightly underbaked. TRUST ME ON THIS. They will continue to cook on the hot baking sheet. This is the ultimate secret to a chewy, fudgy center.
- The Cool Down: Let the cookies cool on the baking sheet for a full 5 minutes. This allows them to set up properly so they don’t fall apart when you move them. Then, carefully transfer them to a wire rack to cool completely. The wait is the hardest part, I know!
How to Serve These Festive Beauties
Presentation is part of the fun! For a simple, elegant look, I love dusting a few of these cookies with a light snowfall of powdered sugar right before serving. If you’re feeling extra (and I always am), you can drizzle them with a simple peppermint glaze made from powdered sugar, a splash of milk, and a drop of peppermint extract. For the ultimate holiday experience, serve these cookies stacked on a rustic wooden board alongside a big pot of rich hot chocolate or a pot of coffee. They are the absolute star of any cookie swap or holiday party—just be prepared to hand out the recipe!
Mix It Up! Delicious Recipe Variations
Love this recipe? Make it your own! Here are a few of my favorite twists:
- Peppermint Bark Cookies: After the cookies have cooled, drizzle them with melted white chocolate and sprinkle with extra crushed candy canes. It’s like a cookie and peppermint bark had a baby!
- Double Chocolate Mint: Swap the semi-sweet chocolate chips for Andes Mint baking pieces. You get that classic thin-mint flavor in every single bite.
- Gluten-Free Goodness: No problem! Simply replace the all-purpose flour with a 1:1 gluten-free flour blend. I’ve had fantastic results with this swap.
- “Chewy” Peppermint Patty: Right after the cookies come out of the oven, press a unwrapped York Peppermint Pattie miniature into the center of each one. Let it melt slightly into a gooey, amazing surprise.
- Adult-Only Twist: Add a teaspoon of bourbon or creme de menthe to the dough along with the extracts for a sophisticated, boozy kick.
Chef Emily’s Kitchen Notes
Over the years, this recipe has become a staple in my kitchen, and it’s evolved in fun ways. I used to be a strict “mix-in-all-the-candy” person, until one holiday I ran short and had to just press it on top. It was a happy accident—the cookies looked so much prettier and the peppermint flavor was more distinct! My biggest tip? Don’t you dare overbake them. Taking them out when they look a little underdone is the single most important thing you can do for that perfect, fudgy texture. It feels wrong, but it’s so, so right.
Your Cookie Questions, Answered!
Let’s tackle some common questions to ensure your cookie success!
- My cookies spread too much! What happened? This usually means your butter was too warm. Next time, make sure it’s just softened, not melted. Chilling the dough for 30 minutes before baking can also help control spread.
- Can I make the dough ahead of time? Absolutely! You can scoop the dough balls, freeze them on a baking sheet, and then transfer them to a freezer bag. Bake straight from frozen, just adding 1-2 minutes to the baking time. Hello, fresh cookies anytime!
- My cookies are cakey, not chewy. Why? This can happen if you over-measure the flour. The best way to measure flour is to spoon it into your measuring cup and level it off with a knife. Scooping directly from the bag packs in too much flour.
- Can I use just peppermint extract and skip the vanilla? You can, but I don’t recommend it. Vanilla adds a complex, warm background note that enhances both the chocolate and the peppermint. It’s the supporting actor that makes the stars shine brighter!
Chocolate Peppermint Cookies
- Total Time: 35 minutes
- Yield: 24 Cookies 1x
Description
These rich, fudgy chocolate peppermint cookies are everything cozy season dreams are made of. With a double hit of chocolate and a cool peppermint crunch, they’re festive, chewy, and perfect for cookie swaps, dessert trays, or pairing with a cup of cocoa by the fire.
Ingredients
1 cup all-purpose flour
½ cup cocoa powder
½ tsp baking soda
¼ tsp baking powder
½ cup unsalted butter, softened
¾ cup brown sugar
¼ cup granulated sugar
1 egg
1 tsp vanilla extract
½ tsp peppermint extract
½ cup chocolate chips
¼ cup crushed peppermint candy
Instructions
Preheat oven to 350°F (175°C). Line baking sheets with parchment paper.
In a bowl, whisk together flour, cocoa powder, baking soda, and baking powder.
In a separate bowl, cream butter, brown sugar, and granulated sugar until light and fluffy.
Beat in egg, vanilla, and peppermint extract until combined.
Gradually add dry ingredients to wet mixture, mixing until a dough forms.
Fold in chocolate chips and crushed peppermint.
Scoop dough into tablespoon-sized balls and place on baking sheet.
Bake for 9–11 minutes, until edges are set but centers are soft.
Cool on pan for 5 minutes, then transfer to a wire rack to finish cooling.
- Prep Time: 15 minutes
- Cool Time: 10 minutes
- Cook Time: 10 minutes
Nutrition
- Calories: 130 / Cookie
- Sugar: 11g / Cookie
- Fat: 7g / Cookie
- Carbohydrates: 16g / Cookie
- Protein: 1g / Cookie
Nutritional Information (Because Knowledge is Power!)
Okay, let’s be real—we’re not eating holiday cookies for their vitamin content! But I know many of you like to keep track, so here’s a general breakdown. Please note, this is an estimate and can vary based on specific ingredients and portion sizes.
Per Cookie (approx.): Calories: 130 | Fat: 7g | Carbs: 16g | Sugar: 11g | Protein: 1g
My philosophy? It’s all about balance and joy. Enjoy a cookie (or two!) mindfully, savor every single bite, and share the rest with people you love. That’s what good food is all about.
Final Thoughts from My Kitchen to Yours
Well, my friend, we’ve done it! You are now the proud creator of the most festive, delicious, and soul-warming chocolate peppermint cookies on the planet. I hope this recipe brings as much laughter and light to your kitchen as it has to mine. Baking is about so much more than just the final product; it’s about the messy, fun, love-filled process. So whether you’re baking these for a crowd, for a quiet night in, or as a gift for a neighbor, I hope you feel that warmth and joy.
Now, I’d love to hear from you! Did you add your own twist? Have a funny kitchen story? Share it with me in the comments below. Happy baking, and let’s chow down!
— Emily