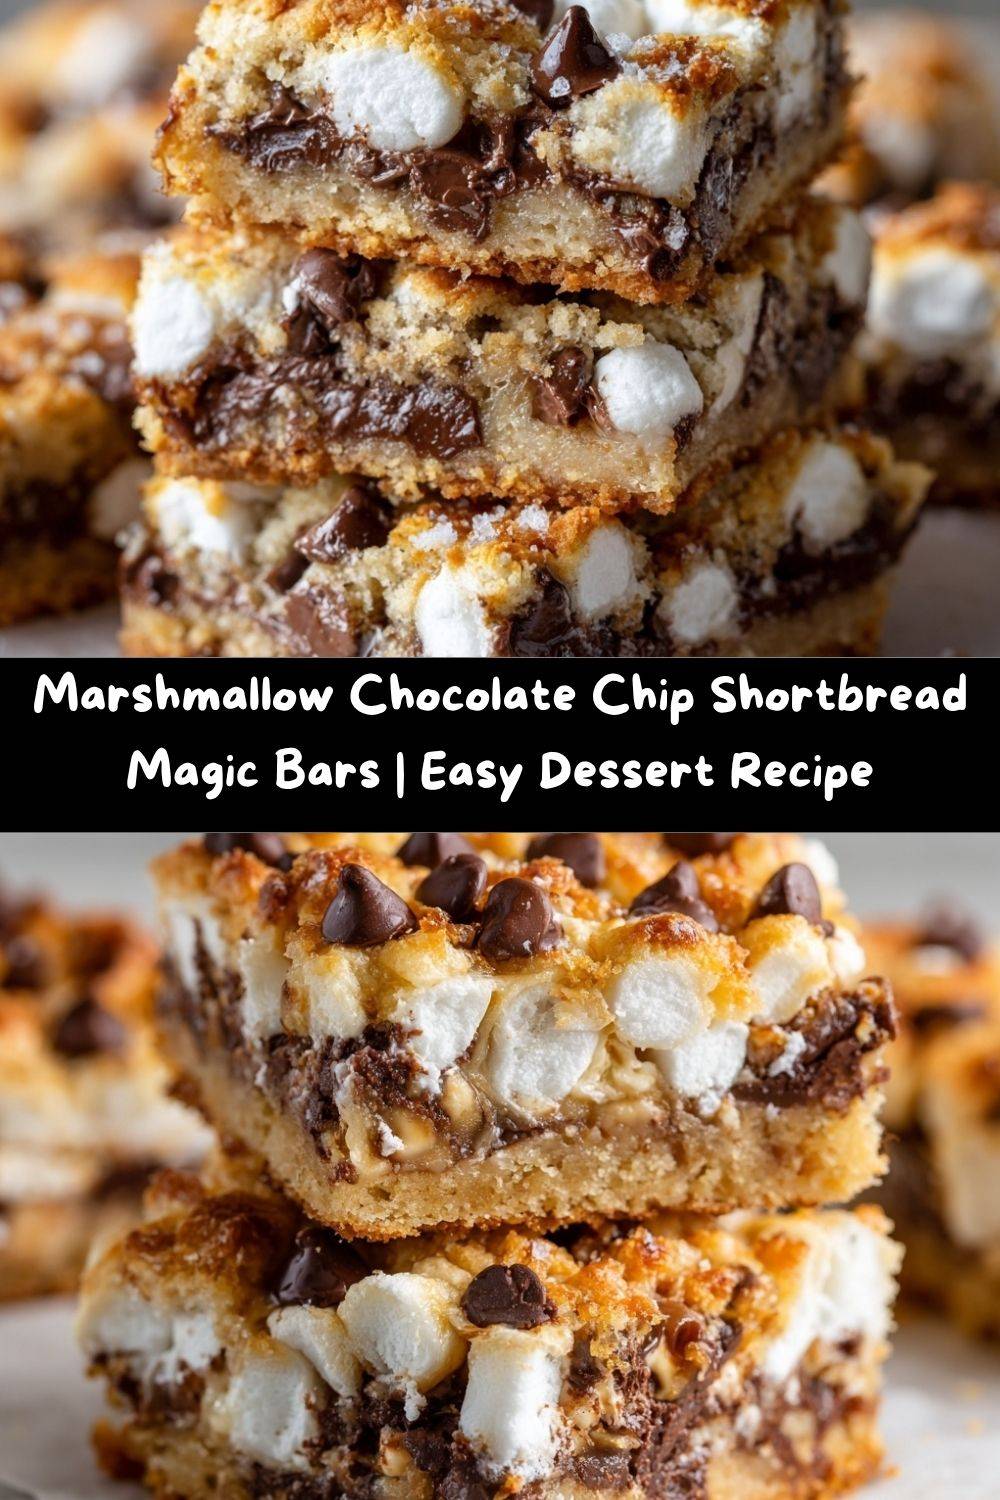
Marshmallow Chocolate Chip Shortbread Magic Bars – Gooey, Buttery Bliss in Every Bite
Hey there, my fellow food lover! Let’s talk about magic. Not the rabbit-out-of-a-hat kind (though that’s pretty cool), but the kind that happens when a few simple, beautiful ingredients get together in a warm oven and transform into something utterly spellbinding. I’m talking about my Marshmallow Chocolate Chip Shortbread Magic Bars, and let me tell you, they are the stuff of dessert legend.
Imagine this: a base so buttery and rich it crumbles in the most perfect shortbread way. Then, a layer of melty, semi-sweet chocolate chips that pool into little pockets of joy. On top of that, fluffy marshmallows are halved and toasted until they’re golden and stretchy. And the secret weapon? A generous drizzle of sweetened condensed milk that weaves it all together into a chewy, caramelized, gooey masterpiece. It’s a textural party in your mouth, and everyone’s invited.
This is the bar cookie you make when you want to be the hero of the bake sale, the PTA meeting, or your own Tuesday night. They’re deceptively easy to whip up, but they taste like you spent hours crafting each layer with love. So, tie on your favorite apron – the one with the flour smudges and the happy memories – and let’s create some kitchen magic together. Your taste buds are about to send you a thank-you note.
The Day I Created a Little Kitchen Magic
This recipe was born from a happy accident, one of those “what if?” moments that makes cooking so much fun. It was a rainy Sunday, the kind that begs for a baking project. My pantry was looking a little sparse, but I had the basics: butter, flour, sugar. I also had a half-bag of marshmallows leftover from a hot cocoa night and a nearly full can of sweetened condensed milk staring me down from the fridge door.
I was craving the buttery snap of my grandma’s classic shortbread, but I also had a powerful need for something gooey and indulgent. As I creamed the butter and sugar, the scent took me right back to her kitchen. But then, my inner rebel took over. “What if we don’t stop at shortbread?” I thought. What if we build on that perfect foundation? I pressed the dough into the pan, and the rest was a whirlwind of chocolate chips, halved marshmallows, and that glorious, sticky-sweet drizzle. When I pulled the golden, bubbling pan from the oven, I knew I had stumbled onto something special. It was the beautiful, delicious lovechild of a Scottish biscuit tin and an American campfire s’more. And it was pure bliss.
Gather Your Ingredients for Gooey Bliss
Here’s your shopping list for happiness! I’ve included a few of my favorite chef-y insights and swaps to make this recipe your own.
- 1 cup (2 sticks) unsalted butter, softened: This is the heart and soul of our shortbread base. Using unsalted butter lets you control the salt level. Chef’s Tip: True “softened” butter should give slightly when you press it but still hold its shape. Don’t let it get oily or melted!
- 1 cup granulated sugar: It creams with the butter to create a light, tender crumb and that classic shortbread sweetness.
- 3 cups all-purpose flour: The structure of our base. For a slightly more tender shortbread, you can swap one cup for cake flour.
- 1 tsp kosher salt: Do not skip this! Salt is the flavor superhero that makes the buttery, sweet notes pop. I prefer kosher salt for its clean taste.
- 4 cups mini chocolate chips (divided): I use mini chips because they distribute more evenly than large ones, ensuring every single bite is chocolaty. We’ll use 3 cups for the main layer and save 1 cup for the top. Substitution Idea: Feel free to use dark chocolate, milk chocolate, or even a mix!
- 1 cup sweetened condensed milk: This is the “magic” glue! It caramelizes as it bakes, binding everything together and adding a rich, creamy sweetness. You’ll have a little left in the can—chef’s treat!
- 20 large marshmallows, halved: Halving them creates more surface area for toasting and gives you that beautiful, gooey pull. Kitchen shears sprayed with a little cooking spray make this job a breeze!
Let’s Bake! Your Step-by-Step Guide to Magic
Ready? Let’s do this! I’ll walk you through each step so you feel like a confident baking boss.
- Preheat and Prep: First things first, fire up your oven to 350°F (175°C). Now, grab an 11×7-inch or a 9×13-inch baking dish. I’m using an 11×7 today for slightly thicker bars, but a 9×13 will give you more, slightly thinner bars—both are fantastic! Lightly grease the dish or, for the ultimate easy cleanup, line it with parchment paper with a little overhang on the sides. This creates a sling that will let you lift the entire block of bars out for pristine slicing later. Chef’s Hack: A light spritz of cooking spray under the parchment helps it stick to the pan and stay put while you press in the dough.
- Create the Shortbread Foundation: In a large mixing bowl, cream together the softened butter and granulated sugar. Use a hand mixer or a stand mixer with the paddle attachment on medium speed until the mixture is pale, light, and fluffy. This should take about 2-3 minutes. This step is crucial—it incorporates air, which gives us a tender base, not a dense one. Now, add the flour and kosher salt. Mix on low speed until the dough just comes together and looks crumbly, like coarse sand. Don’t overmix! We want a shortbread texture, not bread dough.
- Press and Pre-Bake: Dump the crumbly dough into your prepared pan. Using your fingers, the bottom of a measuring cup, or a flat glass, press the dough firmly and evenly into the bottom of the pan. Really compact it! This ensures a solid base that won’t fall apart. Pop it into the preheated oven and bake for 15-18 minutes, or until the edges are just barely starting to turn a light golden brown. It will smell incredible.
- Layer the Magic: As soon as you pull the hot crust from the oven, it’s time to move quickly! Immediately sprinkle 3 cups of the mini chocolate chips evenly over the surface. The heat from the crust will start melting them—this is a good thing! Next, neatly (or artfully messily!) arrange your halved marshmallows, cut-side down, over the chocolate chip layer. Now, take your can of sweetened condensed milk and slowly, artfully drizzle it all over the marshmallows and chocolate. Try to get it in the nooks and crannies!
- Top and Finish Baking: Sprinkle the remaining 1 cup of chocolate chips over the top. This gives us those perfect, unmelted chocolate bits in the final product. Carefully place the pan back in the oven and bake for another 20-22 minutes. You’re looking for the marshmallows to be puffy and a beautiful toasty golden brown, and the condensed milk should be bubbly all over.
- The Hardest Part: The Cool Down: I know, I know. The smell is intoxicating, and you want to dive in face-first. But trust me on this! You MUST let the pan cool completely on a wire rack. I’m talking a few hours, or even pop it in the fridge to speed things up. This allows all the molten sugar and chocolate to set, so when you slice them, you get clean, beautiful bars and not a gooey (albeit delicious) puddle. If you simply cannot wait, you can scoop it out warm with a spoon over ice cream—no judgment here!
How to Serve Your Masterpiece
Once your magic bars are completely cool, use the parchment paper sling to lift the entire block onto a cutting board. Use a sharp knife to slice them into squares or bars. For super clean cuts, I sometimes wipe my knife blade clean between slices.
These bars are a star all on their own, nestled on a pretty plate for a party platter. But let’s get creative! For an over-the-top dessert, place a warm bar in a bowl and top it with a scoop of high-quality vanilla bean ice cream. The contrast of cold ice cream and the rich, chewy bar is a revelation. They’re also the perfect companion to a tall glass of cold milk or a hot cup of coffee to balance the sweetness. Package them in cute cellophane bags tied with a ribbon for the most beloved food gift of all time.
Make It Your Own: Delicious Recipe Variations
The beauty of this recipe is its versatility. Once you’ve mastered the classic, feel free to play with the flavors!
- The Salty-Sweet Dream: Right when the bars come out of the oven, sprinkle the top with a flaky sea salt, like Maldon. The salty flakes are a stunning contrast to the sweet, gooey marshmallow.
- Chip Swap: Swap out half (or all!) of the chocolate chips for butterscotch chips, white chocolate chips, or even peanut butter chips. A mix of semi-sweet and white chocolate is particularly gorgeous.
- Nutty for Crunch: Add ½ to 1 cup of chopped toasted pecans or walnuts to the layer with the chocolate chips. The nutty crunch takes the texture to a whole new level.
- S’mores Remix: Crush up a cup of graham crackers and mix it right into the shortbread base with the flour. You’ve just created the ultimate S’mores Magic Bar!
- Festive Twist: For the holidays, use red and green M&M’s or holiday sprinkles on top along with the final handful of chocolate chips.
Chef Emily’s Kitchen Notes
This recipe has evolved in my kitchen over the years. The first time I made it, I used a whole bag of mini marshmallows instead of halved large ones. It was delicious, but it created a solid, impenetrable marshmallow layer that was almost too chewy! The halved large marshmallows give you those perfect pockets of gooeyness without being overwhelming. Another funny fail: I once tried to speed up the cooling process by putting the hot pan directly on my cold granite countertop. The temperature shock made a loud *CRACK*—the pan was fine, but my heart skipped a beat! Always use a wire rack, friends. It lets air circulate and prevents any kitchen drama.
FAQs & Troubleshooting: Your Questions, Answered!
Q: My marshmallows are browning too fast/burning! What do I do?
A: Ovens can be sneaky with their hot spots! If you see the marshmallows getting too dark too quickly, simply lay a loose piece of aluminum foil over the top of the pan for the remainder of the baking time. This will shield them from direct heat while the rest of the bar finishes cooking.
Q: Can I make these bars ahead of time?
A: Absolutely! Once completely cooled, store them in an airtight container at room temperature for up to 3 days. For longer storage, you can refrigerate them for up to a week, or even freeze them for up to 3 months. Let them come to room temp or warm them slightly before serving for the best texture.
Q: My shortbread base seems too crumbly and won’t hold together. What happened?
A: This usually means the dough wasn’t pressed firmly enough into the pan. You really need to compact it well during that step. Also, make sure you’re accurately measuring your flour. The “scoop and level” method is best—fluff your flour, spoon it into the measuring cup, and level it off with a knife. Scooping directly with the cup can pack in too much flour, leading to a dry, crumbly base.
Q: Can I use a different size pan?
A> You can! A 9×13-inch pan will yield more, slightly thinner bars, so you may need to reduce the final baking time by a few minutes. Keep a close eye on them. An 8×8 or 9×9 pan will make very thick bars, and you’ll likely need to increase the baking time. The key is that the shortbread base should be lightly golden before you add the toppings.
Nutritional Info (Because Balance is Beautiful!)
Okay, let’s be real: we’re not making magic bars for their kale content. These are a treat, through and through! But I believe in enjoying every single bite mindfully and without guilt. The following is an approximate nutritional breakdown per bar (assuming 24 bars from an 11×7 pan).
- Calories: ~300
- Fat: 17g
- Carbohydrates: 35g
- Sugars: 24g
- Protein: 3g
Remember, food is about joy, connection, and celebration. Savor one of these bars with your afternoon tea, share them with neighbors, or enjoy a small piece after a long day. It’s all part of a life well-lived and well-fed!
Final Thoughts from My Kitchen to Yours
Well, my friend, we’ve reached the end of our magical baking journey. I hope you feel inspired, empowered, and maybe a little bit hungry. This recipe is a testament to the fact that the most beloved dishes often come from a place of playfulness and a willingness to experiment.
I truly believe that sharing food baked with love is one of the simplest and most powerful ways to connect. So, bake a batch of these Marshmallow Chocolate Chip Shortbread Magic Bars. Share them. Watch faces light up. That’s the real magic right there.
— Emily