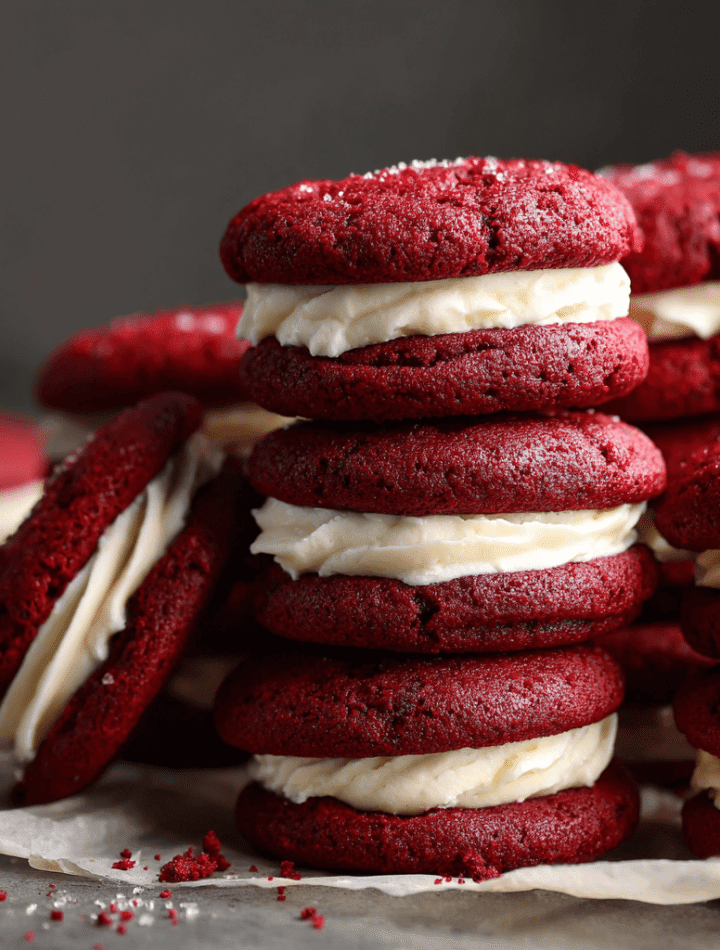
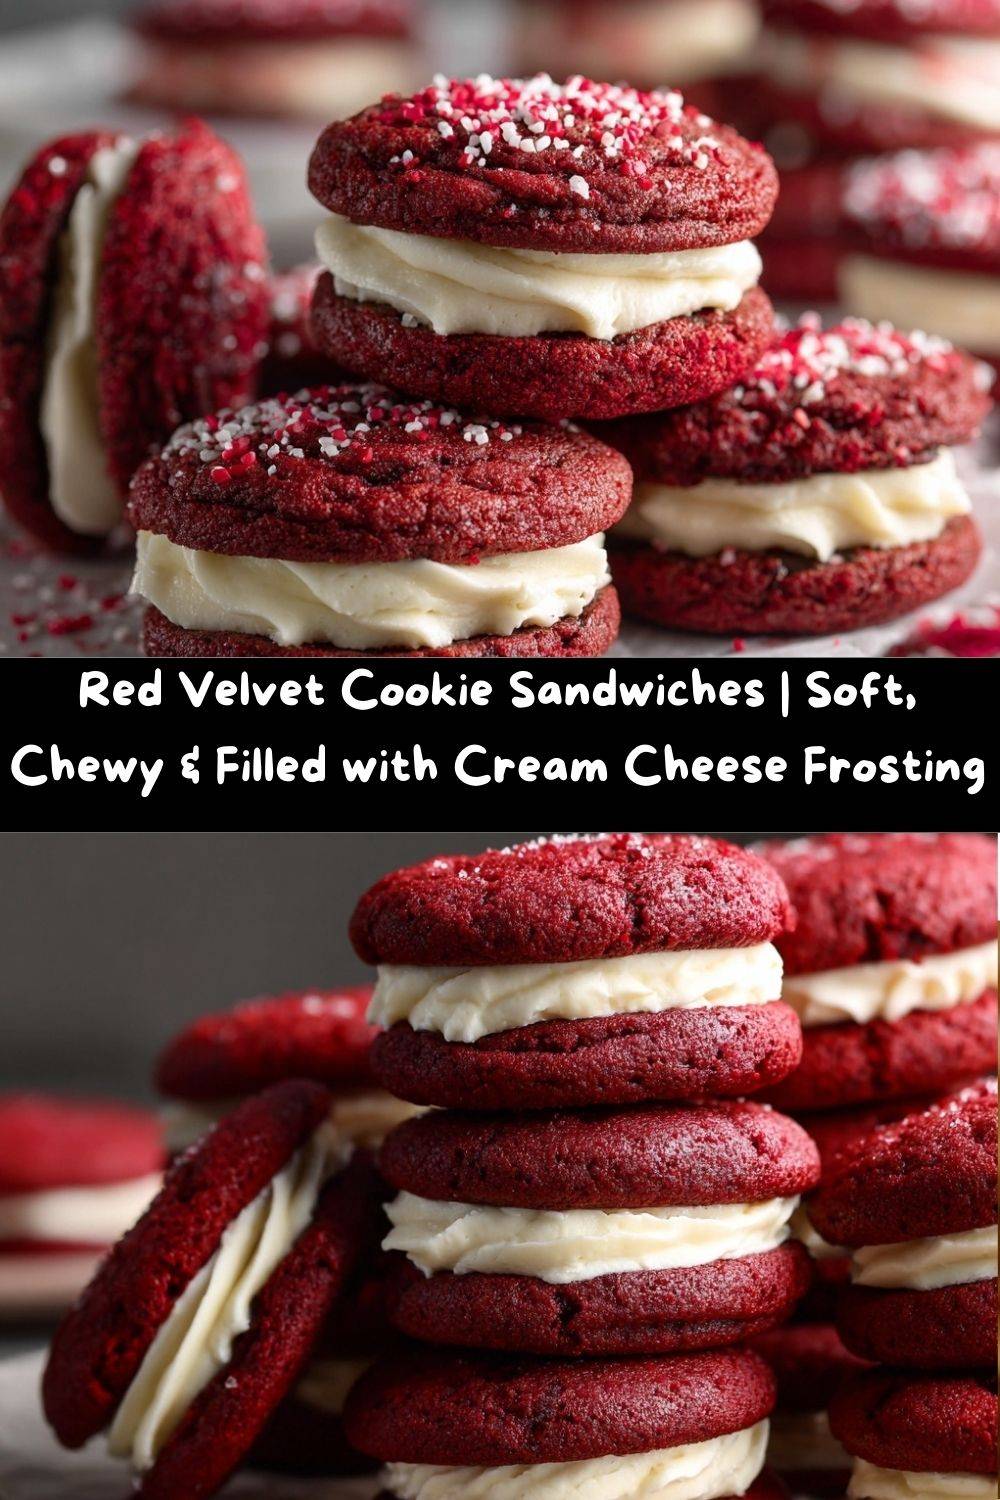
Red Velvet Cookie Sandwiches: Your New Favorite Indulgence
Hey there, friend! Come on in, pull up a stool, and let’s talk about one of life’s greatest joys: the perfect cookie. And not just any cookie, but a cookie that’s been dressed up for a party, hugged by its best friend, and transformed into a handheld slice of pure bliss. I’m talking, of course, about these stunning Red Velvet Cookie Sandwiches.
If you’ve ever sunk your teeth into a soft, chewy red velvet cupcake and thought, “I wish I could take this with me everywhere,” then you, my friend, are in for the treat of a lifetime. We’re taking that iconic, slightly chocolatey, brilliantly red flavor and packing it into a perfectly portable cookie form. And the pièce de résistance? A generous, tangy, swoon-worthy cream cheese frosting filling that holds it all together.
I know some folks think red velvet is just a chocolate cookie in a fancy red dress, but oh, it is so much more. It’s a specific, delicate flavor born from the magic of buttermilk and a touch of cocoa, and when you pair it with that signature cream cheese tang… well, it’s a match made in dessert heaven. These cookie sandwiches are not just a dessert; they’re a conversation starter, a smile-maker, and the star of any bake sale, holiday party, or “I-made-it-through-Monday” celebration. So, tie on your favorite apron (the one with the stains that tell a story), and let’s bake up some magic together!
The Cookie That Started It All: A Messy, Beautiful Memory
My love affair with red velvet started long before culinary school, in my Grandma Mae’s kitchen. She was a wizard with a whisk and believed firmly that the color red made any dessert taste 50% better. One sweltering summer afternoon, she decided we were going to tackle a towering Red Velvet Layer Cake for the church picnic.
I was her official “color mixer,” tasked with stirring in the bottle of vibrant red food coloring. Let’s just say my enthusiasm got the better of me. A little slip of the wrist, and suddenly my hands, the counter, and our white kitchen cat, Mittens (don’t worry, he was fine!), were sporting a lovely shade of crimson. Instead of being upset, Grandma just threw her head back and laughed, her cackle filling the whole house. We ended up with a slightly pink-tinged cake thanks to the remaining coloring, but it was the most delicious, love-filled cake I’ve ever had. Every time I mix that red gel into a bowl of batter, I think of her, that messy kitchen, and the powerful lesson that the best recipes are the ones you make with joy, even when they’re a little imperfect.
Gathering Your Cookie Crew: The Ingredients
Before we get creaming and mixing, let’s get familiar with our team players. Using the right ingredients, and understanding why we use them, is the first secret to bakery-worthy cookies at home!
For the Red Velvet Cookies:
- 1½ cups all-purpose flour: The trusty foundation of our cookie. It gives structure without making them tough. For a slightly more tender cookie, you can swap in ½ cup cake flour, but all-purpose works beautifully.
- ¼ cup unsweetened cocoa powder: This is the secret to true red velvet flavor! We use just enough for a hint of chocolatey depth, not an overwhelming cocoa punch. I prefer natural cocoa powder for its slightly more acidic tang.
- 1 tsp baking soda: Our leavening agent! It helps the cookies puff up and achieve that perfect, soft, and chewy texture.
- ¼ tsp salt: Don’t you dare skip this! Salt is the flavor enhancer that makes all the sweet, chocolatey notes pop. It’s the quiet hero of any good dessert.
- ½ cup unsalted butter, room temperature: The key to richness and that dreamy, soft chew. “Room temperature” is crucial here—it should be soft enough that you can leave an indent with your finger, but not melted or greasy. This allows it to cream perfectly with the sugar.
- ¾ cup granulated sugar: For sweetness and that lovely, slightly crisp edge. It also helps create a tender crumb.
- 1 large egg + 1 large egg yolk: The whole egg provides structure, while the extra yolk is my little chef hack for an ultra-rich, fudgy, and chewy texture. It’s a game-changer!
- 2 tbsp buttermilk: This is non-negotiable for authentic red velvet flavor! The acidity reacts with the cocoa and baking soda, giving the cookie its distinct, subtle tang and keeping it incredibly moist. No buttermilk? No problem! Make a quick substitute by adding ½ tsp of white vinegar or lemon juice to 2 tbsp of regular milk and let it sit for 5 minutes.
- 1 tsp vanilla extract: The aromatic backbone that rounds out all the flavors. Use the good stuff if you have it!
- 1–2 tsp red gel food coloring: Gel food coloring is my strong recommendation! It’s highly concentrated, so you get a vibrant, bold red color without adding extra liquid to the dough, which can throw off the texture. Liquid coloring can make your cookies cakey.
For the Cream Cheese Frosting:
- 8 oz cream cheese, softened: The star of the show! Use full-fat brick-style cream cheese for the best, sturdiest frosting. The tub kind is too soft and can lead to a runny filling.
- ¼ cup unsalted butter, softened: Butter adds structure and a lovely richness to the frosting, balancing the tang of the cream cheese.
- 2 cups powdered sugar, sifted: Sifting is a non-negotiable step for a silky-smooth, lump-free frosting. It incorporates air and makes whipping a dream.
- 1 tsp vanilla extract: A little extra vanilla in the frosting makes it simply irresistible.
- Pinch of salt: Again, this little pinch cuts the sweetness and makes the frosting taste more complex.
Let’s Get Baking: The Step-by-Step Magic
Alright, team! Now for the fun part. Follow these steps, and you’ll be a red velvet cookie sandwich pro in no time. I’ve packed each step with my favorite kitchen hacks to ensure your success.
- Preheat and Prep: Fire up your oven to 350°F (175°C). This gives it plenty of time to reach the perfect, consistent temperature. Line your baking sheets with parchment paper. This is my #1 trick for perfectly golden bottoms and no-stick cleanup. Silicone mats work great, too!
- Combine the Dry Team: In a medium bowl, grab your whisk and give the flour, cocoa powder, baking soda, and salt a good, thorough whisking. We’re not just mixing here; we’re aerating the flour and making sure the leavening is evenly distributed. This prevents those weird bitter pockets of baking soda and ensures every cookie bakes up uniformly. Set this bowl aside.
- Creaming is Key: In a larger mixing bowl, use an electric hand mixer or stand mixer fitted with the paddle attachment to beat the softened butter and granulated sugar together. Now, don’t rush this! Beat on medium-high speed for a good 2-3 minutes, until the mixture becomes pale, fluffy, and wonderfully light. This step incorporates air, which is essential for that perfect cookie texture.
- Incorporate the Wet Ingredients: Scrape down the sides of the bowl with a spatula. Add the whole egg, then the extra egg yolk, the buttermilk, vanilla extract, and your desired amount of red gel coloring. Mix on medium until everything is fully combined and you have a gloriously vibrant red batter. It might look a little curdled at this point—that’s totally normal, don’t panic!
- Bringing It All Together: With your mixer on low speed, gradually add the dry ingredient mixture to the wet ingredients. Mix until *just* combined and no dry streaks of flour remain. Pro-Tip: Overmixing at this stage is the enemy of a tender cookie! It develops the gluten in the flour and can make them tough.
- The Chill Factor (Optional but Recommended): If your dough feels very soft or sticky, cover the bowl and pop it in the fridge for 15-30 minutes. This firms up the butter slightly, preventing the cookies from spreading too much in the oven. It’s especially helpful on a warm day!
- Scoop and Space: Using a cookie scoop or a tablespoon, portion out about 1½ tablespoons of dough per cookie. Roll them into smooth balls and place them on your prepared baking sheets, leaving about 2 inches between each one. They need their personal space to spread and become the beautiful, round cookies we know they can be!
- Bake to Perfection: Bake for 9-11 minutes. Now, here’s the most important tip I can give you: DO NOT OVERBAKE. The cookies will look soft in the center and just set around the edges. They might even seem a little underdone, but that’s exactly what we want! They will continue to cook on the hot baking sheet as they cool. This is the secret to that dreamy, soft, and chewy texture.
- The Cool Down: Let the cookies cool on the baking sheet for a full 5 minutes. This allows them to set up enough to handle. Then, carefully transfer them to a wire rack to cool completely. Patience is a virtue here—if you try to frost warm cookies, the frosting will melt into a delicious but messy puddle.
- Whip Up the Frosting: While the cookies cool, make the frosting. In a clean bowl, beat the softened cream cheese and butter together until completely smooth and lump-free. Gradually add the sifted powdered sugar, vanilla, and salt, starting on low speed so you don’t get a sugar dust cloud, then increasing to high. Beat for 2-3 minutes until it’s light, fluffy, and wonderfully spreadable.
- The Grand Finale: Assembly! Once the cookies are completely cool, it’s time to create the sandwiches! You can spread the frosting with a knife or offset spatula, or for a fancier look, pipe it using a piping bag with a round or star tip. Place a generous dollop of frosting on the flat side of half the cookies, then gently press a second cookie on top to form a sandwich.
How to Serve These Show-Stopping Sandwiches
Presentation is part of the fun! These cookies are already a visual delight, but a little extra flair never hurt anybody.
For a classic look, simply arrange them on a beautiful cake stand or platter. The vibrant red peeking out from the white filling is stunning all on its own. If you’re feeling fancy, you can roll the exposed edges of the frosting in mini chocolate chips, sprinkles, or even crushed pecans for a little extra crunch and visual pop.
These are the ultimate party dessert, perfect for Valentine’s Day, Christmas, birthdays, or a bake sale that will have everyone talking. Pair them with a tall glass of cold milk, a hot cup of coffee to cut the sweetness, or even a scoop of vanilla bean ice cream on the side for the ultimate indulgence. Trust me, your guests will be swooning!
Mix It Up! Fun Recipe Variations
One of the best things about this recipe is how adaptable it is! Feel free to get creative and make it your own.
- Chocolate Lover’s Dream: Add ½ cup of mini chocolate chips or white chocolate chips to the cookie dough for an extra burst of chocolate in every bite.
- Peppermint Twist: Perfect for the holidays! Add ½ teaspoon of peppermint extract to the frosting instead of vanilla, and roll the edges in crushed candy canes.
- “Funfetti” Celebration: Fold ¼ cup of rainbow sprinkles into the cookie dough along with the dry ingredients. It’s a party in a cookie!
- Gluten-Free Goodness: You can easily make these gluten-free by using a 1:1 gluten-free all-purpose flour blend. I’ve had great success with brands like Bob’s Red Mill or King Arthur.
- Zesty Lemon Cream Cheese: For a brighter, tangier twist, add the zest of one lemon to the cream cheese frosting. The lemon and red velvet are a surprisingly fantastic duo!
Chef Emily’s Corner: Notes from My Kitchen
This recipe has been a labor of love in my kitchen for years. I’ve found that using gel food coloring truly makes all the difference in achieving that classic, bold red without sacrificing texture. And that extra egg yolk? That was a happy accident one day when I cracked an egg a little too hard and decided to just roll with it. The result was so much chewier and more decadent that I wrote it into the recipe permanently!
Remember, baking is about joy, not perfection. So what if your cookies aren’t all exactly the same size? It just adds to their homemade charm. The most important ingredient is always the love you stir into the bowl.
Your Questions, Answered!
Let’s tackle some common questions to make sure your cookie sandwich journey is smooth sailing.
Q: My cookies spread too much. What happened?
A: This is usually a temperature issue! The most common culprits are butter that was too soft/melted or a dough that needed a quick chill. Next time, make sure your butter is just softened (not greasy) and don’t skip the 15-minute chill if your kitchen is warm. Also, double-check that your baking soda is fresh!
Q: Can I make these ahead of time?
A: Absolutely! You can bake the cookies and let them cool completely, then store them in an airtight container at room temperature for up to 2 days, or freeze them for up to 3 months. The frosting can be made ahead and stored in the fridge for up to 5 days. Let it come to room temperature and re-whip it before using. I recommend assembling the sandwiches the day you plan to serve them for the best texture.
Q: My frosting is too runny. How can I fix it?
A: Runny frosting is almost always due to the cream cheese and butter being too soft. Pop the whole bowl of frosting into the fridge for 20-30 minutes to firm up, then whip it again. You can also add a little more sifted powdered sugar, a tablespoon at a time, until it reaches your desired consistency.
Q: Can I use a natural food coloring?
A> You can certainly try! Natural colorings from beets or pitaya can work, but they tend to be less concentrated and may impart a slight flavor. You’ll likely need to use more, which can add extra liquid, and the color will be more of a pink or burgundy shade and may fade slightly during baking.
Red Velvet Cookie Sandwiches with Cream Cheese Frosting : Soft Chewy Cookies with Tangy Filling
- Total Time: 30 minutes
- Yield: 12 cookie sandwiches 1x
Description
These red velvet cookie sandwiches are the perfect balance of rich, chewy cookies and silky cream cheese frosting. With their vibrant red hue and sweet, tangy center, they’re an eye-catching addition to any dessert tray. Whether for a special occasion or a weekday indulgence, these treats deliver a delightful bite every time.
Ingredients
1½ cups all-purpose flour
¼ cup unsweetened cocoa powder
1 tsp baking soda
¼ tsp salt
½ cup unsalted butter, room temperature
¾ cup granulated sugar
1 large egg + 1 large egg yolk
2 tbsp buttermilk
1 tsp vanilla extract
1–2 tsp red gel food coloring
For the cream cheese frosting:
8 oz cream cheese, softened
¼ cup unsalted butter, softened
2 cups powdered sugar, sifted
1 tsp vanilla extract
Pinch of salt
Instructions
Preheat oven to 350°F (175°C). Line baking sheets with parchment paper.
In a bowl, whisk flour, cocoa, baking soda, and salt.
In another bowl, cream butter and sugar until fluffy. Add egg, yolk, buttermilk, vanilla, and red food coloring. Mix well.
Gradually add dry ingredients to wet, mix until just combined. Chill dough 15–30 minutes if soft.
Scoop dough (1½ tbsp portions) onto baking sheets, 2 inches apart.
Bake 9–11 minutes until set at edges but soft in the center. Cool on sheets for 5 minutes, then transfer to a wire rack.
Beat cream cheese and butter until smooth. Add powdered sugar, vanilla, and salt. Beat until fluffy.
Spread or pipe frosting onto half the cookies, sandwich with remaining cookies.
Chill 30 minutes before serving for best results.
- Prep Time: 20 minutes
- Cook Time: 10 minutes
Nutrition
- Calories: 315 / Cookie
- Sugar: 27g / Cookie
- Fat: 16g / Cookie
- Carbohydrates: 40g / Cookie
- Protein: 3g / Cookie
Nutritional Information
I believe in indulgence, but I also believe in being informed! Here’s a general breakdown per cookie sandwich (assuming 12 sandwiches). Remember, these are estimates and can vary based on specific ingredients used.
- Calories: ~315
- Fat: ~16g
- Carbohydrates: ~40g
- Sugars: ~27g
- Protein: ~3g
These are a treat, through and through! To balance things out a bit, you can always make smaller sandwiches, lighten up the frosting by using a bit less sugar, or enjoy them alongside something fresh like berries to brighten the plate. But honestly? These are meant to be savored. Share one with a friend, tuck one into a lunchbox, or enjoy one slowly with a cup of coffee on a quiet afternoon. Food should bring joy, and these little red velvet beauties deliver it in every single bite.
So go ahead — indulge, delight, and enjoy every crumb. You’ve earned it!