Strawberry Shortcake Biscuit Sandwiches – Fluffy, Juicy, and Summer-Ready
Hey, friend! Can you smell that? It’s the sweet, sun-warmed scent of ripe strawberries and the buttery, toasty promise of freshly baked biscuits. That, my fellow foodie, is the official aroma of summer in my kitchen, and today, we’re bottling it up into the most delightful dessert you can eat with your hands: Strawberry Shortcake Biscuit Sandwiches.
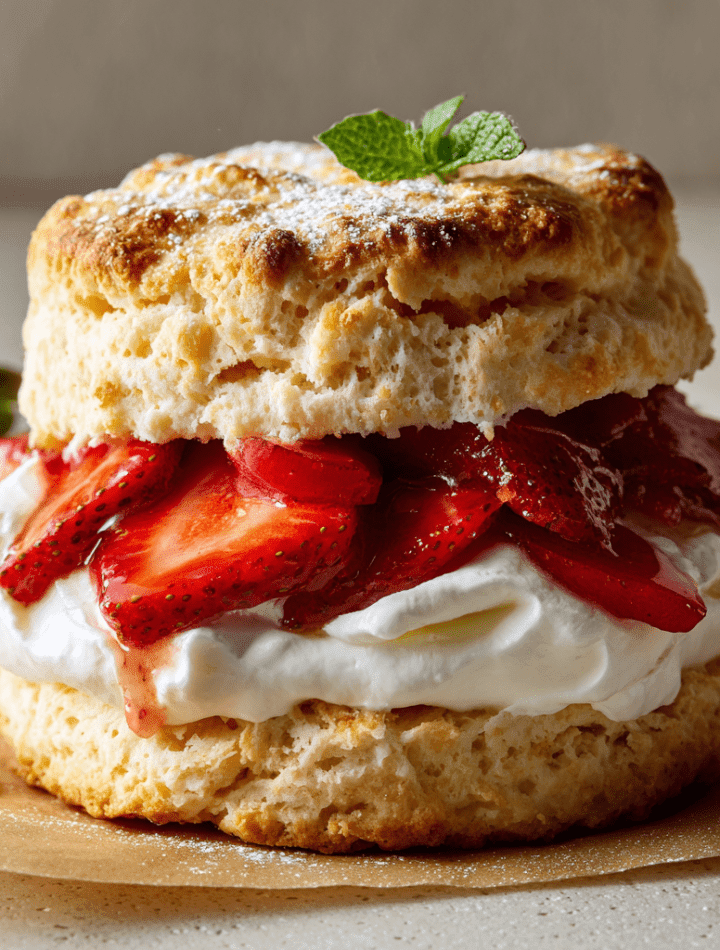
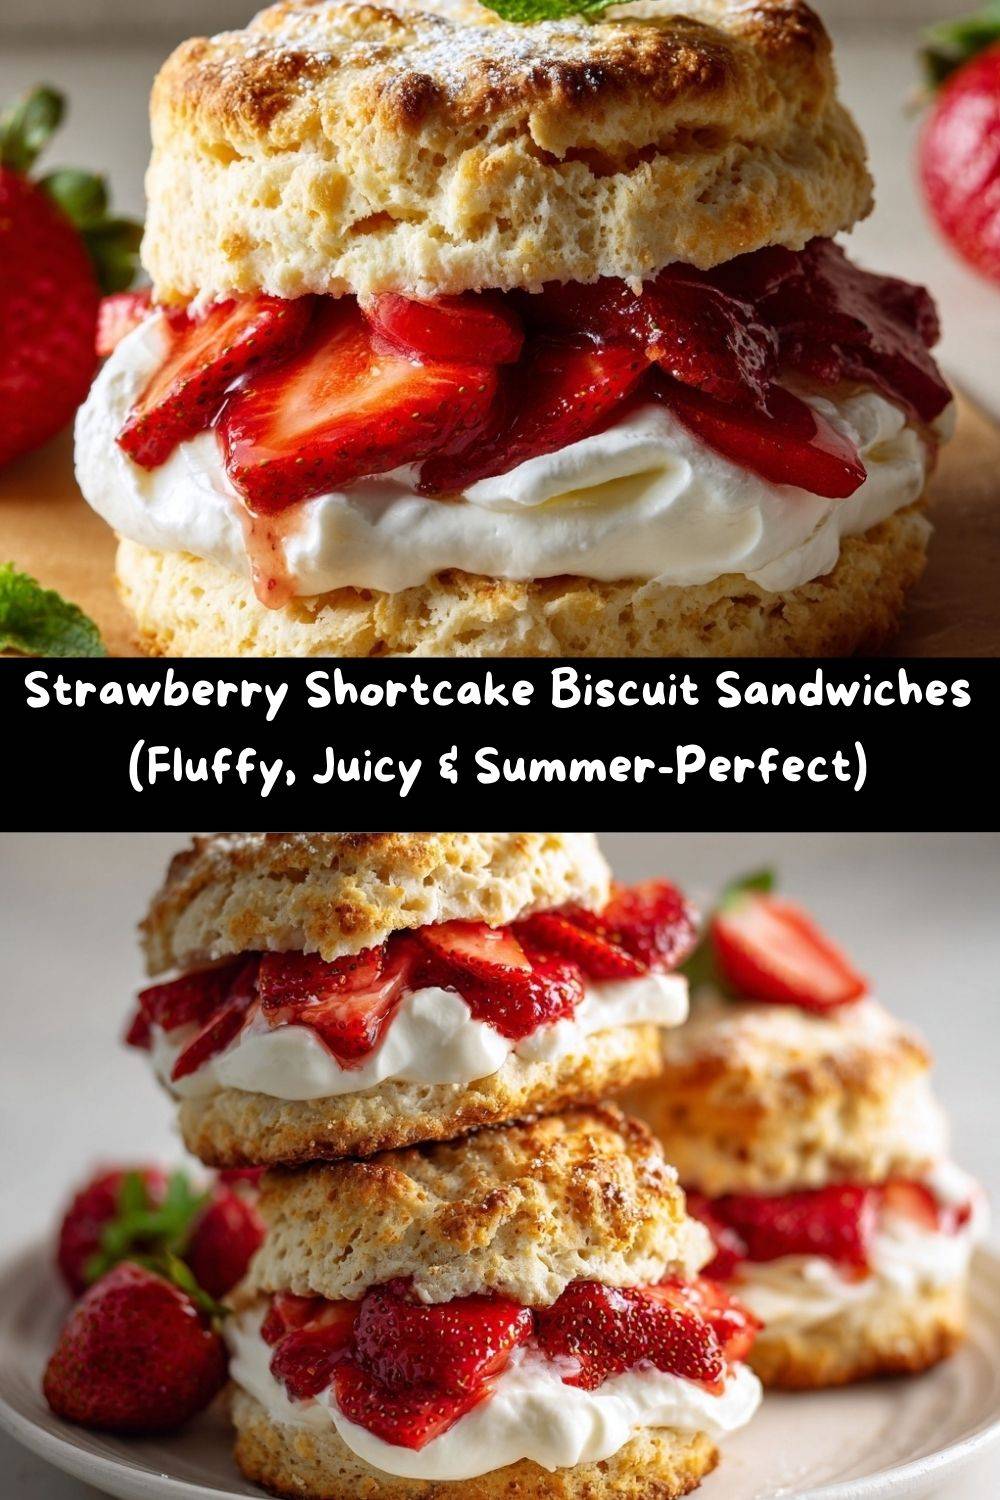
This isn’t just any strawberry shortcake. We’re taking the classic and giving it a fun, portable, downright irresistible upgrade. Imagine: impossibly flaky, tender biscuits, baked until golden and just begging to be split open. Inside, we’re piling on clouds of vanilla-speckled whipped cream and a tumble of juicy, macerated strawberries that taste like pure summer sunshine. Every bite is a perfect harmony of textures—crispy, soft, creamy, and juicy—all in one handheld package.
This recipe is my love letter to peak berry season, to lazy backyard afternoons, and to desserts that feel special without being fussy. Whether you’re hosting a brunch, heading to a picnic, or just treating yourself after a long day, these biscuit sandwiches are the answer. They come together with simple, honest ingredients and a few chef-approved tricks that guarantee bakery-level results. So, tie on your favorite apron (the messy one is always the best), and let’s bake up some pure, unadulterated joy.
My Grandma’s Wooden Spoon and the First Taste of Summer
My obsession with strawberry shortcake started before I could even see over the kitchen counter. My grandma, the original flavor wizard in my life, would make it every single year when the local strawberry stand opened its red-and-white striped awning. For her, it was never about fancy sponge cake; it was always, always about the biscuits.
I can still see her hands, dusted with flour, working cold butter into the dough with her trusty wooden spoon. She’d never own a pastry cutter. “Your hands and a good spoon are all the tools you need,” she’d say with a wink. The magic wasn’t just in the eating (though, trust me, that was magic). It was in the ritual. The waiting for the biscuits to turn golden in her old oven, the gentle squish of slicing the strawberries, the soft *whirr-whirr-whirr* of her hand mixer making the whipped cream.
That first bite was my official welcome to summer. It was messy, it was sweet, and it was served with a whole lot of love. This recipe is my modern nod to her. I’ve tweaked it here and there (a little more sugar in the biscuit, my secret buttermilk trick), but the soul of it—the flaky layers, the juicy berries, the celebration of simple things—that’s all Grandma. Every time I make these, I feel that same rush of summer excitement, and I hope they create a delicious little memory for you, too.
Gathering Your Sunshine Ingredients
Great recipes start with great ingredients. Here’s everything you’ll need to build these heavenly sandwiches. I’ve added my little chef notes to explain the “why” behind each one and give you easy swaps!
For the Flaky, Buttery Biscuits:
- 2 cups (250g) all-purpose flour: The sturdy foundation. It gives our biscuits structure. For a slightly more tender crumb, you can swap in 1/2 cup of cake flour, but all-purpose works beautifully.
- 1 tablespoon baking powder: Our primary leavening agent! This is what gives the biscuits their lift and airy interior. Make sure yours is fresh for the best rise.
- ¼ teaspoon baking soda: Baking soda’s best friend. It reacts with the acid in the buttermilk, creating extra bubbles for tenderness.
- ½ teaspoon salt: Never skip the salt in baking. It balances the sweetness and enhances all the other flavors, making the berries taste berrier and the cream taste creamier.
- 2 tablespoons granulated sugar: Just a touch! It helps with browning and adds a subtle sweetness that makes the biscuit a perfect partner for the filling.
- ½ cup (1 stick / 113g) cold unsalted butter, cubed: THE SECRET TO FLAKY LAYERS. It must be cold. When cold butter hits the hot oven, it steams, creating pockets that become those irresistible, shattering flakes. I pop my cubed butter in the freezer for 10 minutes before starting.
- ¾ cup cold buttermilk: The tangy hero. Buttermilk tenderizes the gluten and activates the baking soda. Chef’s Hack: No buttermilk? Mix ¾ cup regular milk with 2 teaspoons of white vinegar or lemon juice. Let it sit for 5 minutes until it curdles. Good as gold!
For the Dreamy Filling:
- 1 ½ cups sliced fresh strawberries: The star of the show! Look for berries that are fragrant and bright red. Don’t use frozen here—they’ll be too watery.
- 1 tablespoon granulated sugar (optional): This is for macerating. It draws out the strawberries’ natural juices, creating a light, syupy sauce. It’s optional if your berries are perfectly sweet, but I almost always do it.
- 1 cup heavy cream (or heavy whipping cream): Must be cold for maximum volume. This is going to become our pillowy cloud.
- 1 tablespoon powdered sugar: Sweetens and stabilizes the whipped cream ever so slightly. Granulated sugar can make it gritty.
- ½ teaspoon pure vanilla extract: The flavor fairy. It adds a warm, aromatic depth that takes whipped cream from “good” to “where has this been all my life?”
Let’s Build Some Edible Sunshine: Step-by-Step
Ready to make some magic? Follow these steps, and don’t worry about perfection. Baking is about feeling, and I’m right here with you!
Step 1: Preheat & Prep. Crank your oven to 425°F (220°C). This high heat is key for that explosive rise and golden top. Line a baking sheet with parchment paper. No greasing needed—the butter in the dough has got us covered.
Step 2: Mix the Dry Team. In a large bowl, whisk together your flour, baking powder, baking soda, salt, and sugar. Give it a good whisk for at least 30 seconds. This isn’t just mixing; it’s aerating the flour and making sure our leaveners are evenly distributed. No one wants a baking powder pocket!
Step 3: Work in the Cold Butter. Scatter your ice-cold butter cubes over the flour mixture. Now, we’re going to “cut it in.” You can use a pastry cutter, two forks, or my favorite quick hack: coarse-grate the frozen butter straight into the flour! Toss the butter shavings in the flour. Then, use your fingertips to quickly smash each piece of butter into flat little shards. Stop when the mixture looks like coarse crumbs with some pea-sized bits of butter remaining. Those visible butter bits = future flaky layers. Pro Tip: If your hands are warm, rinse them under cold water first!
Step 4: Bring It Together with Buttermilk. Make a well in the center of your crumbly mixture and pour in the cold buttermilk. Using a fork or a silicone spatula, gently stir just until a shaggy, sticky dough forms. It will look messy and uneven. THAT IS PERFECT. Over-mixing is the enemy of tender biscuits.
Step 5: Shape & Cut with Confidence. Dump the dough onto a lightly floured surface. With floured hands, gently pat and fold it over itself 3-4 times—this builds layers! Then, pat it into a rectangle about 1-inch thick. Dip a 2.5 or 3-inch round cutter in flour and press straight down to cut your biscuits. Do not twist the cutter! Twisting seals the edges and hinders the rise. Re-roll scraps gently and cut until you have about 6 biscuits.
Step 6: Bake to Golden Perfection. Place your biscuits on the prepared baking sheet, about 2 inches apart. You can brush the tops with a little extra buttermilk for extra browning. Bake for 12-15 minutes, or until they are puffed high and beautiful with golden-brown tops. Let them cool on the sheet for 5 minutes before moving them.
Step 7: Macerate & Whip While They Bake. As soon as the biscuits are in the oven, toss your sliced strawberries with that optional tablespoon of sugar in a bowl. Let them sit and get juicy. In a separate chilled bowl, whip the cold heavy cream, powdered sugar, and vanilla on medium-high speed until soft peaks form. You should be able to dip a spoon in and have a creamy, dreamy dollop hold its shape.
Step 8: Assemble the Joy. Once biscuits are cool enough to handle, split them in half with a fork or a serrated knife. Pile a generous spoonful of whipped cream on the bottom half, top with a heap of those glorious juicy strawberries (don’t forget the syrup!), and crown it with the biscuit top. Serve immediately and prepare for happy sighs.
How to Serve These Like a Pro (Or a Very Happy Amateur!)
The beauty of these sandwiches is in their casual charm, but a little presentation goes a long way! For a simple, stunning look, I like to plate them on a rustic wooden board or a bright, colorful platter. Let a few extra strawberry slices and maybe a mint sprig or two tumble around the sides—it screams “fresh from the garden.”
If you’re serving a crowd, set up a DIY biscuit sandwich bar! Keep the warm biscuits, bowl of macerated berries, and whipped cream in separate dishes. Let everyone build their own masterpiece. It’s interactive, fun, and ensures everyone gets their ideal cream-to-berry ratio.
Pairing idea? A glass of cold iced tea with a sprig of mint, a sparkling Prosecco for a brunch celebration, or just a big, cold glass of milk for the ultimate nostalgic touch. They’re best enjoyed the day they’re made, ideally within an hour of assembling, while the biscuits are still slightly warm and tender.
Make It Your Own: Delicious Twists & Swaps
Once you’ve mastered the classic, the playground is open! Here are a few ways to mix it up:
- Lemon-Zested Bliss: Add the zest of one lemon to the biscuit dough and a teaspoon of lemon zest to the whipped cream. The bright citrus cuts through the richness and makes the strawberries pop.
- Mixed Berry Bonanza: Swap half the strawberries for other summer berries like raspberries, blueberries, or blackberries. You get a gorgeous, jewel-toned filling.
- “Cheater’s” Cream Cheese Frosting: For a denser, tangier filling, fold 4 oz of softened cream cheese into the whipped cream after it’s whipped. It’s insanely decadent.
- Grilled Peach & Berry: Add grilled peach slices to the strawberry mix. The caramelized flavor from the grill is a game-changer.
- Dairy-Free/Dietary Swap: Use a high-quality vegan butter and a plant-based “buttermilk” (non-dairy milk + vinegar). For the cream, chill a can of full-fat coconut cream overnight and whip the solid part with powdered sugar.
Chef Emily’s Notebook Scribbles
This recipe has been my summer staple for years, and it’s evolved in my kitchen. I used to be terrified of overworking biscuit dough, resulting in crumbly mounds. Then I learned the “fold and pat” technique, and it changed everything—giving me consistent, tall, flaky layers every time.
A funny fail? The time I tried to use frozen strawberries in a pinch. Let’s just say the biscuits turned into a soggy, pink puddle. Lesson learned: fresh is best for this one! Now, I wait impatiently for strawberry season, and that first batch tastes like victory.
Don’t stress if your biscuits aren’t perfect circles. Mine rarely are! Those rustic, craggy edges just mean more surface area for browning and more nooks for whipped cream to hide in. It’s all part of the charm.
Your Questions, Answered!
Q: Can I make the biscuits ahead of time?
A: Absolutely! You can bake the biscuits up to a day ahead. Let them cool completely, store in an airtight container at room temperature, and gently re-warm in a 300°F oven for 5-8 minutes before assembling. You can also freeze the unbaked biscuit dough circles on a sheet, then transfer to a bag. Bake from frozen, adding 2-4 extra minutes.
Q: My biscuits didn’t rise very much. What happened?
A: The usual suspects: 1) Your baking powder might be old (check the date!). 2) The butter or buttermilk wasn’t cold enough. 3) The dough was overworked or kneaded like bread dough. Remember, gentle pats and folds are your friend!
Q: Can I use frozen whipped topping or store-bought whipped cream?
A> You can, for sure, in a pinch. But I promise you, homemade whipped cream is exponentially better in flavor and texture, and it takes just 3 minutes. It’s the difference between “good” and “OMG.”
Q: My whipped cream turned to butter! Help!
A> Ah, we’ve all been there. You whipped just a little too long. Sadly, you can’t reverse it, but don’t waste it! Use your accidental sweet butter on toast or pancakes. For the sandwiches, start over with new cold cream and keep a close eye on it, stopping as soon as soft peaks form.
A Quick Note on Nutrition
Let’s be honest, friend: this is a treat-yourself kind of dessert — the kind that belongs on sunny porches, picnic blankets, and happy summer evenings. It’s not meant to be “light,” but it is meant to be joyful, satisfying, and made with real, simple ingredients.
Here’s the approximate breakdown for one fully assembled biscuit sandwich (biscuit + whipped cream + strawberries):
Calories: ~320–380
Fat: ~18–22g
Carbohydrates: ~38–44g
Sugar: ~12–16g (mostly natural from the berries)
Protein: ~4–6g
Fiber: ~2–3g
Most of the richness comes from the butter in the biscuits and the heavy cream — the very things that give you those sky-high flaky layers and that dreamy, cloud-like filling. The strawberries bring natural sweetness, vitamin C, and a refreshing brightness that makes the whole dessert feel lighter than it actually is.
If you want to lighten things up a bit, here are a few easy tweaks:
– Use half-and-half whipped with a stabilizer instead of heavy cream
– Make mini tea-sized biscuit sandwiches for portion-friendly servings
– Sweeten the berries with just a teaspoon of sugar (or none at all if they’re peak-season sweet)
– Swap half the whipped cream for Greek yogurt for a tangy, lighter filling
But truly?
Enjoy the real version when you want a classic summer moment. These sandwiches are meant to feel like sunshine and nostalgia wrapped in warm, buttery biscuits — and that is nourishment for the soul as much as for the body.