The Cornish Pasty: A Handheld Hug from the Heart of the Kitchen
Hey there, friends! Emily here, from my flour-dusted kitchen to yours. Have you ever craved something that just feels like a complete meal in one perfect, portable package? Something with a golden, flaky crust that gives way to a steaming, savory filling so hearty and satisfying it practically tells you a story with every bite? If you’re nodding along (or your stomach just growled in agreement), then you and I are about to become best friends over today’s project: the glorious, legendary Cornish Pasty.
Forget what you know about dainty finger food. This is a hand pie with heritage, a turnover with tales to tell. Born in the tin mines of Cornwall, England, these weren’t just lunch; they were a ingenious solution—a durable, delicious, all-in-one meal that a miner could hold in a sooty hand, with a thick crimped edge meant to be discarded (though who would?!). The crust was the wrapper, the plate, and the insulation all in one.
But let’s be real: we’re not heading into a mineshaft (I hope!). We’re heading into our happy place: the kitchen. And we’re making these because they are pure, unadulterated comfort. The combination of tender beef, soft potatoes, sweet onions, and that uniquely earthy swede (or rutabaga, as we call it here) is magic. It’s simple, honest food that warms you from the inside out. So, tie on your apron, put on some fun music, and let’s make something truly special together. This isn’t just cooking; it’s creating edible history, one delicious crimp at a time.

My First Pasty: A Lesson in Love (& Leaky Seams!)
My love affair with pasties started not in Cornwall, but in my Grandma’s Midwestern kitchen. She called them “meat hand-pies,” and hers were filled with ground beef and carrots, a true immigrant’s adaptation. But the spirit was the same: a self-contained feast. I remember the first time I tried to make a traditional version after culinary school, full of theory and confidence. I pictured these picturesque, half-moon beauties.
What I pulled out of the oven looked more like a family of hungry, angry volcanoes. Juicy, delicious lava (aka beef stew) was erupting from every poorly sealed seam. They were a mess… but my goodness, they were a delicious mess. We ate them with forks over bowls, laughing at my “deconstructed pasties.” That failure taught me more than any perfect bake ever could: the crimp isn’t just decorative, it’s the guardian of flavor. It’s a love letter written in pastry, sealing in all the steam and goodness. Every time I make them now and get that perfect, tight seal, I think of Grandma and my leaky first attempt, and it makes the victory taste even sweeter.
Gathering Your Pasty Toolkit: Simple Ingredients, Big Flavor
Here’s what you’ll need to create about 6 generous, authentic-tasting pasties. I’ve added my little chef notes next to each one—because knowing the “why” makes the “how” even more fun!
For the Pastry (Our Flaky Fortress):
- 3 cups all-purpose flour: The foundation. A good, unbleached all-purpose gives us the perfect balance of tenderness and structure to hold our hefty filling.
- ¾ cup (1½ sticks) cold, unsalted butter, diced: Cold is key! I keep mine in the freezer for 10 minutes before using. Those little solid butter bits are what will create steam pockets during baking, leading to that dreamy, flaky layers. For a richer flavor, you can substitute half with cold lard or shortening.
- 1 teaspoon salt: Don’t skip this! It seasons the pastry itself, making the crust taste amazing, not bland.
- 6–8 tablespoons ice-cold water: The binder. Start with 6 tablespoons and add just until the dough comes together. Too much water = tough pastry.
- 1 egg, beaten with a splash of water: This is our egg wash for that gorgeous, glossy, golden-brown finish. Milk works in a pinch, but egg gives the best shine.
For the Filling (The Heart of the Matter):
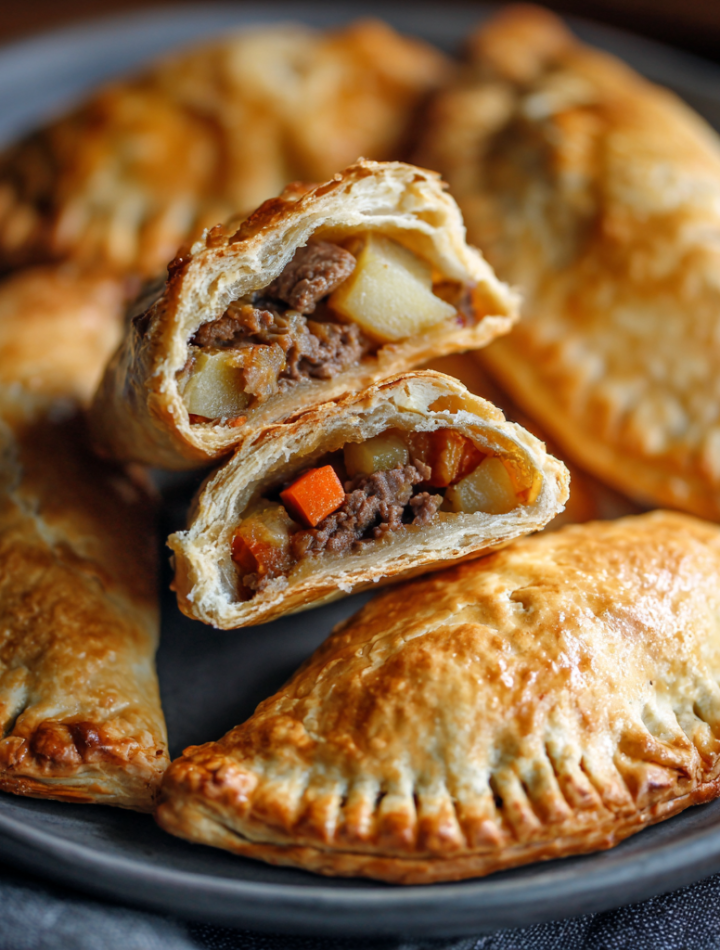
- 1 lb (about 2 cups) skirt steak, chuck roast, or braising steak, finely diced: You want a cut with some marbling and flavor that will become tender with slow cooking inside the pastry. Avoid super-lean steaks. Chef’s Tip: Partially freeze the steak for 20 minutes; it makes dicing it into perfect little cubes so much easier!
- 1 cup potato (like Yukon Gold), peeled and diced into ¼-inch cubes: A waxy potato holds its shape beautifully. Russets can get too mushy.
- ¾ cup swede (rutabaga), peeled and diced into ¼-inch cubes: The traditional Cornish vegetable! It adds a subtle, sweet earthiness that’s essential. If you’re skeptical, trust me on this one.
- ½ cup onion, finely chopped: Sweet yellow or white onions are perfect here. They melt into the filling.
- Salt and freshly ground black pepper to taste: Be generous! Season in layers for the best flavor.
- Optional: A few small knobs of cold butter (about ½ tsp per pasty): A little insider trick! Placing a dot of butter on top of the filling before sealing adds an extra layer of richness and moisture.
Step-by-Step: Let’s Build Some Pasty Magic!
Okay, team. Let’s break this down into simple, foolproof steps. I’m right here with you, talking you through every fold and crimp!
- Make the Dough: In a large bowl, whisk together your flour and salt. Scatter the tiny, cold butter cubes over the top. Now, using your fingertips, rub the butter into the flour until the mixture looks like coarse breadcrumbs with some pea-sized bits of butter remaining. This is what makes it flaky! Gradually drizzle in the ice water, mixing with a fork, until the dough just begins to clump together. Turn it out onto a surface, gently knead it 2-3 times to bring it into a ball, wrap in plastic, and chill for at least 30 minutes. This rest relaxes the gluten and firms up the butter—critical for easy rolling!
- Prep the Filling: While the dough chills, let’s get our filling ready. This is the easy part! Simply dice all your steak and veggies and place them in a large bowl. Season very generously with salt and pepper—remember, this is all the seasoning inside, so don’t be shy. Give it all a good mix and set aside.
- Roll & Cut: Preheat your oven to 375°F (190°C). Line a large baking sheet with parchment paper. On a lightly floured surface, roll your chilled dough to about ⅛-inch thickness. Use a bowl or plate about 7-8 inches across as a guide to cut out circles. Re-roll the scraps to get all your circles. You should get about 6.
- The Fill & Fold: Place a good heap of the filling mixture (about ¾ to 1 cup) onto one half of each dough circle, leaving a 1-inch border. If using, place a small knob of cold butter on top. Here’s the key: brush a little water or egg wash around the bare border. This acts like glue! Now, carefully fold the empty half of the dough over the filling to create a half-moon.
- The All-Important Crimp: This is where we make it official! Starting at one end, fold and twist the edges over themselves to create a thick, rope-like seal. You can also just press with a fork. Whatever method you choose, seal it tightly. This is what keeps the steam in and the juices from staging a great escape (learned from experience!). Place your sealed pasties on the prepared tray.
- Bake to Golden Perfection: Brush the pasties all over with your beaten egg wash. This gives them that beautiful color. Using a small knife, prick 1-2 small steam holes in the top of each one. Bake for 45-50 minutes, until they are deeply golden brown and you can see the filling bubbling through the steam holes. Your kitchen will smell incredible.
- The Rest: I know it’s hard, but let them cool on the tray for at least 10-15 minutes. The filling is molten lava hot and needs time to settle. This also lets the pastry firm up perfectly.
Serving Your Masterpiece: More Than Just a Handheld Pie
The beauty of a pasty is that it needs no accompaniment—it’s the complete show! But that doesn’t mean we can’t have a little fun with presentation.
- The Traditionalist: Serve it warm, wrapped in a clean napkin, just as a miner would. A mug of strong tea or a dark beer is the perfect companion.
- The Comfort Feast: Plate it hot with a simple side of baked beans, a tangy pickle (a Cornish tradition!), and a big dollop of ketchup or HP Brown Sauce for dipping the crust.
- For a Crowd: Slice a few pasties in half on a big wooden board with ramekins of whole-grain mustard, chutney, and a simple green salad. Let everyone dig in family-style.
- The Next-Day Genius: They are fantastic at room temperature for lunchboxes, or gently reheated in the oven. The flavors deepen overnight, making them arguably even better on day two!
Make It Your Own: Delicious Pasty Variations
Once you’ve mastered the classic, the pasty world is your oyster! Here are a few of my favorite twists:
- The “Leftover Roast” Pasty: Swap the raw steak for 2 cups of diced leftover roast beef or pot roast. Use the leftover gravy to moisten the filling. It’s a revelation!
- Chicken & Leek: Use diced chicken thigh, sautéed leeks, a handful of grated cheddar, and a touch of thyme. Lighter but still incredibly comforting.
- Vegan “Steak” & Ale: Use hearty mushrooms and lentils as the base. Sauté with a tablespoon of tomato paste and a splash of vegan stout for deep, meaty flavor without the meat.
- Breakfast Pasty: Scrambled eggs, cooked sausage, diced bell pepper, and a sprinkle of cheddar. Perfect for on-the-go mornings.
- Spicy Southwest Style: Use seasoned ground beef or turkey, corn, black beans, diced green chiles, and a blend of chili powder and cumin. Serve with salsa and sour cream.
Chef Emily’s Notebook: A Few More Secrets
Over the years, this recipe has become a trusted friend in my kitchen, and like any good friend, we’ve learned a few things together. I now always use a metal baking sheet—it gets the bottoms crisper than a glass or ceramic one. If I’m feeling fancy, I’ll add a teaspoon of fresh thyme to the filling. And my biggest tip? Don’t stress the crimp. Your first one might be messy. Your fifth will be beautiful. It’s the love (and the tight seal!) that counts. I still sometimes have a pasty that decides to burst a little, and you know what? We just call it “rustic” and eat it with extra gusto.
Your Pasty Questions, Answered!
Q: My bottom crust was soggy. What happened?
A: This usually means the filling was too wet or the oven wasn’t hot enough. Make sure your diced veggies are patted dry, and always bake on a preheated sheet in the middle of the oven. Placing a pizza stone on the rack below can also help blast heat at the bottom.
Q: Can I make these ahead of time?
A: Absolutely! You can assemble them, place them on the baking sheet, and freeze them solid before wrapping. Bake from frozen, adding 10-15 minutes to the bake time. You can also refrigerate assembled (unbaked) pasties for up to 24 hours.
Q: What’s the best meat substitute for authenticity?
A: If you can’t find skirt or chuck, boneless short ribs are fantastic. Just be sure to trim any large bits of fat and dice it small. The flavor is incredible.
Q: My pastry was tough, not flaky.
A: You probably overworked the dough or used warm butter/water. Remember: cold ingredients, minimal handling, and that chill time are non-negotiable for tender, flaky pastry.
A Note on Nutrition (Because We Care!)
Let’s be real: a Cornish pasty is hearty, wholesome comfort food. It’s a balanced meal with protein, carbs, and veggies all in one. Using leaner cuts of beef can reduce fat, and you can incorporate whole wheat flour for up to half of the all-purpose for added fiber. The portion is satisfying, making it a fulfilling main dish. As with all good things, it’s about enjoyment and balance within your overall diet. Savor it, share it, and relish the nourishment of a homemade meal made with care.
Final Thoughts from My Kitchen to Yours
Well, my fellow food lovers, we’ve done it! We’ve taken simple ingredients and transformed them into edible history, a portable piece of comfort that connects us to kitchens and miners from centuries past. That’s the power of food—it tells stories. I hope you feel a huge sense of pride pulling those golden, gleaming pasties from your oven. Share them with people you love, pack one for an adventure, or savor it quietly with a good book.
Remember, cooking is never just about the recipe. It’s about the flour on your nose, the stories you tell while you crimp, and the shared “mmm” around the table. Thank you for letting me be part of your kitchen story today. Now, go on and chow down! And be sure to tag me if you make them—I love seeing your creations.
With love and a fully belly,
Emily 🧑🍳