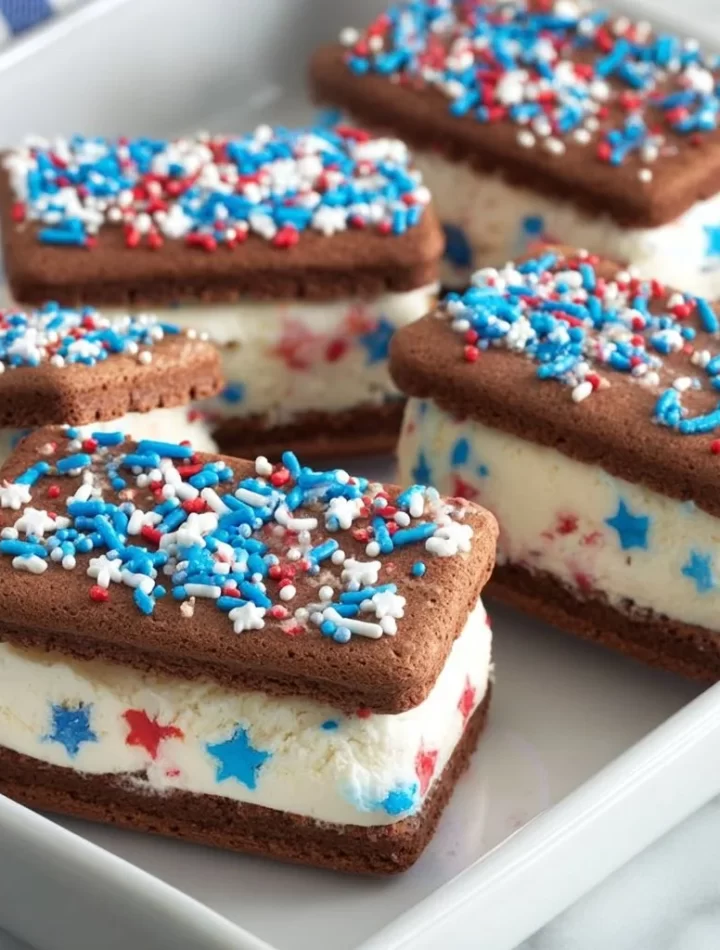
# Celebrate with Patriotic Mini Ice Cream Sandwiches: A Delicious Treat for Every Occasion!

Hey there, fellow food lovers! If you’ve been searching for the perfect dessert to celebrate, look no further. Today, we’re diving into a delightful recipe that not only looks appealing but also bursts with flavors—Patriotic Mini Ice Cream Sandwiches! 🇺🇸 These little treats are perfect for barbecues, picnics, or just a cozy evening at home when you want to indulge in something deliciously nostalgic.

You might be wondering, "Why ice cream sandwiches?" Well, let me tell you—they’re the quintessential summer dessert! They conjure up memories of hot days, backyard fun, and laughter shared with family and friends. And dressing them up in red, white, and blue not only makes them festive but also infuses your celebrations with a burst of color and joy.

## A Trip Down Memory Lane

Before we dive into the recipe, allow me to take you on a little stroll down memory lane. It was a hot July afternoon, and there I was, a bright-eyed kid, running around with my cousins while the sun beat down mercilessly. The sticky warmth wasn’t even a concern because the promise of cool treats awaited us. My grandma—bless her soul—would pull out her icy stash of homemade ice cream sandwiches.

Picture this: soft, chewy cookies hugging creamy, dreamy ice cream and rolled in colorful sprinkles. Yes, those were my favorite summer treats. We’d pick the ice cream flavor based on who could shout it the loudest, and the excitement was palpable. Fast forward to today, and you’ll see how those joyful memories inspired this recipe. This time, we’re creating a craftier, mini version that’s just as tender and sweet, with a patriotic twist. Grab your aprons, and let’s make some magic happen!

## Ingredients
Here’s what you’ll need to whip up these delightful Patriotic Mini Ice Cream Sandwiches:

- **Sugar Cookies**
  - **Why:** They’re the perfect sweet base for holding all the deliciousness inside.
  - **Substitution Tip:** If you’re looking for gluten-free options, try almond flour or a gluten-free cookie mix.

- **Vanilla Ice Cream**
  - **Why:** You can’t go wrong with classic vanilla—it’s creamy, sweet, and the ultimate partner for cookies.
  - **Substitution Tip:** Feel free to swap it for your favorite flavors—try strawberry for a sweet twist or even refreshing lemon sorbet!

- **Red and Blue Sprinkles**
  - **Why:** They add a fun pop of color and crunch to our mini sandwiches.
  - **Quick Chef Insight:** Look for sprinkles without artificial colors if you want a more natural option!

- **Mini Chocolate Chips (Optional)**
  - **Why:** A touch of chocolate can balance the sweetness and provide texture.
  - **Substitution Tip:** Use dark chocolate chips for a richer flavor or go for dairy-free chips if needed.

- **Food Coloring (Optional)**
  - **Why:** If you want to customize your ice cream to be vividly colored, food coloring is the way to go.
  - **Chef Insight:** A drop or two of gel color will give you vibrant hues without thinning the ice cream.

## Step-by-Step Instructions

Now that we’ve gathered our ingredients, let’s jump into the fun part: making these mini ice cream sandwiches!

### Step 1: Preheat your Oven
First things first! Preheat your oven to 350°F (175°C). This ensures your cookies will bake beautifully, so they’re just the right amount of chewy.

### Step 2: Prepare the Sugar Cookie Dough
In a large mixing bowl, cream together **1 cup of softened butter** and **1 cup of sugar** until the mixture becomes light and fluffy. This step is crucial for airy cookies. Pro tip: Using room-temperature butter makes for easier mixing!

### Step 3: Add in Eggs and Extracts
Beat in **2 large eggs** (one at a time), followed by **2 teaspoons of vanilla extract**. This is where the magic happens—the extract infuses a beautifully rich flavor into our cookies.

### Step 4: Combine Dry Ingredients
In another bowl, whisk together **3 cups of all-purpose flour**, **2 teaspoons of baking powder**, and **1 teaspoon of salt**. Gradually add this mixture to your wet ingredients. Mix just until combined—overmixing can lead to tough cookies.

### Step 5: Scoop and Shape Cookies
Using a tablespoon, scoop out small portions of dough and roll them into balls. Place them on a baking sheet lined with parchment paper, leaving some space in between since they will spread a bit while baking. You can also flatten them slightly for mini sandwiches.

### Step 6: Bake and Cool
Bake for **8–10 minutes**, or until the edges are lightly golden. Let the cookies cool on the baking sheet for a few minutes before transferring them to a wire rack. This cooling time is key—they will firm up as they cool!

### Step 7: Prepare the Ice Cream
While your cookies are cooling, scoop out **1 quart of vanilla ice cream** and let it soften at room temperature for about 10 minutes. If you want to add color, you can mix in a few drops of food coloring at this stage—just be sure to swirl it gently for a marbled look!

### Step 8: Assemble the Sandwiches
Now for the magic moment! Take one cookie, add a generous scoop of soft ice cream, and press another cookie on top to create a sandwich. Roll the edges in red and blue sprinkles, mini chocolate chips, or even some crushed nuts if you're feeling adventurous.

### Step 9: Freeze
For the ultimate treat, place your assembled mini sandwiches on a lined baking sheet and freeze for about **1 hour**. This will ensure they hold their shape and are ready to enjoy!

### Step 10: Serve and Enjoy!
Once frozen, serve your mini ice cream sandwiches immediately or store them in an airtight container in the freezer for up to a week (if they last that long!).

## Serving Suggestions
Serve your Patriotic Mini Ice Cream Sandwiches on a colorful platter for a festive touch. You can stack them high for a tower of fun or place them on individual dessert plates. Garnish with fresh strawberries or blueberries for a pop of color and a burst of freshness. Drizzle with chocolate sauce for an extra treat and watch your guests drool!

## Recipe Variations
1. **Jumbo Version**: For a fun twist, use regular-sized cookies instead of mini ones. This will yield a more substantial sandwich that's perfect for sharing.

2. **Flavor Swaps**: Use chocolate or red velvet cookies instead of classic sugar cookies. This will add a unique flavor profile while maintaining the festive aesthetic.

3. **Health-Conscious Option**: Swap out regular ice cream for a lighter frozen yogurt or a vegan coconut ice cream to cater to dietary preferences while keeping it delicious.

4. **Ice Cream Flavors**: Experiment with cookie dough, peppermint, or caramel ice cream to change things up and elevate your sandwiches.

5. **Add-Ins**: Think nuts, crushed candy bars, or even marshmallows! Toss your favorite mix-ins into the ice cream before assembling.

## Chef’s Notes
This mini ice cream sandwich recipe has evolved over the years as I've experimented with different flavor combinations and presentations. Sometimes, I get funky and add crushed candy canes for Christmas or delicious pumpkin spice for that autumn vibe. The best part? It's a blank canvas! Feel free to mix and match your favorite flavors and colors. Remember to have fun in the kitchen—it’s all about creating joyful experiences and making memories!

## FAQs and Troubleshooting

**Q: My cookies turned out too hard! What did I do wrong?**
A: Overbaking can lead to hard cookies. Keep an eye on them during the final minutes of baking and take them out as soon as they’re lightly golden.

**Q: Can I use store-bought ice cream?**
A: Absolutely! Store-bought ice cream can actually save you time, and there are so many great flavors out there to experiment with.

**Q: How can I get my ice cream to stay in the sandwich?**
A: Make sure your ice cream is soft but firm enough to scoop. Freezing the assembled sandwiches for a bit helps keep everything intact.

**Q: Is there a dairy-free option for this recipe?**
A: You can easily use dairy-free butter and choose a non-dairy ice cream to create a similar delightful treat.

## Nutritional Info
(Nutritional info is approximate and may vary based on specific ingredients used.)
- **Calories:** 180 per mini sandwich
- **Fat:** 8g
- **Carbohydrates:** 25g
- **Protein:** 1g
- **Sugar:** 15g

Keep in mind that the nutritional values can be adjusted based on the specific ingredients and portion sizes you choose.

## Final Thoughts
There you have it—your guide to creating scrumptious Patriotic Mini Ice Cream Sandwiches for your next gathering or simply for a well-deserved treat! Remember, it’s not just about the food but the memories you make while enjoying it. So, get those little hands involved, experiment with flavors, and create your cooking adventure. And when you do, be sure to tag me! I can't wait to see how your adorable sandwiches turn out.

Happy chowing down, friends! 🍦❤️

Patriotic Mini Ice Cream Sandwiches
- Total Time: 30 minutes
- Yield: 12 mini sandwiches 1x
- Diet: Vegetarian
Description
Delightful mini ice cream sandwiches that are perfect for summer celebrations with a festive red, white, and blue twist.
Ingredients
Scale
- 1 cup of softened butter
- 1 cup of sugar
- 2 large eggs
- 2 teaspoons of vanilla extract
- 3 cups of all-purpose flour
- 2 teaspoons of baking powder
- 1 teaspoon of salt
- 1 quart of vanilla ice cream
- Red and blue sprinkles
- Mini chocolate chips (optional)
- Food coloring (optional)
Instructions
- Preheat your oven to 350°F (175°C).
- In a large mixing bowl, cream together butter and sugar until light and fluffy.
- Beat in eggs one at a time, followed by vanilla extract.
- Whisk together flour, baking powder, and salt in another bowl.
- Gradually add dry ingredients to wet ingredients, mixing until combined.
- Scoop out small portions of dough and roll into balls; place on a lined baking sheet.
- Bake for 8–10 minutes until edges are lightly golden.
- Cool on baking sheet for a few minutes then transfer to wire rack.
- Scoop out ice cream and let it soften before mixing in food coloring if desired.
- Assemble sandwiches by placing one cookie, adding ice cream, and pressing another cookie on top; roll in sprinkles.
- Freeze assembled sandwiches for about 1 hour.
- Serve immediately or store in an airtight container.
Notes
Feel free to experiment with different flavors and add-ins for your ice cream sandwiches!
- Prep Time: 20 minutes
- Cook Time: 10 minutes
- Category: Dessert
- Method: Baking
- Cuisine: American
Nutrition
- Serving Size: 1 sandwich
- Calories: 180
- Sugar: 15g
- Sodium: 150mg
- Fat: 8g
- Saturated Fat: 4g
- Unsaturated Fat: 3g
- Trans Fat: 0g
- Carbohydrates: 25g
- Fiber: 0g
- Protein: 1g
- Cholesterol: 30mg
Keywords: mini ice cream sandwiches, patriotic dessert, summer treat, ice cream, cookies