Grilled Cheese Roll-Ups: The Ultimate Comfort Food Treat
Hey there, fellow food lover! If you’re anything like me, you’ve probably found yourself dreaming about that perfect melty, cheesy goodness that only a grilled cheese sandwich can deliver. But what if I told you there’s a way to make that classic feel even more fun and exciting? Let’s dive into the world of Grilled Cheese Roll-Ups—crispy, gooey, and filled with flavor. This innovative twist on a childhood favorite is sure to get everyone in your home excited for mealtime!
Imagine this: it’s a rainy afternoon, and you’re curled up on the couch with a blanket. The scent of buttery bread and melted cheese wafts through the air, creating a warm embrace that you can only find in a comforting meal. These Grilled Cheese Roll-Ups are not only easy to make but also a delightful way to enjoy the flavors we all know and love—from crispy edges to ooey-gooey centers. Plus, they’re super convenient for dipping into your favorite sauces. Trust me, whether you’re making it for yourself or a crowd, this recipe is going to be a hit.
Today, I’ll be sharing not just how to whip up these delicious roll-ups, but also a little backstory that makes this dish even more special to me. So grab your apron, let’s roll up our sleeves, and get ready to make some kitchen magic!
A Nostalgic Bite: My Grilled Cheese Memory
One of my fondest memories in the kitchen growing up revolves around Saturday movie nights with my family. There we were—me, my siblings, and my parents—all gathered around, cozy on the couch, popcorn in one hand and our homemade grilled cheese sandwiches in the other. My dad would whip up his famous grilled cheese, turning our ordinary meal into something extraordinary. Each sandwich was an exciting creation, expertly crafted with a mix of cheeses melted between good old-fashioned white bread.
One weekend, I got brave and asked if I could help. My dad handed me the spatula, and together we created our first new version while perfecting the classic. We rolled the bread flat, added cheese, and rolled it up like a little burrito before toasting it in the pan. Voila—Grilled Cheese Roll-Ups were born! Our movie night tradition evolved, and I knew then that sharing recipes and making delicious food was where my heart belonged. Fast forward to now, and I can’t wait to spread that cheesy joy by sharing my Grilled Cheese Roll-Ups with you all!
Ingredients
To create these delightful Grilled Cheese Roll-Ups, gather the following ingredients:
- Sliced White Bread: Classic and soft, it’s the perfect base for rolling up the cheese. If you want to switch it up, feel free to use whole grain or sourdough bread!
- Shredded Cheese: I recommend a blend of sharp cheddar and mozzarella for ultimate gooeyness. Need a substitute? Use provolone or pepper jack for an extra kick!
- Butter: For that golden, crispy crust. You can also use olive oil or vegan butter if you want a lighter version.
- Garlic Powder (optional): A sprinkle of garlic powder not only adds flavor but elevates your grilled cheese experience. You could also try onion powder for a twist!
- Dipping Sauce (optional): Pair your roll-ups with marinara sauce, ranch dressing, or even a spicy aioli for a flavor explosion.
Step-by-Step Instructions
Now that you have your ingredients ready, let’s jump into making these Grilled Cheese Roll-Ups. Follow these steps and remember, I’m here to guide you with tips along the way!
-
Flatten the Bread: Start by taking your slices of bread and rolling them flat with a rolling pin. This helps them hold more cheese while making them easier to roll. Don’t worry too much about perfection; a little rustic charm is part of the fun!
-
Add the Cheese: Take a generous handful of shredded cheese and place it at one end of each flattened slice. The more cheese, the better, right? Don’t forget to leave a little space at the edges for rolling.
-
Roll ‘Em Up: Starting from the cheese end, gently but tightly roll the bread away from you. Make sure that the cheese is secure inside. After you have rolled it, a little bit of pressure applies here helps seal the roll together.
-
Prep for the Pan: In a shallow dish, melt some butter (or heat that olive oil!). While it’s melting, sprinkle in a pinch of garlic powder for extra flavor.
-
Coat the Roll-Ups: Dip each roll-up in the melting butter, coating it evenly. This will give it that beautiful, crispy exterior we all love. Remember, a little butter goes a long way in terms of flavor!
-
Toast to Perfection: Heat a skillet over medium heat. Once it’s nice and warm, add the roll-ups seam-side down. Cook for about 2–3 minutes on each side or until golden brown. Keep a close eye on them because we want them crispy, not charred!
-
Serve and Enjoy: When they are done, take them off the heat and let them sit for a minute. Then slice them in half to reveal the delicious cheesy goodness inside. Perfect for dipping!
Serving Suggestions
When it comes to serving these Grilled Cheese Roll-Ups, presentation can definitely elevate the experience! Here are a few ideas:
-
Platter Style: Arrange your roll-ups on a nice platter and serve with a small bowl of marinara sauce in the center for dipping. Garnishing with a sprinkle of fresh herbs, like parsley or basil, adds color and freshness.
-
Family Style: For a cozy experience, set the roll-ups on a large cutting board alongside a couple of dipping sauces and let everyone dig in! It’s perfect for gatherings or family dinners.
-
Fancy Touch: If you’re feeling a bit extra, serve the roll-ups with a side of creamy tomato soup in shot glasses for an adorable and nostalgic twist on the classic combo.
Recipe Variations
Here are a few creative twists to keep things exciting with your Grilled Cheese Roll-Ups!
-
Spicy Southwest: Add diced jalapeños and some pepper jack cheese for a fiery kick. Serve it with a side of guacamole for dipping.
-
Veggie Delight: Toss in some sautéed spinach, roasted red peppers, or mushrooms with the cheese before rolling for a nutritious boost.
-
Caprese Style: Use fresh mozzarella, basil, and a drizzle of balsamic reduction inside the roll-up for a gourmet touch. A side of pesto for dipping would be perfection!
-
Sweet and Savory: Try spreading a thin layer of apple or fig jam on the bread before adding the cheese. Sweet and cheesy? Yes, please!
-
Breakfast Roll-Ups: Use scrambled eggs and cheddar cheese for a breakfast option. Serve with salsa on the side for a flavorful start to your day.
Chef’s Notes
These Grilled Cheese Roll-Ups are one of those recipes that evolve beautifully over time. I started with the classic cheese and bread combo, but as years went by, I found joy in mixing and matching flavors. It’s become a staple both for family gatherings and casual weeknight dinners. One of my funniest kitchen moments was when I forgot to seal one roll-up properly; it exploded in the pan! But instead of being upset, I reminded myself that cooking is about having fun and learning.
FAQs and Troubleshooting
Before you dive in, here are a few common questions and troubleshooting tips to ensure your Grilled Cheese Roll-Ups turn out perfectly!
-
What type of bread works best?
Any soft bread will work, but we all know buttery white bread gives the best texture. Just make sure it isn’t too thick to roll! -
Why did my roll-ups unroll while cooking?
Ensure you’re rolling them tightly and sealing the edge properly. Also, flipping them gently helps keep the filling inside. -
Can I pre-make these?
Absolutely! You can assemble them a few hours ahead and then heat them up in a skillet when you’re ready for a delicious snack. -
How can I make these healthier?
Use whole grain bread and low-fat cheese. You can also load them up with veggies or swap out the butter for cooking spray.
Nutritional Info
(Per serving, including 2 roll-ups with cheese and butter):
- Calories: ~250
- Protein: 10g
- Fat: 15g
- Carbohydrates: 22g
- Fiber: 1g
- Sugars: 1g
- Sodium: 400mg
Please note that the nutritional values can vary based on ingredient brands and any modifications.
Final Thoughts
There you have it—my beloved Grilled Cheese Roll-Ups recipe, complete with tips, variations, and a heartwarming backstory. Whether you’re dipping them in sauce during a movie marathon or serving them up for a quick dinner, they’re sure to bring a smile to your face and warmth to your belly. Remember, cooking is an adventure, and every recipe is a chance to create delicious memories. So go ahead, grab those ingredients and let the roll-up magic begin!
Happy cooking, and may your kitchen always be filled with love and cheese!
— Chef Emily
Print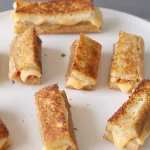
Grilled Cheese Roll-Ups
- Total Time: 25 minutes
- Yield: 4 servings 1x
- Diet: Vegetarian
Description
Delicious and fun twist on the classic grilled cheese sandwich, perfect for dipping and sharing.
Ingredients
- 8 slices Sliced White Bread
- 2 cups Shredded Cheese (sharp cheddar and mozzarella blend)
- 2 tablespoons Butter
- 1/2 teaspoon Garlic Powder (optional)
- Dipping Sauce (optional, e.g., marinara sauce, ranch dressing, spicy aioli)
Instructions
- Flatten the bread by rolling each slice flat with a rolling pin.
- Add a generous handful of shredded cheese at one end of each slice of bread.
- Roll the bread tightly around the cheese.
- Prep a shallow dish with melted butter and mix in garlic powder.
- Coat each roll-up in the melted butter.
- Toast in a skillet over medium heat for 2-3 minutes on each side until golden brown.
- Serve and enjoy by slicing in half to reveal the cheesy center.
Notes
Feel free to get creative with fillings, such as adding veggies or using different types of cheese.
- Prep Time: 15 minutes
- Cook Time: 10 minutes
- Category: Snack
- Method: Pan-frying
- Cuisine: American
Nutrition
- Serving Size: 2 roll-ups
- Calories: 250
- Sugar: 1g
- Sodium: 400mg
- Fat: 15g
- Saturated Fat: 8g
- Unsaturated Fat: 7g
- Trans Fat: 0g
- Carbohydrates: 22g
- Fiber: 1g
- Protein: 10g
- Cholesterol: 30mg
Keywords: grilled cheese, comfort food, roll-ups, easy snack, kid-friendly, cheesy