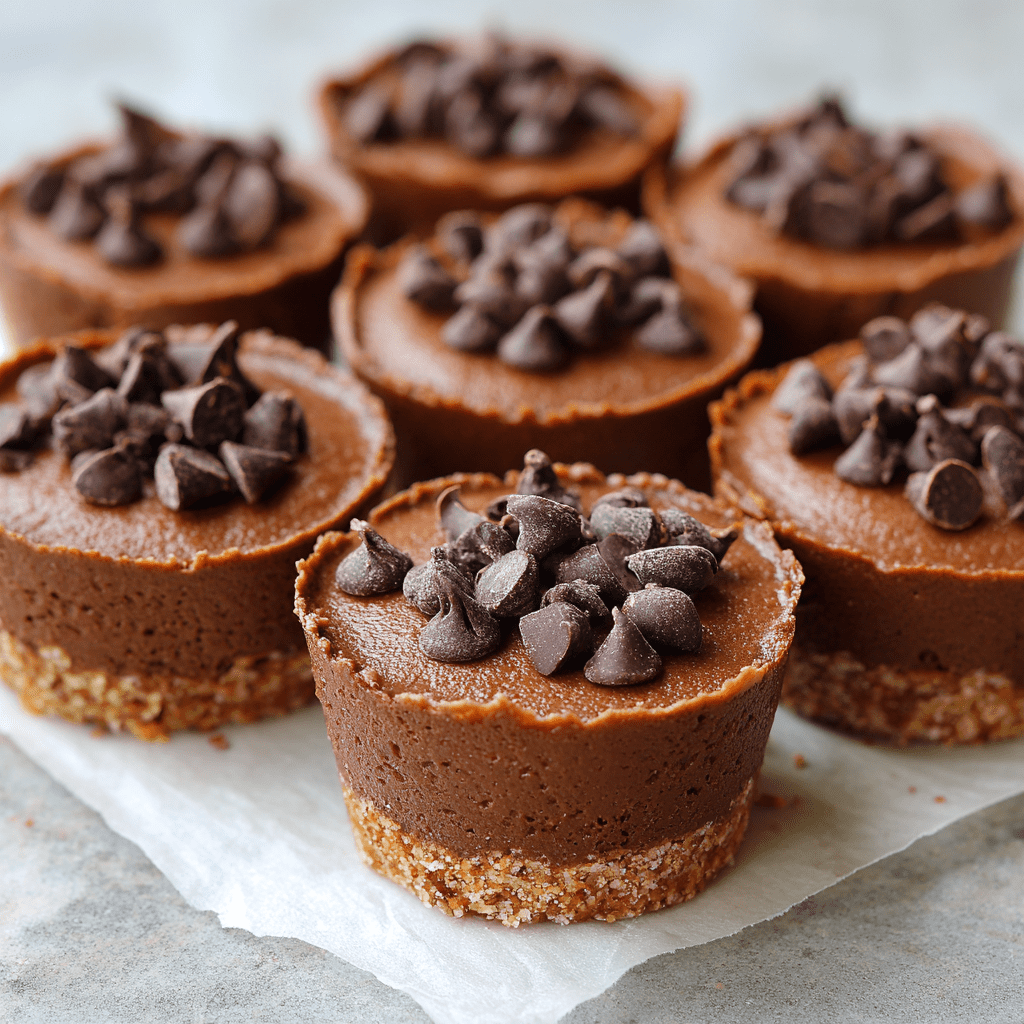
No-Bake Chocolate Protein Cheesecake Bites: Your New Fitness-Sweetheart Treat!
Hey, beautiful people! Emily Walker here, waving from my flour-dusted kitchen where magic (and occasional messes) happen. Raise your hand if you’ve ever stared longingly at cheesecake while clutching your protein shaker? 🙋♀️ Oh honey, I’ve been there too – torn between dessert dreams and wellness goals. That’s why I did a happy dance when these No-Bake Chocolate Protein Cheesecake Bites were born! Imagine: velvety chocolate cheesecake hugging a fudgy crust, all packed with muscle-loving protein, zero oven required. These little heroes are your secret weapon for post-workout wins, 3pm slumps, or “I deserve something fabulous” moments. They’re gluten-free, naturally sweetened, and so creamy you’ll swear they’re naughty. Spoiler: They’re not! Grab your food processor – we’re making guilt-free magic in 15 minutes flat. Your taste buds and biceps will high-five!
Grandma’s Spoon & My Protein Epiphany
This recipe? It’s a love letter to two kitchen legends: my grandma’s ancient wooden spoon and my beat-up blender. Growing up, Grandma’s chocolate cheesecake was the holy grail of Sunday treats. I’d perch on her countertop, stealing bites of that crackly crust while she’d swat my hand playfully. Fast-forward to culinary school days, when I’d drag myself home after midnight shifts, craving comfort but needing fuel. One exhausted night, I stared at cottage cheese (my trainer’s obsession) and remembered Grandma’s crust. “What if…?” Cue the blender symphony! That first experimental bite – creamy, chocolatey, powerful – made me do a literal kitchen sprint. These bites marry Grandma’s cozy magic with my grown-up nutrition hustle. Every time I make them, I swear I smell her vanilla extract and hear her chuckle: “Smart cookie, this one.”
Your Cheat-Code Ingredients (Pantry Power-Ups!)
Gather these simple superheroes! Pro tip: Use room-temperature ingredients for smoother blending.
Crust
- 8 Medjool dates, pitted – Nature’s caramel! Soak in warm water for 10 mins if they’re dry. Sub: 1/4 cup date paste or prunes.
- 1¾ cups almond flour – Nutty base with healthy fats. Sub: oat flour (add 1 extra tbsp maple syrup).
- 4 tbsp chocolate protein powder – My fave? Whey-casein blend for ultra-creaminess. Vegan? Use plant-based!
- 2 tbsp cocoa powder – Go dark for intense flavor! Dutch-process works beautifully.
- 2 tbsp pure maple syrup – Balances bitterness. Sub: honey or agave.
- 1 tsp pure vanilla extract – The soul of the crust! Splurge on the good stuff.
Filling
- 1 cup cottage cheese – Secret weapon! Blends silky-smooth. Must be full-fat for richness.
- ½ cup vanilla protein powder – Vanilla + chocolate = match made in heaven.
- 2 tbsp cashew butter – Creates lush texture. Sub: almond butter or sunflower seed butter.
- 1 tsp vanilla extract – Doubling down on flavor!
- ⅓ cup mini semi-sweet chocolate chips – Melty pockets of joy! Use sugar-free chips if preferred.
Let’s Build Bite-Sized Bliss! (No Chef Hat Required)
- Crush that crust! Pulse dates in a food processor until they form a sticky ball (scrape sides often!). Add remaining crust ingredients. Blend until it looks like damp sand and holds together when pinched. Chef’s hack: Throw in a pinch of salt to make flavors pop!
- Press like you mean it. Line a 24-cup mini muffin tin with paper liners or spritz with coconut oil. Drop 1 tbsp crust mix into each cup. Use a shot glass or small spoon to press FIRMLY – compacted crust won’t crumble! Tip: Wet your fingers to prevent sticking.
- Whip the filling dream. Rinse processor (no need to deep clean!). Blend cottage cheese until completely smooth – 1 full minute. Scrape down sides. Add protein powder, cashew butter, and vanilla. Blend until thick as frosting. Watch magic happen: gritty cottage cheese becomes satin!
- Swirl & sparkle. Spoon filling over crusts, leaving a tiny space at the top. Tap tin hard on counter 3x to remove air bubbles. Sprinkle chocolate chips evenly – gently press some in so they stick.
- Chill out, gorgeous! Refrigerate 2+ hours OR freeze 45 mins for firmer bites. Emergency snack? Freeze 15 mins! They set faster than my resolve near warm cookies.
- Release the joy! Run a butter knife around edges if using a tin. Pop bites out. Store in fridge (5 days) or freezer (1 month). Pro tip: Eat straight from freezer – tastes like ice cream cheesecake!
Serve with Sizzle (or Just Sneak Them from the Fridge!)
These bites shine solo, but let’s gild the lily! Plate them on a slate board with fresh raspberries and mint sprigs for “ooh-la-la” brunches. Crumble one over Greek yogurt for protein-packed parfaits. Or – my fave – stack three with a candle for a healthy birthday “cake”! For gym-bag surprises, toss frozen bites in a silicone pouch – they thaw by post-workout. Coffee? Dunk away! The chocolate chips melt dreamily into hot brew.
Shake It Up, Sugar!
Play mad scientist with these combos:
- Cookie Dough Twist: Swap cocoa powder in crust for 1 tbsp coconut flour + 2 tbsp almond butter. Fold sprinkles into filling!
- PB Cup Explosion: Use peanut butter instead of cashew butter. Press mini peanut butter cup into center before chilling.
- Berry Swirl: Swirl 2 tbsp sugar-free raspberry jam into filling before adding chips.
- Vegan Victory: Plant-based protein powder + coconut yogurt instead of cottage cheese.
- Mint Chip Cool-Down: Add ½ tsp peppermint extract to filling. Top with chopped dark chocolate.
Confessions from My Apron Pocket
Okay, real talk: The first batch tasted like chalky regret! I learned the hard way – cheap protein powder = gritty bites. Invest in quality! Also, cottage cheese scared some taste-testers… until they tried it. “Is this really cottage cheese?!” is my favorite shocked question. Pro evolution: I now add 1 tsp espresso powder to the crust – it amplifies chocolate like WHOA. These bites also started life as bars, but portion control is REAL, friends. Mini bites = less guilt, more joy. Last confession: I hide a stash behind frozen peas. Don’t tell my kids!
Your Burning Questions, Answered!
Q: My crust crumbles when I bite! Help!
A: Press harder, friend! Use that shot glass like it owes you money. If still crumbly, add 1 tsp water or extra date while blending.
Q: Can I use regular flour?
A: Almond flour keeps it gluten-free and moist. Regular flour makes dry, dense crust – not recommended.
Q: Why cottage cheese? Can I use cream cheese?
A: Cottage cheese packs protein without heavy fats! Cream cheese works (use ¾ cup) but changes macros. Blend EXTRA smooth!
Q: Filling too runny?
A> Chances are: cottage cheese was watery. Drain it in a sieve 10 mins first! Or add 1 tbsp coconut flour while blending.
Fuel Facts (Per Bite)
Calories: ~150 | Protein: 9g | Carbs: 11g | Fiber: 2g | Sugar: 6g | Fat: 8g
Note: Values vary by ingredient brands. Higher protein powder = more protein!
Print
No-Bake Chocolate Protein Cheesecake Bites
- Total Time: 2 hrs 15 minutes
- Yield: 12–14 bites 1x
Description
These dreamy bites are the ultimate guilt-free indulgence! Packed with rich chocolate flavor, natural sweetness, and a creamy protein-boosted filling, they’re perfect as a post-workout treat or a sweet midday pick-me-up. No oven needed—just blend, chill, and enjoy!
Ingredients
Crust:
8 Medjool dates, pitted
1¾ cups almond flour
4 tbsp chocolate protein powder
2 tbsp cocoa powder
2 tbsp pure maple syrup
1 tsp pure vanilla extract
Filling:
1 cup cottage cheese
½ cup vanilla protein powder
2 tbsp cashew butter
1 tsp vanilla extract
⅓ cup mini semi-sweet chocolate chips
Instructions
Make the crust: In a food processor, blend dates until sticky. Add almond flour, chocolate protein powder, cocoa powder, maple syrup, and vanilla. Blend until a soft dough forms.
Form base: Press crust mixture evenly into the bottom of a lined mini muffin tin or silicone mold.
Make the filling: Blend cottage cheese, vanilla protein powder, cashew butter, and vanilla extract until silky smooth.
Assemble: Spoon the filling over the crusts. Smooth the tops, then sprinkle mini chocolate chips evenly.
Chill: Refrigerate for at least 2 hours or freeze for 45 minutes until set.
Serve: Pop out of molds and enjoy cold for the best texture!
- Prep Time: 15 minutes
- Cook Time: 2 hrs
Nutrition
- Calories: 150 / serving
- Sugar: 6g / serving
- Fat: 8g / serving
- Carbohydrates: 11g / serving
- Fiber: 2g / serving
- Protein: 9g / serving
Final Thoughts: A Treat Worth Every (Guilt-Free) Bite!
There’s something wildly empowering about a recipe that checks all the boxes: decadent flavor, smart nutrition, no oven fuss, and pure joy in every bite. These No-Bake Chocolate Protein Cheesecake Bites aren’t just a recipe – they’re a lifestyle move. A gentle rebellion against the idea that healthy has to mean bland. A wink to your inner dessert lover that says, “I got you, babe.”
Whether you’re in the thick of a fitness routine, juggling 50 tabs open in your brain, or just want to indulge without the sugar spiral – this is your new go-to. Keep a stash in the fridge for late-night cravings, or bring them to your next brunch and watch everyone swoon without realizing they’re eating cottage cheese (cue your smug smile).
So here’s your official permission slip to treat yourself – beautifully, powerfully, and deliciously. Grandma would be proud. Your muscles will be grateful. And your sweet tooth? Oh, honey, it’s already doing a happy dance.
Now go blend that magic and make every bite a celebration. You deserve it.