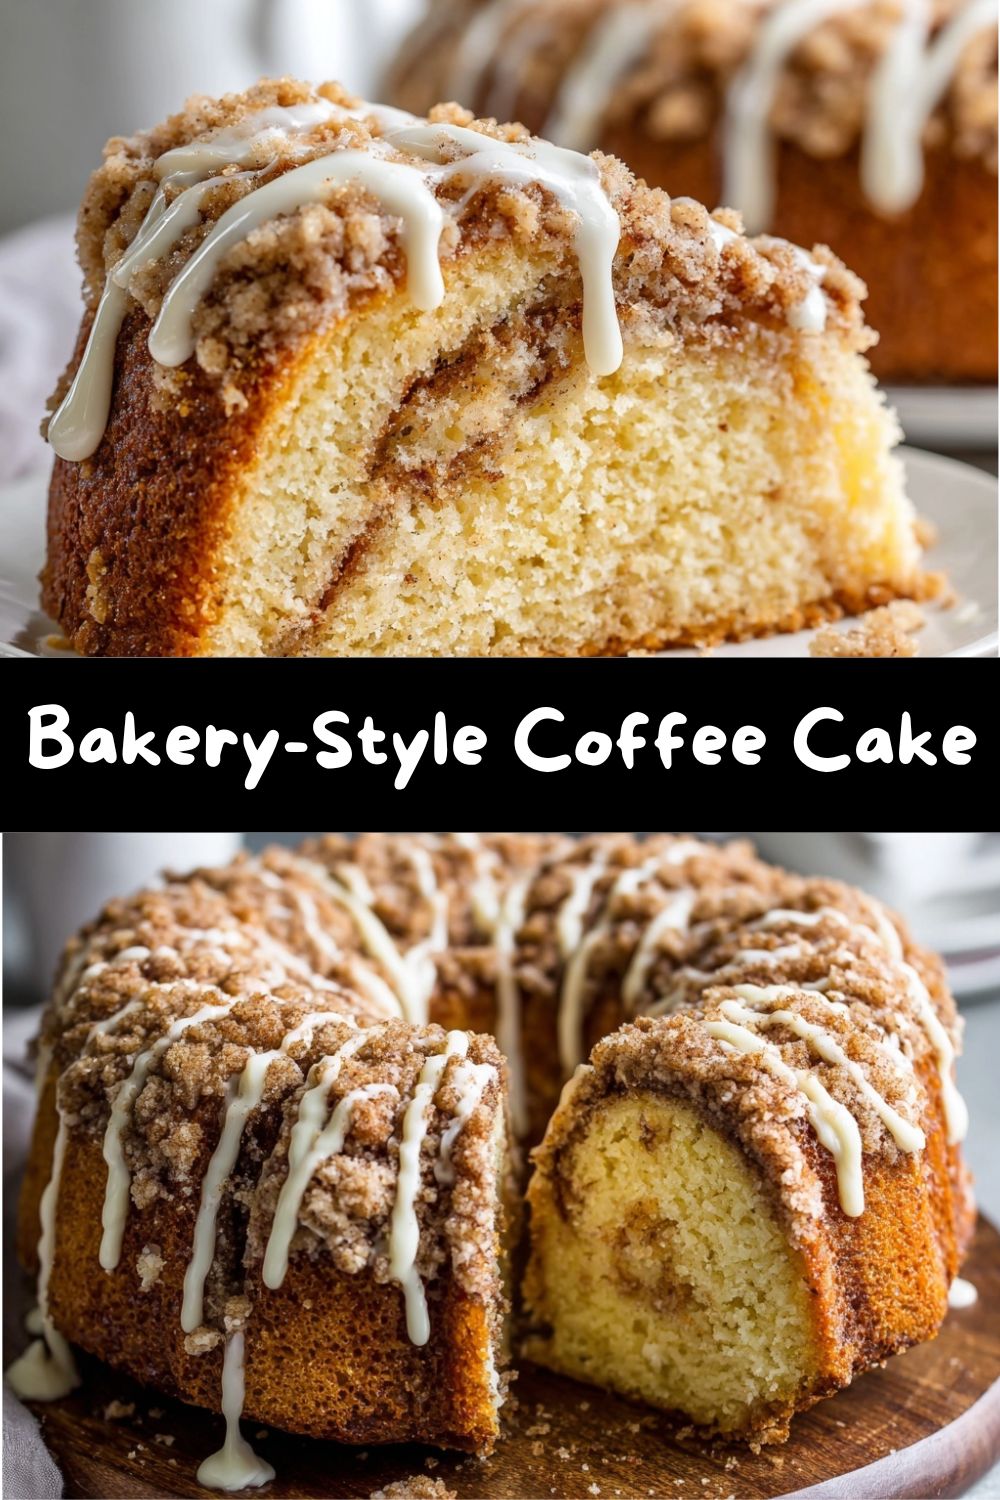
Bakery-Style Coffee Cake: The Ultimate Recipe for a Cozy, Crumb-Topped Treat
Hey, friend! Come on in, grab a mug of something warm, and pull up a chair. If you’ve ever walked into a bakery, taken one deep breath of that sweet, buttery, cinnamon-spiced air, and immediately pointed at the thickest, most crumb-covered coffee cake in the case… this is for you. That feeling of pure, unadulterated joy when you break off that first perfect forkful? We’re bringing it straight to your kitchen today.
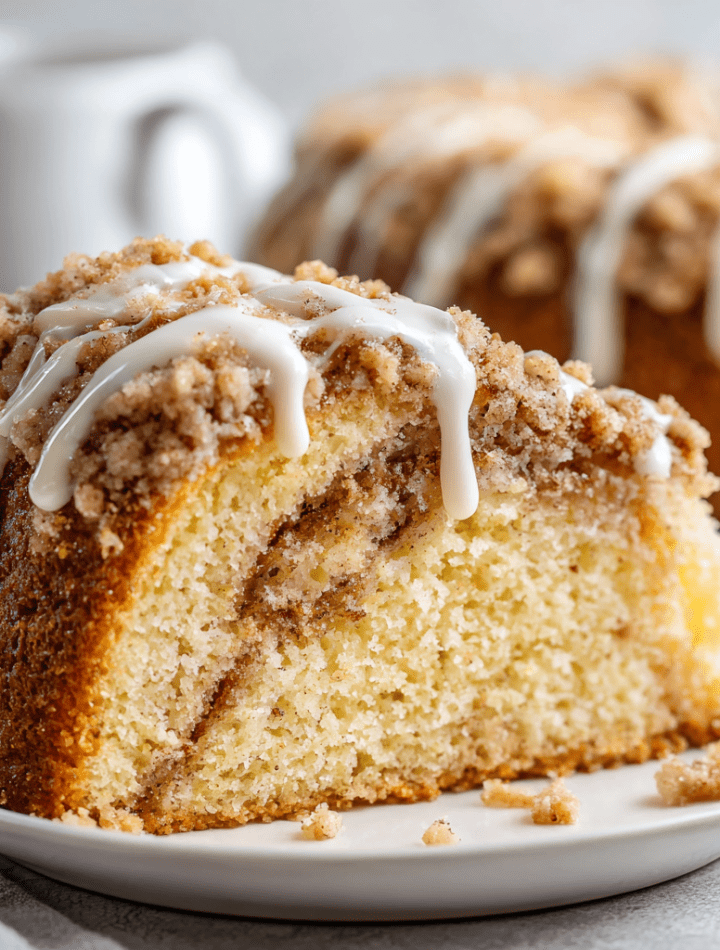
I’m talking about a supremely tender, moist vanilla cake, ribboned with a crackly cinnamon-sugar heart, absolutely buried under a mountain of buttery, crunchy crumb topping, and finished with a sweet vanilla glaze drizzle. This isn’t just a coffee cake; it’s a Bakery-Style Coffee Cake experience. It’s the centerpiece of a lazy weekend brunch, the star of the book club table, and the ultimate “I deserve something wonderful” treat on a Tuesday afternoon. And the best part? You don’t need any fancy skills or equipment. Just a bowl, a spoon (and maybe a whisk for good measure), and a whole lot of love.
So many folks think that towering crumb topping and that perfect, soft crumb are secrets only professional bakers hold. I’m here to tell you—with a wink and a nudge—that the magic is totally within reach. We’re going to make it together, step-by-step, and I’ll share all my favorite chef hacks along the way. Get ready to make your house smell absolutely incredible and to earn some serious “you made this?!” points from everyone lucky enough to get a slice. Let’s preheat the oven and get started!
The Coffee Cake That Built a Friendship
This recipe always takes me back to my first apartment after culinary school. It was a tiny place with an even tinier kitchen, but it had this wonderful, sun-drenched nook perfect for a little table. My neighbor, Mrs. Henderson, was a retired school teacher who had seen me moving in boxes of (mostly) kitchenware. One rainy Saturday morning, there was a soft knock on my door. There she stood, holding a plate covered in foil, with that unmistakable sweet, spiced scent wafting from it.
“Welcome to the building,” she said. “I always believe new beginnings should start with something sweet.” Under that foil was the most gorgeous, crumb-topped coffee cake I’d ever seen—it looked like it came from a patisserie window. We sat in my sunny nook, drank terrible instant coffee (I hadn’t unpacked the good stuff yet!), and ate cake. She told me her recipe was her mother’s, “the only one worth making.” That moment of unexpected kindness, of community forged over sugar and flour, is what “comfort food” is all about for me. My version today is a love letter to that memory—a blend of professional technique and the heartfelt, shared tradition that Mrs. Henderson gifted me. Every time I bake it, I think of her, and I hope this recipe becomes part of your story, too.
Gathering Your Coffee Cake Cast of Characters
Here’s everything you’ll need. I’ve added my little chef notes next to each one because knowing your ingredients is the first step to kitchen confidence!
For the Cake:
- 1/2 cup (1 stick) unsalted butter, softened: This is the foundation of our rich flavor and tender texture. Pro Tip: “Softened” means when you press it, your finger leaves a clear indent. Don’t melt it! If you forgot to take it out, cut it into chunks and let it sit for 15-20 minutes.
- 1 cup granulated sugar: For sweetness and, crucially, to help cream with the butter to create a light, fluffy base for our cake.
- 2 large eggs, at room temperature: They’ll incorporate into the batter much more smoothly if they’re not cold straight from the fridge. Pop them in a bowl of warm water for 5 minutes if you’re in a hurry.
- 1 tsp pure vanilla extract: The secret background singer that makes all the other flavors pop. Use the good stuff if you can!
- 1 cup sour cream or full-fat Greek yogurt: THIS is the ultimate secret weapon for a melt-in-your-mouth, moist crumb that stays soft for days. The acidity also tenderizes the gluten. Sour cream gives a richer tang, while Greek yogurt is a touch lighter.
- 1 ¾ cups all-purpose flour: The workhorse. No need for cake flour here; all-purpose gives us the perfect sturdy-yet-soft structure to hold up all that crumb.
- 1 tsp baking powder & 1/2 tsp baking soda: Our leavening dream team. The baking powder provides lift, and the baking soda reacts with the sour cream for an extra boost of tenderness.
- 1/4 tsp salt: Never, ever skip this! Salt is a flavor enhancer. It makes the sweet taste sweeter and the butter taste richer.
For the Cinnamon Swirl:
- 1/3 cup packed brown sugar: The molasses in brown sugar creates that gooey, delicious ribbon. Pack it firmly into your measuring cup.
- 1 tbsp ground cinnamon: Because we believe in a bold, unapologetic cinnamon swirl. Feel free to add a pinch of nutmeg or cardamom if you’re feeling adventurous!
For the Crumb Topping:
- 1/2 cup all-purpose flour
- 1/2 cup packed brown sugar
- 1 tsp ground cinnamon: Yes, more cinnamon! This is a cinnamon-lover’s paradise.
- 1/4 cup (1/2 stick) cold unsalted butter, cubed: COLD is non-negotiable here. It’s what creates those delightful, craggy crumbs rather than a paste.
For the Vanilla Glaze:
- 1/2 cup powdered sugar: Also called confectioners’ sugar. It dissolves instantly for a smooth glaze.
- 1–2 tbsp milk or cream: Start with 1 tbsp and add the second drop-by-drop until you get a thick but drizzle-able consistency.
- 1/4 tsp vanilla extract: The perfect sweet finish.
Let’s Build This Masterpiece: Step-by-Step
Ready? Tie on that apron—things are about to get deliciously messy. Follow these steps, and you’ll have a perfect coffee cake.
Step 1: Prep Like a Pro. First, preheat your oven to 350°F (175°C). This gives it plenty of time to reach a steady, even temperature. Grab an 8×8 or 9×9-inch square baking pan. I love glass or ceramic for even browning, but metal works great too! Grease the bottom and sides generously with butter or non-stick spray. Chef Hack: For super easy removal, line the pan with a parchment paper sling, letting the edges hang over two sides. You’ll be able to lift the whole cake out for pristine slicing!
Step 2: Make the Cake Batter. In a large bowl, cream together the softened butter and granulated sugar. Use a hand mixer or stand mixer on medium speed for a good 2-3 minutes. We want it pale, fluffy, and almost whipped. This incorporates air, which is key for lift. Now, beat in the eggs, one at a time, making sure each is fully blended before adding the next. Scrape down the bowl, then mix in the vanilla. Next comes the sour cream—mix it in on low speed until just combined. It will look a little curdled, but that’s okay! In a separate bowl, whisk together the flour, baking powder, baking soda, and salt. Add this dry mixture to the wet ingredients. CRUCIAL TIP: Mix on low speed *only until the flour disappears*. A few streaks are fine. Overmixing is the enemy of a tender cake—it develops gluten and makes it tough. Set this gorgeous batter aside.
Step 3: Create the Cinnamon Swirl & Layer Up. In a small bowl, stir together the 1/3 cup brown sugar and 1 tbsp cinnamon. Now, spread half of your cake batter into the bottom of your prepared pan. This can be tricky as the batter is thick! I use a small offset spatula or the back of a spoon lightly coated with water or spray oil to help spread it evenly. Sprinkle all of that cinnamon-sugar mixture over this first layer. Gently dollop the remaining cake batter over the top in big spoonfuls. Then, with a light touch, spread it to cover the cinnamon layer as best you can. It’s okay if some cinnamon peeks through—this isn’t a perfection contest, it’s a flavor contest!
Step 4: Craft the Legendary Crumb Topping. In a medium bowl, combine the 1/2 cup flour, 1/2 cup brown sugar, and 1 tsp cinnamon. Add the cold, cubed butter. Now, get in there with your fingertips! Pinch, rub, and squeeze the mixture until it forms clumps and crumbs of all different sizes—from pea-sized to almond-sized. This variety gives you the perfect textural contrast. No forks or pastry cutters needed; your hands are the best tool. Sprinkle this crumbly heaven evenly over the entire surface of the batter. Don’t press down!
Step 5: Bake to Golden Perfection. Slide the pan into your preheated oven. Bake for 40-45 minutes. Ovens vary, so start checking at the 35-minute mark. You’re looking for the top to be golden brown, the crumbs look crisp, and a toothpick inserted into the center (pushing through the crumb layer into the cake) comes out with just a few moist crumbs attached, not wet batter. If the crumbs are browning too fast, you can loosely tent the top with foil for the last 10 minutes of baking.
Step 6: The Glaze & Finale. Let the cake cool in the pan on a wire rack for at least 30 minutes. While it’s cooling, make the glaze: whisk the powdered sugar, 1 tbsp of milk, and vanilla together. Add more milk literally a half-teaspoon at a time until it’s thick but will drizzle off your whisk in a lovely ribbon. Drizzle this all over the warm (or completely cooled) cake. Slice, serve, and prepare for the compliments to roll in!
Serving Your Bakery-Worthy Creation
How you serve this cake is half the fun! For the full classic diner experience, slice it into generous squares right in the pan and serve it warm with a hot cup of coffee or a tall glass of cold milk. The way the glaze soaks in just a little when it’s warm is pure magic.
If you’re going for brunch elegance, use the parchment sling to lift the whole cake onto a cutting board. Slice it cleanly with a sharp knife, wiping it between cuts for neat slices. Arrange them on a beautiful platter, maybe with a dusting of extra powdered sugar and a bowl of fresh berries on the side for a pop of color and freshness. For a special occasion, a dollop of lightly sweetened whipped cream or a scoop of vanilla bean ice cream turns this coffee cake into an unforgettable dessert. Remember, the crumb topping is the star—make sure every plate gets a generous helping of those buttery pieces!
Make It Your Own: Delicious Twists & Swaps
Once you’ve mastered the classic, the playground is open! Here are a few of my favorite ways to mix it up.
- The Fruitful Twist: Add 1 cup of fresh or frozen (not thawed) blueberries or raspberries to the cake batter. Or, layer thin slices of apple or pear over the first cinnamon swirl layer before adding the top layer of batter.
- Chocolate Chip Craving: Fold 3/4 cup of semi-sweet or dark chocolate chips into the batter. The melty pockets with the cinnamon are next-level.
- Nutty Crunch: Add 1/2 cup of chopped toasted pecans or walnuts to your crumb topping mixture. The toasty flavor is incredible.
- Lemon-Blueberry Bliss: Swap the vanilla extract in the cake for 1 tsp of lemon zest and 1 tbsp of lemon juice. Use the cinnamon swirl as is, or mix in 1/2 cup of dried blueberries. This bright, tangy version is a springtime favorite.
- Gluten-Free & Dairy-Free Friendly: Use a 1-to-1 gluten-free all-purpose flour blend. For dairy-free, use plant-based butter sticks and a plain, unsweetened dairy-free yogurt (like coconut or almond) in place of sour cream. Use your favorite non-dairy milk for the glaze.
Chef Emily’s Kitchen Confessions & Notes
This recipe has been my trusty sidekick for years, and it’s evolved with every bake. I once, in a frantic pre-guest cleanup, accidentally used salted butter in the crumb topping AND added the salt to the dry ingredients. The result? A subtly salty-sweet masterpiece that my friends still request! (Now I do it on purpose sometimes.) The beauty of this cake is its flexibility and forgiveness.
My biggest lesson? Patience with the creaming step. Don’t rush creaming the butter and sugar. Those few minutes of whipping are building the foundation for that beautiful, light texture. Also, this cake actually tastes even better on day two, as the flavors meld and the crumb topping softens just a touch into the cake beneath it. If it lasts that long, of course!
Your Questions, Answered!
Q: My crumb topping melted into the cake! What happened?
A: This usually means your butter was too warm. For perfect crumbs, the butter must be truly cold, straight from the fridge, and you should use your fingertips to work it in quickly. Also, ensure your cake batter isn’t overly warm when you sprinkle the crumbs on.
Q: Can I make this coffee cake ahead of time?
A: Absolutely! You have two great options: 1) Bake it the day before, let it cool completely, wrap the whole pan tightly in foil, and store at room temp. Glaze before serving. 2) Prepare the batter, layer it in the pan, and make the crumb topping. Cover both (the crumb in a separate bag in the fridge) and refrigerate overnight. In the morning, sprinkle on the cold crumbs and bake—you may need to add 5-7 extra minutes.
Q: My center is still gooey but the edges are done. Help!
A> This is common with dense, moist cakes. First, make sure your oven is fully preheated. Second, use the toothpick test in the very center. If it’s wet, bake in 3-5 minute increments until it comes out with just moist crumbs. If the top is browning too much, tent it with foil. Using a glass or ceramic dish (which heats more gently) instead of a dark metal pan can also help the center bake more evenly.
A Final Slice of Comfort (The Best Part)
If there’s one recipe I hope you tuck into your back pocket and come back to again and again, it’s this one. This bakery-style coffee cake isn’t just about crumbs and cinnamon—it’s about slowing down, making something with your hands, and filling your kitchen with a smell that feels like a hug.
It’s the cake you bake when friends are coming over “just for coffee” (and somehow stay for hours). It’s the one you bring to a new neighbor, the one you cut into generous squares for sleepy weekend mornings, the one you sneak a second slice of when no one’s looking. It’s unfussy, forgiving, and endlessly comforting—exactly the kind of recipe that earns a permanent place in your rotation.
So whether you serve it warm with a mug of strong coffee, dress it up with berries for brunch, or wrap up leftovers for tomorrow’s treat, I hope this coffee cake brings a little bakery magic into your home.
From my kitchen to yours—happy baking, happy sharing, and never skimp on the crumbs. 💛
— Chef Emily