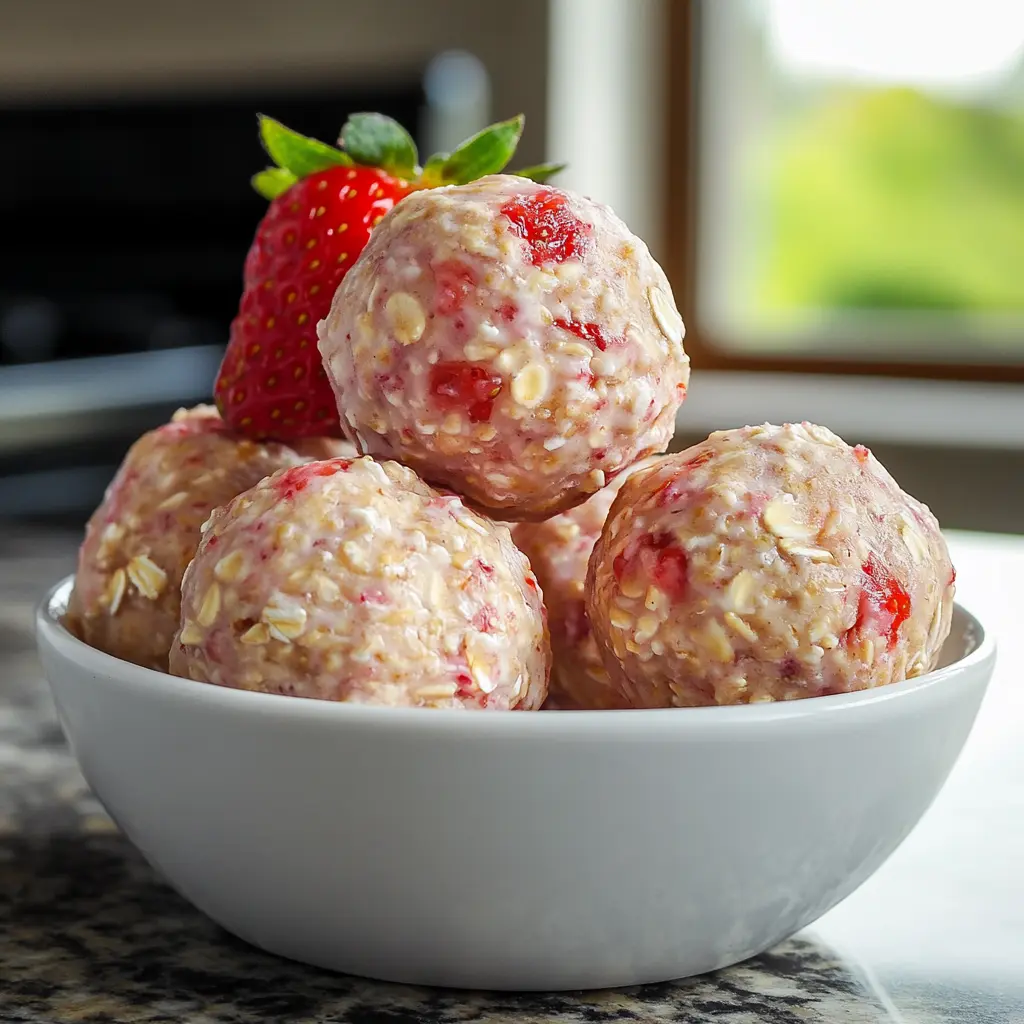
Banana Pudding Easter Truffles: Your New Favorite No-Bake Bite!
Hey friend! Can we talk about Easter desserts for a second? I love a show-stopping layer cake or a perfect pie as much as the next person, but sometimes—especially when you’re juggling egg hunts, family visits, and that one relative who always shows up early—you need a treat that’s secretly simple but looks and tastes like you fussed for hours. Enter the hero of our story today: Banana Pudding Easter Truffles.
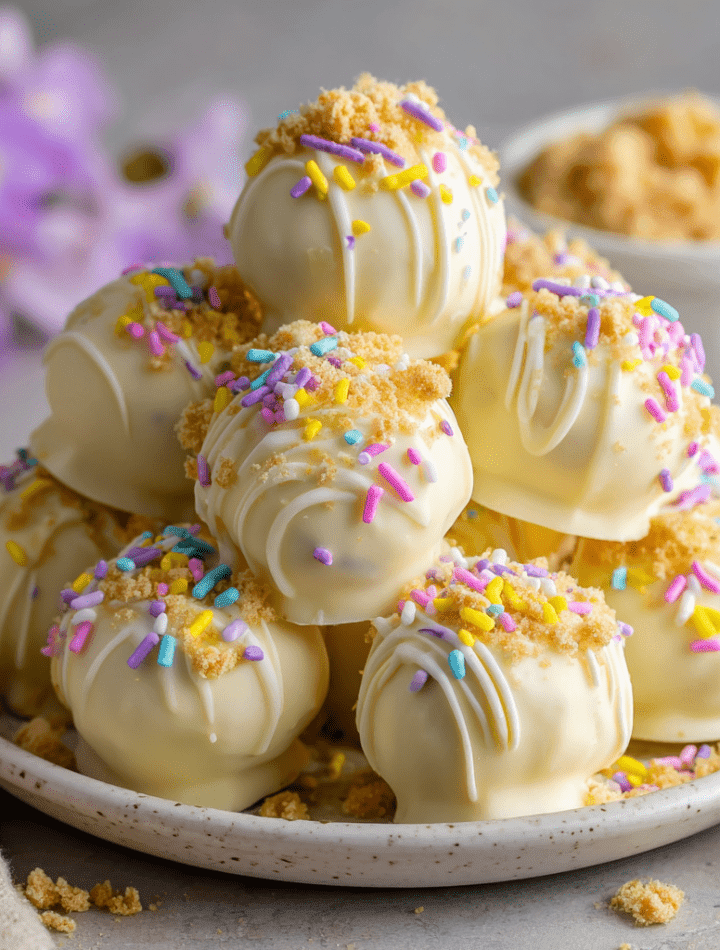
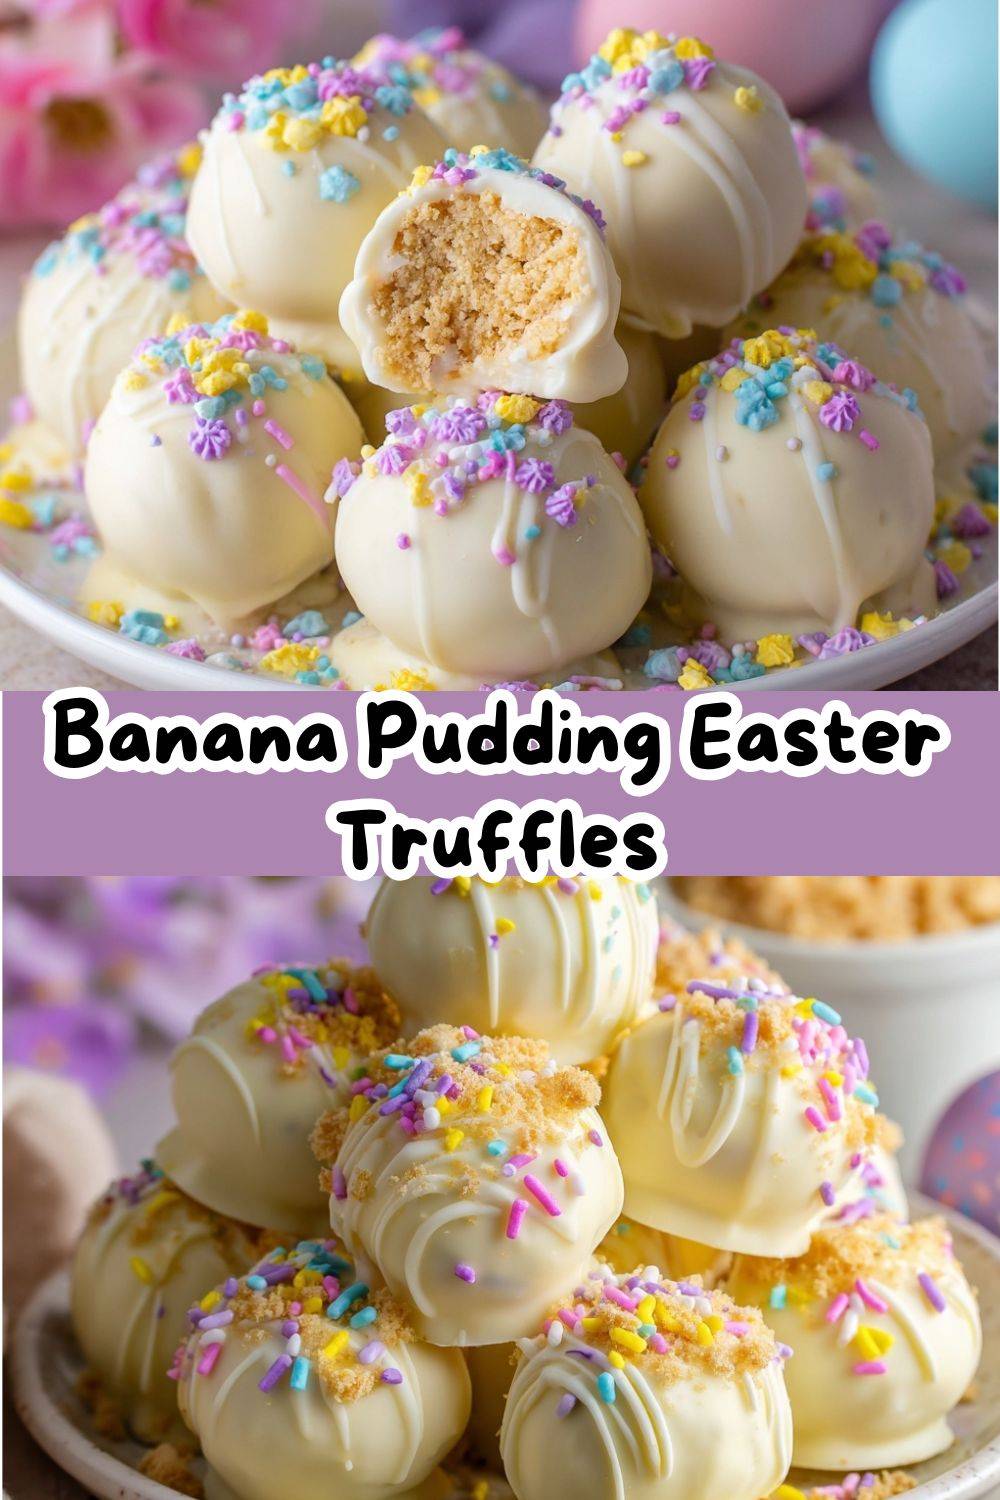
Imagine all the cozy, nostalgic flavor of classic banana pudding—the creamy sweetness, the hint of vanilla, the satisfying crumble of those wafers—transformed into a adorable, pop-in-your-mouth truffle. Then, we dip them in a sleek coat of white chocolate and add a sprinkle of springtime joy. They’re rich, they’re creamy, and they are irresistibly fun. The best part? No oven required, minimal mess, and maximum smiles. Whether you’re setting up a festive dessert table, packing pretty boxes for neighbors, or just need a sweet project to do with the kiddos, these truffles are your answer. So, tie on your favorite apron (the one with the stains that tell stories), and let’s make something delicious together.
A Spoonful of Nostalgia: Why This Recipe Tastes Like Home
This recipe takes me right back to my grandma’s linoleum-tiled kitchen. She wasn’t a “fancy” dessert maker, but she was a legend with a box of pudding mix and a bag of vanilla wafers. Her banana pudding, layered in that same giant glass bowl for every potluck and picnic, was the stuff of family lore. We’d all hover, spoons at the ready, waiting for that moment she’d pull back the cling film to reveal the pillowy peaks of meringue (hers was the baked kind, God rest her soul).
I wanted to capture that magic in a form you could share, gift, and nibble on without needing a bowl and spoon. One afternoon, after a slightly failed attempt at banana pudding macarons (a story for another day!), I started playing with the core components. Mashing up the wafers, blending in the pudding flavor, and binding it with cream cheese created this epically delicious dough that had me doing a happy dance right there by the mixer. Rolling them into little balls felt like playing with edible play-dough, and the white chocolate coating? That was the glossy, elegant finish my grandma would have pretended was too much fuss but secretly loved. Every bite is a hug from the past, and I think that’s the best kind of recipe there is.
Gathering Your Sunshine: What You’ll Need
Here’s the beautiful lineup for these no-bake wonders. I’ve added my little chef insights next to each one because knowledge is power—and tastier truffles!
- 1 (3.4 oz) box instant banana pudding mix: This is our flavor powerhouse! Instant is key here—we’re not making pudding, we’re using the dry mix for its concentrated banana-vanilla magic. Don’t swap for cook-and-serve.
- 1½ cups crushed vanilla wafers: The soul of the operation! I use a food processor for fine crumbs, but a zip-top bag and a rolling pin works too (great for stress relief!). This gives us that iconic texture and flavor.
- 4 oz cream cheese, softened: Our binder and the source of that luscious, tangy creaminess. Full-fat is best here for the right texture. Let it sit out for 30-60 minutes until it’s soft to the touch for easy mixing.
- 2 tbsp milk: Just a splash to bring everything together. Whole milk adds richness, but any milk you have works.
- 1 tsp vanilla extract: A flavor booster! It enhances the vanilla from the wafers and rounds out the banana perfectly.
- 12 oz white chocolate or vanilla candy melts: For the glamorous coating. Chocolate chips or bars chopped small melt smoothly. Candy melts are more forgiving and set with a firmer shell—great for beginners!
- Yellow or pastel sprinkles (optional): The Easter flair! I love nonpareils or little egg-shaped sprinkles. This is where you and the kids can get creative.
Let’s Get Rolling: Your Foolproof Truffle-Making Steps
Ready? This process is simple, fun, and almost impossible to mess up. I’ll walk you through each step with my favorite kitchen hacks.
- Create the Truffle “Dough.” In a medium bowl, combine the dry banana pudding mix and crushed vanilla wafers. Stir them together so the pudding mix is evenly distributed. Add the softened cream cheese, milk, and vanilla extract. Now, get your hands in there (or use a sturdy spatula) and mix until it’s completely combined, thick, and smooth. It will look a bit like a cookie dough and will hold together when pinched. Chef’s Tip: If the mixture feels too dry to come together, add milk ½ tablespoon at a time. If it feels too sticky, add a few more crushed wafers. Climate can affect it!
- Chill Out. Cover the bowl and pop it into the refrigerator for 30 minutes. This firming-up step is crucial—it makes rolling the balls so much cleaner and easier. Use this time to tidy up or line a baking sheet with parchment paper.
- Roll, Roll, Roll! Using a small cookie scoop (about 1 tablespoon), portion the dough. Roll each portion between your palms to form a smooth ball. Place them on your parchment-lined tray. Chef’s Hack: A little vegetable oil or a spritz of cooking spray on your hands can prevent sticking if the dough starts to get warm.
- The Deep Freeze (Briefly!). Slide the tray into the freezer for 15-20 minutes. We’re not freezing them solid, just getting them very cold and firm. This is the #1 secret to getting a smooth, thick chocolate coating later!
- Melt Your Chocolate. While the balls chill, melt your coating. Do this gently! Use a double boiler or a heatproof bowl set over a pot of simmering water (don’t let the bowl touch the water). Stir frequently until smooth. If using the microwave, do it in 20-second bursts, stirring well between each, to avoid seizing. Chef’s Tip: For extra smooth dipping, add a teaspoon of coconut oil to the chocolate as it melts.
- Dip & Decorate. Remove a few truffles from the freezer at a time. Using a fork or a dipping tool, lower a ball into the melted chocolate, tap off the excess, and gently slide it back onto the parchment. Immediately add your sprinkles—the coating sets fast! Chef’s Hack: Have a second fork or knife handy to help push the truffle off the dipping fork for a cleaner finish.
- Set & Store. Let the chocolate set completely at room temperature if using candy melts, or chill in the fridge for 10 minutes if using white chocolate. Once set, store them in an airtight container in the refrigerator until you’re ready to serve and impress everyone!
How to Serve These Little Balls of Sunshine
Presentation is half the fun! For an Easter dessert table, pile them high on a cake stand or in a pretty pastel bowl. They look gorgeous mixed with some speckled candy eggs or fresh spring flowers (just keep the flowers away from direct contact). For gift-giving, place them in small cardboard candy boxes or clear cellophane bags tied with a ribbon. They’re the perfect sweet token for teachers, neighbors, or your brunch host. I love serving them with a pot of coffee after a big meal—they’re the ideal light, sweet finish that doesn’t weigh you down.
Mix It Up! Fun Flavor Twists & Swaps
Once you master the basic formula, a world of variations opens up! Here are a few of my favorites:
- Nilla Wafer & Berry: Use cheesecake or vanilla instant pudding instead of banana. After dipping, top with a tiny freeze-dried strawberry or raspberry piece.
- Chocolate Banana: Swap the white chocolate coating for semi-sweet or dark chocolate. A divine combination!
- Peanut Butter Banana: Add 2 tablespoons of creamy peanut butter to the dough mixture. Roll the finished truffles in crushed peanuts for a salty-sweet crunch.
- “Naked” Dusted Truffles: For a less sweet option, skip the chocolate dip. Simply roll the chilled balls in a coating of powdered sugar, extra pudding mix, or finely crushed graham crackers.
- Dairy-Free Friendly: Use dairy-free cream cheese and milk, and ensure your white chocolate is vegan. The pudding mix is usually accidentally vegan, but always check the label!
Emily’s Kitchen Notes & Confessions
This recipe has seen some fun experiments in my kitchen. The first batch? I was so eager I didn’t chill the dough long enough. Let’s just say I ended up with more of a “banana pudding spread” than truffles—delicious, but not rollable! Patience is your friend. I’ve also learned that the brand of pudding mix can slightly alter the sweetness, so taste your dough (you know, for science) and adjust if needed. Over time, I started adding that tiny bit of vanilla extract; it just makes the flavor pop in a way that reminds me even more of my grandma’s version. These truffles are now a springtime staple in my house, and I hope they become one in yours, too.
Your Questions, Answered!
Q: My truffle mixture is too sticky to roll. Help!
A: No worries! This usually means it needs a bit more structure. Add more crushed vanilla wafers, a tablespoon at a time, until it’s manageable. Also, ensure you chilled the base mixture for the full 30 minutes—it makes a huge difference.
Q: Can I make these ahead of time?
A: Absolutely! They are perfect for making ahead. Store the finished, coated truffles in an airtight container in the fridge for up to 5 days. You can also freeze the un-dipped balls on a tray, then transfer to a freezer bag for up to a month. Thaw in the fridge before dipping.
Q: My white chocolate got clumpy when I melted it. What happened?
A> That’s called “seizing,” and it often happens from overheating or a single drop of water getting in the bowl. To save it, try stirring in a teaspoon of solid vegetable shortening (like Crisco) until it smooths out. Gentle, low heat is key next time!
Q: Can I use real banana instead of pudding mix?
A: I don’t recommend it for this specific recipe. Fresh banana adds too much moisture and will make the truffles mushy and shorten their shelf life dramatically. The pudding mix gives us that perfect, stable flavor and texture.
Nutritional Info (Because We’re Curious!)
Okay, let’s keep it real—these are a celebratory treat! But here’s a general breakdown per truffle (assuming a yield of about 20). Please note, this is an estimate and can vary based on specific ingredients and brands used: Approximately 110 calories, 6g fat, 12g carbohydrates, and 1g protein. The majority of the carbs come from the wafers and pudding mix, while the fat comes from the cream cheese and chocolate coating. To make them a bit lighter, you could use reduced-fat cream cheese, but the texture may be slightly less rich. Remember, treats like these are all about balance and joy!
Final Thoughts from My Kitchen to Yours
And there you have it, my friend—everything you need to create these delightful little bites of spring. What I love most about this recipe is how it turns simple, pantry-friendly ingredients into something truly special. It’s about the joy of creating, the fun of decorating, and the shared happiness of eating something made with love. I hope these Banana Pudding Easter Truffles bring a big dose of sweetness to your celebration and maybe even start a new tradition. If you make them, I’d be over the moon if you tagged me @TastyChow so I can see your beautiful creations! Now, go forth and conquer that dessert table. You’ve got this.
With love and a full heart,
Emily