You Deserve a Treat That Loves You Back: Introducing Cake Batter Protein Balls!
Hey there, friend! Emily Walker here, from my flour-dusted kitchen to yours. Let’s get real for a second. How many times have you found yourself in that 3 p.m. slump, staring into the pantry abyss, craving something sweet, but also knowing your body is practically waving a white flag for something substantial? Or maybe you’re rushing out the door, breakfast totally forgotten (again!), wishing you had a grab-and-go option that didn’t taste like cardboard. I’ve been there more times than I can count, usually with a streak of chocolate on my apron as proof.
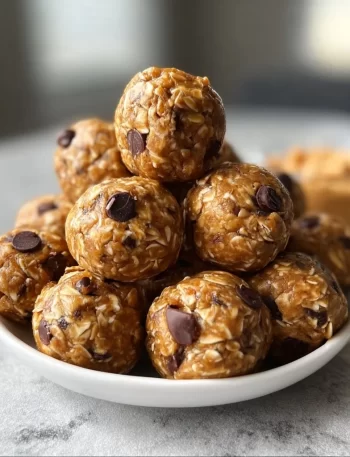
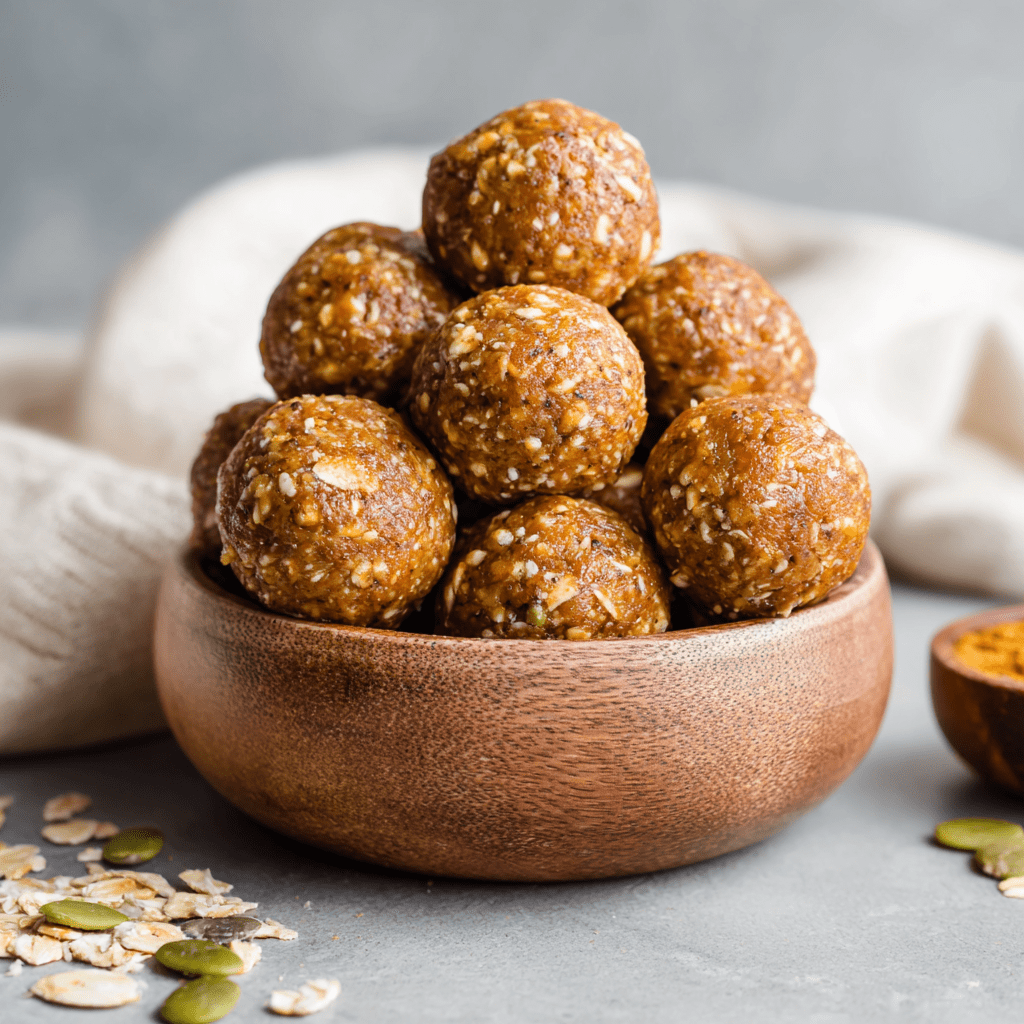
That’s why I’m absolutely over-the-moon to share one of my all-time favorite kitchen hacks with you today: Cake Batter Protein Balls. These little nuggets of joy are the ultimate solution to the sweet-and-sustaining snack dilemma. Imagine everything you love about licking the spoon after making birthday cake batter—that nostalgic, vanilla-kissed, sprinkle-studded fun—but packed with protein and wholesome energy to actually power your day. They’re no-bake, meaning zero oven preheating and more time for you. They come together in one bowl with simple ingredients, and they’re so darn cute and cheerful, they’re basically edible motivation. Whether you need a post-workout refuel, a lunchbox surprise, or just a moment of “heck yes, I made something healthy and delicious,” these protein balls have got your back. So, tie on your apron (the messy one is totally welcome here), and let’s make something that’s equal parts treat and fuel!

The Birthday Bowl: Where This Recipe Was Born
This recipe has a special place in my heart because it’s a direct descendant of my favorite childhood memory: The Birthday Bowl. In our house, the best part of making a birthday cake wasn’t the cake itself—it was the glorious, buttery, sugary remains in the mixing bowl. My grandma would always call my sister and me over, hand us two spoons, and let us go to town. It was a sacred, sticky, sprinkle-flecked ritual. The problem? As I got older and my days started including things like gym sessions and chasing after a busy life, that raw flour-and-egg-laden treat wasn’t exactly the best choice for a snack.
Fast forward to culinary school, where I became obsessed with flavor balancing and nutrition. I started playing around in the kitchen, determined to capture that pure, unadulterated joy of cake batter in a form that I could enjoy anytime, guilt-free. After many experiments (some involving alarmingly green food coloring and too much peanut butter), I landed on this perfect combo. These protein balls are my grown-up, nutrient-packed homage to Grandma’s Birthday Bowl. Every bite takes me right back to that sunlit kitchen, but now it gives me the energy to keep creating more delicious memories. It’s proof that you really can have your cake batter… and eat it, too!
What You’ll Need: Simple, Wholesome, & Flexible
Here’s the beautiful part: you probably have most of this in your pantry already! This is a “framework” recipe—once you get the basic texture down, the flavor world is your oyster. Let’s break it down.
- 1 cup oat flour – This is our wholesome, gluten-free base that gives the balls structure and a lovely, tender chew. Chef’s Insight: You can buy oat flour, but it’s SO easy (and cheaper!) to make your own. Just toss old-fashioned rolled oats into a blender or food processor and blitz until it looks like fine flour. Done!
- ½ cup vanilla protein powder – The protein powerhouse! This is where a lot of the “cake batter” flavor comes from. Substitution Tip: Use a high-quality powder you enjoy the taste of on its own. For a vegan option, a vanilla pea or soy protein blend works great. If you don’t have vanilla, a plain or “cake batter” flavored one is perfect.
- 2 tbsp almond butter – Our healthy fat binder that adds richness and helps everything stick together. Chef’s Insight: I love almond butter for its mild flavor, but creamy peanut butter, cashew butter, or even sunflower seed butter (for a nut-free version) are fantastic swaps. Just make sure they’re drippy, not the super-stiff kind at the bottom of the jar.
- 2 tbsp pure maple syrup or honey – The natural sweetener that brings it all together. Substitution Tip: Maple syrup keeps it vegan, while honey adds its own distinct floral note. Agave nectar works in a pinch, or for a sugar-free version, you could try a monk fruit syrup.
- 2–3 tbsp milk of choice – The magic moisture variable! I use unsweetened almond milk. Chef’s Insight: Start with 2 tablespoons. The type of protein powder and nut butter you use can greatly affect how much liquid you’ll need. Dairy milk, oat milk, or even coconut milk all work beautifully.
- 1 tsp pure vanilla extract – Non-negotiable for that true cake batter aroma! It deepens all the other flavors.
- 1–2 tbsp sprinkles (jimmies) – The FUN factor! Chef’s Insight: For a cleaner look, use natural, dye-free sprinkles. Or, for a major flavor boost, try using rainbow nonpareils (the tiny round balls)—they add a delightful little crunch!
- A tiny pinch of salt – This is my secret weapon. Salt makes the sweet flavors pop and taste more complex. Trust me on this one!
Let’s Make ‘Em! Your Foolproof, No-Bake Guide
Ready? This is the easiest 10 minutes of kitchen therapy you’ll have all week. Let’s walk through it step-by-step.
- Make Your Oat Flour (If Needed). If you’re using whole rolled oats, pour about 1 heaping cup into your blender or food processor. Blitz on high for 30-60 seconds, until it’s a fine, powdery flour. Give it a quick shake halfway through to ensure even blending. Chef’s Hack: Make a big batch of oat flour and store it in a jar for future recipes—you’ll thank yourself later!
- The Dry Team Assembles. In a medium mixing bowl, add your freshly made (or store-bought) oat flour, vanilla protein powder, and that all-important pinch of salt. Whisk them together with a fork or small whisk. This isn’t just busy work—it evenly distributes the protein powder and salt so every bite is perfectly flavored.
- Bring in the Wet Crew. To the dry ingredients, add your almond butter, maple syrup or honey, and vanilla extract. Now, pour in 2 tablespoons of your chosen milk. Grab a sturdy spatula or spoon and start mixing! It will look crumbly at first, but keep folding and pressing. The goal is a dough that holds together when pinched. Chef’s Tip: If after a minute of mixing it still seems dry and sandy, add more milk 1 teaspoon at a time. Different protein powders absorb liquid differently, so patience is key here!
- Fold in the Fun! Once your dough is cohesive and holds together easily, gently fold in your sprinkles. Don’t over-mix here, or the colors might start to bleed (though that can look kinda cool and tie-dye-ish!).
- Roll and Rally. Line a small baking sheet or plate with parchment paper. Using a tablespoon or small cookie scoop, portion out the dough. Roll each portion between your palms to form a smooth, 1-inch ball. If the dough starts sticking to your hands, a very light spritz of cooking oil or dampening your palms with water helps immensely. Chef’s Hack: For perfectly uniform balls, I love using a #60 cookie scoop—it’s a total game-changer for snack prep!
- The Chill Pill. Place your rolled balls on the prepared tray and pop them in the fridge for at least 15-20 minutes. This firming-up time is crucial—it allows the oats to absorb the moisture and lets the flavors really mingle and develop. Think of it as their beauty rest!
How to Serve & Savor Your Creation
Okay, the hardest part (waiting) is over! Now, how to enjoy these gems?
These protein balls are the ultimate grab-and-go snack, but let’s get creative with presentation. For a fun after-school or post-workout treat, I love stacking them in a clear mason jar with layers separated by parchment paper—it looks so cute on the counter! Pack them in a small reusable container in your gym bag or purse for a smart pick-me-up.
Want to fancy them up for guests? Serve them on a pretty platter with a side of extra sprinkles for rolling, or even drizzle them with a little melted white chocolate or a simple vanilla glaze for a next-level dessert bite. They pair wonderfully with a cup of coffee for an afternoon boost or a cold glass of almond milk as a light, satisfying dessert. The best part? They’re perfectly portable happiness.
Mix It Up! 5 Delicious Twists on the Classic
Once you’ve mastered the basic recipe, the flavor playground is open! Here are a few of my favorite riffs:
- Chocolate Chip Cookie Dough: Swap the vanilla protein powder for a chocolate variety, omit the sprinkles, and fold in 2 tbsp of mini chocolate chips. A little cocoa powder (1 tsp) adds even more depth.
- Lemon Poppy Seed: Use vanilla protein powder, but replace the vanilla extract with 1 tsp of lemon extract (or the zest of one lemon + ½ tsp extract). Fold in 1 tbsp of poppy seeds instead of sprinkles. So bright and fresh!
- Peanut Butter Cup: Use chocolate protein powder and peanut butter. After rolling, you can even roll the balls in crushed rice cereal for a crunchy shell, or press a mini chocolate chip into the top of each ball.
- Tropical Escape: Use vanilla or coconut-flavored protein powder. Substitute the almond butter with coconut cream (the thick part from a can) and fold in 2 tbsp of finely chopped dried pineapple and coconut flakes.
- Double Chocolate Mint: Use chocolate protein powder and add ¼ tsp of peppermint extract along with the vanilla. Fold in cacao nibs or dark chocolate chunks for a crunchy, antioxidant-rich bite.
Emily’s Kitchen Notes & Stories
This recipe has been a living, evolving thing in my kitchen for years. The first batch I ever made was comically dry—I could have used them as ping pong balls! Lesson learned: add liquid slowly. Another time, I got overzealous with natural beet powder for pink color and created “earth ball” flavor. Not a win.
My biggest tip? Don’t stress about precision. Cooking is a feel, especially with no-bake recipes. If your dough seems too wet, add a touch more oat flour. Too dry? More milk, a teaspoon at a time. You’re in control. These are also the perfect recipe to make with kids—they love rolling the balls and, of course, adding ALL the sprinkles. It’s a mess, but it’s the best kind of mess, full of laughter and little fingers eager to help. That’s what Tasty Chow is all about.
Your Questions, Answered!
Q: My mixture is too dry and crumbly—it won’t form a ball! What did I do wrong?
A: No worries, this is the most common hiccup! It likely means your protein powder or nut butter is extra absorbent. The fix is easy: add more liquid. Add an additional ½ to 1 teaspoon of milk at a time, mixing thoroughly after each addition, until the dough holds together when pinched. Patience is key!
Q: Can I make these without protein powder?
A: You can, but the texture and flavor will change. The protein powder adds structure and sweetness. To replace it, try using an additional ½ cup of oat flour and maybe a touch more sweetener to compensate for the lost sweetness. They’ll be more like traditional energy balls but still delicious.
Q: How long do they last, and how should I store them?
A: Store them in an airtight container in the refrigerator for up to 1 week. For longer storage, they freeze beautifully! Layer them in a freezer-safe bag or container with parchment paper between layers. They’ll keep for 2-3 months. Thaw in the fridge overnight or for 15-20 minutes on the counter.
Q: My balls are too soft/sticky after chilling. Help!
A: If they’re still sticky, they might need a touch more oat flour or a longer chill time (sometimes up to an hour). If they’re just generally soft, that’s okay—it means they’re tender! But if you prefer a firmer bite, try reducing the initial milk by 1 tablespoon next time.
A Quick Peek at the Nutrition (Per Ball, Approximate)
Let’s talk fuel! While I’m all about joy first, it’s nice to know what’s powering you. These values are estimates based on using vanilla whey protein powder, almond butter, and maple syrup. Your specific brands may cause slight variations.
- Calories: ~95
- Protein: ~6g (Hello, satiety and muscle support!)
- Carbohydrates: ~8g
- Dietary Fiber: ~1g (Thanks, oats!)
- Sugar: ~3g (Primarily from the natural sweetener)
- Fat: ~5g (The good, satisfying kind from nuts and seeds)
These macros make them a fantastic balanced snack. The protein and healthy fats help keep blood sugar stable and cravings at bay, while the carbs provide a quick source of energy. It’s a win-win!
Final Thoughts & A Big Virtual High-Five
And there you have it! Your new secret weapon for conquering cravings and fueling your adventures. I hope these Cake Batter Protein Balls bring a little sparkle and a lot of satisfaction to your day. Remember, the kitchen is your playground. Make this recipe yours—add more sprinkles, try a different nut butter, get the kids involved.
If you make them (and I truly hope you do!), I’d love to see your creations. Tag me on social @TastyChow so I can cheer you on! There’s nothing that makes my heart happier than seeing you all in your kitchens, creating and enjoying food that makes you feel good.