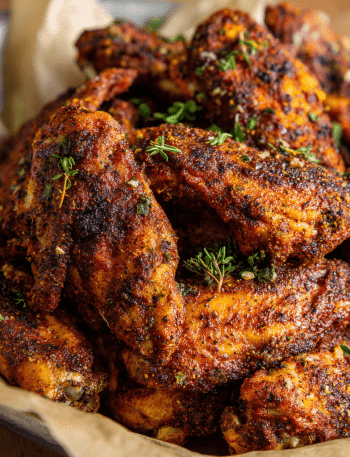
Cheesy Game Day Potato Skins: Your New MVP (Most Valuable Party Snack!)
Hey there, fellow food fan! Emily here, from my (currently flour-dusted) kitchen to yours. Is there anything better than that electric, hungry buzz of a game day gathering? The cheers, the groans, the high-fives… and the absolute, non-negotiable need for seriously good snack fuel. You can keep your dainty canapés—when friends are gathered and the score is tight, you need a snack that’s all in: crispy, cheesy, savory, and utterly unapologetic.
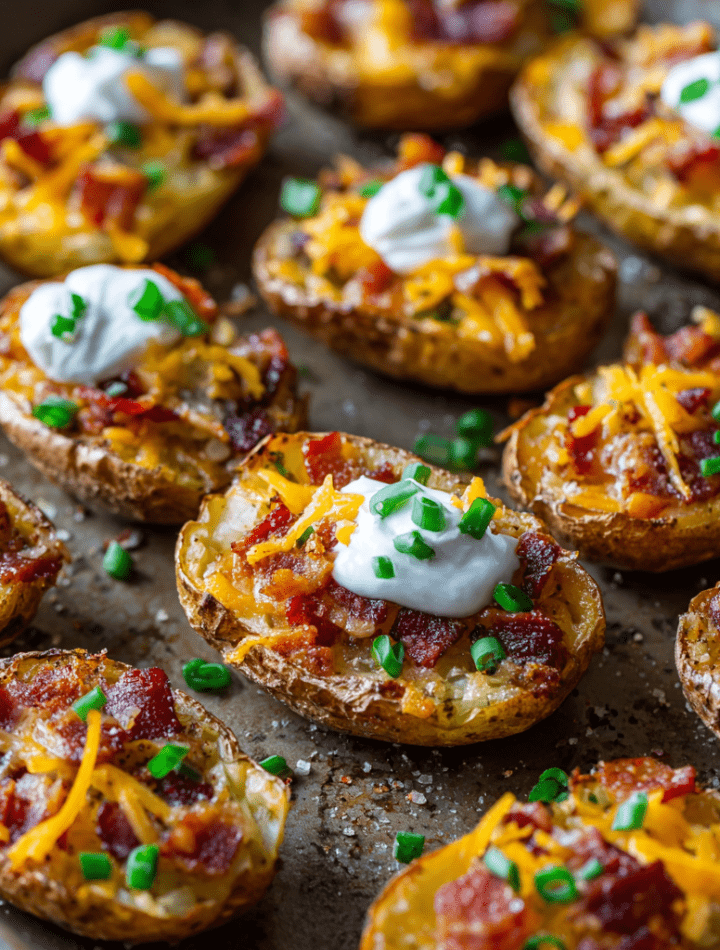
That’s where these legendary Cheesy Game Day Potato Skins swoop in for the win. Imagine this: a golden, crispy potato shell, shatteringly crisp from a double-bake, cradling a molten river of sharp cheddar, topped with smoky, salty bacon bits, a cool dollop of sour cream, and a confetti of fresh green onions. It’s a perfect bite of texture and flavor in a handy, portable package. No fork required, just pure, joyous eating.
This isn’t just a recipe; it’s a game plan. I’m talking about the kind of snack that makes people hover by the oven, the one that disappears from the platter before you’ve even had a chance to announce they’re ready. Whether you’re hosting the big game, needing a triumphant tailgate treat, or just facing a serious Friday night craving, these potato skins are your playbook for success. So, tie on that apron (the messy one is the best one), and let’s make a snack that’s guaranteed to get a standing ovation from your hungriest fans.

More Than Just a Snack: A Crispy, Cheesy Time Machine
This recipe always takes me right back to my grandma’s linoleum-floored kitchen. She wasn’t a fancy chef, but she was a wizard of comfort. Her version of “potato skins” was born from beautiful thriftiness. After baking potatoes for dinner, she’d never dream of tossing the peels. Instead, she’d toss those crispy remnants with a little saved bacon fat and salt, and bake them until they curled into what she called “cook’s treats.” We’d sneak them before dinner, burning our fingers, giggling at the secret salty crunch.
My version today is the glorious, loaded-up evolution of her kitchen magic. I take the whole shell, make it extra sturdy and crisp, and fill it with all the good things she would have loved. Every time I make these, I think of her, that worn wooden spoon, and the lesson that the most beloved foods often come from a place of love and resourcefulness, not a complicated recipe. It’s that spirit—of making something spectacularly delicious from simple, honest ingredients—that I want to share with you in every bite.
Gathering Your All-Star Lineup: Ingredients & Insights
Great food starts with great ingredients, but never let perfection be the enemy of delicious! Here’s what you’ll need, along with my best chef-y tips and swaps to make this recipe your own.
- 6 medium russet potatoes: The MVP of the potato world for this job. Their thick, starchy skin gets incredibly crispy, and their fluffy interior scoops out cleanly. Chef’s Insight: Look for potatoes that are oval and uniform in size so they bake evenly. No need for giant ones—medium is perfect for a few satisfying bites per skin.
- 2 tbsp olive oil: This is our crisp-maker! Brushing it on the scooped-out shells is non-negotiable for that golden, crunchy texture. Substitution Tip: Melted butter or even bacon fat (for the ultimate flavor boost!) works beautifully here too.
- Salt & pepper to taste: Season at every stage! Don’t be shy. Season the outside before the first bake, and definitely season the shells before their crisp-up bake.
- 1½ cups shredded cheddar cheese: I prefer sharp or extra-sharp cheddar for its bold flavor that stands up to the potato and bacon. Chef’s Insight: For the love of melty cheese, shred it yourself! Pre-shredded bags contain anti-caking agents that can make your cheese sauce grainy and less melty. A block and a box grater are your best friends.
- 6 slices cooked bacon, crumbled: The savory, smoky crunch we all dream of. Substitution Tip: For a shortcut, use pre-cooked bacon pieces. For a different twist, try diced pancetta or even chorizo. Vegetarian? Sautéed mushrooms or a plant-based “bacon” crumble are fantastic.
- Sour cream, for topping: The essential cool, creamy contrast. Chef’s Insight: Let it sit out for 15 minutes before serving so it’s easy to dollop. You can also use Greek yogurt for a tangy protein boost.
- 2 green onions, sliced (for garnish): This isn’t just pretty green confetti! The fresh, sharp bite cuts through the richness perfectly. Chives work great too!
Let’s Get Cooking: Your Step-by-Step Playbook
Follow these steps, and you’ll be a potato skin pro in no time. I’ve sprinkled in my favorite kitchen hacks to ensure your victory!
- Preheat & Prep: Fire up your oven to a solid 400°F (200°C). While it heats, give those russet potatoes a good scrub under cold water—we’re eating the skin, so let’s make it delicious! Dry them thoroughly. Now, take a fork and poke each potato 8-10 times. Why? This lets steam escape so they don’t turn into potato grenades in your oven. Trust me on this one.
- The First Bake (The Foundation): Place the potatoes directly on the oven rack (line the bottom with foil for easy cleanup if a little drips). Bake for 45–50 minutes until they’re tender when pierced with a fork. Chef’s Hack: For ultra-fluffy insides, rub the dry, washed potatoes with a tiny bit of oil and salt before this first bake. It seasons the skin from the inside out!
- The Great Cool-Down (Patience is a Virtue): Let the potatoes cool just until you can handle them, about 10-15 minutes. Do not skip this! If they’re scalding hot, they’ll fall apart when you try to scoop them. Cutting them too soon also releases a lot of steam, making the skins soggy.
- Sculpting Your Vessels: Slice each potato in half lengthwise. Using a spoon (a small metal ice cream scoop is my secret weapon!), gently scoop out most of the fluffy potato interior, leaving about a ¼-inch thick layer attached to the skin. What to do with the scooped-out potato? Save it! It’s perfect for tomorrow’s breakfast hash, to thicken a soup, or for the most incredible mashed potatoes.
- Crisp ‘Em Up! Increase your oven temp to 425°F (220°C). Brush the inside and outside of each potato shell with olive oil. Season generously with salt and pepper. Place them skin-side-up on a baking sheet. This first crisp bake, 10–15 minutes, is what transforms them from floppy shells into crispy, edible spoons. You want them golden and firm.
- The Cheesy Finale: Flip the crispy shells over. Now, pile in that beautiful shredded cheddar and sprinkle with the glorious bacon crumbles. Bake for another 5–7 minutes at 425°F, just until the cheese is bubbly and melted. Your kitchen will smell like heaven.
- The Grand Finale: Pull your masterpiece from the oven. Let them cool for a minute (that cheese is lava!). Then, artfully add a dollop of sour cream and a sprinkle of green onions. Serve immediately while the crowd goes wild.
How to Serve Like a Pro: Presentation & Pairings
You’ve built the ultimate snack—now let’s show it off! I love serving these on a big, rustic wooden board or a warm platter. Scatter a few extra green onions or even a little extra bacon over the top for that “chef’s kiss” look.
Turn it into a DIY topping bar for interactive fun! Set out small bowls with extras like pickled jalapeños, diced tomatoes, black olives, guacamole, or a drizzle of spicy ranch. Let your friends build their own perfect skin.
What to serve alongside? These are hearty, so keep other snacks light and fresh. A big, crunchy veggie platter with ranch, some zesty buffalo cauliflower bites, or a simple, tangy slaw are perfect teammates. For drinks, icy-cold beer, citrusy margaritas, or even a batch of fizzy mocktails are all winning combinations.
Get Creative: 5 Tasty Twists on the Classic
Once you’ve mastered the classic, the field is wide open for fun variations! Here are a few of my favorite plays to call:
- Buffalo Chicken: Toss shredded rotisserie chicken with your favorite buffalo sauce. Fill the crispy shells with the chicken, then top with blue cheese crumbles and mozzarella. Bake as directed, and finish with a drizzle of ranch.
- Fiesta Style: Swap cheddar for pepper jack cheese. After baking, top with pico de gallo, a spoonful of black beans, diced avocado, and a squeeze of lime. Cilantro is a must here!
- Loaded Veggie: Sauté diced bell peppers, onions, and mushrooms until soft. Fill skins with the veggie mix and cheese. Perfect for your vegetarian friends!
- Pizza Party: Fill with shredded mozzarella and mini pepperoni slices. After baking, top with a spoonful of warm marinara and fresh basil.
- Fully Loaded Baked Potato: Mix some of the reserved potato with a splash of cream, butter, and chives. Spoon back into the skins, then top with cheese and bacon. It’s a double-potato delight!
Chef Emily’s Notebook: Extra Thoughts & Stories
This recipe has seen many game days in my house, and it’s evolved from a simple snack to a beloved tradition. I once, in a pre-coffee haze, forgot to poke the potatoes before the first bake. Let’s just say the resulting “pop” sounded like a touchdown cannon and gave me (and my dog) a serious fright. The potato was delicious, but my oven needed a moment of silence. Always poke your potatoes, friends.
I’ve also learned that the double-bake method is the absolute key. That first crisp-up bake without the toppings is what guarantees that satisfying, sturdy crunch. Don’t rush it! Lastly, these are best enjoyed fresh, but the beauty is in their simplicity—they come together so fast once the potatoes are baked that you can be the hero of the party with minimal last-minute fuss.
Your Questions, Answered: FAQs & Fixes
- Q: My potato skins turned out soggy. What happened?
A: The most common culprit is not letting the initial baked potatoes cool enough before scooping, which lets out steam that softens the shell. Also, ensure you’re brushing them well with oil and baking them at a high enough temp (425°F) for that crucial crisp-up step. - Q: Can I make any part of this ahead of time?
A> Absolutely! You can bake and scoop the potatoes up to a day in advance. Store the shells and filling separately in the fridge. Let the shells come to room temp, then do the crisp-up bake and final cheese melt just before serving. - Q: Can I freeze potato skins?
A: You can freeze them after the crisp-up bake (before adding cheese). Let them cool completely, freeze on a sheet pan, then transfer to a bag. To cook, bake from frozen at 425°F for 10 mins, then add cheese and bake 5-7 mins more. - Q: What’s the best way to reheat leftovers?
A> The oven or air fryer is your best bet to recrisp the shell. A few minutes at 375°F will get them warm and crispy again. The microwave will make them soft.
Nutritional Snapshot (Because We’re Curious!)
Here’s a general breakdown per potato skin (based on 12 skins, using the ingredients listed). Remember, this is an estimate—toppings are to your taste!
- Calories: ~180
- Protein: 6g
- Carbohydrates: 15g
- Fat: 10g
While these are a treat, you can lighten them up: use a light sour cream or Greek yogurt, go heavier on the veggie toppings, and use a leaner cheese. At the end of the day, it’s about balance and joy—enjoying delicious, homemade food with people you love is always nutritious for the soul.
Final Whistle: Let’s Chow Down!
And there you have it, my friend—the complete guide to creating the most crave-worthy, crowd-pleasing Cheesy Game Day Potato Skins imaginable. This recipe is more than just a list of steps; it’s an invitation to create those loud, happy, finger-licking memories that stick with you long after the final score is forgotten.
I hope you feel empowered to get in the kitchen, crank up the oven, and make a snack that’s made for sharing. Don’t forget to tag me @TastyChow if you make them—I love seeing your culinary touchdowns! Now, go forth, get crispy, get cheesy, and most importantly, enjoy every single delicious moment. Until next time, keep your spatula close and your appetite closer!
— Emily 🧀🥔