Cheesy Taco Nacho Fries: The Ultimate Comfort Food Mashup
Hey there, my fellow flavor fanatics! Chef Emily here, coming at you from my (currently very cheese-dusted) kitchen. If your idea of a perfect Friday night involves a big pan of something cheesy, a little bit messy, and guaranteed to make everyone at the table do a happy dance, then you and I are already on the same delicious wavelength.
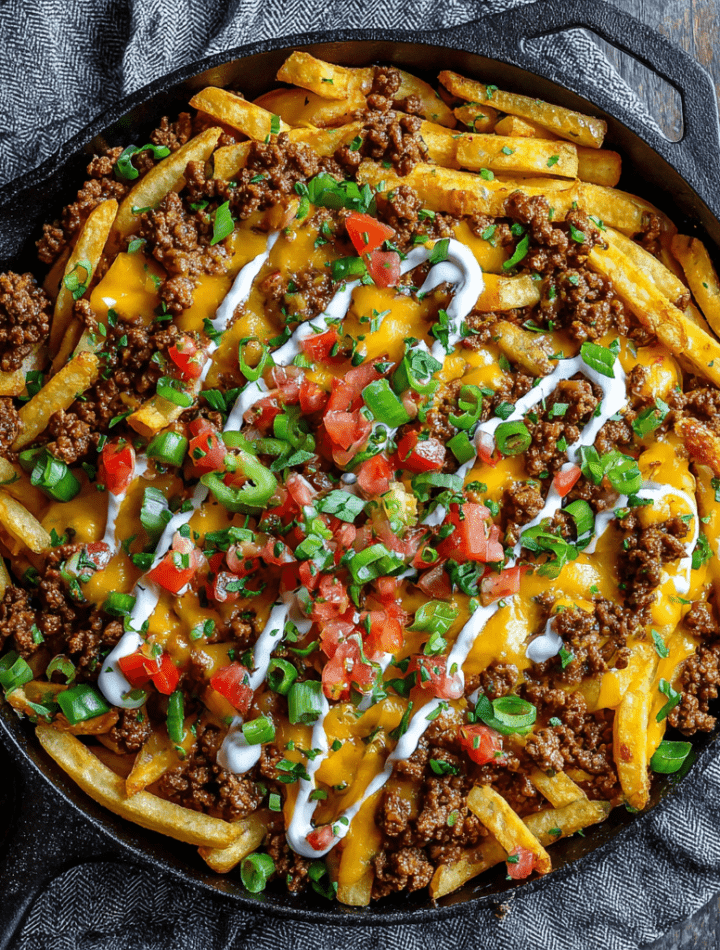
Today, we’re throwing the rulebook out the window and creating the kind of meal that’s pure, unadulterated joy on a baking sheet. We’re talking about my legendary Cheesy Taco Nacho Fries. Imagine this: golden, crispy, seasoned fries, acting as the world’s best edible plate for perfectly spiced taco meat, all smothered under a blanket of gloriously melted cheese. It’s the epic love child of your favorite drive-thru fries and a fully-loaded plate of nachos. It’s a party in a pan, and everyone’s invited!
This dish is my go-to for game day feasts, busy weeknights when cooking feels like a chore, or those “I just need some seriously good comfort food” moments. It’s incredibly easy, wildly affordable, and the customization options are endless. So, tie on your favorite apron (the one that’s already seen some action), and let’s make a memory—and a magnificent mess—together.
The Night We Invented a Legend
This recipe wasn’t born in a fancy test kitchen. Oh no. It was born out of sheer, beautiful desperation on a chaotic Friday night years ago. My friends had spontaneously shown up, our planned pizza order fell through, and my pantry was looking… sparse. I had a bag of frozen fries, some ground beef, and a rogue packet of taco seasoning staring back at me.
In a moment of “what’s the worst that could happen?” inspiration, I baked off the fries, browned the beef, and threw it all together in one pan. When I pulled that bubbling, cheesy, fragrant masterpiece out of the oven, the entire room went silent. Then, it was followed by a chorus of “Whoa,” “What IS that?” and “I need that in my life immediately.” We passed around the pan, forks in hand, and demolished the whole thing in minutes. It was a messy, laugh-filled, finger-licking good moment of pure culinary triumph. It taught me that the best recipes aren’t always the most complicated—they’re the ones made with a dash of creativity and a whole lot of love.

Gathering Your Flavor Arsenal
Here’s everything you’ll need to create this epic dish. Remember, cooking is an adventure, not a rigid test! Feel free to play around with these ingredients based on what you have and love.
- 2 lb (900g) bag of frozen seasoned fries: This is our glorious base. I often grab the Walmart brand—they’re crispy and reliable. Using seasoned fries adds an extra layer of flavor right from the start. No need to thaw!
- 1 lb (450g) ground beef: I prefer an 80/20 blend for the best flavor, but leaner beef works too (you might just need a tiny bit of oil to get it going). Chef’s Insight: For a lighter twist, ground turkey or chicken works beautifully here!
- 1 packet taco seasoning: The ultimate shortcut to big flavor. I love the classic Old El Paso or Ortega blends. Pro Tip: If you have 5 extra minutes, whipping up your own blend is a game-changer for controlling salt and heat!
- 2 tbsp water: This little splash helps the seasoning bloom and coat every morsel of meat perfectly, creating that saucy, authentic taco texture.
- 1½–2 cups shredded cheese: Don’t be shy! I use a mix of sharp cheddar for punch and a Mexican blend for its fantastic meltiness. Pre-shredded bags are convenient, but shredding a block yourself will give you an even meltier, gooier result (no anti-caking agents!).
- Optional Toppings (The Fun Part!): This is where you make it your own.
- Sour cream: Or Greek yogurt for a tangy, cool contrast.
- Diced jalapeños: For those who like a kick! Pickled ones add great acidity.
- Sliced green onions: A pop of fresh color and flavor.
- Fresh salsa or pico de gallo: Brings a juicy, bright element.
- Guacamole or diced avocado: For creamy, dreamy goodness.
- Cilantro: A must for us cilantro lovers!
Building Your Masterpiece, Step-by-Step
Alright, team! Let’s fire up the oven and get layering. This process is simple, but a few chef-approved hacks will take your fries from good to “can I have this every night?!” status.
- Cook the fries: Preheat your oven to the temperature specified on your fry bag. Spread the frozen fries in a single, even layer on a large, rimmed baking sheet. Chef’s Hack: Give the pan a quick spritz of cooking spray first for extra non-stick insurance. Don’t crowd them! This is the secret to getting them crispy instead of steamed. Bake according to the package directions, usually about 20-25 minutes, until they are golden brown and perfectly crisp. I like to give the pan a shake halfway through for even cooking.
- Brown the beef: While the fries are baking, place a large skillet over medium-high heat. Add the ground beef and cook, breaking it up with a wooden spoon, until it’s no longer pink. This should take about 5-7 minutes. Once cooked, carefully drain off the excess grease. Pro Tip: I drain it into an old can or jar, not down the sink to avoid clogs!
- Season it up: Reduce the heat to low. Sprinkle the taco seasoning over the cooked beef and add the 2 tablespoons of water. Stir constantly for 2-3 minutes, letting the mixture simmer gently. You’ll know it’s ready when the meat is fully coated in that fragrant, spiced sauce. Remove from heat.
- Layer it up: Once your fries are perfectly crispy, pull the baking sheet out of the oven. Immediately and evenly scatter the seasoned taco meat over the top of the hot fries. The heat from the fries will start warming the meat through again, which is exactly what we want!
- Cheese, please!: Now, for the best part. Sprinkle your mountain of shredded cheese generously over the beef and fries, covering as much surface area as possible. We want every bite to have cheesy goodness.
- Bake again: Pop the entire loaded pan back into the hot oven for 5-7 minutes. We’re not cooking anything further, we’re just melting that cheese into a glorious, bubbly, irresistible blanket. Keep a close eye on it—you want melted and bubbly, not browned and burnt.
- Top & serve: Carefully remove the pan from the oven (remember, the handle is hot!). Now, artfully (or just enthusiastically) dollop and scatter all your chosen toppings over the molten cheese. I go for sour cream, jalapeños, and a huge handful of green onions. Serve it right from the pan in the middle of the table with a stack of plates and forks—or just hand out forks and let everyone dig in family-style!
How to Serve These Bad Boys
Presentation is part of the fun! While serving this straight from the baking sheet is totally acceptable (and encouraged for maximum casual vibes), you can also plate it up for individual servings.
Use a large spatula to lift out hearty portions onto plates or into shallow bowls. The key is to get every layer—fry, meat, cheese, topping—in each scoop. I love serving this with a big, crisp side salad to balance the richness, or just a stack of napkins and a cold beer or fizzy margarita. For a true fiesta feel, put all the optional toppings in little bowls and let everyone build their own perfect bite. It’s interactive, fun, and guarantees happy eaters!
Let’s Get Creative: Recipe Variations
The beauty of this recipe is its versatility. Don’t be afraid to make it your own!
- Loaded Burger Fries: Swap the taco seasoning for a blend of onion powder, garlic powder, and smoked paprika. Use a blend of cheddar and Swiss cheese, and top with shredded lettuce, diced tomatoes, chopped pickles, and a drizzle of special sauce (mayo, ketchup, relish, and a pinch of paprika) for a fries-and-burger hybrid.
- Fully Loaded Breakfast Fries: Use crispy potato nuggets or diced potato fries as the base. Top with cooked breakfast sausage or crumbled bacon instead of taco meat. Use a cheese sauce or shredded cheddar, and then top with a fried egg, chopped chives, and a drizzle of hot sauce for the ultimate hangover cure or brunch showstopper.
- Chicken Fajita Fries: Sauté sliced bell peppers and onions with strips of chicken breast seasoned with fajita spice. Use a Monterey Jack cheese blend and top with pico de gallo, guacamole, and a squeeze of lime.
- Vegetarian/Vegan Delight: Use plant-based ground “beef” or a can of black beans (rinsed and drained) and corn as your protein layer. Ensure your taco seasoning is vegan. Use a generous amount of vegan cheese shreds or a drizzle of creamy vegan queso. Load up with all the fresh veggie toppings!
- Supreme “Everything” Style: Go all out! After adding the cheese, scatter on sliced black olives, diced tomatoes, and a few spoonfuls of canned, drained black beans and corn before the final bake. It’s a full meal on one pan.
Chef Emily’s Notes & Kitchen Confessions
Over the years, this recipe has seen many iterations. I once, in a fit of ambition, tried to make the fries from scratch. They were delicious, but honestly? For a quick, crave-able meal, the frozen bag is 100% the way to go. It saves so much time and delivers consistent crunch.
Another funny kitchen story: I once accidentally used a packet of chili seasoning instead of taco seasoning. It was a happy accident! It was a bit smokier and less spicy, but my family loved it. It just goes to show you can’t really go wrong. The real secret ingredient here isn’t just the cheese—it’s the laughter and the lack of pressure. This dish is meant to be fun, forgiving, and utterly delicious. Don’t stress over perfection.
Your Questions, Answered!
Q: My fries got soggy. How can I prevent that?
A: The number one culprit is overcrowding the pan! Fries need space for the oven’s heat to circulate and crisp them up. Use a large enough baking sheet. Also, ensure your oven is fully preheated. Draining the beef thoroughly is key, too—excess grease can make the bottom layer of fries soft.
Q: Can I make this ahead of time?
A: You can prep the components! Cook the taco meat and store it in the fridge for up to 2 days. When you’re ready, bake the fries, reheat the meat in the microwave or skillet, and assemble as directed. I don’t recommend assembling the whole thing ahead of time and then baking, as the fries will lose their crunch.
Q: What’s the best cheese for maximum melt?
A> While pre-shredded bags are convenient, they contain additives to prevent clumping, which can also inhibit melting. For the ultimate, gooey, stretchy cheese pull, buy a block of cheddar, Monterey Jack, or Oaxaca cheese and shred it yourself. It makes a noticeable difference!
Q: Can I use an air fryer?
A> Absolutely! This is a fantastic method. Cook the fries in your air fryer according to its instructions until crispy. Cook the meat on the stove. Then, layer the fries, meat, and cheese in an air fryer-safe baking dish (or just in the basket if it’s large enough). Air fry at 350°F (175°C) for 3-4 minutes, just until the cheese is melted. Add toppings and serve!
Nutritional Information*
*Please note: This is an approximate estimate based on the specific ingredients listed (using 80/20 beef and a Mexican cheese blend), and does not include optional toppings. Values can vary greatly based on brands and specific ingredients used.
Print
CHEESY TACO NACHO FRIES
- Yield: 6-8 1x
Description
Golden fries. Zesty taco meat. Melty cheese. It’s like nachos and fries had a deliciously messy love child. This easy, budget-friendly dish is perfect for game night, casual dinners, or a snack that brings the wow without the work.
Ingredients
2 lb (900g) bag of frozen seasoned fries (Walmart brand or your fave)
1 lb (450g) ground beef
1 packet taco seasoning
2 tbsp water
1½–2 cups shredded cheese (cheddar, Mexican blend, or combo)
Optional: Sour cream, jalapeños, green onions, salsa, or guac for topping
Instructions
Cook the fries: Bake fries on a large sheet pan per package instructions until golden and crispy.
Brown the beef: In a skillet over medium heat, cook the ground beef until no longer pink. Drain excess fat.
Season it: Add taco seasoning and 2 tbsp water. Stir and simmer for 2–3 minutes until fully coated.
Layer it up: Once fries are done, top them evenly with the seasoned beef.
Cheese, please: Sprinkle shredded cheese generously over the top.
Bake again: Return to the oven for 5–7 minutes, or until cheese is melted and bubbly.
Top & serve: Add optional toppings if desired, and serve hot!
Nutrition
- Calories: 430 / Serving
- Sugar: 2g / Serving
- Fat: 24g / Serving
- Carbohydrates: 35g / Serving
- Fiber: 4g / Serving
- Protein: 22g / Serving
Per Serving (assuming 6 servings):
- Calories: ~430 kcal
- Protein: 22g
- Fat: 24g
- Carbohydrates: 35g
- Fiber: 4g
- Sugar: 2g
To lighten it up: Use extra-lean ground beef or ground turkey, opt for a reduced-fat cheese, and load up on healthy toppings like salsa, jalapeños, and lettuce. Remember, food is about joy and community, too! This is a dish to be enjoyed as part of a balanced lifestyle.
Final Thoughts from My Kitchen to Yours
Well, friends, there you have it. My heart-on-a-plate, the Cheesy Taco Nacho Fries. This recipe is more than just a list of ingredients; it’s a reminder that the best meals aren’t about perfection. They’re about gathering, sharing, and indulging in something that makes your taste buds sing.
I hope this recipe finds its way into your regular rotation and becomes a requested favorite in your home, just like it is in mine. It’s a testament to the fact that with a little creativity, you can turn a few simple ingredients into pure magic.
So, what are you waiting for? Grab those ingredients, preheat that oven, and get ready for a symphony of crunch, spice, and cheese. I can’t wait for you to try it. When you do, be sure to tag me @TastyChow on social media so I can see your beautiful, cheesy creations! Now, if you’ll excuse me, I have a pan of fries calling my name.
With love and a full belly,
Emily