Crispy Baked Tofu Bites: The Flavor-Packed Snack That Will Make You a Tofu Believer
Hey friends! Emily here, apron on and oven preheating. Let’s talk about a little food miracle that happens when you take a humble block of tofu and transform it into something ridiculously crispy, golden, and downright addictive. If your past experiences with tofu have been… let’s say, beige and bland, I’m here to change the game. These Crispy Baked Tofu Bites are my weeknight hero, my salad’s best friend, and the snack that disappears faster than a warm cookie at a bake sale.
I get it. Tofu can be intimidating. It sits there in its watery package, looking about as exciting as a sponge. But trust me, that neutral canvas is its superpower. With a few simple tricks—hello, pressing and cornstarch!—we can turn it into little flavor bombs with a crispy shell and a tender, protein-packed heart. The best part? We’re baking them, not deep-frying. That means less mess, less guilt, and more reasons to eat the whole batch yourself (no judgment here!).
Whether you’re a lifelong vegetarian, a Meatless Monday explorer, or just someone who loves a seriously tasty bite, this recipe is for you. We’re going to walk through every step together, from pressing out that moisture to getting that perfect golden crunch. Grab your favorite baking sheet, and let’s make your kitchen smell amazing.

The Tofu Transformation: A Culinary School Tale
My love affair with tofu didn’t start with a bang. It started with a whimper—a sadly steamed, unseasoned block in my early culinary school days. We were taught the technical aspects, but not the magic. The real “aha!” moment came during a late-night study session with my friend Luis. We were broke, hungry, and our fridge held only a block of tofu, some random spices, and a dream.
“What if we treat it like chicken nuggets?” Luis said, eyes gleaming. We pressed it with heavy textbooks (true story), tore it into craggy pieces, tossed it in the only starch we had—cornstarch from a taco kit—and baked it until it was shatteringly crisp. We dipped those hot, salty, crunchy bites in a mix of soy sauce and maple syrup. It was a revelation! That night, we weren’t just students; we were innovators. It taught me that the best recipes often come from playfulness, necessity, and a willingness to see potential where others see a blank slate. Every time I make these, I think of that messy, joyful kitchen experiment.
Your Flavor Toolkit: Ingredients & Why They Work
Here’s everything you’ll need. I’ve added my chef-y notes so you know the “why” behind each item. This isn’t just a list; it’s your roadmap to crispy success!
- 1 block (14 oz) extra-firm tofu: This is our star. Extra-firm has the least water, which is CRUCIAL for crispiness. Chef’s Insight: Don’t be tempted by silken or soft here—they’re amazing in other dishes, but for bites that hold their shape and get crisp, extra-firm is non-negotiable.
- 1 tbsp olive oil: This helps the seasoning stick and promotes that beautiful browning. Substitution Tip: Avocado oil, melted refined coconut oil, or even a good spray oil work perfectly.
- 2 tbsp cornstarch: This is the SECRET WEAPON! Cornstarch creates a delicate, crispy coating when baked. Chef’s Insight: For a gluten-free option, this is already it! You can use arrowroot powder or tapioca starch in a pinch.
- 1 tsp garlic powder: Provides a robust, savory base flavor that permeates every bite. Fresh garlic burns, so powder is perfect here.
- 1 tsp paprika: Adds a sweet, earthy depth and gorgeous color. Fun Twist: Swap for smoked paprika for a subtle, campfire-kissed flavor that’s incredible.
- ½ tsp salt: Balances and enhances all the other flavors. I use kosher salt.
- ½ tsp black pepper: A little bite to keep things interesting. Freshly cracked is always best!
Let’s Get Cooking: Step-by-Step to Crispy Perfection
Follow these steps, and you’ll be a tofu-crisping master in no time. I’ve tucked my favorite hacks and commentary right in there with you!
- Press That Tofu! This is the most important step. Remove the tofu from its package and drain the water. Wrap the block in a clean kitchen towel or several layers of paper towels. Place it on a plate and set something heavy on top—a cast-iron skillet, a few heavy books, or a pot filled with water. Let it press for at least 15-20 minutes. Chef’s Hack: If you’re in a rush, you can gently squeeze the wrapped block over the sink to force out a lot of water quickly. More moisture out = crispier bites in!
- Preheat & Prep. While the tofu presses, preheat your oven to 400°F (200°C). This ensures it’s perfectly hot and ready to crisp our bites immediately. Line a baking sheet with parchment paper for easy cleanup. No sticking, no scrubbing. Chef’s Tip: Avoid using a silpat or greased foil here; parchment gives the best all-around crispiness.
- Cube It Up. Unwrap your pressed tofu. You’ll see the towel is damp—that’s the moisture we didn’t want! Slice the block into 1-inch cubes. Try to make them as even as possible so they cook at the same rate.
- The First Coat. In a large bowl, toss the tofu cubes with the 1 tablespoon of olive oil. Massage it gently until every surface has a slight sheen. This thin layer of fat helps the dry mixture adhere and is the first step toward golden brown goodness.
- The Crispy Coating. In a separate small bowl, whisk together the cornstarch, garlic powder, paprika, salt, and pepper. Sprinkle this dry mixture over the oiled tofu. Now, gently toss and fold until every cube is lightly and evenly coated. It should look like a faint, dusty snow has fallen on them. Chef’s Hack: You can do this in a reusable container or zip-top bag for super-even coating with minimal mess!
- Space for Success. Arrange the coated tofu cubes on your prepared baking sheet in a single layer. Make sure they aren’t touching! This is critical. If they’re crowded, they’ll steam instead of crisp up. Give them their personal space.
- Bake & Flip. Slide the sheet into your preheated oven. Bake for 15 minutes, then take the sheet out and carefully flip each cube. This ensures all sides get crispy and golden. Return to the oven for another 10-15 minutes, until they are deeply golden, firm, and crispy on the edges. Chef’s Tip: Don’t skip the flip! It makes all the difference.
How to Serve Your Crispy Masterpiece
Okay, they’re out of the oven and smelling incredible. Now what? The possibilities are endless!
For the ultimate snack or appetizer, serve them hot in a bowl with an array of dipping sauces. My go-tos are spicy sriracha mayo (just mayo and sriracha mixed), sweet chili sauce straight from the bottle, or a quick soy-ginger dressing (soy sauce, rice vinegar, a touch of honey, and minced fresh ginger).
Turn them into a meal! Toss a handful over a big, vibrant grain bowl with quinoa, roasted veggies, and avocado. Pile them into soft tacos with slaw and a creamy lime sauce. Or, my personal favorite, use them as the protein-packed “croutons” on a massive salad. They add the most satisfying crunch. They’re fantastic hot, warm, or even at room temperature, making them perfect for packed lunches.
Mix It Up! 5 Flavorful Variations
Once you’ve mastered the basic formula, the world is your tofu oyster! Here are some of my favorite twists:
-
- Buffalo “Wings”: After baking, toss the hot bites in ¼ cup of your favorite Buffalo sauce. Return to the oven for 3-5 minutes to let them glaze. Serve with vegan ranch or blue cheese dressing and celery sticks.
- Teriyaki Glaze: Whisk together 2 tbsp soy sauce, 1 tbsp maple syrup, 1 tsp grated ginger, and ½ tsp sesame oil. Toss with baked bites in a hot skillet for 1-2 minutes until sticky. Garnish with sesame seeds and green onion.
Soy & Sesame: Add 1 tbsp nutritional yeast and ½ tsp toasted sesame oil to the dry cornstarch mixture. After baking, sprinkle with toasted sesame seeds.
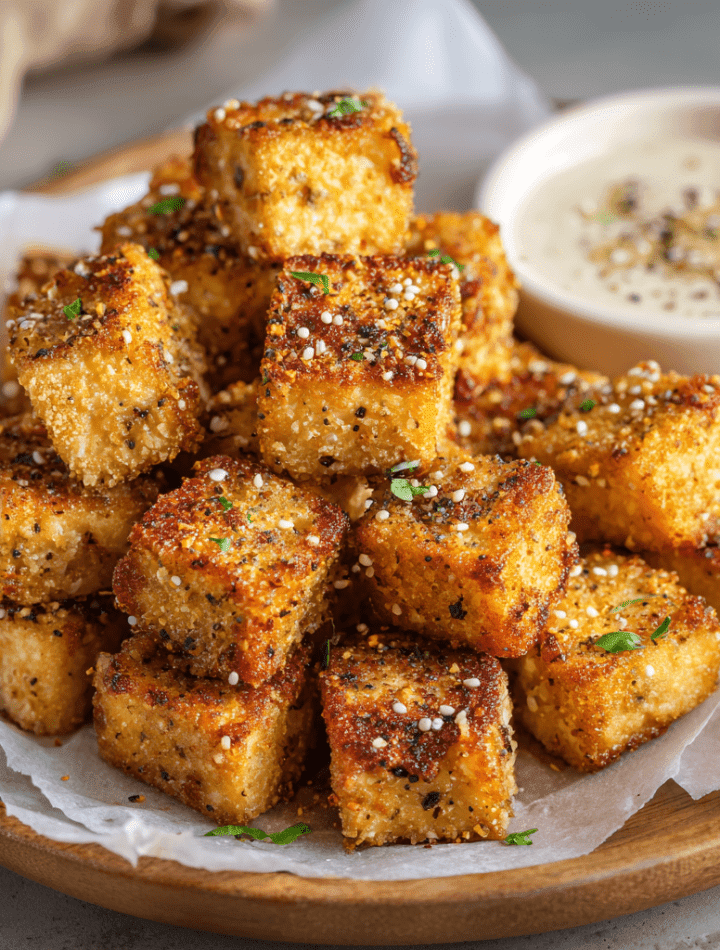
- “Everything Bagel” Style: Replace the paprika with 2 tsp of Everything Bagel Seasoning in the dry mix. So good for a brunch-y vibe!
- Lemon-Pepper Herb: Swap paprika for dried thyme or oregano. After baking, while still hot, zest a little lemon over the top and add an extra crack of black pepper.
Chef Emily’s Notebook
This recipe has been a living, evolving staple in my kitchen for years. The cornstarch trick was a total game-changer—I used to just use flour, and the texture was never quite right. I’ve also learned that patience with the pressing pays dividends. One time, I was in such a hurry I barely patted the tofu dry… let’s just say the results were more “chewy steamed cubes” than “crispy bites.” A lesson in tenderness, even with tofu!
Don’t be afraid to double the batch. These keep surprisingly well in the fridge for 3-4 days and re-crisp beautifully in an air fryer or toaster oven for a few minutes. They’re my secret weapon for adding instant protein and pizzazz to last-minute meals.
Your Questions, Answered!
Q: My tofu came out soft, not crispy. What happened?
A: The usual culprit is moisture. Did you press it long enough? Was the cornstarch mixture fully absorbed/coating the tofu? Also, overcrowding the pan causes steaming. Make sure those bites have space! Finally, oven temperatures can vary—try baking for 5 extra minutes.
Q: Can I make these without cornstarch?
A: You can, but the crispiness will be different. All-purpose flour or chickpea flour will give a slightly thicker, more substantial coating. For a gluten-free option besides cornstarch, arrowroot powder is the closest substitute.
Q: Can I use an air fryer?
A: Absolutely! It’s a fantastic option. Cook at 400°F for 12-15 minutes, shaking the basket halfway through. They get incredibly crisp!
Q: How do I get more flavor inside the tofu?
A> For deeply seasoned bites, marinate the pressed, cubed tofu in a simple mix of soy sauce and a splash of water for 15-30 minutes before patting VERY dry and proceeding with the oil and cornstarch coating. This adds a savory note right at the center.
Nutritional Nibbles
Let’s talk about the good stuff you’re putting in your body! One serving (about ¼ of the recipe) is packed with approximately 13 grams of plant-based protein, making it a fantastic fuel for your day. With about 150 calories per serving, it’s a satisfying snack or meal component that won’t weigh you down. It’s naturally cholesterol-free and low in saturated fat. The carbs are minimal and come primarily from the cornstarch coating. Remember, nutritional values can vary slightly based on the specific brand of tofu you use and any dipping sauces you add. Think of this not as “diet food,” but as delicious, wholesome, energy-giving food that just happens to be really good for you, too.
Final Thoughts from My Kitchen to Yours
And there you have it, my friends—the simple magic of Crispy Baked Tofu Bites. This recipe is more than just instructions; it’s an invitation to play, to experiment, and to discover just how delightful plant-based eating can be. I hope these little crispy nuggets find their way into your weekly rotation, onto your salads, and into the hands of your friends and family (if you’re willing to share!).
Remember, the best kitchen is a happy, sometimes messy, always flavorful one. If you make these, I’d love to hear about it! Tag me on social or leave a comment on the blog. Now, go forth and get crispy! Sending you all the good kitchen vibes.
— Emily 🧡