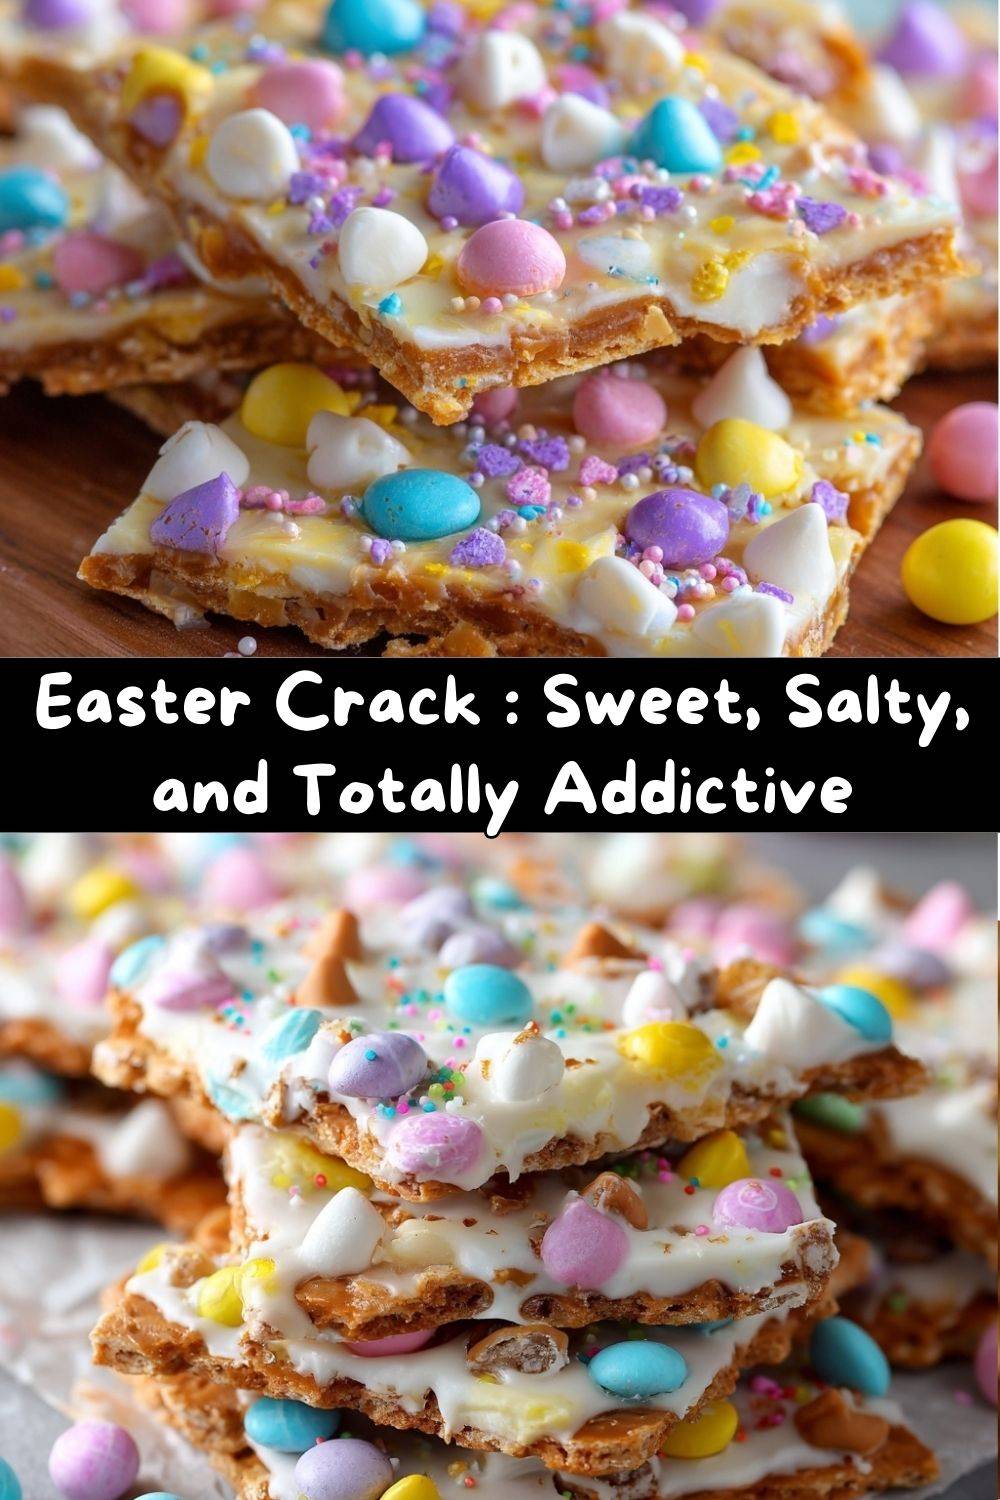
Easter Crack: The Sweet, Salty, and Totally Addictive Treat You Need This Spring!
Hey there, friend! Chef Emily here, coming to you from a kitchen that currently smells like butter, sugar, and pure joy. If you’ve ever found yourself staring into your pantry, willing a magical dessert to appear for your Easter gathering, spring potluck, or just… a Tuesday, I have got the recipe for you. Let’s talk about Easter Crack. The name tells you everything you need to know: it’s dangerously delicious, wildly addictive, and you’ll want to share it with everyone (or maybe hide a little stash for yourself, I won’t judge).
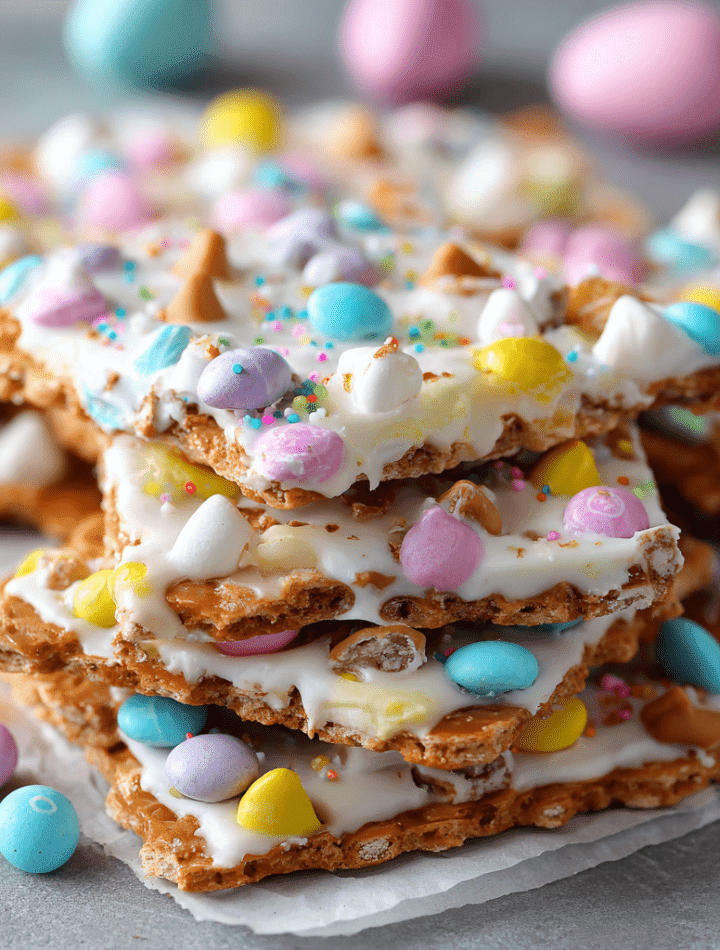
This isn’t just a recipe; it’s a kitchen experience. It’s the glorious clash of crunchy saltine crackers, rich homemade toffee, velvety white chocolate, and a confetti of cheerful pastel candies. It’s sweet, it’s salty, it’s crunchy, it’s creamy—it’s everything you want in a bite-sized treat. And the best part? It comes together in about 10 minutes of active kitchen time. No fancy skills required, just a willingness to create something spectacularly simple. Whether you’re a seasoned baker or someone who considers toast a culinary achievement, you can absolutely rock this recipe. So, tie on that apron, grab your favorite mixing spoon (the one that feels just right in your hand), and let’s make a treat that’s guaranteed to be the star of your spring table. Get ready for the compliments to roll in!
A Crack(er) of a Memory: My First Batch
My love for this treat goes way back, but not to some fancy patisserie. Oh no. My first encounter with “crack” was in my grandma’s linoleum-floored kitchen, right after a slightly-disastrous attempt at homemade divinity candy. My cousin Sarah had brought over a tin of her famous “Christmas Crack,” and we demolished it while bemoaning our failed fluffy candy. I remember the shock of that first bite—the audacity of putting toffee on a saltine cracker! It was genius. It was rebellious. It was the most delicious thing I’d eaten all holiday.
That moment stuck with me. Years later in culinary school, surrounded by intricate techniques, I found myself craving that simple, bold flavor contrast. I started playing with the formula, making it for every holiday. But there’s something about the pastel version for Easter that feels extra special. It’s like edible confetti, a celebration of spring and new beginnings. Making it now always takes me back to that messy, laughter-filled kitchen with my grandma and cousin, reminding me that the best recipes aren’t about perfection—they’re about joy, sharing, and that perfect salty-sweet crunch.
Gathering Your Rainbow: Ingredients & Chef Insights
Here’s the beautiful part: the ingredient list is short, sweet, and probably already in your kitchen. Every component plays a starring role. Let’s break it down:
- 40 Saltine Crackers: The humble foundation. Their subtle saltiness and crisp texture are non-negotiable for balancing the sweet toffee. Chef’s Insight: Use a name-brand for sturdiness. For a fun twist, try Ritz crackers for a richer, buttery base!
- 1 Cup (packed) Brown Sugar: This is the soul of your toffee, providing that deep, molasses-kissed caramel flavor. Chef’s Tip: Pack it firmly into your measuring cup for an accurate, gooey result.
- 1 Cup (2 sticks) Salted Butter: Richness, here we come! Salted butter enhances all the other flavors. Substitution Tip: If you only have unsalted, just add a generous pinch of fine sea salt to the saucepan.
- 2 Cups White Chocolate Chips: Our creamy, dreamy canvas. Chef’s Insight: Look for a brand with cocoa butter listed (like Ghirardelli or Guittard) for the smoothest melt. White chocolate chips can be finicky, so we’ll let the residual heat do the work!
- 1 1/2 Cups Pastel M&M’s or Candy-Coated Chocolates: The festive, colorful crown. Fun Swap: Use mini eggs (lightly crushed or whole), pastel sprinkles, or even chopped freeze-dried strawberries for a pop of flavor and color.
- Optional: Pastel Sprinkles: Because more color is always a good idea! Jimmies, nonpareils, or sugar pearls all add wonderful texture and whimsy.
Let’s Get Cooking: Step-by-Step with Chef Emily
Ready? This is where the magic happens. Follow these steps, and you’ll be a crack(er) expert in no time.
- Prep Your Stage: Preheat your oven to 350°F (175°C). Line a standard 10×15-inch baking sheet (jelly roll pan) with parchment paper or aluminum foil. If using foil, a very light spray of cooking oil helps. Arrange your saltines in a single, snug layer, breaking a few to fill any gaps. This is your edible mosaic base!
- Create the Golden Toffee: In a medium, heavy-bottomed saucepan, combine the butter and packed brown sugar. Place it over medium heat. Now, this is crucial: stir it constantly with a wooden spoon or heat-proof spatula. We’re encouraging friendship between butter and sugar! Once it comes to a full, rolling boil, let it bubble away for exactly 3 minutes, continuing to stir. You’ll see it transform from grainy to smooth and slightly thickened. Chef’s Hack: Set a timer! This ensures your toffee sets up perfectly and doesn’t burn.
- The Big Pour: Immediately and carefully pour the hot toffee mixture over your waiting crackers. Try to cover them as evenly as possible. Tilt the pan gently or use an offset spatula to spread it into the corners. Work quickly—the toffee sets fast! Pro Tip: If you have a few bare spots, don’t stress. It’ll still be delicious.
- Quick Bake: Slide the pan into your preheated oven and bake for 5 minutes. You’ll see it become beautifully bubbly and unified. This step sets the toffee onto the crackers.
- Chocolate Time: Take the pan out of the oven (OVEN MITTS!) and place it on a heat-safe surface. Immediately sprinkle the white chocolate chips evenly over the blistering hot toffee. Let them sit for 2-3 minutes. The residual heat will melt them perfectly. Then, use a spatula or the back of a spoon to gently spread the melted chocolate into a smooth, luscious layer. Chef’s Secret: A few unmelted chips are okay! Just spread what’s melted.
- Rainbow Party: Here’s the fun part! While the chocolate is still warm and soft, generously sprinkle your pastel M&M’s and sprinkles all over the top. Gently press them down just a tad so they stick. This is your artistic moment—make it colorful!
- The Chill-Out: Transfer the entire pan to your refrigerator. Let it chill completely, for at least 30 minutes, until the chocolate is firm and set. This is the hardest part—waiting!
- Break It Up! Once it’s fully set, lift the whole slab out of the pan using the parchment or foil. Place it on a cutting board and break it into rustic, uneven pieces with your hands. You can also use a knife for cleaner edges, but I love the organic, fun look of hand-broken pieces.
How to Serve Your Edible Masterpiece
Presentation is part of the fun! Pile the broken pieces high in a large, colorful ceramic bowl for a casual party. For Easter baskets, tuck a few pieces into cellophane bags tied with a ribbon. Heading to a potluck? Layer the pieces in a clear glass jar or tin—it’s a beautiful, edible gift. I love setting out a platter of Easter Crack alongside a bowl of fresh berries and a pot of coffee after a spring brunch. It’s the perfect sweet bite that doesn’t feel too heavy. Remember, this treat is sturdy, so it travels like a dream!
Mix It Up! 5 Delicious Variations
Once you master the classic, the world is your oyster (or, your candy-coated chocolate!). Here are some of my favorite twists:
- The Chocolate Lover’s Dream: Swap the white chocolate for semi-sweet or dark chocolate chips. Top with chopped pecans, walnuts, and a sprinkle of flaky sea salt.
- Spring Fling: Use Golden Grahams cereal instead of saltines for a honey-kissed base. Top the white chocolate with chopped dried apricots, pistachios, and a drizzle of melted dark chocolate.
- Pretzel Power: Replace half the saltines with mini pretzel twists or sticks for an extra hit of salty crunch. A match made in heaven!
- “Everything but the Kitchen Sink” Crack: Go wild! Top the melted chocolate with a mix of mini marshmallows, toffee bits, crushed potato chips (trust me!), and rainbow sprinkles.
- Dietary-Friendly Swap: Use your favorite gluten-free crackers and vegan butter. For dairy-free, choose a high-quality vegan white chocolate bar (chopped) and ensure your candies are dairy-free.
Chef Emily’s Notes from a (Sometimes) Messy Kitchen
This recipe has seen me through countless springs. I’ve made it with toddlers “helping” by eating more M&M’s than they sprinkle, and I’ve made it at 11 PM because a sudden potluck announcement sent me into a panic. It has never, ever let me down. Over time, I’ve learned that the boiling time for the toffee is the real key—less than 3 minutes and it can be too soft; more than 4 and it risks burning. A heavy-bottomed pan is your best friend here for even heat. And a little secret? I sometimes add a teaspoon of pure vanilla extract to the toffee right after I take it off the heat. It adds a whisper of warmth that’s just divine. Most importantly, have fun with it. Cooking should be joyful, not stressful. If your pieces aren’t perfect, they’ll still taste incredible.
Your Questions, Answered!
Q: My toffee separated or looks greasy. What happened?
A: This usually means the toffee wasn’t boiled long enough for the butter and sugar to fully emulsify. Next time, ensure you bring it to a full, rolling boil and maintain that boil for the full 3 minutes while stirring constantly. A heavy-bottomed pan also helps prevent hot spots that can cause separation.
Q: Can I use milk chocolate instead of white?
A: Absolutely! Milk or dark chocolate works beautifully. The process is identical. Just note that darker chocolates set up a bit firmer.
Q: How do I store this, and how long does it last?
A: Store it in an airtight container at room temperature for up to 5 days, or in the fridge for up to 2 weeks (if it lasts that long!). The layers may soften slightly at room temp but will still be delicious. You can also freeze it for up to 2 months.
Q: My chocolate got clumpy when I tried to spread it. Help!
A> White chocolate is heat-sensitive. If it seizes (gets grainy), it was likely overheated. The “let it sit on the hot toffee” method usually prevents this. If you need to re-melt, do it very gently in short bursts in the microwave at 50% power, stirring between each burst.
A Note on Nutrition
Let’s be real, friends—this is a celebratory treat, meant to be enjoyed in moderation as part of a joyful occasion. The provided approximate nutrition (per piece: ~180 calories, 10g fat, 22g carbs, 17g sugar, 1g protein) is based on the classic recipe broken into 24 pieces. Using different crackers, chocolates, or toppings will alter these values. If you’re managing dietary needs, the variation section includes great ideas for gluten-free or dairy-free adaptations. Remember, the heart of home cooking is about connection and celebration. So savor a piece (or two!), share the rest, and enjoy every sweet, salty, crunchy bite without guilt.
Final Thoughts from My Kitchen to Yours
Well, my fellow flavor-chaser, we’ve done it! You’re now armed with the secrets to making the most irresistible, conversation-starting, smile-inducing treat of the spring season. Easter Crack is more than just a recipe—it’s a reminder that the most legendary dishes are often the simplest, the ones that bring people together over a shared “Wow, you MADE this?!”
I hope this recipe brings as much laughter and light into your kitchen as it has into mine. I hope you feel that spark of pride when you break that first piece. And I really hope you’ll tag me on social @TastyChow if you make it—I love seeing your creations! Now, go forth, spread that toffee, sprinkle those candies, and make something delicious. Happy cooking, and happy Easter!
With love and a full tin of treats,
Chef Emily 🐣