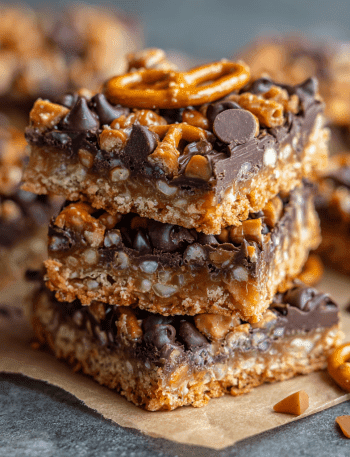
Easy No-Bake Homemade Protein Bars
Hey there, food lovers! If you’re on the hunt for a delicious snack that will keep your energy levels up without weighing you down, you’ve landed at the right place. Today, we’re whipping up some Easy No-Bake Homemade Protein Bars that are perfect for those busy days when you need a bite that’s both tasty and nutritious. Made with simple ingredients you might already have in your pantry, these bars are not only a breeze to prepare, but they’re also a crowd-pleaser. So, let’s roll up our sleeves and get started!
Let’s face it—snack time can often become a slippery slope into the abyss of convenience foods that leave your body feeling sluggish and your taste buds less than satisfied. But what if I told you that you could whip up a batch of protein-packed goodness in a snap, without ever turning on your oven? That’s the beauty of these Easy No-Bake Homemade Protein Bars! 😋
Imagine a chewy, nutty bar that’s both filling and flavorful—all while giving you a nutritious boost. Whether you’re hitting the gym, tackling a busy workday, or just need a wholesome treat to hold you over, these bars are the perfect solution. They’re also a great way to clean out your pantry and get creative with different flavors and add-ins.
Not only do these protein bars save time and effort, but they also allow you to control exactly what goes into them. Bye-bye, overly processed store-bought bars! With a variety of textures and tastes, from crunchy nuts to creamy nut butter, these bars are a testament to how simple ingredients can come together to create something truly satisfying. Get ready to step into my kitchen, where we’ll share not just a recipe but also a little bit of love and plenty of kitchen wisdom. So, let’s put on our aprons and dive right in!
Personal Story
Looking back, my love for creating snacks started in my childhood kitchen, where my grandma used to make her famous granola bars. Picture this: a bustling Saturday afternoon, the scent of sweet oats and honey filling the air while I watched her stir together simple ingredients into a sticky mixture. We’d roll the concoction into bars, and as they cooled, we impatiently waited to dig in, crunching our way through those chewy treats.
Those moments were filled with laughter, just like the time I accidentally confused baking soda for baking powder and nearly created a comic disaster instead of a delicious snack! Ah, the joys of culinary experimentation. Fast forward to today, my No-Bake Homemade Protein Bars are reminiscent of those cherished weekend memories, but with a modern twist. They bring a smile to my face and fuel my days as fiercely as my grandma’s granola bars once did.
Ingredients
Let’s take a peek at what you’ll need to whip up these delightful bars!
-
Oats (2 cups)
- Rolled oats are perfect for binding and give these bars a hearty texture. You can substitute quick oats if you’re in a pinch, but keep in mind they may yield a slightly softer bar.
-
Nut Butter (1 cup)
- Use your favorite creamy or crunchy nut butter, like almond or peanut! Prefer not to use peanuts? Go for sunflower seed butter for a nut-free option that packs a punch.
-
Honey or Maple Syrup (1/2 cup)
- Either of these natural sweeteners works brilliantly to hold the bars together. If you’re looking for a vegan option, maple syrup is your best bet!
-
Protein Powder (1 cup)
- Feel free to use the flavor that suits your taste; vanilla or chocolate protein powder are both fan favorites! If you want a dietary swap, consider using a plant-based protein powder.
-
Chia Seeds (optional, 1/4 cup)
- Chia seeds not only add a nice crunch but are also packed with omega-3 fatty acids. No chia? No problem! Just skip this ingredient, or swap with flax seeds.
-
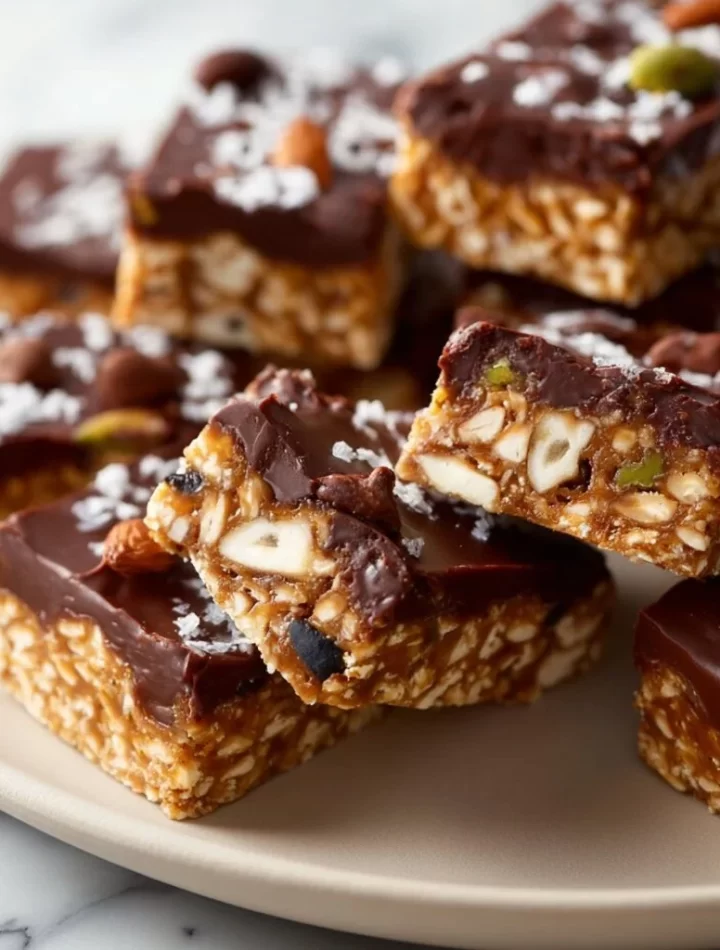
Chocolate Chips or Dried Fruit (1 cup)
- Add a bit of indulgence with dark chocolate chips or sweetness with dried cranberries! Go with your cravings here; it’s all about making it personal.
Step-by-Step Instructions
Alright, let’s get cooking! or, well, no-cooking. Here’s how to make these No-Bake Protein Bars:
-
Prep Your Dish:
Start by lining an 8×8 inch baking dish with parchment paper. Leave a little overhang on the sides. This makes it super easy to lift the bars out once they’re set. A light spray of cooking oil on the parchment will ensure nothing sticks. -
Mix the Dry Ingredients:
In a large mixing bowl, combine the oats, protein powder, and chia seeds (if using). Give it a good whisk to ensure that the dry ingredients are evenly mixed. This will help distribute the flavors throughout the bars. -
Combine the Wet Ingredients:
In a separate bowl, mix together the nut butter and honey (or maple syrup). You might find it easier to microwave the nut butter for about 20 seconds to soften it, which will help it blend more seamlessly with the honey. -
Mix Everything Together:
Pour the nut butter mixture into the dry ingredient bowl. Get ready to get your hands a little dirty! Use a spatula (or your hands) to mix everything together until you have a sticky and cohesive mixture. Don’t be afraid to really get in there—it’s a workout for your arms! -
Add Extras:
Now it’s time to fold in the chocolate chips or dried fruit. Gently stir until they’re evenly distributed throughout the mixture. Each bite will be a delicious blend! -
Spread and Press:
Transfer the mixture to your prepared baking dish, and using your hands (or a spatula), press it down firmly. Make sure it’s packed in tightly; this step is crucial for the bars holding their shape once they’re set. -
Chill and Set:
Pop your baking dish in the refrigerator for at least 2 hours. Patience is key here! You want those bars to set firmly so they don’t crumble apart. -
Slice and Serve:
Once the waiting game is over, lift the bars out using the parchment overhang and place them on a cutting board. Use a sharp knife to slice them into squares or rectangles. Store any leftovers in an airtight container in the fridge. They typically last a week—if they last that long!
Serving Suggestions
When it comes to serving these protein bars, the possibilities are fun and endless! You can enjoy them on their own for a quick snack or pair them with a piece of fresh fruit for a more filling meal. Want to jazz them up a bit? Consider drizzling some melted dark chocolate over the top for an extra indulgent touch!
For a lunchbox treat, wrap them up in parchment or place them in individual baggies for easy grab-and-go goodness. This way, you’ll always have a healthy snack on hand, whether you’re on the go or at your desk. And who doesn’t love a treat that you can take anywhere?
Recipe Variations
Here are a few ideas to twist this basic recipe into something uniquely yours:
-
Nutty Delight: Add a mix of chopped nuts (like almonds, walnuts, or pecans) for an extra crunch. Feel free to roast them lightly beforehand for enhanced flavor!
-
Cocoa Craze: Swirl in cocoa powder (1/4 cup) to turn these bars into rich chocolate delights. You may also want to up the sweetness slightly if going this route.
-
Tropical Burst: Mix in dried fruits such as pineapple, coconut flakes, and macadamia nuts for a taste of the tropics!
-
Spicy Twist: Stir in a pinch of cinnamon or even cayenne pepper for a little kick. The warm spice can give the bars an unexpected flavor dimension.
-
Nut-Free Version: Replace the nut butter with tahini or sunflower seed butter to keep it nut-free, perfect for school or allergy-friendly options!
Chef’s Notes
Oh, I have to share my favorite kitchen fail-tale while making these bars! The first time I tried this recipe, I confidently added a full cup of flax seeds thinking they’d provide wonderful texture and additional protein. Instead, I ended up with something that resembled breakfast pudding more than protein bars!
After a good laugh and some experimenting, I realized moderation is crucial. These bars are all about balance! I’ve since perfected my mix, and I can’t wait to hear about your fun experiences in the kitchen too. They’re what keep cooking exciting!
FAQs and Troubleshooting
Q1: My bars are crumbling apart! What went wrong?
- You may not have pressed the mixture down firmly enough or didn’t use enough sticky ingredients. Make sure to pack them down tightly and consider increasing the nut butter or honey slightly next time.
Q2: Can I use quick oats instead of rolled oats?
- Yes, you can! The texture will be a bit softer, but they’ll still work well. Just remember to adjust the chilling time as needed.
Q3: How can I make these bars vegan?
- Substituting honey with maple syrup and ensuring your protein powder is plant-based will do the trick!
Q4: Do I have to refrigerate these bars?
- While the bars can be stored at room temperature for a day or two, refrigeration helps them maintain their structure and keeps them fresher longer.
Nutritional Info
While nutritional info can vary greatly depending on the specific ingredients you choose, a general estimate for one homemade protein bar (based on the recipe provided) might look like this:
- Calories: ~200
- Protein: 8-10g
- Total Fat: 10-12g
- Carbohydrates: 20g
- Fiber: 3-4g
- Sugar: 7g (depending on your choice of sweetener)
These bars are not only a wonderful source of protein, they’re also packed with wholesome ingredients that provide energy and satisfaction.
Final Thoughts
That’s a wrap, my foodie friends! I hope you’re feeling inspired to give these Easy No-Bake Homemade Protein Bars a try. They’re perfect for breakfast on-the-go, post-workout snacks, or an afternoon pick-me-up. The beauty of this recipe lies in its versatility—make it your own and have fun doing it!
Cooking and creating together in the kitchen is all about sharing knowledge, experiences, and, most importantly, love. So gather your ingredients, throw on your favorite apron, and let’s make these delicious bars! Remember, cooking is all about experimenting and learning, so don’t hesitate to try new things and make your own culinary memories along the way. I can’t wait to hear what you come up with!
Now, go forth and snack responsibly—your taste buds (and your energy levels!) will thank you! Happy cooking! 🥳
Print
Easy No-Bake Homemade Protein Bars
- Total Time: 120 minutes
- Yield: 12 servings 1x
- Diet: Vegan
Description
A quick and nutritious recipe for no-bake protein bars perfect for snacks or on-the-go energy.
Ingredients
- 2 cups Rolled oats
- 1 cup Nut butter
- 1/2 cup Honey or Maple syrup
- 1 cup Protein powder
- 1/4 cup Chia seeds (optional)
- 1 cup Chocolate chips or Dried fruit
Instructions
- Prep your dish by lining an 8×8 inch baking dish with parchment paper.
- Mix the dry ingredients in a large bowl: oats, protein powder, and chia seeds if using.
- Combine the wet ingredients in another bowl: nut butter and honey (or maple syrup).
- Mix everything together in the dry ingredient bowl until well combined.
- Add the chocolate chips or dried fruit, gently stirring until evenly distributed.
- Spread the mixture into the prepared baking dish and press down firmly.
- Chill in the refrigerator for at least 2 hours to set.
- Slice into squares or rectangles and store in an airtight container.
Notes
For added flavor, consider experimenting with different nut butters or add-ins like nuts or spices.
- Prep Time: 15 minutes
- Cook Time: 0 minutes
- Category: Snack
- Method: No Cooking Required
- Cuisine: American
Nutrition
- Serving Size: 1 bar
- Calories: 200
- Sugar: 7g
- Sodium: 20mg
- Fat: 10g
- Saturated Fat: 2g
- Unsaturated Fat: 8g
- Trans Fat: 0g
- Carbohydrates: 20g
- Fiber: 4g
- Protein: 10g
- Cholesterol: 0mg
Keywords: protein bars, no-bake snacks, healthy snacks, easy recipes