Frozen Honey Yogurt Bites: Your New Favorite Healthy Snack Hack!
Hey there, friend! Pull up a stool and let’s chat. Ever have one of those days where you’re buzzing around, life is moving at a million miles an hour, and you find yourself standing in front of the freezer, just wishing for a little something sweet? But then that little voice (you know the one) pipes up, reminding you that maybe a pint of ice cream isn’t the best afternoon fuel? I’ve been there more times than I can count. That exact feeling—the craving for something cold, creamy, and satisfying without the sugar crash—is what sparked the magic behind these Frozen Honey Yogurt Bites.
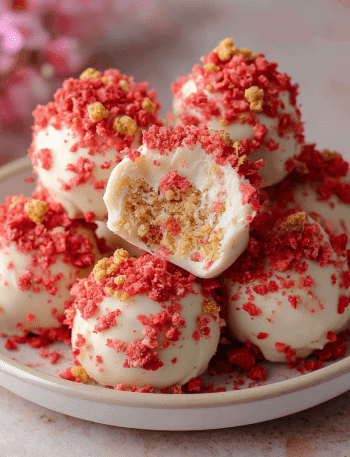
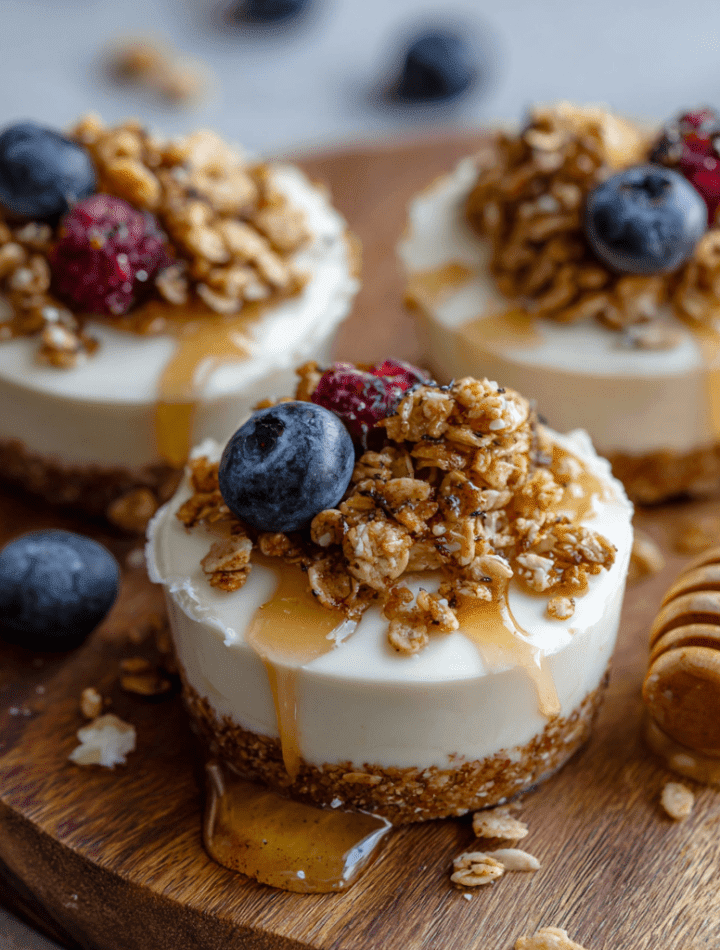
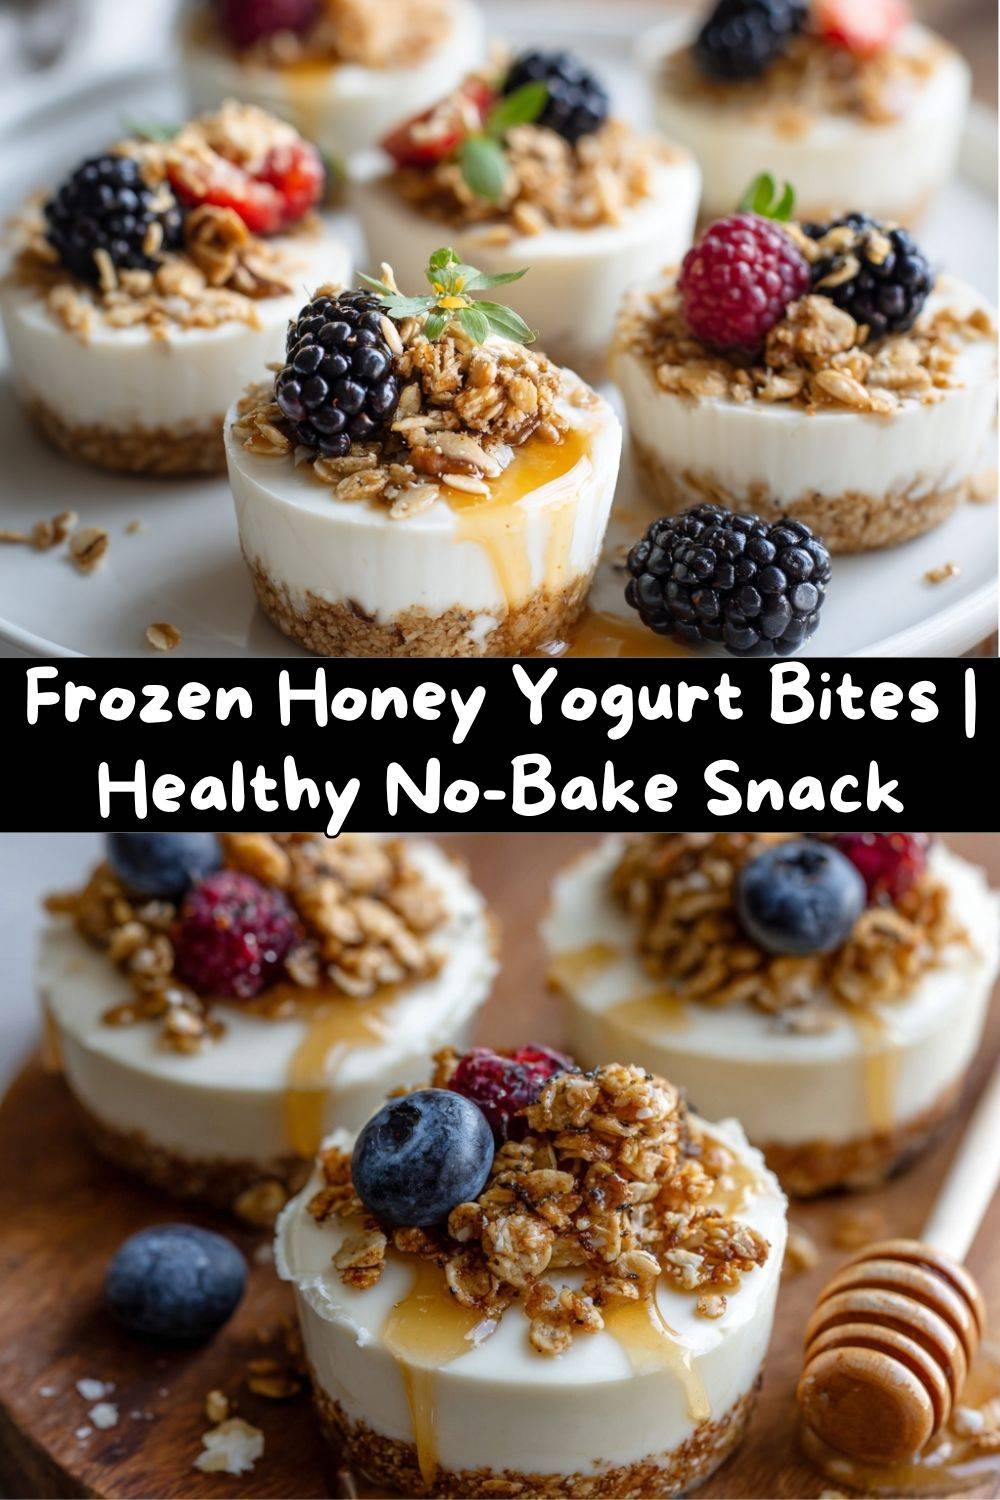
Imagine this: a crunchy, toasty granola crust that gives you that cookie-like satisfaction. On top of that, a layer of luxuriously thick, tangy Greek yogurt, sweetened just right with golden, sunny honey. Pop one in your mouth, and it’s an instant cool-down: creamy, crunchy, sweet, and wholesome all at once. They’re like if a yogurt parfait and an ice cream bonbon had the most delicious, healthy baby. And the best part? They’re unbelievably simple. We’re talking 10 minutes of active prep, a few hours of letting your freezer do the heavy lifting, and boom—you’ve got a stash of ready-to-go snack magic.
This isn’t just a recipe; it’s your secret weapon. Perfect for lunchboxes, post-workout cool-downs, satisfying that after-dinner sweet tooth, or impressing friends at a summer BBQ. They look like you fussed for hours, but between you and me? This is the kind of clever, no-bake wizardry I live for. So, tie that apron, grab your favorite honey, and let’s make your freezer a happier, healthier place.
The Day My Freezer Saved Summer
This recipe was born out of a minor kitchen disaster that turned into a favorite memory. A few summers back, my niece and nephew were visiting, and we’d planned this epic “make-your-own-sundae” afternoon. I had all the fixings: hot fudge, sprinkles, cherries, the works. But wouldn’t you know it, halfway through whipping the cream, I realized my ice cream had… vanished. A quick investigation (led by two giggly kids) revealed an empty carton in the trash. They’d “sampled” it for lunch.
Panic! I had a backyard full of expectant little faces and a melting bowl of whipped cream. My eyes darted around the kitchen and landed on a big tub of Greek yogurt, a bag of granola from breakfast, and the beautiful local honey from the farmer’s market. In a moment of “what if?” desperation, I mixed the yogurt with honey, pressed granola into a muffin tin, and poured the mixture on top. A few hours in the freezer later, we had our “sundaes”—these adorable, frozen, bite-sized treats. The kids went wild for them, calling them “magic yogurt cookies.” The crisis was averted, and a star recipe was born. Now, every time I make them, I think of that chaotic, happy day and how the best kitchen creations often come from happy accidents.
Gathering Your Magical Ingredients
Here’s the beautiful part: you only need a handful of simple, wholesome ingredients to create this snack sorcery. Let’s break them down, because knowing your ingredients is the first step to becoming a kitchen rockstar.
- 1 ½ cups granola (your favorite kind): This is the foundation of our crunchy crust. I love using a granola with big clusters and maybe some nuts or seeds for extra texture. Chef’s Insight: Using a granola that’s already a little sweet means we need less added sweetener overall. No granola? Pulse some old-fashioned oats with a teaspoon of cinnamon and a pinch of salt in a food processor until coarsely ground!
- 2 tbsp coconut oil or melted butter: Our binder! This is what turns loose granola into a pressable, firm crust. Coconut oil adds a subtle tropical note and keeps things dairy-free if needed. Melted butter gives that classic, rich, cookie-dough flavor. You can’t go wrong.
- 1 ½ cups Greek yogurt (plain or vanilla): The creamy superstar. I insist on Greek yogurt for its ultra-thick, protein-packed glory. It freezes to a perfect, creamy-chewy texture. Plain yogurt lets the honey flavor shine, while vanilla adds another layer of sweetness. Substitution Tip: For a dairy-free version, use an equally thick coconut or almond-based yogurt.
- 2–3 tbsp honey (plus extra for drizzling): Liquid sunshine! Honey sweetens the yogurt beautifully and adds its unique floral notes. The amount is up to you—start with 2 tbsp and taste. I always drizzle a little extra on top before freezing for those gorgeous sticky-sweet threads. Maple syrup or agave nectar are perfect vegan-friendly swaps.
- 1 tsp vanilla extract (optional but recommended): Think of vanilla as the background singer that makes the lead vocalist (the honey) sound even better. It rounds out the flavors and adds warmth. If using vanilla yogurt, you can skip this.
- Optional toppings: fresh berries, chia seeds, dark chocolate chips: This is where you make them your own! A few blueberries or raspberries press beautifully into the surface. Chia seeds add a fun pop and fiber. And let’s be real—a few dark chocolate chips never hurt anybody. They become little frozen gems of joy.
Let’s Build Some Bites: A Step-by-Step Guide
Ready to assemble? This is the fun, hands-on part. I’ll walk you through each step with all my favorite little hacks to ensure perfection.
- Prep Your Pan: First, grab a mini muffin tin. Now, here’s a game-changer: line it with paper liners or use a silicone mold. The liners make removal absolutely foolproof and are great for storage. If you’re using a silicone mold, you can skip the liners—they pop out like a dream. Give the liners a tiny spritz of cooking spray to prevent any potential sticking, just to be safe.
- Create the Crust: In a medium bowl, combine your granola and melted coconut oil or butter. Mix it with a fork until every little oat and cluster is lightly coated. It should look like damp sand. Now, take about 1-2 teaspoons of this mixture and press it firmly into the bottom of each muffin cup. I mean it—press firmly! Use the back of a small spoon or your fingers to create a solid, compact layer. This is what gives you that satisfying cookie-like base that won’t crumble when you bite. This step is oddly therapeutic, trust me.
- Whip Up the Creamy Filling: In another bowl, add your Greek yogurt, honey, and vanilla. Grab a whisk and stir, stir, stir until it’s completely smooth, creamy, and beautifully combined. Take a taste! This is your moment. Want it sweeter? Add another half-tablespoon of honey. Perfect? Let’s move on. Pro tip: Let this mixture sit for a minute or two. This allows the honey to fully incorporate, so you don’t get any sneaky, overly-sweet streaks.
- Assemble & Customize: Now, carefully spoon or even pipe the yogurt mixture over your granola crusts, filling each cup almost to the top. This is your blank canvas! Scatter on your chosen toppings. Gently press berries or chocolate chips in slightly so they set in place. For that final bakery-worthy touch, take a spoon and drizzle a tiny, artful swirl of honey over each bite. It will harden in the freezer and look (and taste) incredible.
- The Big Freeze: Carefully transfer your filled tin to the freezer. Give them space—don’t stack anything on top. Now, walk away. Let the magic happen for at least 2-3 hours, but ideally overnight. You want them completely solid. Patience, grasshopper. The wait is worth it.
- The Grand Reveal: Once fully frozen, it’s time! If you used a silicone mold, just pop them out. If you used a metal tin with liners, let it sit on the counter for exactly 2-3 minutes. This loosens them up just enough so you can lift them out by the liner edges. Peel the liner away and behold your gorgeous, frosty creations!
How to Serve Your Frozen Treasures
Okay, you’ve got a container of these gorgeous bites in the freezer. Now what? The beauty is in their versatility!
For the ultimate snack plate, arrange a few bites on a small chilled plate with some fresh fruit on the side—think sliced strawberries, a handful of raspberries, or some mango chunks. It turns a simple snack into a beautiful, Instagram-worthy moment. They’re also the perfect healthy dessert at a dinner party. Serve three to a guest on a little dessert slate or in a mini cupcake liner for a elegant, guilt-free finish.
My absolute favorite way to enjoy them? Straight from the freezer, as a mid-afternoon “reset.” One or two bites are enough to satisfy that craving, cool you down, and give you a protein boost to power through the rest of your day. For kids (or kids-at-heart), stick a popsicle stick or a cute paper straw into the center before freezing, and you’ve got a fun, handheld frozen yogurt pop!
Get Creative: 5 Fun Twists to Try
Once you’ve mastered the classic, the flavor world is your oyster! Here are some of my favorite riffs on this recipe.
- Peanut Butter Cup: Mix 2 tablespoons of natural peanut butter into the yogurt filling. Use a chocolate granola for the crust and top with a few mini chocolate chips. It’s like a frozen, healthy peanut butter cup!
- Tropical Escape: Use coconut-flavored yogurt. Mix a tablespoon of toasted coconut into the granola crust. Top with a small piece of diced mango or pineapple before freezing. Close your eyes, take a bite, and you’re on vacation.
- Chocolate Berry Bliss: Add 1 tablespoon of unsweetened cocoa powder to the yogurt mixture (you may want a touch more honey). Use a berry-flavored granola and top each bite with a fresh raspberry. Decadent, yet still wholesome.
- Cookie Dough Dream: Add a handful of mini chocolate chips and a sprinkle of mini cinnamon chips to the granola crust mixture. Use vanilla yogurt. It tastes like frozen cookie dough bites!
- Green Goddess (Vegan & Superfood): Use a thick coconut yogurt, maple syrup, and mix 1 teaspoon of matcha powder into the filling for a gorgeous color and antioxidant boost. Top with a sprinkle of hemp seeds. So good, so good for you.
A Few Notes from My Kitchen to Yours
This recipe has become a staple in my house, and over time, I’ve learned a few things. First, these bites are forgiving! If your crust seems too dry, add a half teaspoon more melted oil. If your yogurt seems thin, let it strain in a cheesecloth-lined sieve for 30 minutes to thicken up, or just know you’ll have a slightly softer bite—still delicious.
I also love making a double batch and storing them in a single layer in a airtight container in the freezer, separated by parchment paper. They keep beautifully for up to 2 months, meaning you always have a healthy treat on deck. The evolution from that desperate “ice cream-less” day to this reliable recipe reminds me that some of the best things in life (and the kitchen) are simple, made with love, and waiting for you in your own freezer.
Your Questions, Answered!
Q: My bites are really hard to get out of the tin. Help!
A: No worries! This usually means they needed that 2-3 minute rest on the counter to loosen up. If they’re really stuck, run a butter knife gently around the very edge of each bite to break the seal. For next time, those paper liners are your best friend, or a light spritz of cooking spray directly in the tin cups if going liner-free.
Q: Can I use regular yogurt instead of Greek?
A: You can, but the texture will be icier and less creamy. Greek yogurt has less water and more protein, which gives that perfect, firm-yet-creamy freeze. If you only have regular yogurt, you can strain it through a coffee filter or cheesecloth for an hour first to thicken it up.
Q: How long do they last in the freezer, and how do I store them?
A: Stored properly in an airtight container or freezer bag, they’ll stay delicious for 1-2 months. I recommend laying them in a single layer so they don’t freeze together into one big clump. If stacking, separate layers with parchment paper.
Q: My granola crust is crumbly when I bite into it. What happened?
A: This means we didn’t pack it firmly enough! The pressing step is crucial. It should feel solid and compact before you add the yogurt. Also, ensure your oil/butter is evenly distributed—it’s the glue holding it all together.
A Quick Peek at the Good Stuff
While I’m all about flavor first, it feels great to know you’re feeding your body something good. Here’s a general nutritional snapshot per bite (based on a batch of 14, using plain Greek yogurt, 2 tbsp honey, and no extra toppings). Remember, these are estimates and will vary based on your specific ingredients.
Per Bite: Calories: ~90 | Protein: ~4g | Carbohydrates: ~10g | Fat: ~4g | Sugar: ~6g (mostly from natural honey and granola)
These bites are a fantastic source of protein from the Greek yogurt, which helps keep you full. The granola provides complex carbs and fiber for sustained energy, and the healthy fats from the coconut oil or nuts in the granola help your body absorb nutrients. They’re a balanced, real-food snack that’s miles ahead of anything you’d find in a freezer aisle package!
Go Forth and Freeze!
And there you have it, my friend—your guide to creating the easiest, most satisfying little bites of frozen joy. This recipe is more than just a list of steps; it’s an invitation to play, to customize, and to give yourself the gift of a wholesome treat that’s always ready when you are.
I hope these Frozen Honey Yogurt Bites bring a little cool, creamy happiness to your kitchen, just like they do to mine. Making them should be fun, eating them should be a moment of pure pleasure. If you give them a try (and I really hope you do), snap a pic and tag me! There’s nothing I love more than seeing your kitchen creations.
Now, go raid your pantry, get a little messy, and make something delicious. Your future self, opening that freezer on a busy day, will thank you. Happy snacking!
With love and a full freezer,
Emily