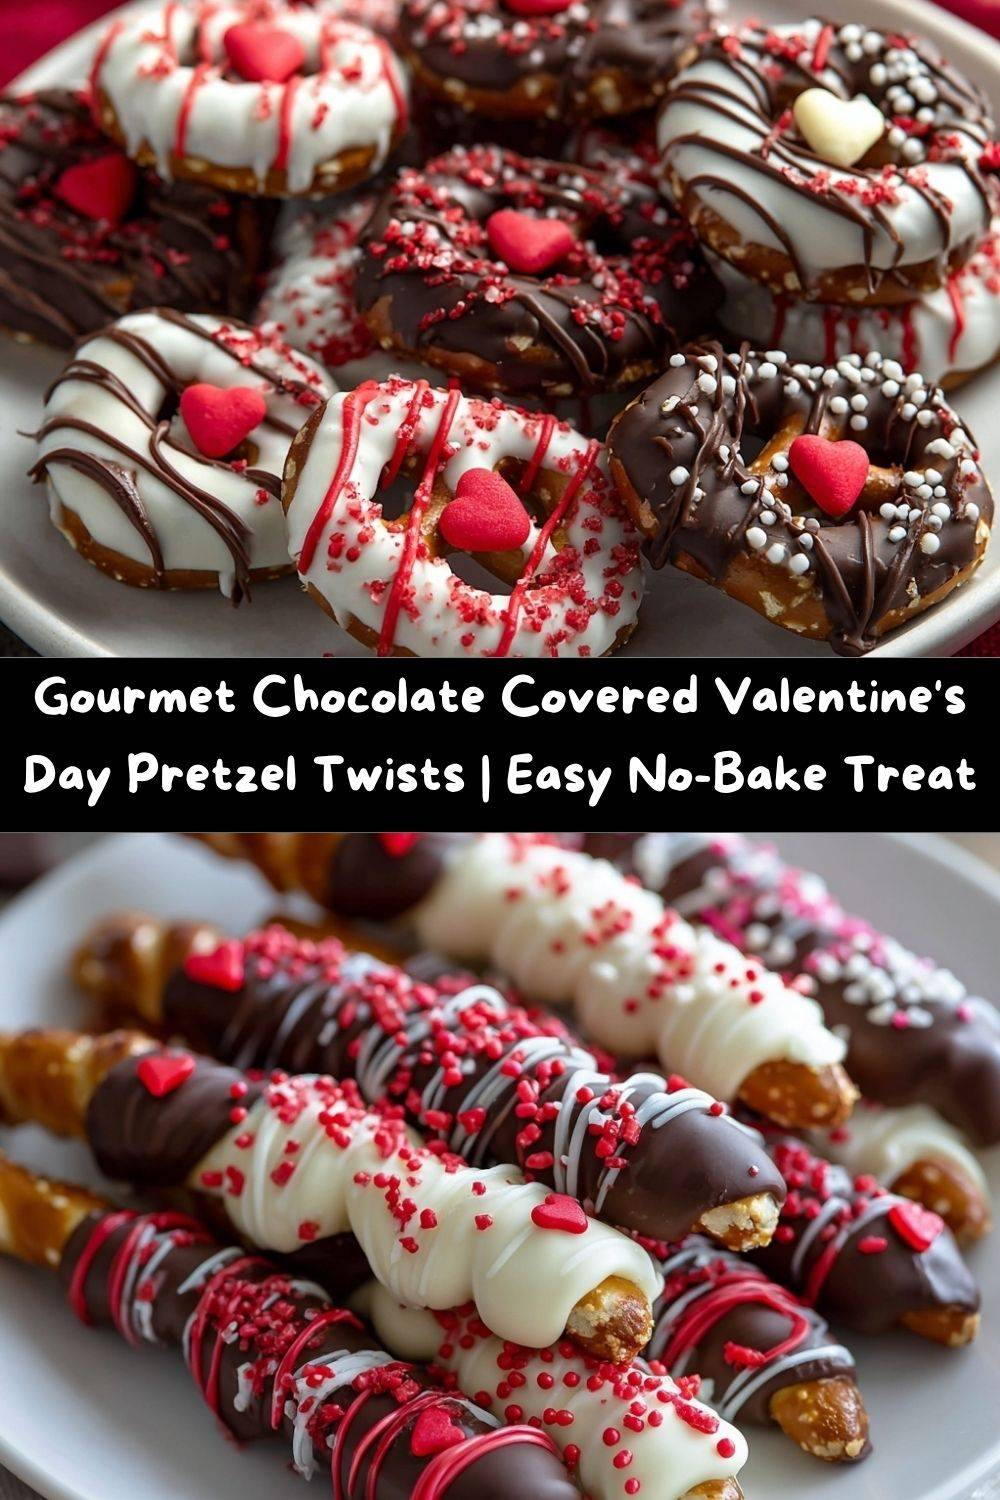
Gourmet Chocolate Covered Valentine’s Day Pretzel Twists: Your New Favorite Sweet & Salty Treat
Hey there, my fellow flavor fanatic! Chef Emily here, back in my happy place—the kitchen—and buzzing with excitement to share a recipe that’s an absolute game-changer for Valentine’s Day. We’re talking about my Gourmet Chocolate Covered Valentine’s Day Pretzel Twists. Can you just *imagine* it? That satisfying crunch of a salty pretzel, hugged by a layer of rich, silky chocolate, and then dressed to the nines with festive sprinkles and drizzles. It’s a symphony of textures and tastes in every single bite.
Now, I know what you might be thinking. “Emily, Valentine’s Day treats have to be complicated and fussy, right?” Wrong! I’m here to tell you, with a sparkle in my eye and a smudge of chocolate on my apron, that these gorgeous little bites are deceptively simple. You don’t need to be a pastry chef. You don’t even need to turn on your oven. All you need is a little bit of love, a handful of ingredients, and the willingness to get a little messy (which, let’s be honest, is the best part of cooking).
Whether you’re crafting a heartfelt, homemade gift for your sweetheart, whipping up a show-stopping snack for your Galentine’s party, or just treating yourself because you deserve it (you absolutely do!), these pretzel twists are your secret weapon. They look like you spent hours in a fancy chocolatier’s kitchen, but the truth is, they come together in minutes. So, grab your favorite mixing bowls, and let’s create some edible magic that’s equal parts fun, festive, and downright delicious.
A Sweet and Salty Start: My First Kitchen Crush
My love affair with the sweet-and-salty combo started not in culinary school, but on my grandma’s linoleum floor. I was about seven years old, and she was making her famous chocolate-dipped peanut butter crackers. I was her official “sprinkle applier,” a job I took with the utmost seriousness. She’d dip, I’d decorate, and we’d both sneak a few broken ones, the salt from the cracker making the chocolate taste a million times better.
That memory—the smell of melting chocolate, the sound of sprinkles hitting the plate, the sheer joy of creating something beautiful with my own two hands—stuck with me. These Valentine’s pretzel twists are the spiritual successor to those afternoons with my grandma. They capture that same playful, unpretentious spirit. They’re not about perfection; they’re about the joy of making something with love. Every time I drizzle that last bit of pink chocolate over a tray, I’m right back in that sunny kitchen, feeling that same little-kid excitement. It’s a feeling I want to share with all of you.
Gather Your Goodies: The Pretzel Dream Team
Here’s your shopping list for this edible happiness! I’ve included some of my favorite chef-y insights and substitution hacks to make this recipe truly your own.
- 24 medium pretzel twists: The sturdy foundation of our treat! I love the classic twists because they have those perfect little nooks and crannies for holding onto chocolate. Chef’s Tip: If you’re gluten-free, your favorite GF pretzel twists will work beautifully here!
- 1 cup dark or milk chocolate chips (or melting wafers): This is your rich, decadent base. I’m a dark chocolate gal myself (that 60-70% cacao is *chef’s kiss*), but milk chocolate is a classic crowd-pleaser. Chef’s Insight: Melting wafers (like Candy Melts or Ghirardelli melting wafers) are formulated to set with a beautiful snap and glossy finish, making them extra forgiving for beginners!
- 1 cup white chocolate or white candy melts: For that gorgeous contrast! White chocolate adds a creamy sweetness that plays so nicely against the dark chocolate. Substitution Tip: Not a fan of white chocolate? Use pink or red candy melts instead for a monochromatic look!
- ½ cup red candy melts: This is for our festive drizzle. A little goes a long way in making these look professionally decorated.
- Red sanding sugar: For that classic, sparkling Valentine’s crunch. It adds a wonderful texture and a pop of vibrant color.
- Heart-shaped candy toppers (optional but highly encouraged!): The cherry on top! These little cuties (like the conversation hearts or heart sprinkles) instantly scream “Valentine’s Day.”
- Parchment paper: Your best friend for any chocolate-dipping project. It prevents sticking and makes for an effortless cleanup. Chef’s Hack: Don’t have parchment? A clean, non-stick silicone baking mat works wonders too.
Let’s Get Dipping! Your Foolproof Step-by-Step Guide
Okay, team! Aprons on! This is where the fun begins. Follow these steps, and you’ll have a tray of gorgeous, gourmet-looking treats in no time.
- Prep Your Station. Before you even think about melting chocolate, line two large baking sheets with parchment paper. This is your “setting zone.” Having everything ready to go is the key to a smooth, stress-free dipping session. Trust me on this one!
- Melt Like a Pro. Now, let’s melt our chocolates. I strongly recommend using separate, microwave-safe bowls for each color (dark, white, and red). Microwave each bowl in 30-second intervals on medium power, stirring vigorously in between, until they’re smooth and silky. Chef’s Hack: Be patient! Chocolate burns easily. If you’re using real chocolate (not wafers), add a tiny teaspoon of coconut oil to help it thin out and become extra dippable.
- The Grand Dip. Here’s the moment of truth! Hold a pretzel by one end and dip it into your melted chocolate. Swirl it around to coat it as much or as little as you like—half-dipped looks chic, fully coated is decadent. Gently tap your wrist with your other hand to let the excess chocolate drip back into the bowl. This prevents a big, messy chocolate puddle underneath your pretzel. Chef’s Commentary: This is the part where I usually get chocolate on my nose. Consider it a badge of honor!
- Decorating Extravaganza. Immediately after placing the chocolate-dipped pretzel onto the parchment paper, it’s time to decorate! This is your chance to get creative.
- For some, sprinkle on the red sanding sugar immediately before the chocolate sets.
- For others, let the base chocolate layer set completely, then use a fork or a piping bag with a tiny tip to drizzle the contrasting white and red chocolates over the top in zig-zags or swoops.
- Gently press a few heart-shaped candies onto the wet chocolate of your final few pretzels.
Chef’s Tip: Don’t decorate them all the same way! A mix of styles on your tray looks incredibly artistic and professional.
- The Final Set. Once your masterpieces are all decorated, let them sit at room temperature until the chocolate is firm to the touch. If you’re impatient like me (or if your kitchen is warm), you can pop the entire baking sheet into the refrigerator for about 15 minutes to speed things up. Chef’s Hack: Avoid the freezer! It can cause the chocolate to “sweat” when it comes back to room temperature, which can mess with your beautiful decorations.
How to Serve These Stunning Sweethearts
Presentation is everything, and these pretzels make it so easy to look like a rockstar. For a casual family treat, I love piling them high on a beautiful ceramic platter or in a rustic wooden bowl. The mix of colors and textures is a feast for the eyes before you even take a bite.
If you’re gifting them (what a wonderful idea!), you have so many adorable options. Stack a few in a clear cellophane bag and tie it with a gorgeous red or pink ribbon. For your significant other, arrange them in a gift box lined with parchment paper—it’s a homemade gift that truly comes from the heart. And for a party? Create a dedicated “Pretzel Bar” with different bowls of toppings and let your guests decorate their own! It’s a fantastic, interactive activity for both kids and adults.
Mix It Up! Fun & Festive Recipe Twists
Once you’ve mastered the basic formula, the sky’s the limit! Here are a few of my favorite ways to play with this recipe:
- The Raspberry Dream: Use raspberry-flavored melting wafers (they’re often a lovely pink color) instead of the red candy melts. The fruity tang is incredible with the dark chocolate.
- Salted Caramel Pretzel: After dipping in dark chocolate, drizzle with a little store-bought caramel sauce and then give it a tiny sprinkle of flaky sea salt. It’s a next-level sweet and salty experience.
- Cookies & Cream Crunch: Dip your pretzels in white chocolate, and while it’s still wet, roll the edges in crushed Oreo cookie crumbs. It’s a kid (and adult) favorite!
- The “Unicorn” Twist: Go full rainbow! Use white chocolate as your base and then decorate with a mix of colorful sprinkles, sanding sugars, and nonpareils.
- Nutty for You: After drizzling, sprinkle on some finely chopped pistachios, peanuts, or toasted almonds for a delicious crunch and a hit of protein.
From My Kitchen to Yours: A Few Chef’s Notes
This recipe has evolved so much since I first started making it! My earliest batch was… well, let’s just call it a “chocolate puddle with pretzel bits.” I learned that tapping off the excess chocolate is non-negotiable. I’ve also learned to embrace the “imperfect” ones. The one with the lopsided drizzle? It has character. The one that broke and you had to “quality test”? That’s the chef’s treat. Some of my best kitchen memories come from these happy little accidents.
Over the years, I’ve found that letting the pretzels set at a cool room temperature gives the chocolate the best texture and shine. But on a hot summer day, the fridge is your best friend. Cooking is about adapting, and this recipe is wonderfully flexible. Make it your own!
Your Questions, Answered!
Q: My chocolate got thick and clumpy when I was melting it! What happened?
A: Ah, you’ve likely encountered “seized” chocolate! This usually happens if a tiny drop of water gets into the melting chocolate. To fix it, try stirring in a tiny amount (about ½ teaspoon) of vegetable oil or coconut oil at a time until it becomes smooth again. Prevention is key: make sure all your bowls and utensils are completely dry.
Q: How far in advance can I make these?
A: You can absolutely make these 2-3 days ahead of time! Once the chocolate is fully set, store them in a single layer in an airtight container at cool room temperature. If you stack them, place a sheet of parchment paper between the layers to prevent sticking.
Q: Can I use almond bark instead of candy melts?
A: You sure can! Almond bark is a fantastic, easy-to-use alternative. It melts smoothly and sets up nicely. The flavor is a little different than real chocolate, but it works like a charm for dipping and drizzling.
Q: My decorations are sliding off! How do I prevent that?
A: The key is timing. Make sure to add your sprinkles and non-liquid toppings while the base chocolate is still wet and tacky. For drizzles, you want the base layer to be completely set so the drizzle sits on top.
A Little Note on Nutrition
Okay, let’s be real: we’re not eating these for their vitamin content! These are a celebratory treat, meant to be enjoyed mindfully and with sheer delight. That said, here’s a rough nutritional breakdown so you can plan accordingly. This is an approximation per serving (about 2 pretzels), as ingredients can vary.
- Calories: ~180
- Fat: 9g
- Carbohydrates: 24g
- Sugar: 16g
- Protein: 2g
- Sodium: 150mg
Remember, life is all about balance. A kale salad for lunch means you can absolutely enjoy a few of these gorgeous pretzels for dessert! The joy they bring is part of their nourishment, in my opinion.
Final Thoughts: Share the Love (and the Pretzels!)
And there you have it, my friend! Your ultimate guide to creating the most delightful, delicious, and downright adorable Valentine’s Day treat. I hope this recipe brings as much fun and laughter to your kitchen as it has to mine. Seeing your creations light up someone’s face is one of the greatest joys of cooking.
So, don your favorite messy apron, put on some good music, and whip up a batch of these sweet and salty wonders. They’re more than just a snack; they’re a little edible hug, a moment of joy, and a perfect way to say “I love you” or “I appreciate you” this Valentine’s season.
I’d love to see your beautiful creations! Tag me on social @TastyChow with #TastyChowValentine so I can ooh and aah over your masterpieces. Now, go forth and get your dip on!
With a full heart and a happy belly,
— Emily