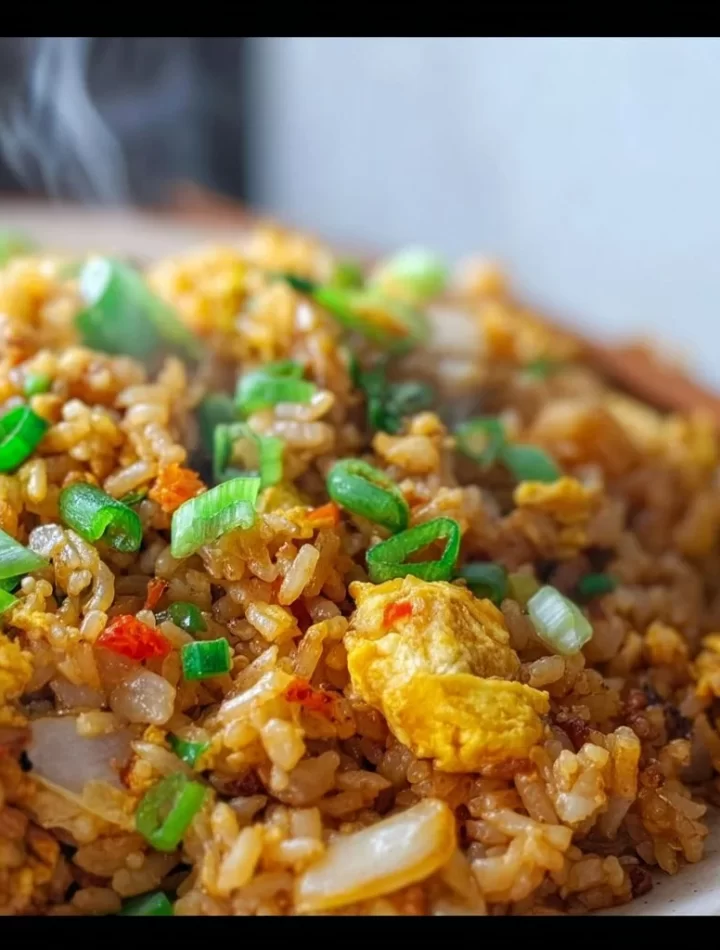
Hibachi Fried Rice: A Comforting Journey to Flavor Town
Hey there, fellow food lovers! 👋 Today, we’re diving into a delightful dish that’ll make your taste buds do a happy dance: Hibachi Fried Rice! Picture this: you’re at your favorite Japanese restaurant, the sizzling sound of fresh ingredients hitting the grill, the delicious aroma wafting through the air, and that perfect blend of soy sauce, garlic, and vegetables turning into a culinary masterpiece right before your eyes. Isn’t it incredible?
But guess what? You don’t have to snag a reservation at a fancy restaurant to experience that same joy. You can whip up your own Hibachi Fried Rice right in your cozy kitchen! This dish is not only fun and easy to make, but it’s also a great way to use up leftover rice and veggies you might have lounging around. Plus, the flavor? Oh my goodness—it’s a warm hug in a bowl!
I remember my very first attempt at making fried rice. I was a culinary newbie, and I had no idea what I was doing. Armed with a mediocre recipe and a burning desire to impress my friends, I fired up my old skillet, tossed in some chicken, veggies, and a mountain of day-old rice, and prayed for a miracle. What came out was one of those delicious accidents that turned into a beloved go-to in my meal rotation. The blend of colors, sounds, and aromas was enough to win my friends over—and it has been a hit ever since. This dish is all about the vibrant flavors coming together in harmony, creating a comforting meal that warms your heart!
In this blog post, I’ll guide you through my ultimate Hibachi Fried Rice recipe. Get ready for a culinary adventure filled with tips, flavorful ideas, and stories that’ll make you want to grab your chef’s apron and hop right into the kitchen! Let’s get started!
Personal Story
Ah, the memories of vibrant gatherings filled with laughter and sizzling sounds! One of my favorite experiences with fried rice happened during a holiday get-together with my family years ago. Our tradition was to have theme nights for dinner, and one evening, we turned our humble kitchen into a Japanese hibachi grill experience.
With a portable griddle, colorful veggies, shrimp, and chicken, the air was thick with excitement. My mom, channeling her inner chef, dominated the grill while my siblings and I were tasked with dancing around her, mimicking the chefs we’d seen in restaurants. As the shrimp flew and everyone laughed, I knew that the fun wasn’t just in the food but in the moment we were sharing together.
That night, we created our own rendition of Hibachi Fried Rice, and it was a complete hit! We gathered around the table, devouring heaping bowls of that beautiful fried rice while swapping stories and giggling to our heart’s content. That meal stands out to me not just for its delightful flavors but for the memories of love, laughter, and togetherness. So, whether you’re prepping for a family dinner, a casual gathering, or just a night to indulge in comfort food, this dish is perfect for celebrating those special moments.
Ingredients
Here’s what you need to create this delicious Hibachi Fried Rice:
- Cooked Rice: 4 cups, preferably day-old
- Tip: Using day-old rice (overnight in the fridge) will give you the best texture. Freshly cooked rice tends to be too moist and sticky!
- Vegetable Oil: 2 tablespoons
- Chef Insight: A high smoke point oil, like canola or avocado oil, works well to prevent burning at high temperatures.
- Garlic: 3 cloves, minced
- Substitution: You can use garlic powder in a pinch—about 1 teaspoon will do!
- Onion: 1 medium, diced
- Tip: Sweet onions bring out a delightful flavor—try using red onion for an extra pop of color!
- Mixed Vegetables: 2 cups (peas, carrots, and corn are great choices)
- Quick Insight: If you’re feeling adventurous, switch up the veggies with whatever you have on hand!
- Eggs: 2, whisked
- Tip: For an egg-free version, try using scrambled tofu as a vegan substitute!
- Soy Sauce: 3-4 tablespoons (adjust to taste)
- Chef Tip: Use low-sodium soy sauce for a healthier option or tamari for a gluten-free choice.
- Sesame Oil: 1 tablespoon for flavor depth
- Hint: Drizzle a bit on top as a finishing touch for a lovely aroma.
- Green Onions: 3, chopped (for garnish)
- Substitution: Chives or cilantro can add a different flavor twist!
- Salt and Pepper: to taste
- Tip: Don’t be shy—tasting as you go always helps to achieve the perfect balance!
With all of your ingredients lined up, you’ll be ready to create this vibrant symphony of flavors!
Step-by-Step Instructions
Alright, let’s get that skillet sizzling and dive into the cooking process!
Step 1: Prep Your Ingredients
To make your life easier, let’s get all the chopping and whisking done first. Chop the onions, mince the garlic, and prepare the mixed veggies. If you’re using frozen veggies, no worries—just let them thaw while you’re pre-prepping. Whisk the eggs in a bowl and set aside.
Step 2: Heat the Skillet
Grab a large, heavy skillet or wok and heat it over medium-high heat. It’s essential to get it nice and hot! Once it’s ready, add the vegetable oil and swirl it around to coat the bottom.
Step 3: Sauté Onions and Garlic
Add the diced onions and sauté for about 2–3 minutes until they soften and turn translucent. Then toss in the minced garlic and stir for about 30 seconds, just until it becomes fragrant. Ahh, the aroma already feels like home!
Step 4: Add Mixed Veggies
Next, add your mixed vegetables to the skillet. Stir them in and let them cook for 3–4 minutes until they’re tender. If you’re using frozen veggies, they’ll take a bit longer to heat through, so just be a touch patient!
Step 5: Incorporate the Eggs
Push all the veggie mixture to the sides of the skillet to create a space in the center. Pour your whisked eggs directly into this space. Scramble them for about a minute, then mix everything together. The eggs will add incredible creaminess to our fried rice!
Step 6: Add the Rice
Now, it’s time to introduce the star of the show—your cooked rice! Add it in, breaking apart any clumps as you go. You want your rice to be loose and fluffy, not clumpy. This is where the magic happens!
Step 7: Season with Soy and Sesame
Drizzle the soy sauce evenly over the rice, followed by the sesame oil. Stir everything together, ensuring each grain of rice is coated in that flavorful goodness. Give it a taste, and adjust the seasoning with salt, pepper, or even a dash more soy sauce if necessary.
Step 8: Finish with Green Onions
Finally, toss in those chopped green onions. Stir well to combine. You’re looking for vibrant colors and an intoxicating aroma at this point. Cooking with your senses is a chef’s secret!
Step 9: Serve Up
Remove the skillet from the heat and get ready to dig in! You can garnish your Hibachi Fried Rice with extra green onions or toasted sesame seeds for that added flair. Serve it hot and watch those plates clear as everyone dives in!
Chef’s Tip:
One of my favorite hacks to elevate this dish is to prepare some grilled shrimp or chicken on the side and mix them with the fried rice just before serving. It elevates the meal to superstar levels of deliciousness!
Serving Suggestions
Hibachi Fried Rice is versatile and totally adaptable. You can serve it in bowls and garnish it with additional green onions or sesame seeds for visual appeal. A light drizzle of sriracha or chili oil adds a spicy kick for those who love heat!
Don’t hesitate to pair it with other dishes like teriyaki chicken, grilled steak, or even a refreshing cucumber salad to balance out the flavors. And for a fun presentation, consider making a fried rice tower! Use a small bowl to mold the rice into a quirky shape, then place it on the plate for a beautiful and impressive dish.
Recipe Variations
Hey, we know life is all about exploring flavors! Here are a few creative twists to add some fun to your Hibachi Fried Rice:
- Seafood Delight: Swap out chicken for shrimp or scallops. Just add them to the skillet before the veggies to cook through and infuse the delicious seafood flavor.
- Veggie Lover’s Dream: Go all-out vegetarian by adding mushrooms, bell peppers, and bok choy for a more vibrant and colorful dish.
- Spicy Kick: Want some heat? Add fresh diced jalapeños or a spoonful of gochujang when you add soy sauce for some delightful spice!
- Curried Version: Stir in a bit of curry powder to your fried rice, and you’ll have a delightful fusion of flavors that will surprise and please your taste buds.
- Low-Carb Option: Swap the rice for riced cauliflower! It’s a fantastic way to lighten up the dish and still enjoy amazing flavors.
Chef’s Notes
Over the years, this Hibachi Fried Rice recipe has become a staple in my kitchen, transforming through countless iterations. From those initial college nights with whatever leftovers I could scrounge up to the refined version I’m sharing today, every tweak tells a story. One funny moment that sticks out was when I accidentally used brown sugar instead of soy sauce—talk about an unexpected dessert twist! The kitchen was filled with laughter, and although the fried rice didn’t turn out quite as planned, it turned into a legendary story we still joke about today.
I encourage you to have fun with this recipe! Cooking is all about experimenting and making it your own.
FAQs and Troubleshooting
Q: Can I use fresh rice instead of day-old rice?
A: While you can use fresh rice, it might get mushy since it holds more moisture. If you must, try cooling it on a baking sheet in the fridge for an hour to dry it out a little!
Q: Why is my fried rice sticking together?
A: This usually happens when the rice is too fresh or you haven’t cooked it long enough. Make sure your rice is chilled and try to break apart any clumps while stirring.
Q: How can I store leftovers?
A: Store leftover fried rice in an airtight container in the fridge for up to 3–4 days. Make sure to reheat thoroughly before enjoying!
Q: Can I freeze Hibachi Fried Rice?
A: Absolutely! Just let it cool, then store it in freezer-safe containers for up to 3 months. Thaw it overnight in the fridge and reheat fully.
Nutritional Info
While Hibachi Fried Rice is undeniably delicious, it’s also important to keep track of your nutrient intake. Here’s a rough idea of what you’re looking at for one serving:
- Calories: Approximately 350-400
- Protein: 12-15g (with chicken)
- Carbohydrates: 50-60g
- Fat: 10-12g
Feel free to adjust portions depending on whether you’re serving it as a main dish or a side. Adding more veggies can also enhance the nutritional profile, making it a heartier meal without sacrificing flavor!
Final Thoughts
There you have it, my culinary companions! 🎉 Hibachi Fried Rice is one of those magical dishes that not only satisfies your hunger but also stirs up feelings of nostalgia and joy. With each mouthful, you create memories—whether it’s a weeknight meal that brings the family together or a dish made for gatherings filled with laughter.
So, grab your favorite ingredients, put on some fun tunes, and let’s simmer up some deliciousness! I can’t wait to hear how your Hibachi Fried Rice turns out, so don’t forget to drop me a message or share your foodie adventures with a photo. Let’s keep this flavor-chasing journey going—after all, great food should always be shared. Happy cooking, friends! 🍚💕
Print
Hibachi Fried Rice
- Total Time: 35 minutes
- Yield: 4 servings 1x
- Diet: Vegetarian
Description
A comforting and flavorful dish reminiscent of Japanese hibachi restaurants, perfect for using up leftover rice and vegetables.
Ingredients
- 4 cups cooked rice, preferably day-old
- 2 tablespoons vegetable oil
- 3 cloves garlic, minced
- 1 medium onion, diced
- 2 cups mixed vegetables (peas, carrots, corn)
- 2 eggs, whisked
- 3–4 tablespoons soy sauce (adjust to taste)
- 1 tablespoon sesame oil
- 3 green onions, chopped (for garnish)
- Salt and pepper, to taste
Instructions
- Prep your ingredients by chopping onions, mincing garlic, and whisking the eggs.
- Heat a large skillet or wok over medium-high heat and add the vegetable oil.
- Sauté the diced onions for 2-3 minutes until softened, then add the minced garlic and stir for 30 seconds.
- Add the mixed vegetables into the skillet and cook for 3-4 minutes until tender.
- Push the veggie mixture to the sides and pour the whisked eggs into the center, scrambling for about a minute.
- Introduce the cooked rice, breaking apart any clumps and mixing well.
- Drizzle the soy sauce and sesame oil over the rice, stir to combine, and adjust seasoning with salt and pepper.
- Finish by tossing in the chopped green onions, remove from heat, and serve.
Notes
For a protein boost, consider adding grilled shrimp or chicken before serving. Use day-old rice for the best texture.
- Prep Time: 15 minutes
- Cook Time: 20 minutes
- Category: Main Course
- Method: Stir-frying
- Cuisine: Japanese
Nutrition
- Serving Size: 1 serving
- Calories: 375
- Sugar: 3g
- Sodium: 800mg
- Fat: 12g
- Saturated Fat: 2g
- Unsaturated Fat: 6g
- Trans Fat: 0g
- Carbohydrates: 53g
- Fiber: 3g
- Protein: 14g
- Cholesterol: 30mg
Keywords: Hibachi, Fried Rice, Japanese Recipe, Comfort Food, Easy Dinner