The Only Homemade Chocolate Chip Cookie Recipe You’ll Ever Need
Hey there, my fellow food lover! Let’s talk about one of life’s greatest simple pleasures: a perfect, warm, homemade chocolate chip cookie. You know the one. It’s the cookie that makes you close your eyes after the first bite. The one with a slightly crisp edge that gives way to a soft, buttery center, all while rivers of melted chocolate weave through every single mouthful. That’s the magic we’re creating in our kitchens today.
I’ve tested more chocolate chip cookie recipes than I can count. I’ve made them thin and crispy, cakey and puffy, and everything in between. But this recipe? This is my holy grail. It’s the one I scribbled on a notecard years ago, a recipe that has since been splattered with butter and vanilla more times than I can remember. It’s the cookie my friends and family demand, the one I wrap up for new neighbors, and the one I sneak a piece of dough from when I think no one is looking (we all do it, right?).
So, tie on your favorite apron—the messy one with the heart on it, just like mine—and let’s bake a batch of pure, unadulterated joy. This isn’t just about following steps; it’s about creating a little bit of edible happiness. Let’s get baking!
A Spoonful of Nostalgia: My First Kitchen Victory
My journey with this cookie started long before culinary school, in my grandma’s warm, cinnamon-scented kitchen. I was maybe seven years old, standing on a wobbly wooden stool, my small hands desperately trying to hold a massive mixing bowl steady. Grandma, with her infinite patience, guided my hands as we creamed the butter and sugars together. “You’re not just mixing, Emmy,” she’d say. “You’re putting love in the bowl. You can taste it, you know.”
I’ll never forget the triumphant feeling of pulling that first tray of golden-brown cookies out of the oven. They weren’t perfect. Some were a little lopsided, and I may have been a bit overzealous with the chocolate chips. But when my family took their first bites, their eyes lit up. That moment, the shared smiles and the chorus of “Mmmms,” was my first taste of the power of food—it’s not just fuel, it’s a connector, a comfort, a memory you can hold in your hand. Every time I bake these cookies, I’m right back on that stool, and I’m reminded that the best recipes are the ones that are passed down, shared, and made with a whole lot of heart.
Print
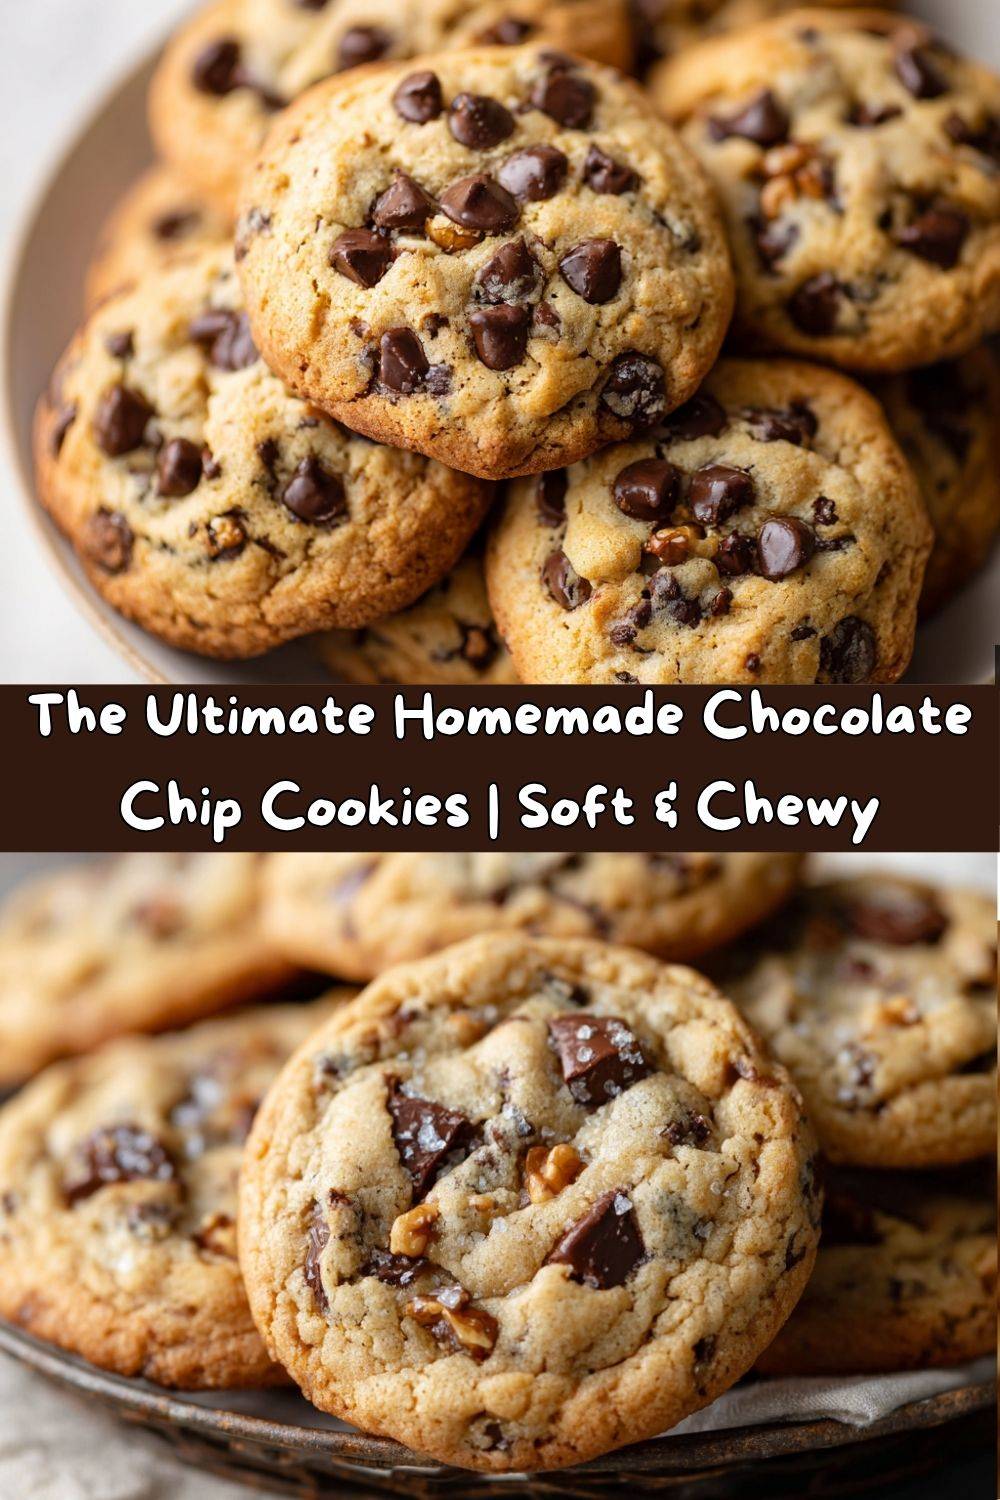
Homemade Chocolate Chip Cookies
- Total Time: 25 minutes
- Yield: 4 Dozen cookies 1x
Description
These homemade chocolate chip cookies are thick, buttery, and packed with melty chocolate in every bite. They’re soft in the center, slightly crisp on the edges, and come together with pantry staples. Whether you add walnuts or not, they’re sure to be a family favorite.
Ingredients
3 eggs
1 cup sugar
1 cup packed brown sugar
3 sticks real butter, softened
3 cups all-purpose flour
2 tsp vanilla extract
1½ tsp baking soda
¾ tsp salt
4 cups semi-sweet chocolate chips
Optional: chopped walnut pieces
Instructions
Preheat oven to 375°F (190°C).
In a large bowl, cream together butter, sugar, and brown sugar until light and fluffy.
Add eggs and vanilla; beat until well combined.
In a separate bowl, whisk together flour, salt, and baking soda.
Gradually add dry mixture to the wet mixture, mixing just until combined.
Fold in chocolate chips and nuts (if using).
Scoop dough onto a baking sheet using a small cookie scoop.
Bake for 8–10 minutes, or until the edges are golden and centers are set.
Cool slightly, then enjoy warm or store in an airtight container.
- Prep Time: 15 minutes
- Cook Time: 10 minutes
Nutrition
- Calories: 180 / Cookie
- Sugar: 14g / Cookie
- Fat: 9g / Cookie
- Carbohydrates: 22g / Cookie
- Protein: 2g / Cookie
Gathering Your Cookie Crew: The Ingredients
Before we start, let’s chat about our lineup. Using simple, quality ingredients is the secret handshake to an incredible cookie. Here’s what you’ll need:
- 3 sticks (1 ½ cups) real butter, softened: This is non-negotiable for me! Real butter gives us that rich, classic flavor. “Softened” is key—it should be cool to the touch but leave a slight indent when you press it. Pro tip: if you forgot to take it out of the fridge, you can grate cold butter on a box grater to speed up the process!
- 1 cup granulated sugar: Our sweet workhorse. It helps create that lovely crisp edge we all crave.
- 1 cup packed brown sugar: This is the flavor MVP. The molasses in brown sugar brings a deep, caramel-like sweetness and, most importantly, moisture for that soft, chewy center. Pack it firmly into your measuring cup!
- 2 large eggs + 1 egg yolk: The original recipe called for 3 whole eggs, but I’ve found that using 2 whole eggs and one extra yolk adds an incredible richness and soft, cake-like texture without making the cookies cakey. It’s my little chef hack for you!
- 2 tsp pure vanilla extract: The aromatic soul of the cookie. Don’t be shy with it! A good quality vanilla makes a world of difference.
- 3 cups all-purpose flour: The foundation of our cookie. I like to fluff my flour with a spoon before scooping and leveling it off with a knife to avoid dense, dry cookies.
- 1 ½ tsp baking soda: Our leavening agent, helping the cookies rise and spread just right.
- ¾ tsp fine sea salt: Salt is the flavor superhero that makes all the sweetness pop. It balances the chocolate perfectly.
- 4 cups semi-sweet chocolate chips: Yes, four cups! I believe in a high chip-to-dough ratio. I prefer semi-sweet for a balanced bitterness, but this is your canvas—use what you love!
- Optional: 1 ½ cups chopped walnut pieces: For my nut lovers, walnuts add a wonderful earthy crunch that pairs beautifully with the chocolate.
Let’s Get Baking: The Step-by-Step Cookie Magic
Ready to make some magic? Follow these steps, and don’t skip my little commentary—it’s where all the chef secrets live!
- Preheat and Prep: Start by preheating your oven to 375°F (190°C). This gives it plenty of time to get perfectly hot. Line your baking sheets with parchment paper. Trust me, this prevents sticking and makes cleanup an absolute dream. No parchment? A light greasing will do in a pinch.
- The Creaming Method is KEY: In a large bowl, cream together the softened butter, granulated sugar, and packed brown sugar. Now, “creaming” isn’t just mixing. Beat it on medium-high speed for a good 2-3 minutes until the mixture becomes light in color and wonderfully fluffy. This step incorporates air, which is essential for the perfect texture. Don’t rush it!
- Incorporate the Wet Team: Add the 2 whole eggs, the extra egg yolk, and the vanilla extract to the butter mixture. Beat again until everything is beautifully combined and the mixture looks smooth and almost glossy. Scrape down the sides of the bowl to make sure no ingredient is left behind.
- Whisk the Dry Goods: In a separate, medium-sized bowl, whisk together the flour, baking soda, and salt. Whisking is important here—it ensures the baking soda and salt are evenly distributed throughout the flour, so every cookie bakes uniformly.
- Combine with Care: Gradually add the dry ingredients to the wet ingredients, mixing on low speed. I usually do this in three additions. Mix just until the flour disappears. The second you can’t see any more dry flour, STOP! Overmixing at this stage is the number one cause of tough cookies. We want tender, not tough!
- The Grand Finale: Fold-ins! Switch to a sturdy spatula or wooden spoon. Now, gently fold in the glorious 4 cups of chocolate chips and the walnuts, if you’re using them. Make sure they’re evenly distributed throughout the dough.
- Scoop and Space: Using a small cookie scoop (about 1.5 tablespoons) or a spoon, drop rounded mounds of dough onto your prepared baking sheets. Leave about 2 inches between each one. They need their personal space to spread and become the beautiful cookies they’re destined to be.
- Bake to Perfection: Bake for 8-10 minutes. I always start checking at 8 minutes. You’re looking for golden-brown edges while the centers still look slightly soft and underdone. They will continue to cook on the hot baking sheet out of the oven. This is the secret to a soft center!
- The Cool Down: Let the cookies cool on the baking sheet for at least 5 minutes. This allows them to set up so they don’t fall apart when you move them. Then, transfer them to a wire rack to cool completely… or, you know, grab a glass of milk and dive right in while they’re still warm and gooey. I won’t judge!
How to Serve These Beauties
Okay, the hard part is over! Now, for the fun: serving. A warm chocolate chip cookie is a experience all on its own, but let’s get creative.
For the ultimate comfort food moment, serve a couple warm cookies in a shallow bowl and pour a glass of cold milk right over the top. It’s like an instant, deconstructed cookie sundae. For a next-level dessert, sandwich a scoop of high-quality vanilla bean ice cream between two cookies for an epic ice cream sandwich. You can even roll the edges in mini chocolate chips for a festive touch.
Want to be the star of the party? Create a cookie bar! Pile a platter high with these cookies and set out small bowls of toppings like flaky sea salt for sprinkling, different flavored ice creams, whipped cream, and hot fudge sauce. Let your guests build their own dream dessert.
Make It Your Own: Delicious Recipe Variations
This recipe is a fantastic foundation. Once you’ve mastered the classic, feel free to play with your food! Here are a few of my favorite twists:
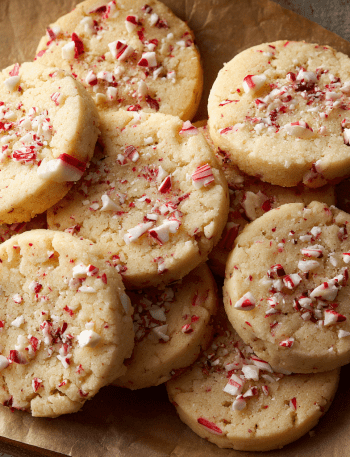
- Sea Salt Dark Chocolate: Swap the semi-sweet chips for high-quality dark chocolate chunks. Right when the cookies come out of the oven, sprinkle the tops with a little flaky sea salt. The sweet-salty combo is absolutely divine.
- Kitchen Sink Cookies: Go all out! Fold in 1 cup of rolled oats, 1 cup of sweetened shredded coconut, and 1 cup of pretzel pieces along with the chocolate chips. It’s a sweet, salty, crunchy masterpiece.
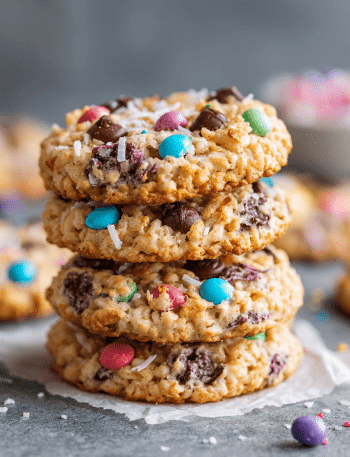
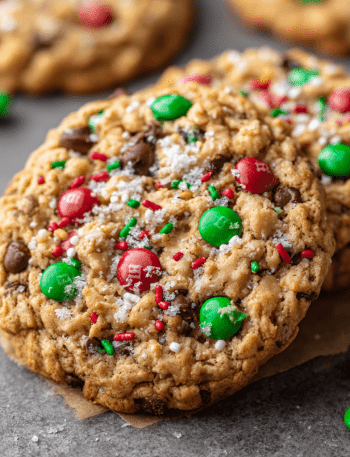
- M&M Funfetti Cookies: Perfect for birthdays! Replace half the chocolate chips with colorful M&Ms for a festive, cheerful cookie that kids (and kids-at-heart) adore.
- Gluten-Free Swap: No problem! Simply replace the all-purpose flour with a 1:1 gluten-free baking blend. My favorite brands work seamlessly in this recipe.
- Brown Butter Bliss: For a deeper, nuttier flavor, brown the butter first. Melt the butter in a saucepan over medium heat, swirling the pan until it turns a beautiful amber color and smells nutty. Let it cool completely before creaming it with the sugars. It’s a game-changer!
Chef Emily’s Corner: Notes from My Kitchen
This recipe has been my trusty sidekick for years, and it’s evolved with me. The extra egg yolk was a happy accident one day when I dropped a white on the floor (my dog, Chowder, was thrilled). The result was so good it became a permanent change!
And a little confession: I am a firm believer in eating a spoonful (or two) of the raw dough. It’s a rite of passage! That said, if you’re concerned about raw eggs, you can easily pasteurize them in their shells in a sous vide bath, or use a pasteurized egg product. But for me, that sweet, buttery dough is part of the baking memory.
Finally, this dough freezes beautifully. Scoop it into balls, freeze them solid on a tray, and then toss them in a freezer bag. You can bake frozen cookie dough balls anytime a craving strikes—just add a minute or two to the baking time. You’re welcome!
Your Cookie Questions, Answered!
I’ve gotten thousands of questions on this recipe over the years. Here are the most common ones to help you troubleshoot:
- Why are my cookies flat and thin? This usually boils down to two things: your butter was too warm/melted, or your baking soda is old. Always use softened, not melted, butter, and check the expiration date on your leavening agents!
- Can I chill the dough? Absolutely! Chilling the dough for at least 30 minutes (or up to 72 hours) helps the flavors meld and prevents excess spreading. This is my secret for a thicker, chewier cookie. It’s called “aging” the dough, and it’s a professional baker’s trick.
- My cookies are cakey. What happened? This can happen if you over-measured your flour. Remember to fluff, spoon, and level! Using a whole extra egg instead of just the yolk can also lead to a more cake-like texture.
- How do I get perfectly round cookies? As soon as you pull the cookies from the oven, take a large round cookie cutter or a glass slightly larger than the cookie and gently swirl it around the edge of the warm cookie to “tuck” in any uneven edges. It works like a charm!
Let’s Talk Nutrition (Because Balance is Key!)
Look, we’re all friends here. We know a homemade chocolate chip cookie is a treat, and that’s exactly what it should be—a delightful, soul-satisfying indulgence. I’m a big believer in enjoying real food without guilt.
That said, here’s a rough nutritional breakdown per cookie (based on a yield of 4 dozen, without walnuts):
- Calories: ~180
- Carbohydrates: 22g
- Fat: 9g
- Sugar: 14g
- Protein: 2g
Remember, these are estimates. The best part of baking at home is that you control the ingredients. You can use a sugar substitute, a lower-sugar chocolate chip, or even add a scoop of collagen peptides to the dough for a protein boost if that’s your thing. But sometimes, the best nourishment is the joy you get from sharing something delicious with people you love.
Final Sweet Thoughts
And there you have it! My entire heart, poured into this one, timeless recipe. These homemade chocolate chip cookies are more than just a dessert; they’re a warm hug, a shared smile, a little piece of my kitchen that I’m so happy to share with you.
I hope this recipe becomes a staple in your home, just like it is in mine. I hope your kitchen fills with that incredible, buttery, chocolatey aroma, and I hope you create your own beautiful memories around this baking tray.
Now, I’d love to hear from you! Did you add a twist? Did your family go crazy for them? Tag me on social @TastyChow with your cookie creations! Happy baking, my friend!
With love and a full cookie jar,
Emily