Honey Lavender Cake: Your New Favorite Slice of Sunshine
Hey friend! Pull up a chair and let me tell you about a cake that feels like a hug from a sunny spring garden. This isn’t just any cake. This is a Honey Lavender Cake—a delicate, elegant, and soul-soothing dessert that’s about to become your go-to for making any day feel special.
If you’ve never baked with lavender before, don’t let it intimidate you! I’m here to guide you through every step. We’re talking about a supremely tender vanilla-honey sponge that’s so moist it practically melts, paired with a cloud-like whipped frosting that carries the softest, most beautiful floral note. It’s not perfume-y, I promise. It’s subtle, sophisticated, and perfectly balanced with the warmth of the honey.
Imagine this on your table: a gorgeous, lightly-frosted layer cake, maybe with a drizzle of golden honey and a sprinkle of purple buds. It’s the star of bridal showers, the talk of the book club, and the secret weapon for when you want to treat yourself on a Tuesday afternoon. This recipe is all about creating that “wow” moment with flavors that are as unique as they are delicious. So, tie on that apron, and let’s make something beautifully delicious together!

The Day I Fell in Love with Lavender
My love affair with lavender didn’t start in a fancy patisserie. Nope. It started on a road trip gone wrong (or maybe right?). Years ago, a friend and I got hopelessly lost on the backroads of Oregon. Just as frustration was setting in, we rounded a corner and stumbled upon the most incredible sight: a family farm with rows upon rows of blooming lavender, stretching out like a purple ocean. The air was sweet and calm.
The kind farmer, seeing our bewildered faces, invited us in. She didn’t just sell us bundles of lavender; she poured us iced tea infused with it and told us how she bakes with it. “The trick,” she whispered, “is to use just a little. It should be a whisper, not a shout.” She sent me home with a bag of culinary-grade buds and that simple piece of advice. That weekend, I created the first version of this cake. With every test batch, I chased that feeling of peaceful, sun-drenched abundance. This cake is that lost highway, that kind stranger, and the magic of discovering something wonderfully new. Every time I bake it, I’m back in that field.
Gathering Your Sunshine & Blooms: The Ingredients
Here’s everything you’ll need to bring this floral dream to life. I’ve added my chef notes so you know exactly why each ingredient matters and how you can swap things if needed!
For the Honey Vanilla Cake:
- 2½ cups all-purpose flour: The trusty foundation. For a slightly lighter crumb, you can swap ½ cup with cake flour. For gluten-free, use a 1:1 gluten-free flour blend.
- 2½ tsp baking powder: Our leavening hero! It gives the cake its beautiful rise. Make sure yours is fresh (less than 6 months old) for the best lift.
- ½ tsp salt: The flavor enhancer. It balances the sweetness and makes the honey and vanilla pop. Never skip it!
- ¾ cup unsalted butter, softened: This is where the rich, tender texture comes from. “Softened” means it should indent easily when poked but not be oily or melted. Take it out of the fridge at least an hour ahead.
- ½ cup honey: The soul of the cake! Use a good-quality local honey if you can—it adds incredible depth. In a pinch, maple syrup works, but the flavor profile will change.
- 1 cup granulated sugar: Teams up with the honey for the perfect sweetness level and helps create that lovely golden crust.
- 4 large eggs, at room temperature: They bind the cake and add structure and richness. Room temp eggs incorporate much more smoothly into the batter.
- 1 tbsp vanilla extract: Yes, a full tablespoon! This pairs with the honey for that warm, classic flavor base. Use pure vanilla for the best taste.
- 1 cup whole milk, at room temperature: Whole milk gives the best moisture and tenderness. Room temp is key so it doesn’t shock the creamed butter.
For the Lavender Whipped Frosting:
- 1½ cups heavy whipping cream: This must be cold, cold, cold! Don’t use “whipping cream”—go for “heavy whipping cream” for the most stable, pillowy frosting.
- ¼ cup powdered sugar: Sweetens and slightly stabilizes the cream. You can adjust to your taste.
- 1–2 tsp dried culinary lavender: CRUCIAL NOTE: You must use culinary-grade lavender. The stuff from craft stores isn’t for eating. Start with 1 tsp for a subtle hint; 2 tsp gives a more pronounced floral note.
- 1 tsp vanilla extract: A little extra vanilla in the frosting ties the whole cake together beautifully.
Let’s Bake! Step-by-Step with Chef Emily
Follow these steps, and you’ll have a flawless cake. I’m chatting you through each one with all my favorite kitchen hacks.
- Prep Like a Pro: Preheat your oven to 350°F (175°C). Grease two 8-inch round cake pans with butter or non-stick spray, then line the bottoms with parchment paper circles. This guarantees your cakes will release perfectly—no sticking! Let your butter, eggs, and milk come to room temperature. This simple step is the secret to a smooth, emulsified batter that bakes up even and lofty.
- Mix the Dry Team: In a medium bowl, whisk together the 2½ cups of flour, 2½ tsp baking powder, and ½ tsp salt. Whisking by hand for 30 seconds does two things: it combines everything evenly and aerates the flour a bit, which is always a good thing. Set this bowl aside.
- Creaming is Key: In a large mixing bowl, beat the softened ¾ cup butter, 1 cup sugar, and ½ cup honey together on medium-high speed for a full 3-4 minutes. Stop and scrape the bowl down once. You want it to become very pale, fluffy, and almost creamy-looking. This incorporates air, which is essential for texture. Don’t rush this step!
- Incorporate the Eggs: Add your 4 room-temperature eggs, one at a time, beating well after each addition. Add the 1 tbsp of vanilla with the last egg. If the mixture looks slightly curdled, don’t panic! It will come together when you add the dry ingredients.
- The Gentle Combine: With your mixer on low speed, add about one-third of your dry flour mixture. Mix until just barely combined. Then, pour in half of the 1 cup of milk. Mix. Repeat: another third of flour, the rest of the milk, and finally the last of the flour. Stop mixing as soon as the last streaks of flour disappear. Over-mixing is the enemy of a tender cake!
- Bake to Golden Perfection: Evenly divide the batter between your two prepared pans. Give the pans a gentle tap on the counter to release any large air bubbles. Bake for 25-30 minutes. The cakes are done when they are golden, spring back lightly to the touch, and a toothpick inserted into the center comes out clean or with a few moist crumbs. Start checking at 25 minutes.
- The Patience Part (Cooling): Let the cakes cool in their pans on a wire rack for 10 minutes. Then, run a knife around the edges, invert them onto the rack, peel off the parchment, and let them cool completely. I cannot stress this enough: DO NOT frost a warm cake. It will melt your beautiful frosting into a sad puddle.
- Infuse the Cream (Do This First or While Cakes Cool): In a small saucepan, combine the 1½ cups heavy cream and your chosen amount of lavender (1-2 tsp). Warm over medium-low heat until it just begins to steam and tiny bubbles form around the edges—do NOT let it boil. Remove from heat, cover, and let it steep for 10-15 minutes. Strain the cream through a fine-mesh sieve into a bowl, pressing on the lavender buds to get all the flavorful cream out. Cover and refrigerate this infused cream until it’s completely cold, at least 2 hours (or overnight).
- Whip the Dreamy Frosting: Pour your chilled lavender cream into a cold mixing bowl. Add the ¼ cup powdered sugar and 1 tsp vanilla. Beat on medium-high speed until soft to medium-stiff peaks form. It should be thick, spreadable, and hold its shape. Don’t over-beat, or you’ll make lavender butter!
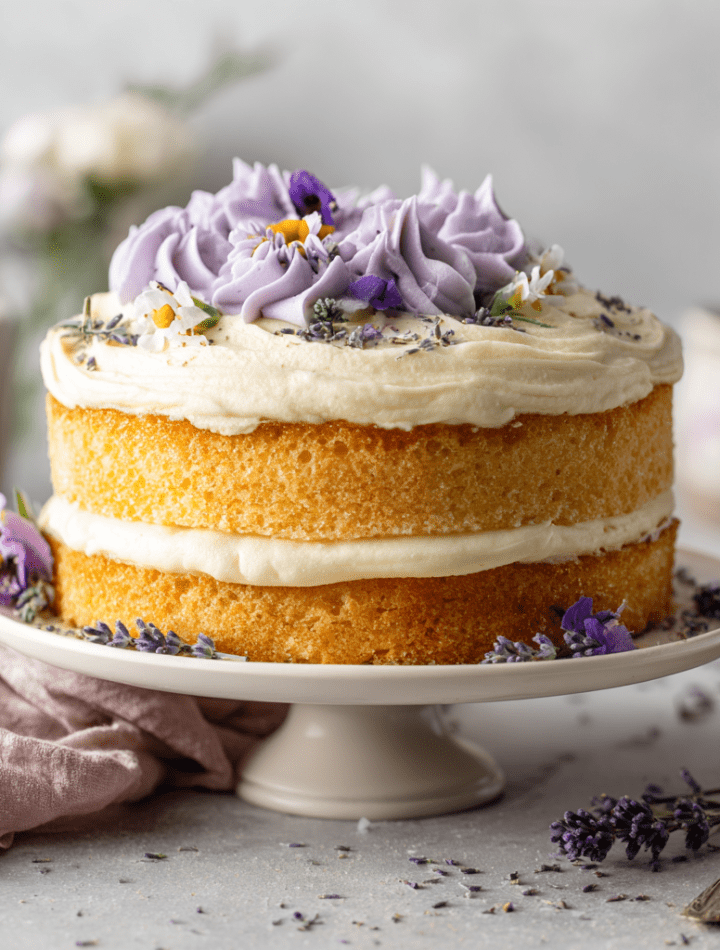
- Assemble Your Masterpiece: Place one cooled cake layer on your serving plate. Spread a generous amount of frosting over the top. Gently place the second layer on top. Frost the top and sides with the remaining lavender whipped cream. I love a “naked cake” look with this frosting—just a thin, swoopy layer that lets the cake peek through. For decoration, a drizzle of honey and a sprinkle of a few dried lavender buds is stunning.
How to Serve This Stunning Cake
Presentation is part of the joy! This cake is elegant enough to stand alone, but a few little touches make it unforgettable.
Slice it with a clean, sharp knife for neat pieces. I love serving it on simple, white plates to let its natural beauty shine. A little fresh berry on the side—like raspberries or blueberries—adds a pop of color and a slight tartness that complements the floral sweetness perfectly. For an extra special touch, offer a small pitcher of warm honey on the side for guests to drizzle over their slice. A pot of Earl Grey tea or a lightly sparkling prosecco are the absolute perfect beverage partners. This cake is all about a relaxed, elegant vibe, whether it’s for afternoon tea or the grand finale of a dinner party.
Make It Your Own: Delicious Variations
Love the idea but want to twist it? Here are some of my favorite riffs on this recipe:
- Lemon-Lavender Joy: Add the zest of one lemon to the cake batter. The bright citrus cuts through the floral notes in the most refreshing way. A lemon curd layer between the cakes would be heavenly!
- Blueberry Swirl: Before baking, drop small spoonfuls of blueberry jam or a handful of fresh blueberries onto the batter in each pan and lightly swirl with a knife. Blueberry and lavender are a match made in heaven.
- Dairy-Free & Vegan: Use plant-based butter sticks, flax eggs (4 tbsp ground flax + 10 tbsp water), and full-fat canned coconut milk (chilled) for the frosting (steep the lavender in the coconut milk). The flavor will be different but still delicious.
- Single-Layer Wonder: Bake the entire batter in a greased 9×13 inch pan for a simple sheet cake. Just frost the top. Perfect for potlucks!
- Earl Grey Twist: Replace the lavender in the frosting with 2-3 Earl Grey tea bags. Steep the same way. You’ll get a beautiful bergamot flavor that pairs wonderfully with the honey.
Chef Emily’s Kitchen Notebook
This recipe has been my quiet little project for years. The first time I made it, I was so nervous about the lavender flavor that I used a single teaspoon and could barely taste it. The next time, I got overzealous and used a heaping tablespoon… let’s just say it tasted like my grandmother’s sachet. Finding that “sweet spot” (literally) took a few tries, but that’s the joy of baking!
One hilarious fail involved me trying to frost the cake the second it came out of the oven because I was impatient for a photo. The frosting melted into a lavender river all over my kitchen counter. My dog licked it up and took a very long, contented nap afterward. Lesson learned: good things come to those who let their cake cool. Now, this recipe is my peaceful, foolproof escape. I hope it becomes that for you, too.
Your Questions, Answered!
Q: My frosting is runny and won’t hold peaks! What happened?
A: This usually means either 1) your infused cream wasn’t chilled completely, or 2) your bowl/beaters weren’t cold. Cream whips best when everything is ice-cold. Pop the bowl and beaters in the freezer for 15 minutes before you start. If it’s already runny, chill the whole bowl for 30 minutes and try whipping again.
Q: Can I use lavender extract instead of dried buds?
A> You can, but be extremely careful! Lavender extract is potent. Start with ¼ teaspoon, mix it into the cold cream, and taste before adding more. The infusion method with buds gives a more rounded, natural flavor.
Q: My cake is dense, not light and fluffy. Why?
A> The most common culprits are over-mixing the batter after adding the flour, or using cold ingredients. Room-temperature ingredients incorporate more air during creaming, which leads to a lighter crumb. Also, check your baking powder’s expiration date!
Q: How far ahead can I make this?
A> The unfrosted cake layers can be baked, wrapped tightly, and kept at room temperature for a day, or frozen for up to a month. The frosting is best made and used the same day. The fully assembled cake is best eaten within 24 hours, as the whipped cream frosting is perishable. Keep it refrigerated.
A Quick Nutritional Glance
I believe in indulgence, and I also believe in being informed! Here’s a basic breakdown per slice (based on 12 servings). Remember, this is a celebratory dessert, meant to be savored and enjoyed.
Approximate values per serving: Calories: ~390 | Protein: 5g | Carbohydrates: 45g | Fat: 22g | Saturated Fat: 13g | Cholesterol: 115mg | Sugar: 30g.
This cake gets its sweetness primarily from honey and sugar, and its rich texture from butter, eggs, and cream. While it’s not an everyday health food, it’s made with real, whole ingredients—no mystery chemicals here! For a lighter option, you can explore the dairy-free variation above, or simply enjoy a slightly smaller slice with a big cup of tea.
Final Thoughts: A Cake That Teaches You to Slow Down
This Honey Lavender Cake is more than a dessert—it’s a reminder.
A reminder that beauty doesn’t have to be loud.
That flavor can be gentle and still unforgettable.
That baking can be an act of calm in a busy world.
Every slice carries that soft balance: the warmth of honey, the whisper of lavender, the comfort of vanilla, and the lightness of whipped cream. It’s the kind of cake you serve when you want people to linger at the table a little longer. The kind you bake when you need your kitchen to feel peaceful again.
If this is your first time baking with lavender, I hope this recipe gives you confidence. Start light. Taste as you go. Trust your instincts. And if you fall in love with floral baking the way I did—well, welcome to the club. There’s no going back.
Bake it for someone you love. Bake it for a celebration. Or bake it just for yourself on a quiet afternoon when sunshine pours through the window and you need something gentle and good.
From my kitchen to yours—
may your cake be tender, your lavender subtle, and your days just a little sweeter.
With love,