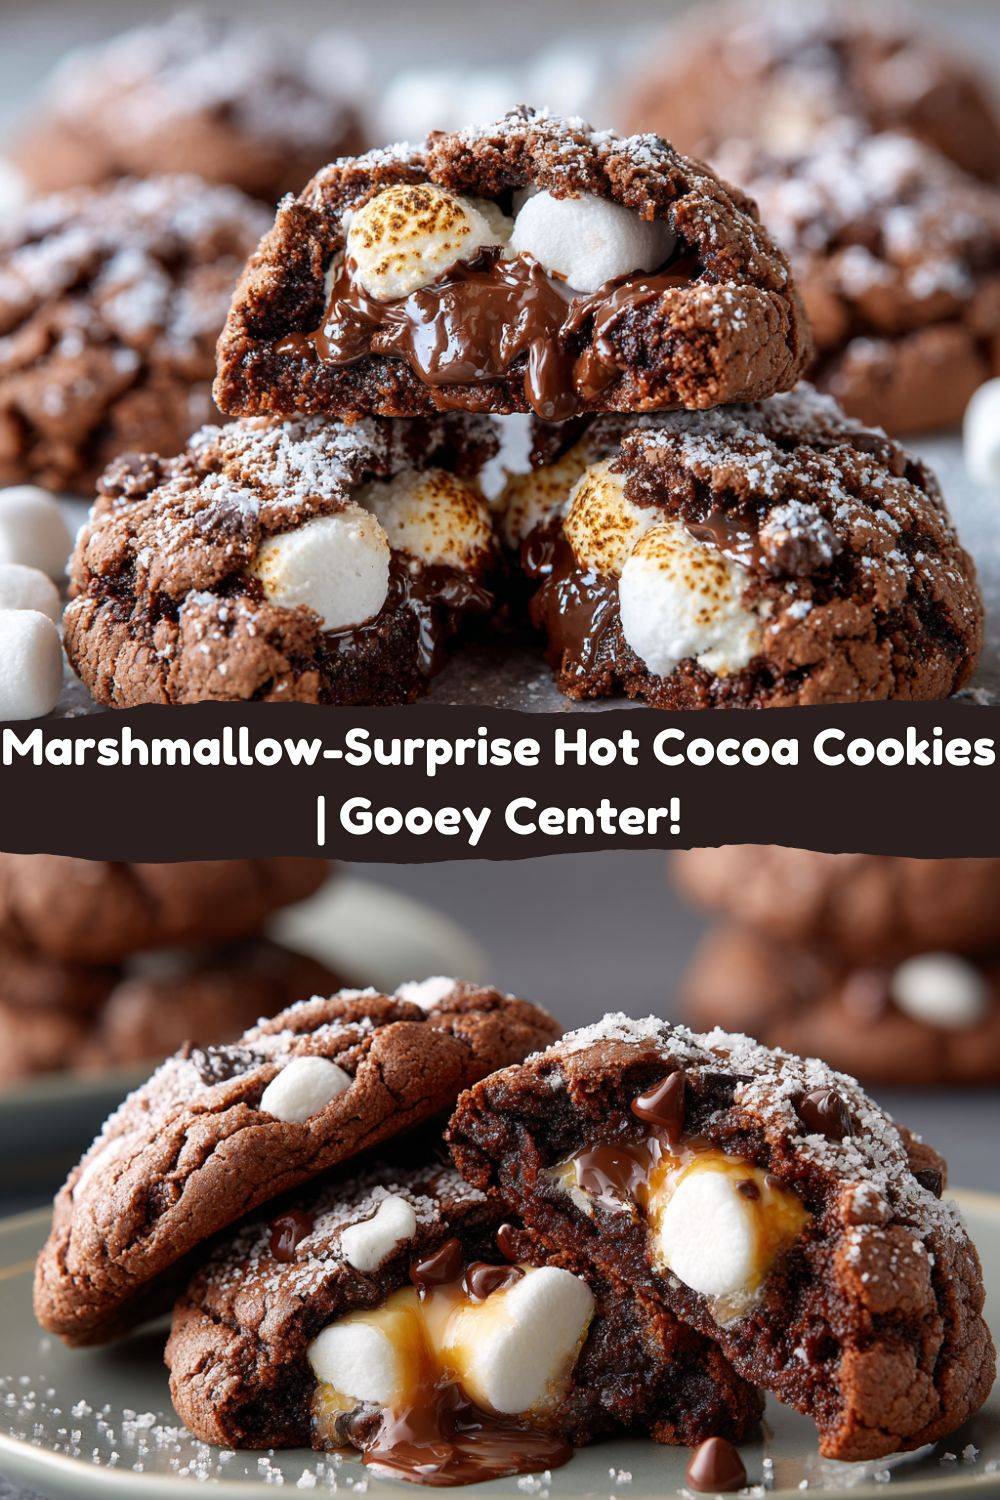
Marshmallow-Surprise Hot Cocoa Cookies: Your New Favorite Winter Treat!
Hey there, my fellow food lover! Chef Emily here, coming to you from my flour-dusted kitchen, probably with a smudge of chocolate on my cheek. Is there anything better than the smell of cookies baking on a chilly day? It’s like a warm, edible hug for your entire house. And today, we’re taking that cozy feeling and turning it up to eleven.
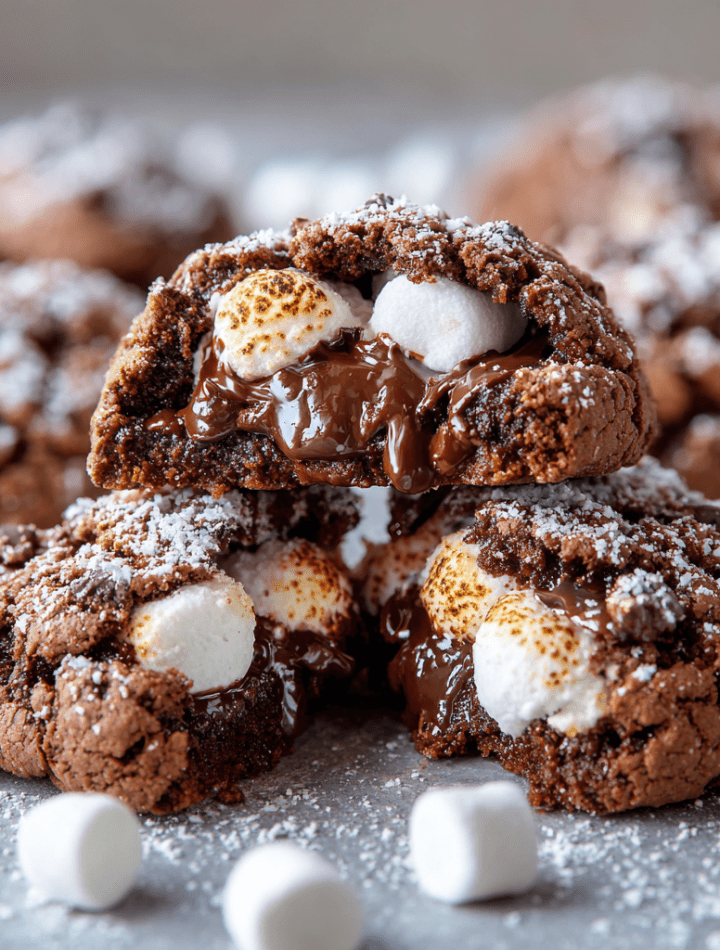
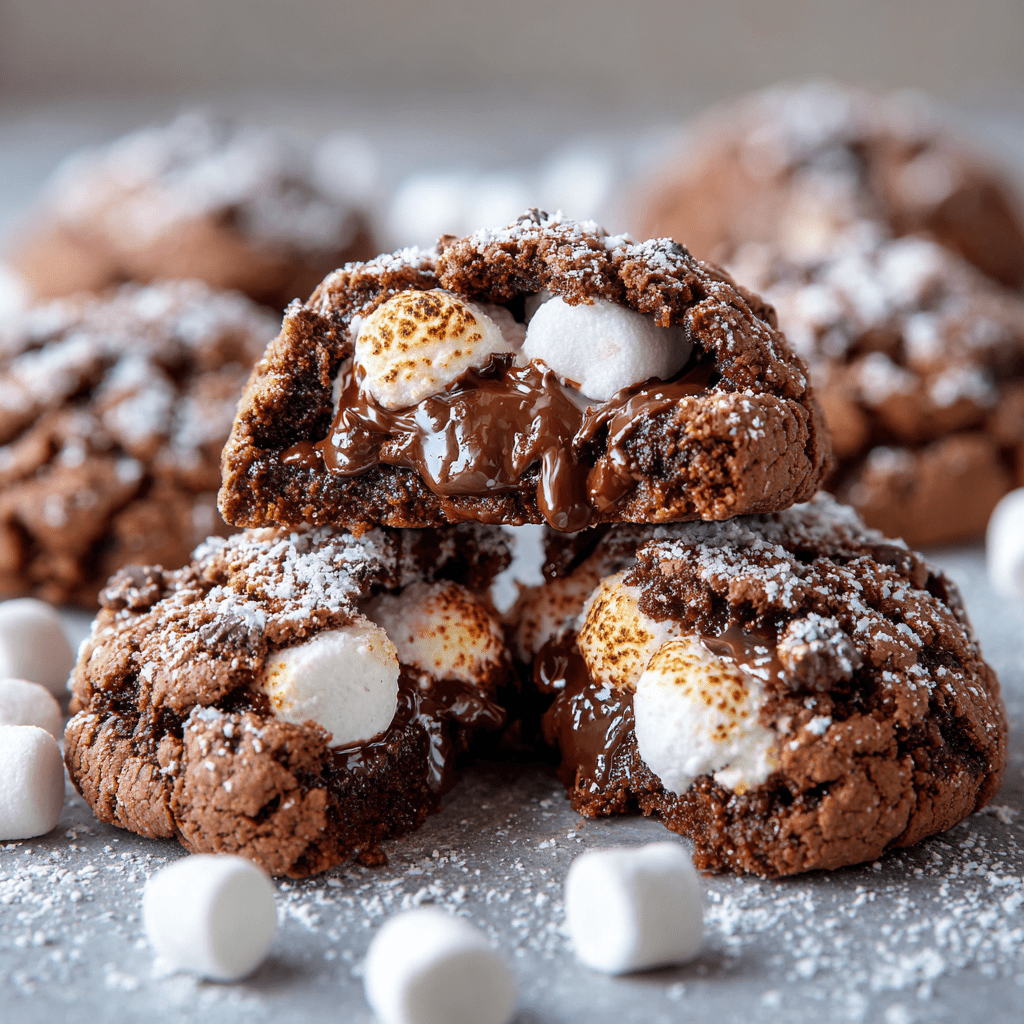
We’re transforming the ultimate winter comfort drink—steamy, rich, marshmallow-topped hot chocolate—into a mind-blowing, bite-sized cookie. Imagine this: a deeply fudgy, soft cocoa cookie that cracks slightly on top to reveal a secret, gooey, melted marshmallow heart. It’s a surprise in every single bite! These Marshmallow-Surprise Hot Cocoa Cookies are the stuff of snow day dreams, holiday cookie swap legends, and “just-because-you-deserve-it” afternoons.
This recipe is everything I love: it’s fun, it’s a little playful, and it delivers a massive payoff of flavor and joy. They look gorgeous dusted with a little powdered sugar “snow” or crushed peppermint, but trust me, their beauty is more than skin deep. That molten marshmallow center is pure magic. So, preheat your oven, grab your favorite mixing bowl, and let’s make a little mess and a whole lot of memories together.
A Sweet Memory: Where It All Began
This recipe always takes me right back to my grandma’s kitchen table. After a long afternoon of building (and subsequently destroying) snow forts with my brothers, we’d tumble inside, boots tracking slush everywhere, noses red and fingers numb. Without fail, Grandma would have a pot of homemade hot cocoa warming on the stove, the steam fogging up the windowpanes.
But the best part wasn’t the cocoa itself—it was the ritual. She’d let us each drop a handful of tiny marshmallows into our mugs. We’d watch them bob on the surface, slowly melting and creating a sweet, sticky foam on top. We’d sip slowly, trying to make the warmth last, always fishing for the last half-melted marshmallow with our spoons. This cookie is my edible tribute to that feeling. It captures that same thrill of discovery, that same gooey, chocolatey perfection, all wrapped up in a portable, bakeable treat. It’s nostalgia, you can eat with your hands.
Gathering Your Cocoa Cookie Crew: The Ingredients
Let’s talk ingredients! This is a simple list of pantry staples, but each one plays a key role in creating cookie perfection. Here’s what you’ll need and why:
- 1 cup unsalted butter, softened – This is the foundation of our rich, tender cookie. I use unsalted so we can control the salt level ourselves. Chef’s Tip: “Softened” means cool to the touch but your finger can leave a gentle indent. Don’t melt it! If you forget to take it out early, cut it into chunks and it will soften faster.
- 1 cup granulated sugar + ½ cup brown sugar – The white sugar gives us that lovely crisp edge, while the brown sugar (packed, please!) brings moisture, chew, and that classic molasses depth. It’s the dynamic duo of cookie sweeteners.
- 2 large eggs + 1½ tsp vanilla extract – Our binding agents and flavor boosters. The eggs provide structure, and the vanilla is the warm, aromatic backdrop that makes the chocolate sing. Use the real stuff if you have it!
- 2 cups all-purpose flour – The main structure of our cookie. For a lighter cookie, fluff your flour with a spoon before gently scooping and leveling off the cup. No packing!
- ¾ cup unsweetened cocoa powder – The star of the show! This is where our “hot cocoa” flavor comes from. Use a good-quality cocoa powder for the richest, deepest chocolate experience.
- 1 tsp baking soda + ½ tsp salt – The baking soda is our leavening agent, helping the cookies rise and get that perfect crackly top. The salt is absolutely crucial—it balances the sweetness and intensifies the chocolate flavor. Don’t skip it!
- ½ cup mini chocolate chips (optional but highly recommended) – Because more chocolate is always the answer. The mini chips distribute better and give you little pockets of melty chocolate in every bite.
- 12 large marshmallows, halved – The “surprise”! Standard large marshmallows work perfectly. We’ll cut them in half crosswise to create 24 gooey centers. For a next-level experience, try using flavored marshmallows like vanilla bean or peppermint!
Let’s Get Baking: Step-by-Step Instructions
Okay, team! Aprons on. Let’s turn these ingredients into something magical. Follow these steps, and you’ll be a cocoa cookie hero in no time.
- Preheat and Prep: First things first, get that oven preheated to a toasty 350°F (175°C). This ensures it’s perfectly hot and ready when your cookie dough is. Line your baking sheets with parchment paper. This is my #1 secret for cookies that never stick and bake evenly. No cleanup? Yes, please!
- Cream That Butter and Sugar: In a large bowl, beat together the softened butter, granulated sugar, and brown sugar. Now, don’t rush this! We want to cream them together on medium-high speed for a good 2-3 minutes until the mixture is light, pale, and fluffy. This incorporates air, which is key for a perfect texture.
- Add Wet Ingredients: Scrape down the sides of the bowl with a spatula (a chef’s best friend!). Add the eggs one at a time, mixing well after each addition until they’re fully incorporated. Then mix in the vanilla. Your mixture should look smooth and luxurious.
- Whisk the Dry Goods: In a separate bowl, grab your whisk and give the flour, cocoa powder, baking soda, and salt a good whisking. This does two things: it combines everything evenly, and it sifts the cocoa powder so we don’t get any lumps. Nobody wants a pocket of plain flour in their chocolate cookie!
- Combine Gently: Gradually add the dry ingredients to the wet ingredients, mixing on low speed just until the flour disappears. Chef’s Hack: Overmixing at this stage is the enemy of a tender cookie! Once it’s almost combined, fold in the mini chocolate chips with your spatula.
- The Big Surprise Assembly: Here’s the fun part! Take a tablespoon or a small cookie scoop (about 2 tbsp worth of dough) and flatten it slightly in your palm. Place one half of a marshmallow right in the center. Now, carefully fold the dough up and around the marshmallow, pinching it shut to completely seal it inside. Roll it gently into a ball. The goal is to hide that marshmallow completely so it doesn’t leak out everywhere while baking.
- Bake to Perfection: Place your dough balls on the prepared baking sheets, spacing them about 2 inches apart. They will spread a little! Bake for 9-11 minutes. You’ll know they’re done when the edges look set and the tops have those beautiful, characteristic cracks. The centers might still look a little soft—that’s perfect! They will continue to set as they cool.
- The Patient Cool Down: This is the hardest part: patience! Let the cookies cool on the hot baking sheet for at least 5 minutes. This allows them to firm up enough to move. If you try to move them too soon, they might break. After 5 minutes, transfer them to a wire rack to cool completely… or enjoy one warm and dangerously gooey. I won’t tell.
How to Serve These Gooey Masterpieces
Okay, you’ve baked the most incredible cookies. Now, how do you serve them? Let’s make it an event!
For the ultimate cozy experience, plate a couple of these while they’re still warm from the oven. That marshmallow inside will be gloriously molten. Dust them with a generous shower of powdered sugar—it looks like a fresh dusting of snow and adds a lovely sweetness.
Feeling festive? Crush up some peppermint candies or candy canes and sprinkle them on top right after the cookies come out of the oven. The heat will help them stick, and you’ll get that classic chocolate-peppermint combo everyone loves.
And of course, what goes better with a Hot Cocoa Cookie than an actual mug of hot cocoa? It’s meta and it’s magnificent. Serve these on a platter at your next holiday party and watch them disappear faster than you can say “seconds, please!” They’re also amazing crumbled over a scoop of vanilla ice cream. You’re welcome.
Get Creative: Recipe Variations
I love this recipe as-is, but baking is all about making it your own! Here are a few fun twists to try:
- Peppermint Twist: Add ½ teaspoon of peppermint extract to the dough along with the vanilla. Use peppermint marshmallows if you can find them, and top with crushed candy canes for a full-on holiday experience.
- S’mores Upgrade: Use a square of chocolate instead of, or in addition to, the marshmallow center. After baking, while the cookies are still warm, press a small piece of a graham cracker on top. Hello, campfire vibes!
- Spiced Mexican Hot Chocolate: Whisk ½ teaspoon of cinnamon and a tiny pinch of cayenne pepper into your dry ingredients. It adds a warm, subtle kick that is absolutely incredible.
- Nutty Delight: Fold ½ cup of chopped toasted walnuts or pecans into the dough along with the chocolate chips. The nutty crunch pairs beautifully with the fudgy texture.
- Gluten-Free Friendly: You can easily swap the all-purpose flour for a 1:1 gluten-free baking blend. I’ve had great success with this swap, and nobody can tell the difference!
Chef Emily’s Notes from the Kitchen
This recipe has become a staple in my house, but it definitely had a few… *explosive* test runs. The first time I made them, I got too eager and used a whole marshmallow. Let’s just say my baking sheet looked like a marshmallow crime scene—they puffed up and oozed everywhere! Halving them is the secret handshake to keeping the goo contained.
I also learned that the dough is quite forgiving. If you find it’s a little too soft to work with after mixing, just pop it in the fridge for 20-30 minutes. It makes wrapping the marshmallows so much easier. These cookies have evolved from a messy experiment to my most-requested holiday treat. They’re a little bit of kitchen magic that never fails to bring a smile.
FAQs & Troubleshooting: Your Questions, Answered!
Q: My marshmallow leaked out everywhere! What did I do wrong?
A: The most common culprit is not sealing the dough completely. Make sure the marshmallow half is completely enclosed with no cracks or holes. Also, ensure your dough isn’t too wet or warm. Chilling it briefly can help firm it up for easier sealing.
Q: Can I use mini marshmallows instead?
A: You can! Instead of halving large ones, just place 3-4 mini marshmallows in the center and encase them in dough. You’ll get multiple little pockets of gooeyness.
Q: How do I store these cookies?
A: Once completely cool, store them in an airtight container at room temperature for up to 3 days. Be aware that the marshmallow center will absorb into the cookie over time—they’ll still be delicious, just less “surprisingly” gooey. They are truly best enjoyed the day they are made.
Q: My cookies came out really cakey. Why?
A: This usually means you overmixed the dough after adding the flour. Remember, mix just until the streaks of flour disappear. Overmixing develops the gluten in the flour, leading to a tougher, cakier texture.
Nutritional Information (Approximate)
Alright, let’s talk facts! Here’s a rough nutritional breakdown per cookie (based on a yield of 24 cookies, including the optional chocolate chips). Remember, this is an estimate and can vary based on specific ingredients used.
Per Cookie: Calories: 210 | Total Fat: 10g | Saturated Fat: 6g | Cholesterol: 35mg | Sodium: 115mg | Total Carbohydrates: 28g | Dietary Fiber: 1g | Sugars: 17g | Protein: 2g
These are a treat, through and through! I firmly believe in enjoying indulgent, homemade treats mindfully and with zero guilt. They’re made with real ingredients and a whole lot of love, which is the best nutrition of all.
Final Sweet Thoughts
Well, my friend, there you have it! My secret recipe for cookies that are basically a hug in dessert form. I hope you have as much fun making these Marshmallow-Surprise Hot Cocoa Cookies as I do. I love imagining you in your kitchen, wrapping those marshmallow centers, your kitchen filling with that incredible chocolatey aroma.
Baking is about so much more than the final product; it’s about the laughter, the little messes, and the shared joy of something made with your own two hands. So whether you’re baking these for a party, a gift, or just a quiet moment of self-care, I hope they bring you immense happiness.
If you make them (and you totally should!), I’d love to hear about it. Tag me @TastyChow on social media so I can see your beautiful creations! Now, go preheat that oven and get your chocolate on. Happy baking!
With love and a full cookie jar,
Emily