No-Bake Protein Bars: Your New Go-To Snack!
Hey there, fellow food lovers! Are you ready to whip up some delicious and healthy snacks that will keep you fueled throughout your busy day? Say hello to my ultimate crowd-pleaser: No-Bake Protein Bars! These little gems are not only super easy to make, but they’re also packed with flavor and energy. Whether you’re post-workout, on-the-go, or just hungry for something that feels indulgent without the guilt, these bars have got you covered.
Let me tell you a little secret: making your own snacks at home is one of the best ways to control what you’re putting into your body. And trust me, once you take a bite of these chewy, nutty bars, you’ll never want to return to store-bought again. They’re customizable, you can pick your favorite flavors, ingredients, and textures, and they require no oven. Seriously, what’s not to love?
Now, before we dive straight into the recipe, I want to share a little bit about why these no-bake treats are special to me. It all started in my tiny apartment kitchen during my culinary school days. I was rushed for time, juggling classes, work, and personal projects, and I realized I needed quick, energy-boosting snacks to keep me going. That’s when I decided to experiment with a few pantry staples to create my own protein bars. Fast-forward to today, and I whip them up regularly for my family and friends — they can’t get enough!
So grab your mixing bowl, and let’s jump into making these delightful bars that may just change your snacking game for good!
Personal Story
I can still vividly recall the first time I attempted to make my own protein bars. It was a lazy Sunday afternoon, my kitchen flooded with the golden sunlight pouring in through the window, filling the space with a warm, inviting glow. I had just finished an intense workout, and my energy was running low. In an attempt to avoid the expensive, store-bought options, I rummaged through my pantry, surveying the shelves filled with oats, nuts, and sweeteners. I decided to get a little adventurous!
I tossed in some peanut butter, a handful of protein powder, and a drizzle of honey, and mixed everything together with great enthusiasm. Shaping the mixture into bars felt like an art project, and honestly, it was a hilarious mess! By the time I had them chilling in the fridge, I was covered in spilled oats and melted chocolate, but I was grinning from ear to ear. The moment I took my first bite of the finished bars, I felt triumphant! They were chewy, nutty, and downright delicious. In that moment, I realized I had created something that could not only satisfy my cravings but also fuel my busy days. That excitement has never left me, and now I’m thrilled to share this recipe to help you create your own batch of no-bake protein bars that will also bring smiles to your faces!
Ingredients
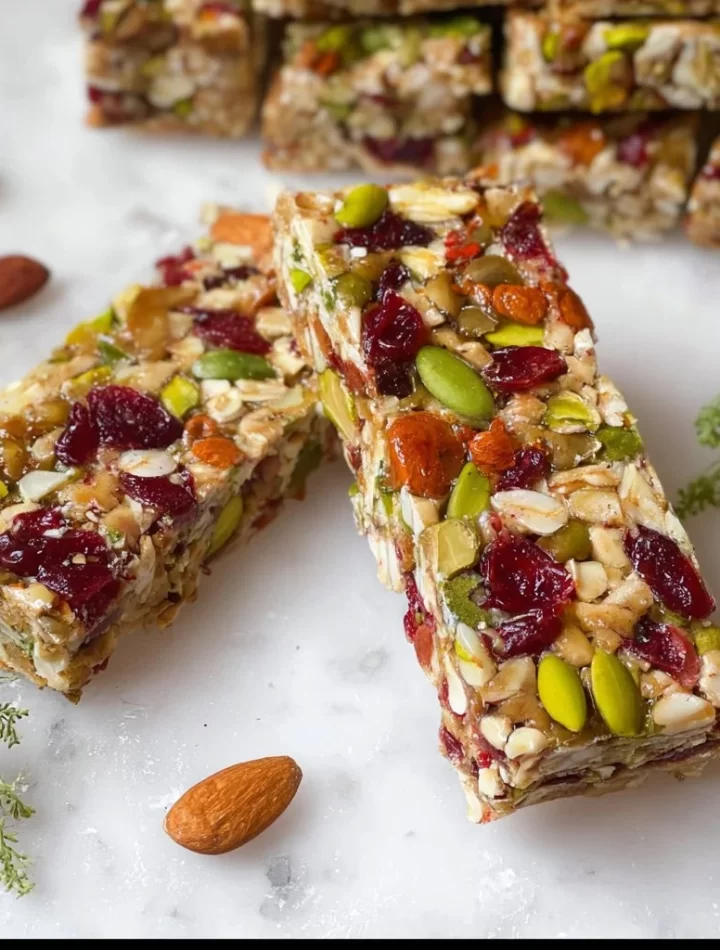
Here’s what you’ll need to create these scrumptious no-bake protein bars. Each ingredient serves a purpose, providing flavor, nutrition, or indeed, that perfect chewy texture!
-
Rolled Oats (2 cups)
These are the backbone of our bars, providing fiber and a satisfying chew. You can swap these for quick oats, but I prefer the heartier texture of rolled oats. -
Peanut Butter (1 cup)
Adds richness and a nutty flavor, plus helps to bind everything together. If you’re allergic or prefer not to use peanuts, almond butter or sunflower seed butter are fantastic substitutes! -
Honey or Maple Syrup (1/2 cup)
A natural sweetener that not only adds sweetness but also helps the bars stick together. You can use agave syrup for a vegan alternative, or even date paste if you’re looking for something more wholesome. -
Protein Powder (1/2 cup)
This is what enhances the nutritional profile. Use your favorite kind—whey, plant-based, or even collagen. If you prefer not to use protein powder, you can replace it with more oats, though it’ll slightly change the protein content. -
Dark Chocolate Chips (1/2 cup)
Because, let’s be honest, who doesn’t love chocolate? You can go for milk chocolate or white chocolate, or even omit them for a less sweet bar. -
Chopped Nuts (1/2 cup)
Nuts add crunch and healthy fats. Choose your favorite: almonds, walnuts, or even pistachios! If you’re nut-free, try seeds like pumpkin or sunflower seeds. -
Vanilla Extract (1 tsp)
This is the magic ingredient that adds depth and enhances all the flavors. Don’t skip it!
Chef Insight:
Always have a little more oats on hand. If you find your mixture too sticky, simply add a few more oats until you get the right consistency. Don’t stress—cooking is about enjoying yourself and rolling with the punches!
Step-by-Step Instructions
Let’s get cooking! Follow these simple steps to create your very own no-bake protein bars:
-
Mix the Dry Ingredients
In a large mixing bowl, combine 2 cups of rolled oats, 1/2 cup of protein powder, and 1/4 cup of chocolate chips (optional). Stir them together until they’re well-distributed. Tip: If you’re adding chopped nuts, stir them in now too! -
Combine the Wet Ingredients
In a separate bowl, mix together the 1 cup of peanut butter, 1/2 cup of honey (or maple syrup), and 1 tsp of vanilla extract. If your peanut butter is thick, microwave it for about 15 seconds to make it easier to blend. -
Combine Both Mixtures
Pour the wet ingredients into the dry ingredients and mix until everything is fully combined. This step can get a bit messy! Use your spatula, or if it’s easier, your hands! You want the mixture to be firm yet sticky—no dry oats should remain. Chef Hack: Use a rubber spatula for maximum mixing power! -
Press into a Pan
Line a baking dish (an 8×8 inch works perfectly) with parchment paper, allowing some overhang for easy removal later. Transfer your mixture into the lined pan and press it down firmly with your hands or the back of a measuring cup. The firmer you press, the better the bars will hold together once chilled. -
Chill
Cover the pan with plastic wrap and refrigerate for at least an hour. This step is crucial—it allows the bars to firm up, making them easier to cut into squares or rectangles. -
Cut into Bars
Once chilled, lift the parchment paper out of the pan. Use a sharp knife to cut into your desired size of bars. I recommend cutting them into 8 or 10 bars, depending on your hunger level! -
Store
Store your no-bake protein bars in an airtight container in the fridge for up to a week, or freeze for longer storage. Make sure to separate them with parchment paper if stacking—this prevents sticking!
Chef Tip:
Feeling adventurous? Dip half your bars in melted chocolate for an extra indulgent treat!
Serving Suggestions
These no-bake protein bars are versatile, and you can serve them in various ways! They are delicious as a standalone snack but can also be paired with fresh fruit (hi there, banana or strawberries!), yogurt, or even crumbled on top of your morning oats for an exciting breakfast twist. For an afternoon pick-me-up, serve these bars alongside a warm cup of herbal tea or a tall glass of your favorite smoothie.
If you want to impress your friends during a casual get-together, plate them on a lovely wooden board, sprinkle some sea salt on top, and perhaps a few whole nuts for decoration. Trust me; they’ll think you whipped up something gourmet!
Recipe Variations
Feeling experimental? Here are some fun twists on the classic no-bake protein bar recipe:
-
Chocolate Mint Protein Bars
Add a few drops of peppermint extract to the wet ingredients and use chocolate protein powder for a refreshing twist. -
Tropical Protein Bars
Swap out the peanut butter for coconut cream and incorporate dried pineapple or banana chips for a flavorful island vibe. -
Caramel Swirl Bars
Incorporate a homemade or store-bought caramel swirl into the mixture before chilling to create that beautiful contrast of flavors. -
Spiced Pumpkin Protein Bars
Perfect for fall, simply add a 1/4 cup of pumpkin puree, spices like cinnamon, nutmeg, and even some chopped pecans for a seasonal treat. -
Matcha Green Tea Bars
For that health-boosting green goodness, add a tablespoon of matcha powder into your dry ingredients, and maybe some white chocolate chips for sweetness!
Chef’s Notes
I still have a soft spot for those first-ever protein bars I created in my little apartment. Over the years, I’ve played with a ton of variations and flavors. From my Grandma’s fractured recipe to my superfood obsession, these no-bake protein bars have evolved right along with me. I even brought a batch to a potluck once, and everyone raved about them—let’s just say I became the ‘protein bar queen’ of my friend group.
My advice? Don’t be afraid to experiment! The kitchen is a playground of flavors waiting to be explored. If something doesn’t work out the first time, laugh it off, and keep trying until you find a combo that makes your taste buds dance!
FAQs and Troubleshooting
-
Why won’t my bars stick together?
If your bars are crumbling and not holding shape, it could mean you didn’t use enough wet ingredients. Try adding a bit more peanut butter or honey, blending it well, and pressing it down even firmer. -
Can I make these bars vegan?
Absolutely! Simply swap the honey for maple syrup or agave and use plant-based protein powder. You can also try coconut or almond butter if you want to switch up the nutty flavor. -
How do I store leftovers?
Keep them in an airtight container in the refrigerator for up to a week or freeze for a longer shelf life. Just ensure you separate them with parchment paper if stacked! -
Can I add other mix-ins?
Yes! Feel free to get creative—seeds, dried fruits, or other nut butters work beautifully. Just be mindful not to overload on liquid add-ins, which may affect the consistency.
Nutritional Info
While I encourage indulgence and enjoying your food, these bars also pack a nutritional punch! Each bar (if cut into 10) provides a boost of protein, healthy fats, and carbohydrates for sustained energy. A quick estimation looks like this:
- Calories: Approx. 200 calories per bar
- Protein: 10g (utilizing whey or plant-based protein powder)
- Carbohydrates: 30g
- Fat: 7g (depends on nut butter choice)
Make sure to adjust based on the specific brands and ingredients you choose to incorporate! The flexibility of this recipe allows you to maximize nutrition according to your needs.
Final Thoughts
Armed with this no-bake protein bar recipe, your snack game is about to catapult to new heights. Whether you enjoy them after a workout, as a sweet treat during a busy afternoon, or a quick breakfast on the go, these bars are not just food; they’re a satisfying hug for your soul.
I hope you find as much joy in creating (and devouring) these bars as I do. Don’t forget to share your creations, photos, and any twists you come up with! Together, we can keep exploring the delicious world of home cooking, one healthy snack at a time. Now, let’s get mixing—and may your kitchens be filled with joy and delicious aromas!
Happy cooking! 🍽️
— Emily
No-Bake Protein Bars
- Total Time: 75 minutes
- Yield: 10 servings 1x
- Diet: Vegetarian
Description
Delicious and healthy no-bake protein bars that are customizable and perfect for a quick snack.
Ingredients
- 2 cups rolled oats
- 1 cup peanut butter
- 1/2 cup honey or maple syrup
- 1/2 cup protein powder
- 1/2 cup dark chocolate chips
- 1/2 cup chopped nuts
- 1 tsp vanilla extract
Instructions
- Mix the dry ingredients in a large mixing bowl: 2 cups of rolled oats, 1/2 cup of protein powder, and 1/4 cup of chocolate chips (optional).
- Combine the wet ingredients in another bowl: 1 cup of peanut butter, 1/2 cup of honey, and 1 tsp of vanilla extract.
- Pour the wet ingredients into the dry ingredients and mix until fully combined.
- Press the mixture into a lined baking dish and press down firmly.
- Chill in the refrigerator for at least 1 hour.
- Cut into bars once chilled and store in an airtight container.
Notes
Feel free to customize with your favorite add-ins like seeds or dried fruits. Store in the fridge for up to a week or freeze for longer storage.
- Prep Time: 15 minutes
- Cook Time: 0 minutes
- Category: Snack
- Method: No-Bake
- Cuisine: American
Nutrition
- Serving Size: 1 bar
- Calories: 200
- Sugar: 10g
- Sodium: 50mg
- Fat: 7g
- Saturated Fat: 1g
- Unsaturated Fat: 5g
- Trans Fat: 0g
- Carbohydrates: 30g
- Fiber: 3g
- Protein: 10g
- Cholesterol: 0mg
Keywords: protein bars, no-bake, healthy snacks, energy bars, meal prep