Peanut Butter Chocolate Chip Snowball Cookies – Easy Meltaway Cookie Recipe
Hey there, friend! Grab a cup of coffee and pull up a chair, because I’m about to share one of my all-time favorite cookie recipes. If you’ve ever met a classic snowball cookie (you know, the ones also called Russian Teacakes or Mexican Wedding Cookies), you know they’re a little bite of powdered-sugar-dusted magic. They’re tender, they’re buttery, and they literally melt in your mouth.
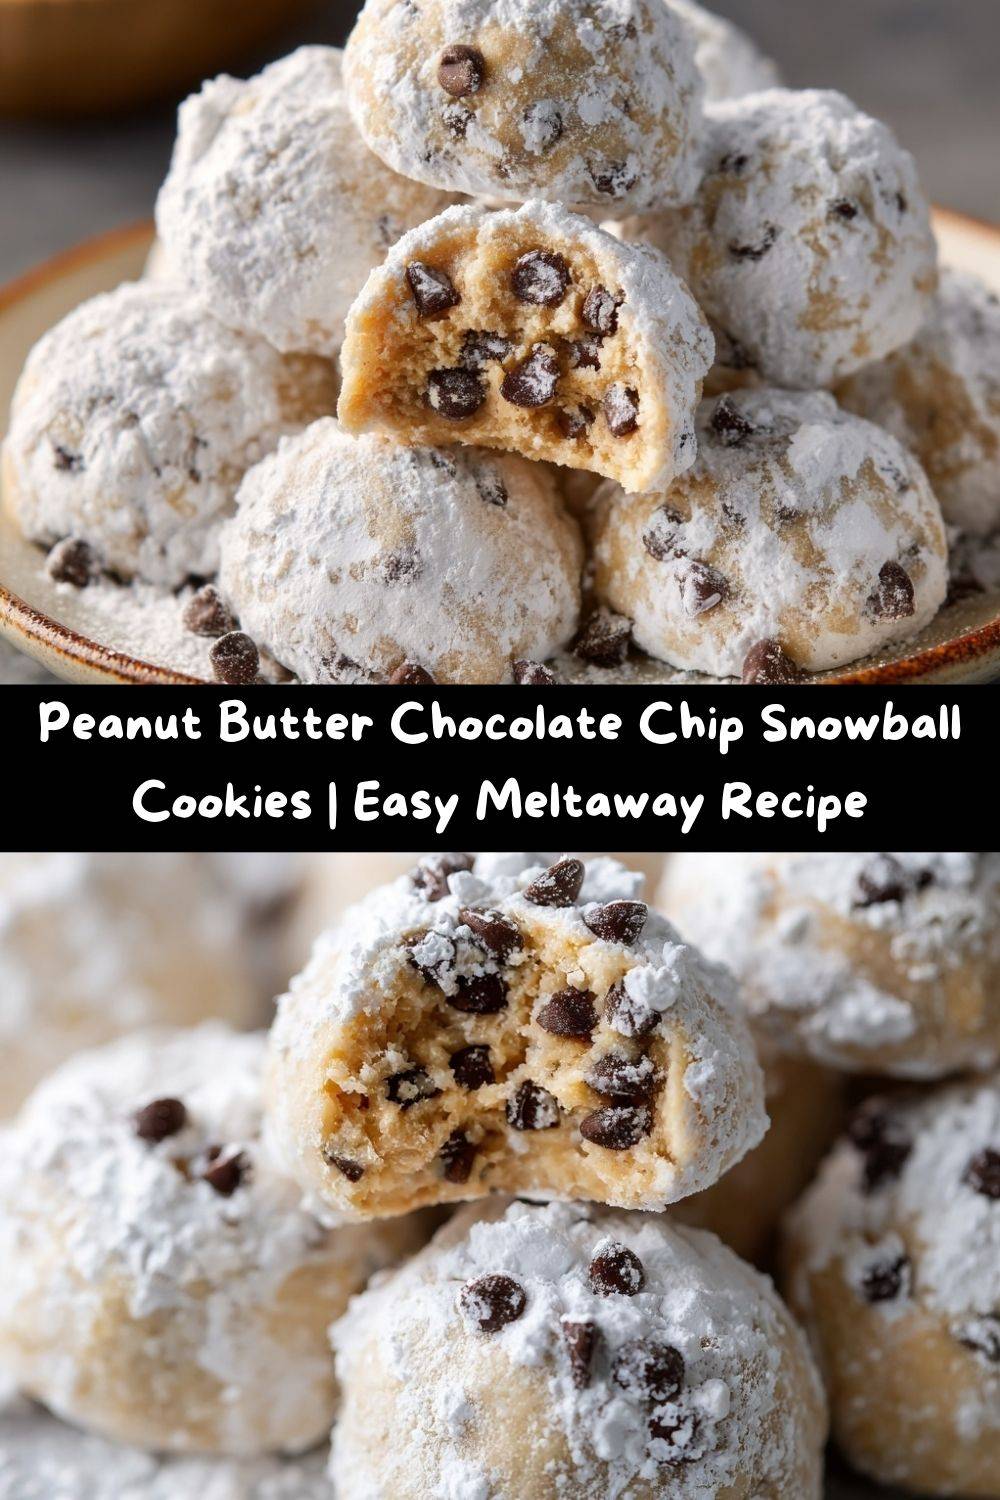
Well, I took that incredible meltaway base and did what any self-respecting peanut butter-chocolate fan would do: I gave it a major upgrade. Introducing my Peanut Butter Chocolate Chip Snowball Cookies! We’re taking that soft, crumbly texture you love, infusing it with rich, creamy peanut butter flavor, and studding it with tiny, melty pockets of mini chocolate chips. The result is a cookie that’s somehow even more irresistible than the original.
These little snowballs are the perfect treat for your holiday cookie tray, a lunchbox surprise, or just because it’s Tuesday. They come together in one bowl with no fancy equipment needed, and the whole process feels as cozy and comforting as the cookies taste. So, tie on your favorite apron—the messy one with the stains tells the best stories—and let’s make some magic happen.
The Day I “Bridged the Gap” with a Cookie
This recipe always takes me back to my first “Friendsgiving” after culinary school. I was so nervous, surrounded by a bunch of my partner’s work friends who were all serious foodies. I wanted to bring a dessert that was impressive but also felt like a warm, familiar hug. My grandma’s classic snowballs were my safety blanket, but I felt this urge to make them *mine*.
In a moment of pre-party panic, I stared into my nearly-empty pantry and saw a jar of peanut butter and a bag of mini chocolate chips. It was a “why not?” moment. I folded them right into my grandma’s dough, crossed my fingers, and popped the tray in the oven. The result? These weren’t just cookies; they were conversation starters. They bridged the gap between nostalgic tradition and bold, new flavor. That night, a dozen new friends asked for the recipe, and I knew this happy kitchen accident was a forever keeper.
Gathering Your Cookie Crew: The Ingredients
One of the best things about this recipe is its simplicity. You probably have most of this in your kitchen right now! Here’s the lineup, with a few of my chef-y insights to help you along the way.
- ½ cup butter, room temperature – This is non-negotiable, friends! Room temp butter creams together with the peanut butter to create that light, melt-in-your-mouth texture. If your butter is too cold, your dough will be crumbly; if it’s melted, your cookies will spread. Pro tip: To quickly soften butter, slice it into tablespoons and let it sit on the counter for 20-30 minutes.
- 1 cup creamy peanut butter – I use the standard, shelf-stable kind for a consistent, smooth texture. Natural peanut butter (the kind you have to stir) can sometimes be too oily and make the cookies greasy, so I don’t recommend it for this particular recipe.
- ¼ cup granulated sugar – You might be surprised there isn’t more sugar in the dough itself. Trust the process! The double roll in powdered sugar at the end gives us all the sweetness we need, allowing the peanut butter flavor to truly shine through without being overly sweet.
- 2 teaspoons vanilla extract – A generous pour enhances all the other flavors and adds a beautiful, warm aroma. It’s the secret backbone of so many great baked goods!
- 2 cups all-purpose flour (scooped and leveled) – The “scooped and leveled” part is my little chef hack for accuracy. Don’t scoop the flour with your measuring cup straight from the bag—that packs it in. Instead, spoon the flour into your measuring cup and level it off with a knife for a perfect, light measure every time.
- 2 cups mini chocolate chips – The *mini* chips are key here! Their small size ensures every single bite gets a little chocolate surprise without disrupting the delicate, snowball structure of the cookie. Regular-sized chips are just a bit too clunky for this delicate dough.
- Powdered sugar, for rolling – This is what gives our cookies their iconic, snowy look. We roll them once while they’re warm so the sugar forms a slightly melty, glazy coat, and then a second time when they’re cool for that final, pristine, winter-wonderland finish.
Let’s Get Rolling: The Step-by-Step Guide
Ready to make some cookie magic? Follow these steps, and you’ll be a snowball pro in no time. I’ve tucked my favorite little kitchen hacks into each one!
- Preheat oven to 350°F. Line a baking sheet with parchment paper. This is my number one tip for perfect cookies! Parchment paper prevents sticking AND makes for an easy cleanup. No parchment? A silicone baking mat works beautifully, too.
- In a large bowl, beat butter, peanut butter, and sugar until creamy and smooth. You can use a stand mixer, a hand mixer, or even a sturdy wooden spoon and some elbow grease. We’re looking for a light, fluffy, and perfectly combined mixture. This is the foundation of our tender cookie, so don’t rush it! Give it a good 2-3 minutes of beating.
- Mix in vanilla until well combined. Just a quick blast to incorporate that lovely flavor. Scrape down the sides of the bowl to make sure everything is homogenous.
- Gradually stir in flour until a soft dough forms. I like to add the flour in two or three parts. This prevents a giant flour cloud from erupting in your kitchen and ensures everything mixes in evenly without overworking the dough. Once the flour is incorporated, the dough should be soft and pliable, not sticky.
- Fold in mini chocolate chips. Switch to a spatula for this part! “Folding” gently incorporates the chips without crushing them or over-mixing the dough. Make sure they’re evenly distributed for maximum chocolate-in-every-bite potential.
- Scoop and roll dough into 1-inch balls. Place 2 inches apart on baking sheet. A small cookie scoop (about 1 tablespoon capacity) is my best friend here for uniformity, but a tablespoon measure works great too. Roll them between your palms until they’re nice and smooth. The 2-inch gap is important—these cookies don’t spread much, but they need room for hot air to circulate for even baking.
- Bake for 18 minutes, or until edges just start to turn golden. Don’t overbake — cookies will firm up as they cool. This is the most critical step! We’re going for a “set” cookie with just the *tiniest* hint of color on the bottom. The tops will still look quite pale and soft. They might not look done, but they are! They continue to cook on the hot tray as they cool, which gives us that perfect meltaway texture. Overbaking is the enemy of a tender snowball.
- Let cookies cool for 5 minutes, then roll in powdered sugar. Five minutes is the sweet spot. They’re still warm enough for the first layer of powdered sugar to stick and get a little melty, but they’re cool enough to handle. I like to roll a few at a time in a small bowl of powdered sugar.
- Transfer to wire racks and cool completely. Letting them cool completely on a rack is essential for that second sugar coating and prevents the bottoms from getting soft.
- Once fully cooled, roll again in powdered sugar and store in an airtight container. The second roll is what gives them that classic, snowy, picture-perfect finish. It’s totally worth the extra step, I promise!
How to Serve These Little Bites of Joy
Honestly, these cookies are stars all on their own, but a little presentation flair never hurts! For a classic cookie exchange or holiday platter, I love piling them high on a vintage cake stand or a simple wooden board. They look so charming and inviting all dusted in white.
Feeling extra? Serve them with a small pot of rich hot chocolate for dipping, or a shot of cold espresso for a grown-up contrast. They’re also the perfect companion to a big scoop of vanilla ice cream—just crumble a few on top for an incredible peanut butter-chocolate crunch. For gifting, tuck a dozen into a cute cellophane bag tied with a ribbon. It’s a homemade gift that says “I love you” in the universal language of peanut butter and chocolate.
Mix It Up! Fun Recipe Variations
Once you’ve mastered the base recipe, the fun really begins! Here are a few of my favorite ways to play with this dough:
- Nutty Twist: Not a peanut butter fan? Swap it out for an equal amount of almond butter or cashew butter. The result is just as rich and delicious!
- Gluten-Free Goodness: You can easily make these gluten-free by using a 1:1 gluten-free all-purpose flour blend. I’ve had great success with brands like Bob’s Red Mill or King Arthur.
- White Chocolate Cranberry: For a festive, tart-and-sweet version, replace the mini chocolate chips with 1 cup of white chocolate chips and 1 cup of dried cranberries.
- Double the Chocolate: Are you a chocoholic? Substitute ¼ cup of the flour with unsweetened cocoa powder for a chocolate-based dough. You’ll get a double-chocolate snowball that’s absolutely divine.
- Pretzel Power: For a salty-sweet crunch, fold in ½ cup of crushed pretzel pieces along with (or instead of!) the chocolate chips.
Chef Emily’s Notebook Scribbles
This recipe has seen a few evolutions in my kitchen! The first time I made them, I was so eager that I rolled the *dough* balls in powdered sugar before baking, thinking I could skip a step. Let’s just say it created a weird, cracked, and slightly burnt sugar shell. Not the vibe! I learned that the double-roll-after-baking method is the only way to go for that perfect, snowy coat.
I also love using a mix of milk and semi-sweet mini chips sometimes, depending on what I have in the pantry. And a little secret? These cookies actually get even better on day two. The flavors have more time to mingle and become even more melt-in-your-mouth tender. Just store them in an airtight container at room temperature—if they last that long!
Your Questions, Answered!
Over the years, I’ve gotten a few repeat questions about these snowball cookies. Here’s the scoop to ensure your baking success!
Q: My dough is too crumbly and won’t roll into balls! What did I do wrong?
A: This usually happens if the butter was too cold or if the flour was over-measured. Remember to spoon and level your flour! If your dough is crumbly, try kneading it with your hands for a minute—the warmth from your hands can help bring it together. If it’s still too dry, add a teaspoon of milk at a time until it’s pliable.
Q: Can I freeze these cookies?
A: Absolutely! They freeze like a dream. You can freeze the baked and fully cooled cookies in a single layer in an airtight container for up to 3 months. You can also freeze the unbaked dough balls on a tray, then transfer them to a freezer bag. Bake straight from frozen, adding 1-2 minutes to the baking time.
Q: My powdered sugar coating melted/soaked in. How can I prevent this?
A> The second roll after they are completely cool is your best defense against this! The first roll creates a base layer, and the second gives you that bright white, fresh-fallen-snow look. If you’re storing them and the sugar seems to be absorbing, you can give them one more light roll in powdered sugar just before serving.
Q: Why did my cookies spread and lose their round shape?
A> This is almost always a butter issue. If your butter was too soft or melted, the cookies will spread. Make sure your butter is at that perfect “room temperature” stage—cool to the touch but soft enough that you can easily press a finger into it.
A Quick Nutritional Glance
I’m all about balance—enjoying decadent treats and nourishing our bodies. While these are definitely a “sometimes food,” it’s helpful to know what’s in them! Please note, this is just an estimate as ingredients can vary.
Estimated per cookie: 120 calories | 7g fat | 12g carbs | 2g protein
The fat comes primarily from the butter and peanut butter, which gives these cookies their rich, satisfying quality. The carbs are a mix from the flour and sugars. For a little nutrient boost, you could use a whole-wheat pastry flour, but it will slightly alter the classic, tender texture. As always, enjoy mindfully!
Final Thoughts from My Kitchen to Yours
Well, there you have it! My heart-and-soul recipe for Peanut Butter Chocolate Chip Snowball Cookies. This recipe is a perfect example of what I love most about cooking: taking something beloved and familiar and adding your own spin to create a new favorite. It’s not about being perfect; it’s about the joy of creating, the mess on the counter, and the smiles these little treats bring.
I hope you bake a batch, share them with someone you love, and create your own delicious memories. This is exactly what Tasty Chow is all about. Now, I’d love to hear from you! Did you try a fun variation? Have a kitchen story of your own? Tag me on social or leave a comment below. Happy baking, my friend!
— Emily 🧡