Reindeer Bark: Your New Favorite No-Bake Holiday Tradition!
Hey there, my festive friend! Can you smell that in the air? It’s the scent of pine needles, crackling fires, and… is that chocolate? You bet it is! With the holiday season in full swing, my kitchen is officially a hub of chaos, creativity, and copious amounts of sprinkles. And if your schedule is looking anything like mine—packed with parties, school plays, and last-minute gift panics—you need a recipe that’s equal parts showstopping and simple. Enter: the most adorable, crowd-pleasing treat you’ll make this year, Reindeer Bark!
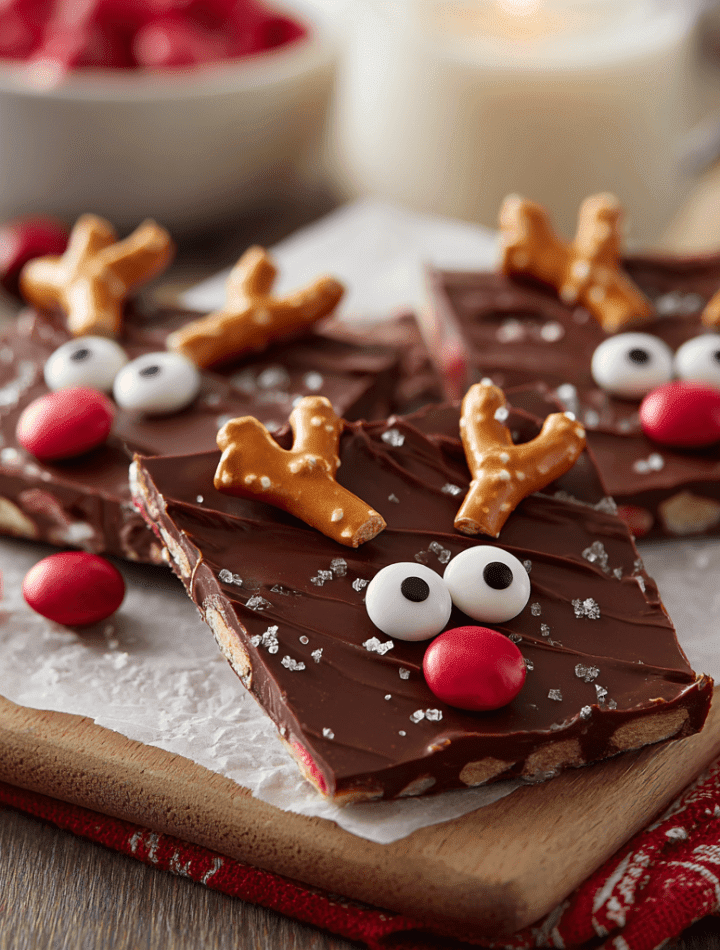
This isn’t just any chocolate bark. Oh no. This is a canvas for pure holiday joy. We’re talking rich, melted chocolate transformed into a herd of cheerful reindeer faces, complete with pretzel antlers and bright red M&M noses. It’s the kind of treat that makes kids’ eyes light up and brings a smile to every adult’s face. The best part? You don’t need any fancy baking skills or equipment. If you can melt chocolate and press on some candy, you are already a Reindeer Bark master.
This recipe is my go-to for holiday cookie exchanges, teacher gifts, and a fun activity to do with my nieces and nephews. It’s incredibly forgiving, wildly customizable, and comes together in less time than it takes to watch a classic Christmas special. So, tie on your favorite festive apron, put on some holiday tunes, and let’s create some magic together. We’re about to make a treat that’s as fun to create as it is to eat!

A Herd of Happy Memories: Where This Recipe Came From
This recipe always takes me right back to my grandma’s cozy kitchen, the first place I ever learned that food could be playful. She wasn’t a fancy chef, but she was a wizard at making everyday things special. One particularly snowy December afternoon, when I was about eight, we were making her famous peanut brittle. I was, admittedly, a little overzealous with the stirring and sent a hot shard of sugar flying across the room. After we stopped laughing, she decided we needed a “less dangerous” project.
She pulled out a bar of baking chocolate, some leftover pretzels from Thanksgiving, and a handful of red hots. “Let’s make something silly,” she said with a wink. What we created was a lopsided, wonderfully messy version of this very bark. My reindeer looked a little cross-eyed, and the antlers were definitely crooked, but I was so proud. We packaged them in a tin foil-lined shoebox and gave them to the mailman. The sheer joy of creating something so charming and giving it away stuck with me. That’s the spirit I try to bring into my kitchen every day—the idea that cooking doesn’t have to be perfect, it just has to be made with love. This Reindeer Bark is a direct descendant of that afternoon, and I hope it brings you the same happy, messy, and heartwarming feeling.
Gathering Your Reindeer Squad: The Ingredients
One of the best things about this recipe is the short and sweet ingredient list. You might already have most of this in your pantry! Here’s what you’ll need to create about 40 delightful pieces.
- 2 cups semisweet or milk chocolate chips (or almond bark): This is your base! I often use semisweet chocolate because I love the rich, deep flavor that balances the sweetness of the candies. But if you’re making this for kids or have a serious sweet tooth, milk chocolate is a fantastic choice. Chef’s Insight: Almond bark or candy melts are brilliant options if you’re worried about chocolate “blooming” (getting those white streaks). They melt smoothly and set up with a perfect snap.
- ½ cup small pretzel twists: These are for the iconic antlers! The small twists are the perfect size. Look for ones that are relatively uniform so your reindeer look like a cohesive herd. Substitution Tip: If you can only find pretzel sticks, you can break them into antler-like shapes. It adds a rustic, modern twist!
- 40 red candy-coated chocolates (like M&M’s): The most famous reindeer of all has a shiny nose, and so will yours! I use the standard red M&M’s, but you could also use red Sixlets for a rounder nose or even cinnamon red hots for a spicy kick. Chef’s Insight: Pro tip: Buy a separate bag of just red M&M’s if you can find it. It saves you the tedious task of sorting them out from the other colors!
- Candy eyes or mini white chocolate chips: This is where the personality comes in! Candy eyes are super easy and give that classic, cute look. But if you want a more minimalist or homemade feel, pressing a mini white chocolate chip pointy-side-down into the chocolate works beautifully. For an extra touch, you can add a tiny dot of melted chocolate on top of the white chip to make a pupil.
Let’s Build Some Reindeer! Your Step-by-Step Guide
Okay, team! It’s go time. This process is simple, but a few chef-approved tips will ensure your bark is absolutely flawless. Let’s do this!
- Line a large baking sheet with parchment paper. Do not skip this step! Parchment paper is your best friend here. It prevents sticking and makes cleanup an absolute dream. I like to use a standard half-sheet pan (about 18×13 inches). Chef’s Hack: If your parchment paper is curling up, dab a tiny bit of your melted chocolate onto the corners of the pan before laying the paper down—it will act as a glue!
- Melt the chocolate. Pour your chocolate chips into a microwave-safe bowl. The key to smooth, glossy chocolate is patience. Microwave on high for 30 seconds, then take it out and stir. Even if it doesn’t look melted, stir! Repeat in 20-30 second bursts, stirring vigorously each time, until the chocolate is completely smooth and liquid. Chef’s Warning: Do not be tempted to microwave it for a full minute or two straight. This will scorch the chocolate and leave you with a grainy, lumpy mess. Slow and steady wins the race!
- Spread the chocolate. Pour the beautifully melted chocolate onto your prepared baking sheet. Use an offset spatula or the back of a spoon to spread it into a rectangle about ¼-inch thick. It doesn’t have to be perfect! The organic, rustic edges of bark are part of its charm. Chef’s Hack: Tapping the pan gently on the counter a few times helps the chocolate settle into an even layer and gets rid of any air bubbles.
- Create your reindeer faces. This is the fun part! Work relatively quickly, as the chocolate will start to set. Imagine where you’ll break the bark. For each piece, press two pretzel twists at the top for antlers. Then, press a red candy just below for the nose. Finally, add two candy eyes (or white chocolate chips) above the nose. Give them some space so you can break them apart later. Chef’s Tip: I like to lay out a few “test reindeer” first to get my spacing right before decorating the whole pan.
- Let it set. You have two options here. You can let the bark set at room temperature, which will take a bit longer (about an hour, depending on the warmth of your kitchen). Or, for speed, you can carefully transfer the pan to the refrigerator. Chilling will firm it up in 15-20 minutes. Chef’s Insight: I prefer the fridge method because it gives the chocolate a satisfying snap when you break it.
- Break it apart. Once the chocolate is completely firm, lift the parchment paper off the pan. Use your hands to break the bark into pieces, aiming to have one complete reindeer face on each piece. The irregular shapes are what make it look like real bark! If you prefer cleaner lines, you can score the chocolate lightly with a knife before it fully sets, then break along those lines.
How to Serve Your Festive Creation
Now for the best part: sharing! This bark is incredibly versatile. Pile it high on a festive platter as the centerpiece of your holiday dessert table. It looks gorgeous next to a plate of cookies and a mug of hot cocoa. For gifting, my absolute favorite way to present it is in clear cellophane bags tied with a rustic ribbon or a cute twist tie. You can layer the pieces in a holiday tin between sheets of parchment paper for a beautiful, homemade gift basket. It’s the perfect treat for neighbors, teachers, coworkers, or your holiday party host. Trust me, receiving a bag of these smiling reindeer is a guaranteed mood-lifter!
Get Creative! Fun Flavor Twists & Dietary Swaps
Once you’ve mastered the classic, feel free to get creative! This recipe is a wonderful blank canvas. Here are a few of my favorite twists:
- Peppermint Swirl: Melt ½ cup of white chocolate chips and drizzle it over the dark chocolate base before adding the reindeer decorations. Then, sprinkle with crushed peppermint candies or candy canes for a refreshing, festive crunch.
- Salted Toffee Delight: Stir ¼ cup of toffee bits (like Heath bits) directly into the melted chocolate before spreading it. The combination of sweet, salty, and crunchy is absolutely divine.
- Dark Chocolate Espresso: For a more sophisticated, adult-friendly version, use high-quality dark chocolate and stir in ½ teaspoon of instant espresso powder into the melted chocolate. It deepens the chocolate flavor beautifully without making it taste like coffee.
- Nutty Buddy Reindeer: Before adding the reindeer features, press a whole roasted almond or pecan half in the center of where the face will be. It adds a delicious nutty flavor and a little extra texture.
- Dairy-Free/Vegan Version: This is super easy! Simply use dairy-free chocolate chips (Enjoy Life brand is great) and ensure your candies are vegan (some dark chocolate M&M’s are accidentally vegan, but always check the label). The pretzels and candy eyes are typically vegan-friendly.
Chef Emily’s Kitchen Confidential
This recipe has evolved so much since that first afternoon with my grandma. One year, I decided to get *really* fancy and pipe the antlers out of melted chocolate. Let’s just say it was a well-intentioned disaster that ended with me covered in chocolate and my reindeer looking like they had been through a windstorm. I learned a valuable lesson that day: the charm of this bark is in its simplicity. The pretzel antlers are not just easy; they’re perfect. They add that salty crunch that contrasts the sweet chocolate so well. Don’t overthink it! The slightly wonky, handmade look is what makes it special. This treat is about joy, not perfection. So, if a reindeer loses an antler in the process, just eat the evidence and carry on. I won’t tell!
Your Reindeer Bark Questions, Answered!
I’ve made this recipe hundreds of times, and here are the most common questions I get from fellow foodies.
- Q: My chocolate got thick and chunky when I melted it. What happened?
A: Ah, you’ve likely encountered “seized” chocolate. This usually happens if a tiny drop of water or steam gets into the chocolate. Unfortunately, it’s hard to fix. To prevent it, always ensure your bowl and utensils are completely dry. If it happens, you can sometimes save it by stirring in a teaspoon of neutral oil (like vegetable or coconut oil) to smooth it out, but it’s best to start over if you can. - Q: Can I use chocolate bars instead of chocolate chips?
A: Absolutely! Just chop the chocolate bars into small, uniform pieces so they melt evenly. High-quality baking chocolate will give you an incredible flavor. - Q: How far in advance can I make this? How should I store it?
A: This bark is a great make-ahead treat! Stored in an airtight container at cool room temperature (or in the fridge if your kitchen is warm), it will stay fresh and delicious for up to two weeks. Just be careful not to stack it too high, or the reindeer faces might get damaged. I like to separate layers with parchment paper. - Q: My candy eyes are falling off! How can I make them stick?
A: The key is to press them in while the chocolate is still wet and soft. If you find they’re not sticking, you can dab a tiny bit of extra melted chocolate on the back of the eye before placing it—think of it as edible glue!
A Little Note on Nutrition
Let’s be real, this is a holiday treat, and it’s all about indulgence! While it’s not a health food, it’s wonderful for bringing joy. Each piece (assuming you get about 40 from the batch) contains roughly 90 calories. It’s a perfect little bite to satisfy a sweet tooth without going overboard. Because you’re making it yourself, you control the ingredients—you can choose dark chocolate for antioxidants or use lower-sugar options if you prefer. But my philosophy? Everything in moderation, especially during the holidays. So enjoy a piece or two guilt-free, savor the moment, and share the rest to spread the cheer!
Final Thoughts from My Kitchen to Yours
Well, my friend, there you have it! Your guide to creating the most delightful, easy, and memorable holiday treat. Reindeer Bark is more than just a recipe to me; it’s a little packet of happiness. It’s about the fun of creating something with your hands, the laughter that inevitably happens when you’re pressing on googly candy eyes, and the warmth of sharing it with people you love.
I hope this recipe becomes a cherished part of your holiday traditions, just like it is for me. So from my messy, flour-dusted kitchen to yours, I wish you a season filled with love, laughter, and incredibly delicious food. Now, go forth and create a reindeer party! And when you do, I’d love to see it. Tag me on social media with #TastyChow so I can admire your beautiful, tasty creations.
Happy holidays, and happy baking!
— Emily 🦌✨