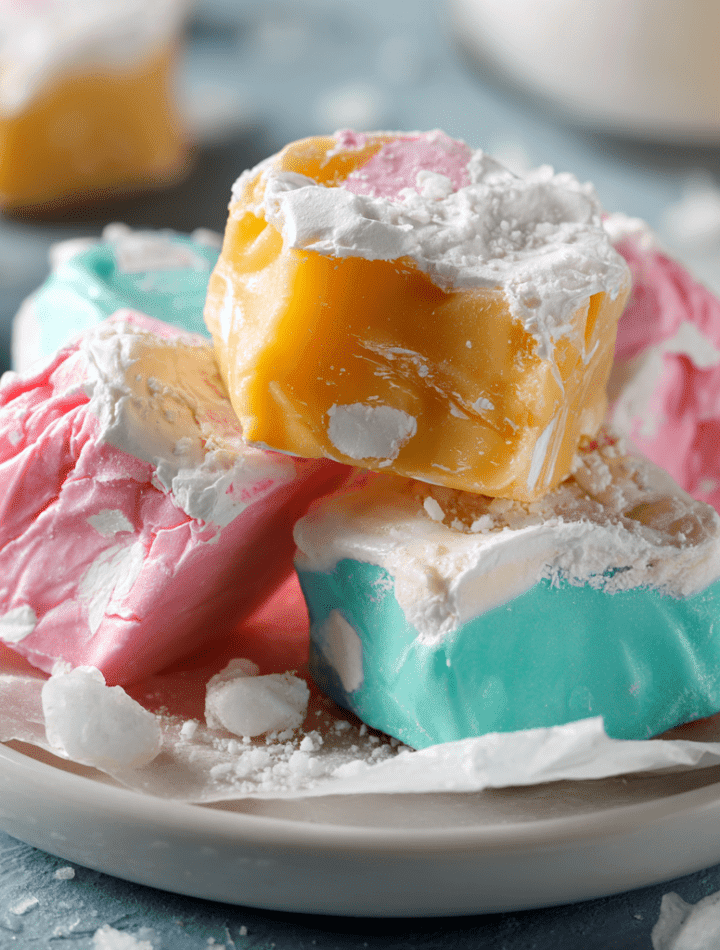
Ditch the Boardwalk: Your Ultimate Guide to Homemade Saltwater Taffy
Hey there, my fellow sweet-toothed friends! 👋 Emily from Tasty Chow here. Is there anything that screams “summer fun” quite like the taste of saltwater taffy? That chewy, sweet, slightly salty pull that takes you straight to a sunny boardwalk, the sound of crashing waves, and the joyful chaos of a carnival game in the background. For years, I thought this magical candy was something only mystical candy-makers in striped aprons could conjure up behind glass windows. Oh, how wrong I was!
Today, we’re pulling back the curtain (and pulling some taffy!) together. I’m going to show you that making this iconic treat at home is not only possible, it’s an absolute blast. It’s a fantastic project for a rainy afternoon, a fun party activity (butter those hands and get everyone involved!), or the most heartfelt homemade gift you could ever give. Forget those flimsy cardboard boxes—we’re making the real deal, infused with love and your own favorite flavors.
So, tie back your hair, slip on your favorite messy apron (you know, the one with all the good stories splattered on it), and let’s create some sweet, stretchy magic. I promise, by the end of this, you’ll be a bona fide candy maestro, ready to impress your friends and family with a treat that’s made with love, not just bought from a shelf. Let’s get cooking!

The Sticky Sweet Soundtrack of My Summers
My love affair with saltwater taffy began not with the candy itself, but with the sound. Every summer, my family would make the pilgrimage to the Jersey Shore to visit my grandparents. And for me, the true sign that vacation had started wasn’t the first glimpse of the ocean; it was the distinct *thump-thump-thump-thwack* of the taffy pulling machine echoing from the fudge shop on the boardwalk.
I’d press my nose against the cool glass, mesmerized as a single, giant blob of candy was hooked onto a metal arm and relentlessly stretched, folded, and aerated into a glossy, beautiful rope. My grandma, a woman who believed joy was found in life’s simple pleasures, would always buy a quarter-pound mix. We’d sit on a weathered bench, the salt air tangling our hair, and have a serious tasting session. Was the vanilla bean better than the strawberry? Could the peanut butter ever be dethroned? Our fingers would be sticky, our cheeks would hurt from smiling, and that moment, suspended in time with the taste of sugar and sea salt, was pure happiness. Making it at home now, that same *thump-thump-thump* replaced by the sound of my own laughter and the pull of the candy in my hands, brings all of that joy right back into my kitchen. It’s more than candy; it’s a memory you can taste.
Gathering Your Candy-Making Crew: The Ingredients
Don’t let the short list fool you—these ingredients are the powerhouse team that creates the magic of texture and flavor. Here’s the breakdown of what you’ll need and why each one is a VIP (Very Important Powder… or syrup… you get it).
- 2 cups granulated sugar: This is the sweet heart of our operation. It provides the structure and the bulk of our candy. For the best results, use standard white granulated sugar. I don’t recommend substitutions like coconut sugar here, as they have different moisture levels and will affect the final texture.
- 2 tbsp cornstarch: Our secret weapon against sugar clumps! It helps keep the sugar crystals fine and separate during the initial mixing, ensuring our taffy is smooth and chewy, not grainy and sad.
- 1 cup light corn syrup: This is the guardian of chewiness. Corn syrup is an invert sugar, which means it prevents the sucrose (table sugar) from crystallizing too much. This is what gives taffy its signature soft, pliable pull. You can substitute golden syrup or agave nectar in a pinch, but the texture might be slightly different.
- ¾ cup water: Simple H2O is the vehicle that dissolves our sugar and allows everything to come together smoothly. Use regular tap water—no need for fancy mineral water here!
- 2 tbsp unsalted butter, plus extra for greasing: Butter adds a rich, creamy flavor and a wonderfully soft texture to the finished taffy. Using unsalted lets us control the salt level. You’ll also need extra for greasing your pan and your hands—trust me, you’ll thank me later!
- 1 tsp salt: The star of the show! This isn’t just for flavor; the salt enhances all the other flavors and creates that iconic “saltwater” contrast. I use a fine sea salt. If you only have iodized table salt, that’s fine, but use a scant teaspoon as it can taste sharper.
- 1 tsp vanilla extract (or flavor of choice): This is where you make it your own! Pure vanilla extract is a classic for a reason. But feel free to get creative—think peppermint, almond, banana, or even lemon extract. For fruitier flavors, LorAnn Oils brand candy flavorings are my go-to; they’re super potent and won’t add extra liquid.
- Food coloring (optional): Go wild! A few drops of gel food coloring give your taffy that classic, fun, boardwalk look. Gel is better than liquid as it won’t thin out your mixture.
The Fun Part: Let’s Make Some Taffy!
Okay, team! Here’s your step-by-step guide to taffy triumph. Read through all the steps once before you start. Candy-making is a science, but it’s a deliciously fun one. Let’s do this!
- Prep Your Station: Before you even think about turning on the stove, line a rimmed baking sheet with parchment paper and grease it lightly with butter. This is where your molten candy will go to cool. Also, butter a spot on your countertop or a large heat-safe cutting board for the pulling stage. Have your flavoring and food coloring measured and ready to go next to the stove. Chef’s Hack: Prep is 90% of the battle in candy making. Having everything within arm’s reach is a game-changer.
- Combine and Dissolve: In a heavy-bottomed, medium-sized saucepan (this is crucial for even heating), whisk together the sugar and cornstarch. This initial whisking is what will keep your candy smooth. Now, add the corn syrup, water, butter, and salt. Stir this mixture over medium heat until the sugar has completely dissolved and the butter has melted. Chef’s Hack: To test if the sugar is dissolved, dip a clean spoon into the mixture and rub a drop between your fingers. If it feels gritty, keep stirring until it’s completely smooth.
- Bring to a Boil, Then Hands Off!: Once everything is dissolved, stop stirring! Attach your candy thermometer to the side of the pan, making sure the bulb is submerged in the syrup but not touching the bottom of the pan. Bring the mixture to a boil over medium heat. This is where patience comes in. Let it boil away, undisturbed, until it reaches exactly 250°F (121°C), the hard-ball stage. Chef’s Hack: If you see sugar crystals forming on the sides of the pan, you can use a wet pastry brush to wash them down. But no stirring!
- The Big Finish: As soon as that thermometer hits 250°F, immediately remove the pan from the heat. Carefully stir in your chosen flavor extract and food coloring. The mixture will bubble up a bit—that’s normal! Stir just until everything is incorporated.
- Cool It Down: Immediately pour the hot candy onto your prepared, buttered baking sheet. Please, please be careful—this stuff is like edible lava! Let it cool for about 10-15 minutes, until it’s cool enough to handle but still very warm and pliable. You should be able to poke it and leave a slight indent. Chef’s Hack: Waiting is the hardest part, but if it’s too hot, you’ll burn your hands. If it cools completely, it will be too hard to pull.
- Butter Up and Pull!: This is the best part! Generously butter your hands. Scoop the warm candy mass into a ball and start pulling! Grab a section, stretch it out, fold it back over itself, give it a slight twist, and repeat. You’ll want to pull for a good 10-15 minutes. You’ll feel the texture change—it will become harder to pull, more firm, and will start to lighten in color and take on a satiny, opaque sheen. This process aerates the taffy, creating that perfect light and chewy texture. Chef’s Hack: Enlist a helper! You can each grab an end and pull it back and forth between you, just like the old-fashioned machines.
- Shape and Wrap: Once your taffy is beautifully pulled and has a lovely light color, stretch it into a long, ½-inch thick rope. Using a pair of buttered kitchen shears or a sharp knife, snip the rope into 1-inch pieces. Immediately wrap each piece in a small square of wax paper, twisting the ends to seal. This keeps them from sticking together and makes them look adorable. Chef’s Hack: Work quickly as the pieces can start to set. If the rope gets too thick while you’re cutting, just stretch it out again.
How to Serve Your Sweet Masterpiece
You’ve just created something amazing! Now, how to present it? Sure, you can pile them all in a bowl and let people dig in (which is a perfectly wonderful option), but if you want to get fancy, here are a few ideas:
The Classic Boardwalk Box: Find a cute cardboard box or a vintage-style tin. Layer the wrapped taffies inside for a truly authentic gift that will wow everyone.
The Candy Buffet: Hosting a party? Put out several jars or glass containers filled with different flavors and colors you made. Let your guests mix and match their own favorite flavor combo to take home as a party favor.
On a Dessert Charcuterie Board: Yes, this is a thing and it’s glorious! Arrange an assortment of your homemade taffy alongside other sweet treats like chocolate truffles, fresh berries, cookies, and nuts for a stunning and interactive dessert spread.
However you serve it, the most important ingredient is the story. Tell your friends you made it from scratch! Brag a little. You’ve earned it.
Get Creative: Flavor Twists & Swaps
The basic recipe is your blank canvas. Now, let’s paint with flavor! Here are a few of my favorite ways to mix it up.
- Chocolate Sea Salt: Replace ¼ cup of the granulated sugar with good-quality unsweetened cocoa powder. Add the cocoa when you first whisk it with the sugar and cornstarch. Use vanilla extract and finish with a light sprinkle of flaky sea salt on the pieces before they fully set.
- Tropical Punch: Use a combination of coconut extract and a few drops of mango or passion fruit flavoring. Color it a bright sunny yellow or orange. It’s like a vacation in every bite!
- Root Beer Float: Use root beer extract for flavoring (LorAnn makes a great one). For an extra fun twist, add a tablespoon of malted milk powder to the dry ingredients for that “float” creaminess.
- Vegan-Friendly Version: This is an easy swap! Simply use a plant-based butter (I find soy-free Earth Balance works best) and ensure your sugar is certified vegan (some are processed with bone char).
- Swirls Galore: Feeling advanced? Make two separate batches, like vanilla (white) and chocolate (brown). Pull them separately until ready, then gently twist the two ropes together before cutting for a beautiful marbled effect.
Emily’s Chef Notes & Kitchen Confessions
I’ll let you in on a little secret: my first-ever batch of taffy was a complete disaster. I was so impatient that I didn’t let it get to the right temperature. I ended up with a pot of syrup that never set and a kitchen that looked like a sticky crime scene. My dog at the time, Butters, tried to “help” clean the floor and got his whiskers glued together. We had quite the laugh (after I helped him out, of course!).
The moral of the story? A good candy thermometer is your best friend. Don’t guess—trust the science! This recipe has evolved for me from that sticky failure to a guaranteed crowd-pleaser because I learned to be patient and respect the process. Now, I always double the batch because it disappears so fast. Making taffy is now one of my favorite ways to spend a weekend afternoon, usually with some classic rock playing and a friend by my side to share the pulling (and the gossip).
TAFFY TROUBLESHOOTING: YOUR QUESTIONS, ANSWERED
Q: My taffy is too hard and crunchy. What happened?
A: This means the candy was cooked to a temperature that was too high. The sugar caramelized past the hard-ball stage. Next time, make sure your candy thermometer is accurate (you can test it in boiling water—it should read 212°F / 100°C). Also, remove the pan from the heat the *second* it hits 250°F, as the residual heat will continue to cook it slightly.
Q: My taffy is too soft and sticky. It won’t hold its shape.
A: This is the opposite problem—it didn’t reach a high enough temperature. It likely didn’t get to a full 250°F. Ensure your thermometer is accurate and that you’re boiling the mixture at a steady, medium heat, not a low simmer.
Q: Why is my taffy grainy?
A: Graininess is caused by sugar crystals forming. This can happen if you stirred the mixture after it started boiling, or if sugar crystals splashed up on the sides of the pan and fell back in. Remember the rule: no stirring after it comes to a boil! Using the cornstarch and a wet pastry brush to wash down any crystals helps prevent this.
Q: How should I store homemade saltwater taffy?
A: Keep your individually wrapped taffy pieces in an airtight container at room temperature. Do not refrigerate, as it can cause the candy to become sticky and weep. Properly stored and wrapped, it should stay fresh and chewy for about 2-3 weeks (if it even lasts that long!).
A Note on Nutrition
Let’s be real, friends—saltwater taffy is a treat, through and through. It’s a candy, and we’re here to enjoy it in all its sugary glory! But I believe in transparency, so here’s a general breakdown. Remember, these values are estimates and can vary based on specific ingredients and portion size.
This recipe yields approximately 60 pieces. Per piece (assuming 1-inch size), you’re looking at roughly:
- Calories: 40
- Fat: 0.5g
- Carbohydrates: 9g
- Sugars: 8g
- Protein: 0g
The primary ingredients are sugars (granulated sugar and corn syrup), which provide quick energy. There’s a small amount of fat from the butter. The joy and fun of making it yourself, controlling the ingredients, and sharing it with loved ones? That’s priceless and has no calorie count! Enjoy it mindfully as part of a balanced diet.
Your New Favorite Kitchen Adventure
And there you have it, friends—you’ve just ditched the boardwalk and created the real deal right in your own kitchen. Saltwater taffy isn’t just candy; it’s an experience. It’s the laughter while pulling warm ropes of sugar, the thrill of choosing flavors and colors, and the joy of wrapping up little bites of nostalgia to share.
Whether you’re whipping up a batch for a rainy-day project, planning a fun family kitchen adventure, or making heartfelt gifts for friends, this recipe brings the magic of summer straight to your countertop. Every chewy bite is a reminder that some of the best memories are made not on the boardwalk, but at home—with buttered hands, sticky counters, and lots of smiles.
So go ahead, grab that apron, pick your flavors, and get pulling. I promise—once you’ve tried homemade taffy, it’ll become your new favorite kitchen adventure.
