Santa Hat Oreo Ornaments: Your New Favorite Edible Holiday Craft!
Hey there, my festive friend! Can you smell that in the air? It’s the scent of pine needles, cinnamon sticks, and pure, unadulterated holiday magic. And if you’re anything like me, your favorite part of the season is finding those special, heartwarming projects that bring everyone together. You know, the ones that end with more laughter than frustration and, ideally, something delicious to show for it. Well, pull up a chair, preheat your enthusiasm (because we’re not baking!), and get ready to fall in love with the most adorable treat to ever grace your Christmas tree or dessert table: Santa Hat Oreo Ornaments.
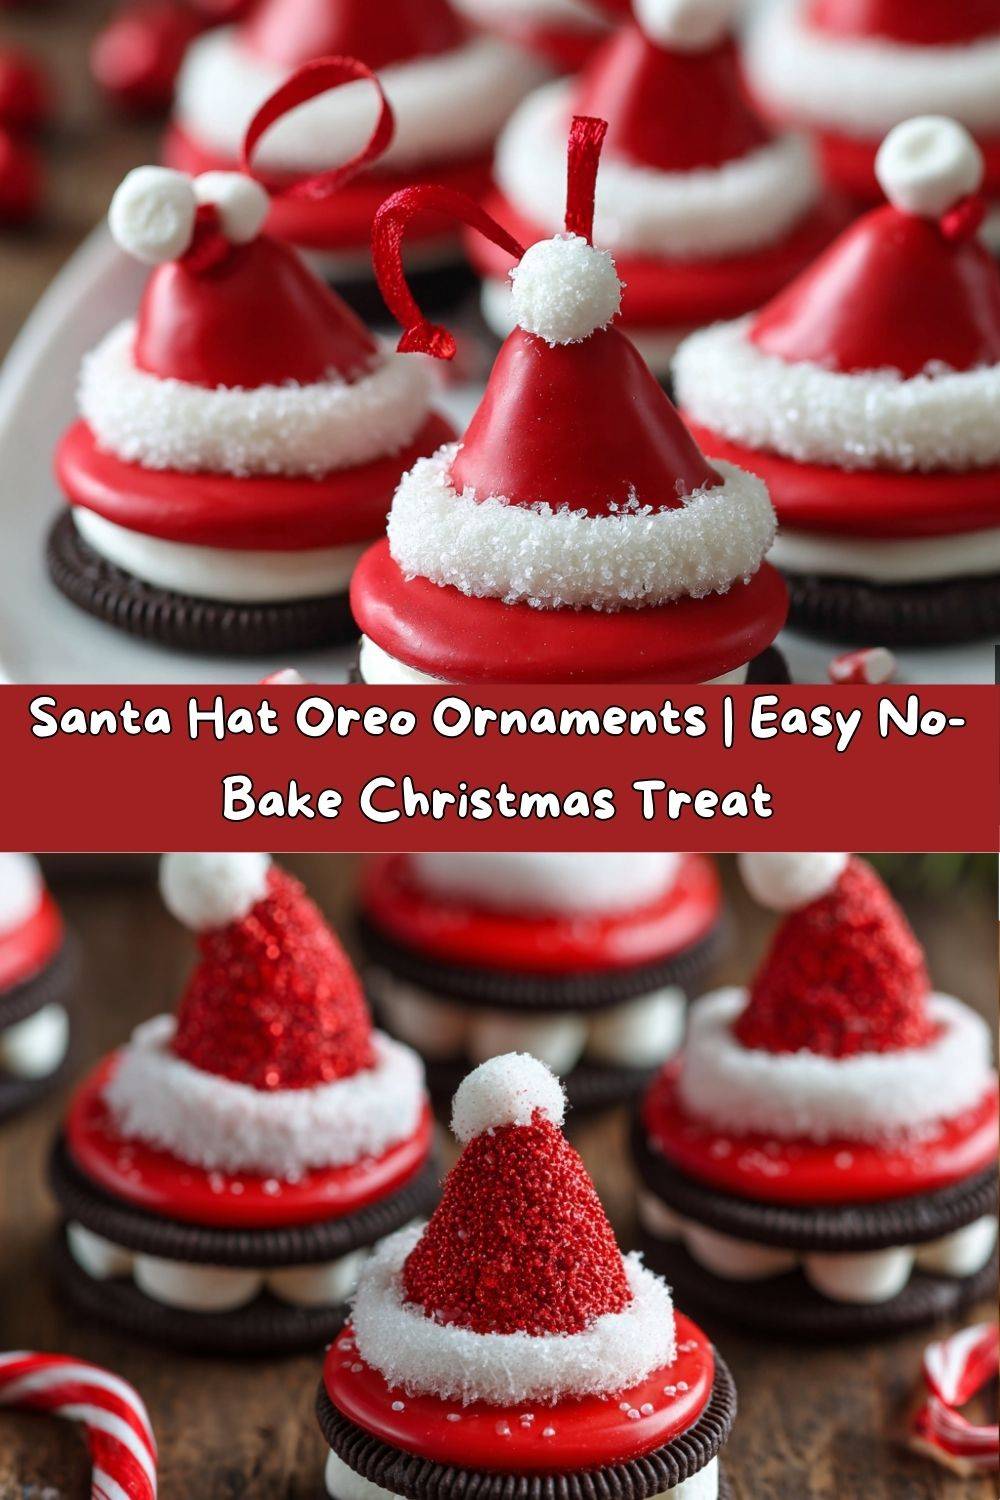
These little guys are the whole package. They’re ridiculously cute, incredibly simple to make, and 100% no-bake, which means they’re the perfect last-minute kitchen craft for you and your little elves. Imagine the scene: a platter of these festive Oreos, each one wearing its own cheery red Santa hat with a fluffy white trim. They’re almost too cute to eat… almost. Whether you’re dangling them from the branches of your tree, using them as place card holders at your holiday dinner, or just stacking them high on a plate for Santa (and you!), they’re guaranteed to spread edible cheer. So, let’s toss on our favorite holiday playlist, maybe even a festive apron, and dive into making some memories—and some seriously tasty ornaments.
A Sweet Memory: Where It All Began
This recipe takes me right back to my grandma’s cozy, overheated kitchen. The year was… well, let’s just say big hair was still in style. I was tasked with the “very important job” of decorating the Christmas cookies, a responsibility I took as seriously as a pastry chef at the North Pole. But, as a kid with a famously short attention span, I’d often get distracted by the cartoons on TV or the first snowfall outside the window. My beautifully iced snowmen would end up with lopsided smiles, and my Christmas trees looked like they’d been through a blizzard of green icing.
One particularly distracted afternoon, I started playing with the leftover red frosting and some marshmallows. I plopped a glob of red on a plain cookie, stuck a mini marshmallow on top, and held it up. “Look, Grandma! A Santa hat!” She laughed that wonderful, full-belly laugh of hers and said, “Well, would you look at that! It’s perfect, Emmy. Sometimes the simplest ideas are the very best.” We spent the rest of the afternoon making a whole army of Santa hat cookies. That memory of simple, improvisational joy is exactly the feeling I want to share with you through this recipe. It’s not about perfection; it’s about the fun you have along the way.
Gathering Your Merry Ingredients
Here’s the beautiful part: you only need a handful of simple ingredients to create this holiday magic. I’ve included some of my favorite chef-y insights and substitution tips to make sure your crafting goes off without a hitch!
- Oreo cookies (any flavor, but Double Stuf holds best): The sturdy canvas for our art! Double Stuf Oreos are my top pick because the extra cream filling provides a more stable base for dipping and a better cream-to-cookie ratio. But feel free to get creative! Golden Oreos make for a lovely “snowy” background, and mint Oreos add a festive coolness.
- Red candy melts: This is what gives our hats that signature, vibrant red and a satisfying chocolatey crunch. Chef’s Insight: Candy melts are formulated to set hard and are much easier to work with than real chocolate for this project. If you’re in a pinch, you can use white chocolate chips mixed with a tablespoon of coconut oil and red food coloring (gel works best for vibrant color), but candy melts will give you the smoothest, most reliable results.
- White icing (in a piping bag or tube): This is your hat’s fluffy trim! The store-bought piping tubes with a fine tip are fantastic for this because they offer so much control. If you’re feeling ambitious, you can make your own royal icing or buttercream, but the convenience of the pre-made stuff is a huge win here.
- Mini marshmallows: The adorable little puff ball on the tip of Santa’s hat! You can also use a small dollop of white icing if you prefer.
- Ribbon or string (optional, for hanging): If you want to turn these into true edible ornaments, you’ll need some thin ribbon, baker’s twine, or even embroidery floss. Make sure it’s food-safe and colorfast!
- Toothpicks or a dedicated piping bag: Essential tools for your detail work. A toothpick is perfect for fixing little mistakes or smoothing out the candy coating.
- Parchment paper: Your best friend for preventing sticky situations. Do not skip this! Wax paper can sometimes stick, so parchment is the way to go.
Let’s Craft Some Christmas Magic: Step-by-Step
Alright, team! Let’s get our hands (maybe a little) dirty. I’ll walk you through each step with all my favorite hacks to ensure your Santa hats are picture-perfect.
- Set the Stage: First things first, line a baking sheet with parchment paper. This is your drying station and will save you from a world of mess. Have all your ingredients measured and laid out within arm’s reach. This is called your mise en place (everything in its place), and it makes the whole process flow like a smooth Christmas carol.
- Melt the Magic: Place your red candy melts in a microwave-safe bowl. The key to melting candy is low and slow! Microwave on 50% power for 1 minute. Stir. Then continue microwaving in 30-second bursts at 50% power, stirring thoroughly each time, until the melts are completely smooth and lump-free. Chef’s Hack: If the melted candy seems too thick for dipping, you can add a tiny, tiny amount of coconut oil or paramount crystals (about ½ tsp at a time) to thin it to a perfect dipping consistency.
- The Big Dip: Hold an Oreo by its edges. Carefully dip the top half of the cookie into the melted red candy at a diagonal angle. You’re aiming to cover about two-thirds of the cookie to create that classic triangular hat shape. Let the excess candy drip back into the bowl for a clean finish. Gently place the dipped Oreo onto your parchment-lined tray. Repeat with the remaining cookies. Pro Tip: If the candy pool at the base of the hat isn’t as pointy as you’d like, use a toothpick to gently guide the candy into a more defined tip before it sets.
- The Waiting Game: Allow the red candy to set completely. You can let them harden at room temperature, which might take 15-20 minutes, or pop the entire tray into the refrigerator for about 5-7 minutes to speed things up. They’re ready when the candy coating is firm to the touch.
- Trim the Hat: Once the red coating is set, it’s time for the fluffy white trim! Take your white icing and pipe a careful line along the bottom edge of the red hat. This covers the rough edge and looks just like fur. Don’t worry if it’s not perfectly straight—it just adds to the homemade charm!
- Top it Off: For the final flourish, add a mini marshmallow to the very tip of the hat. A tiny dab of leftover melted candy or a dot of white icing will act as the perfect edible glue to hold it in place. You can also pipe a small dollop of white icing instead if you’re out of marshmallows.
- Hang Them Up (Optional): If you’re making ornaments, cut short lengths of ribbon (about 4-5 inches). Loop the ribbon and use a small dab of the melted red candy or white icing to glue the ends to the back of the Oreo. Let this dry completely before attempting to hang them.
How to Serve Up Some Christmas Cheer
Now for the best part: showing off your adorable creations! These Santa Hat Oreos are incredibly versatile. For your holiday party, arrange them on a festive platter as the star of the dessert table. They pair wonderfully with a glass of cold milk, a rich hot chocolate, or even a cozy cup of coffee.
If you’ve added ribbons, they’re ready to hang! Drape them on your Christmas tree for a deliciously decorative touch. They also make incredibly sweet place card holders for your holiday dinner—simply write a guest’s name on a small tag and attach it to the ribbon, or place the ornament right on top of their napkin. You can even create a gorgeous edible centerpiece by arranging a bundle of them in a festive bowl or tying them to the branches of a small tabletop tree. However you choose to display them, they’re sure to be a conversation starter.
Deck the Halls (and Your Oreos!) with These Fun Variations
Once you’ve mastered the classic, why not have a little fun and create a whole holiday collection? Here are a few of my favorite twists:
- The Snowman Oreo: Use white candy melts to coat the entire cookie. Then, use black icing to draw a top hat and orange icing for a carrot nose. Dot on some little black buttons and a smile!
- Peppermint Twist: Add a drop or two of peppermint extract to your red candy melts before dipping. Crush up some candy canes and sprinkle the pieces onto the wet candy coating for a crunchy, minty, festive hat.
- Dark Chocolate Elegance: Use dark cocoa Oreos and dip them in a deep red or even a metallic gold candy melt for a more sophisticated, grown-up holiday treat.
- Gluten-Free & Vegan Friendly: Use your favorite gluten-free sandwich cookies (like Glutino or Enjoy Life) and vegan-friendly candy melts (check the label) and icing. It’s an easy swap that ensures everyone can join the fun!
- The “Rudolph” Oreo: Turn that Santa hat upside down! Use brown candy melts for the base, then pipe on antlers with chocolate icing and add two red M&M’s for the nose and eyes.
Chef Emily’s Notes from My Messy Kitchen
I can’t tell you how many batches of these I’ve made over the years. The recipe has evolved from my grandma’s kitchen to my culinary school dorm room (where my roommate and I may or may not have hung them on our tiny fake tree) to now, where I make them every year with my nephew. He is, frankly, much better at placing the marshmallow puff than I am!
The biggest lesson I’ve learned? Embrace the imperfections. Maybe one hat will be a little lopsided. Maybe another will have a slightly thicker trim. It doesn’t matter. Each one is unique and made with love, and that’s what gives them their charm. The goal is to have fun and create something together. The mess is just proof of a good time!
FAQs: Your Questions, Answered!
Q: My candy coating is cracking after it sets. What did I do wrong?
A: This usually happens if the candy was overheated or if the cookies were cold when dipped. Always melt your candy slowly and gently, and make sure your Oreos are at room temperature before you start dipping!
Q: Can I make these ahead of time?
A: Absolutely! You can make them up to 2-3 days in advance. Store them in a single layer in an airtight container at room temperature. I’d wait to add the ribbon until just before you’re ready to hang them to prevent it from getting crushed.
Q: The melted candy is too thick and clumpy. Help!
A: Don’t panic! This is a common issue. Your candy might have gotten too hot. Stir in just a ½ teaspoon of solid vegetable shortening or coconut oil at a time until it smooths out to a dippable consistency.
Q: My white icing is bleeding into the red. How can I prevent this?
A> Make sure the red candy coating is 100% completely set and hardened before you add the white trim. If it’s even slightly tacky, the colors can run. Patience is key here!
Nutritional Information (Because Knowledge is Power!)
Okay, let’s be real: these are a festive treat, through and through. They’re meant to be enjoyed in the spirit of the season! Here’s a rough nutritional breakdown per ornament (assuming one standard Oreo and average amounts of candy and icing). This will vary based on the specific brands you use and how generously you decorate.
Per Ornament (approx.):
Calories: 160 | Fat: 7g | Saturated Fat: 4g | Carbohydrates: 23g | Sugar: 17g | Protein: 1g | Fiber: <1g | Sodium: 85mg
The main contributors are the cookie itself and the candy coating. If you’re looking for a lighter option, you could try using reduced-fat Oreos and be a little lighter-handed with the candy dip and icing. But my professional chef advice? Enjoy one or two guilt-free as part of your holiday celebrations!
Final Thoughts: Share the Sweetness
And there you have it! Your guide to creating the most whimsical, delicious, and downright fun holiday treat. These Santa Hat Oreo Ornaments are more than just a recipe; they’re a tiny, edible memory waiting to happen. They’re a reminder that the best moments often come from the simplest projects, the ones that get your hands a little messy and your heart a lot full.
I truly hope you have a blast making these. I’d love to see your creations! Tag me on social @TastyChow and use the hashtag #TastyChowHoliday so I can share in your festive fun. From my kitchen to yours, have a wonderful, delicious, and very merry holiday season. Now, let’s chow down!
— Emily 🎄