Skillet Chicken Pot Pie Filling: All the Cozy, None of the Fuss!
Hey there, friend! Pull up a stool and let’s chat. Have you ever had one of those days where you’re craving the deep, soul-warming comfort of a homemade chicken pot pie, but the thought of making a crust, rolling it out, and babysitting an oven feels… well, like a lot? I’ve been there more times than I can count, usually on a Tuesday after a long day, staring into the fridge and willing dinner to magically assemble itself.
That’s exactly why I fell head over heels for this Skillet Chicken Pot Pie Filling. This recipe is my ultimate kitchen hack for getting that classic, creamy, veggie-and-chicken-packed goodness on the table in about 30 minutes, with just one pan to wash. We’re skipping the pastry top (though, no judgment if you want to add it—more on that later!) and instead, we’re spooning this luscious, velvety filling right over a buttery biscuit, a slice of toasted rustic bread, or a fluffy cloud of mashed potatoes. It’s like the best part of pot pie got a fast-pass to your dinner plate.
This dish is a weeknight warrior, a comfort food hug, and a crowd-pleaser all in one. It’s forgiving, flexible, and packed with flavor that tastes like it simmered for hours. So, tie on your apron—the cute one with the stains, we’ve all got one—and let’s make something delicious that will have everyone asking for seconds. Trust me, this is about to become your new go-to for busy nights and cozy cravings alike.

The Story Behind the Skillet: Grandma’s Apron & My “Aha!” Moment
This recipe whispers of my grandma’s kitchen, but it shouts with my own messy, real-life cook’s truth. My grandma made the most incredible, from-scratch chicken pot pie. It was an event. The flaky crust, the steaming filling… pure magic. But it was also an all-afternoon affair. I’d sit at her Formica table, my legs swinging, watching her work with a focus I now recognize as love.
Fast forward to my first tiny apartment kitchen after culinary school. I was exhausted, missing home, and desperately wanted that pot pie feeling. But after a 10-hour shift, I just didn’t have it in me. So, I did what any desperate, hungry cook would do: I cheated. I sautéed veggies in a skillet, made a quick gravy, tossed in some leftover rotisserie chicken and peas, and dumped it over a piece of toast. I took one bite, closed my eyes, and there it was—that feeling. The cozy, safe, utterly satisfied feeling of my grandma’s kitchen. It wasn’t her pot pie, but it captured its beautiful, comforting soul in a fraction of the time. That’s the moment Tasty Chow was born in my heart: the idea that legendary comfort doesn’t have to be complicated. This skillet filling is that “aha!” moment, served up for you.
Gathering Your Cast of Flavor Characters
Here’s what you’ll need to create this creamy masterpiece. I’ve added my little chef notes because knowing your ingredients is the first step to cooking with confidence—and making it your own!
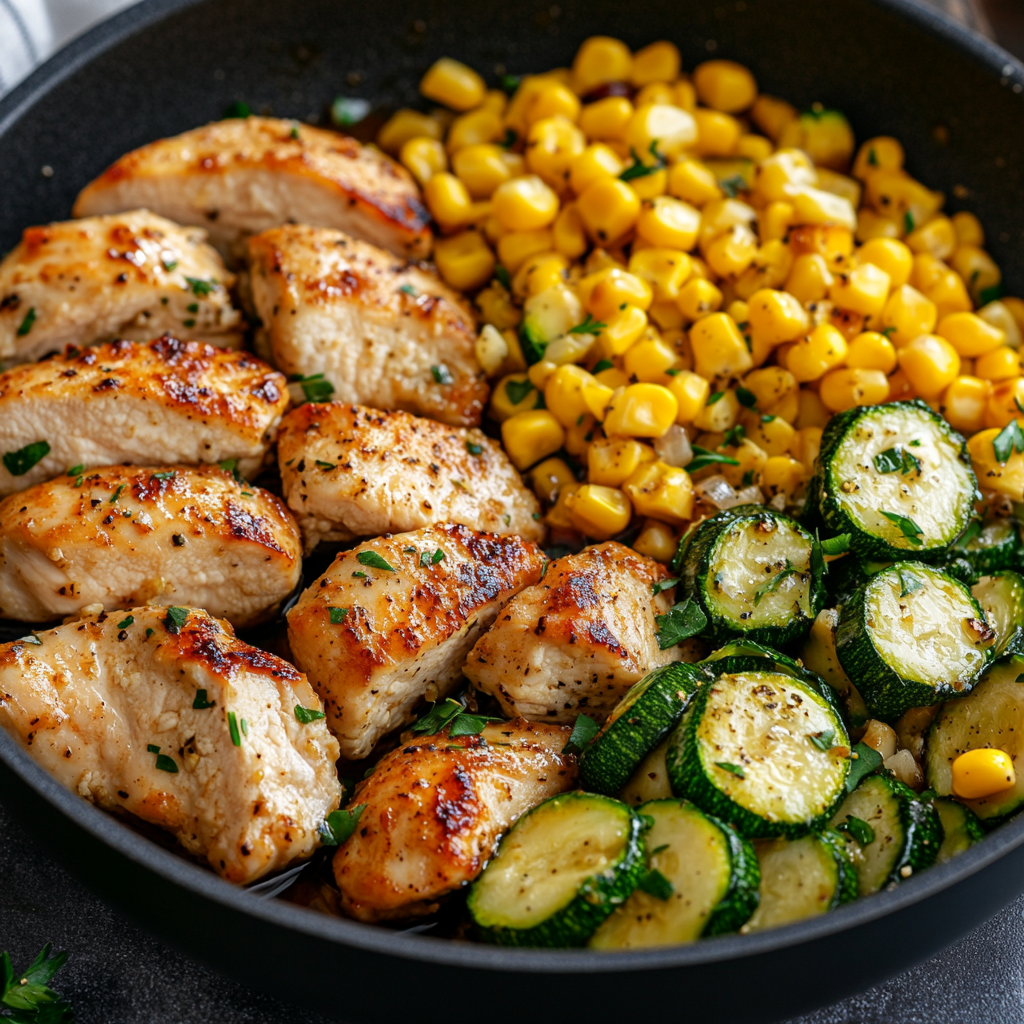
- 4 boneless, skinless chicken breasts, cooked and diced or shredded: The star! I often use a store-bought rotisserie chicken to save time—it’s a genius shortcut. Leftover roasted turkey works wonderfully too, especially after the holidays.
- 2 tablespoons butter: Our flavor foundation. It adds a rich, nutty depth you just don’t get from oil alone. For a dairy-free version, a good olive oil or vegan butter works.
- 1 small onion, diced: The aromatic base. Dicing it small ensures it melts into the sauce beautifully.
- 2 carrots, peeled and diced: Sweetness and color! Try to dice them about the same size as your peas for even cooking.
- 2 celery stalks, diced: The subtle, earthy flavor backbone of so many great dishes. Don’t skip it!
- 2 garlic cloves, minced: Flavor bomb! Fresh is best here. A quick tip: smash the clove with the flat of your knife first—the skin will practically fall off.
- 1/4 cup all-purpose flour: This is our thickening agent. It creates a roux with the butter that gives the filling its perfect, gravy-like body. For a gluten-free version, you can use an equal amount of a 1:1 gluten-free flour blend.
- 1 1/2 cups chicken broth: The liquid gold. Use low-sodium if you can, so you control the salt. Homemade stock is heaven here, but a good quality boxed broth is totally fine.
- 1/2 cup milk or half-and-half: For creaminess! Half-and-half makes it extra luxurious, but whole milk works great. For dairy-free, unsweetened almond or oat milk are good substitutes.
- 1/2 cup frozen peas: I love using frozen peas because they’re sweet, bright, and require no prep. Just stir them in at the end—they cook in the residual heat.
- 1/2 teaspoon thyme or poultry seasoning: The herby whisper. I adore thyme with chicken, but poultry seasoning is a fantastic blend that often includes sage, rosemary, and marjoram. Use what you love!
- Salt and pepper, to taste: Season as you go! Taste after each major step.
- Toasted bread, biscuits, or mashed potatoes for serving: The delicious vehicle for all this goodness. Get creative here!
Let’s Get Cooking: Your Step-by-Step Roadmap to Comfort
Okay, let’s fire up the stove! This process is simple, but each step builds flavor. Read through once, then let’s dive in.
- The Sizzle Start: In a large skillet (I use a 12-inch), melt your butter over medium heat. Once it’s foaming slightly, add the onion, carrots, and celery. This trio is called a mirepoix in chef-speak, and it’s the holy trinity of flavor. We’re not looking to brown them, just to soften and sweeten them up. Give it 5-7 minutes, stirring occasionally. You’ll know they’re ready when the onions turn translucent and the carrots have brightened in color. Chef’s Tip: This is a great time to season with a tiny pinch of salt—it helps draw out their natural moisture and speeds up the cooking.
- Garlic Time: Stir in your minced garlic. Ah, that smell! Cook it for just about 1 minute until it’s fragrant. We don’t want it to burn, as burnt garlic turns bitter. Chef’s Hack: If you’re worried about burning, you can push the veggies to the side and add the garlic to a little clear spot in the pan for a quick 30-second sizzle before stirring everything together.
- Making the Roux (The Magic Thickener): Sprinkle the flour evenly over the cooked vegetables. Now, stir, stir, stir for a full 1-2 minutes. We’re cooking the raw taste out of the flour and coating every veggie bit. It’ll look pasty and clumpy—that’s perfect! This roux is the secret to a sauce that clings to your spoon beautifully.
- Building the Creamy Sauce: Here’s where the magic happens! Grab your whisk. Gradually pour in the chicken broth and milk while whisking constantly. This constant motion prevents lumps from forming. Once it’s all in, switch back to a wooden spoon or spatula. Bring the mixture to a gentle simmer (small bubbles around the edges). Let it bubble and thicken for about 5 minutes, stirring often. You’ll see it transform from a thin liquid to a glorious, creamy gravy. Chef’s Note: If you do get a tiny lump, don’t panic! Just press it against the side of the skillet with your spoon or give the whole thing a quick blitz with an immersion blender.
- The Grand Finale: Turn the heat down to medium-low. Stir in your cooked chicken, frozen peas, thyme, and a good crack of black pepper. Let it all simmer together for 3-5 minutes, just until the chicken is heated through and the peas are tender. Now, taste it! This is the most important step. Does it need more salt? A pinch more thyme? Adjust until it sings to you.
How to Serve It Up: Let’s Get Creative!
The fun part! How you serve this is half the joy. Here are my favorite ways to dish it up:
- The Classic: Spoon it generously over a warm, flaky, buttermilk biscuit. Let the creamy filling seep into all the nooks and crannies. Pure bliss.
- The Toast Trick: Use a thick slice of crusty sourdough or hearty country bread, toasted and slathered with a little butter. It soaks up the sauce like a dream and adds a wonderful chewy texture.
- The Potato Mountain: Create a snowy peak of creamy mashed potatoes (or even cauliflower mash for a lighter twist) and make a well in the center for the filling. It’s like a deconstructed shepherd’s pie.
- The Bowl of Comfort: Sometimes, you just need a bowl. Serve it as-is with a simple green salad on the side for a perfect meal.
- Bonus: The Traditionalist: Want the full pot pie experience? Pour this filling into a baking dish, top with store-bought puff pastry or pie crust, brush with an egg wash, and bake at 400°F until golden. You get the best of both worlds!
Make It Your Own: 5 Delicious Twists
Once you’ve mastered the base recipe, the kitchen playground opens up! Here are some of my favorite ways to switch it up:
- Herb Garden Delight: Swap the thyme for 1 tablespoon of fresh chopped tarragon or dill. It adds a bright, almost lemony note that’s incredible with chicken.
- “Everything But The…” Veggie Load: Add a cup of chopped mushrooms with the initial veggies, or stir in a handful of fresh spinach right at the end until wilted. Frozen corn or green beans are great additions too!
- Creamy Dreamy Upgrade: Replace the milk with heavy cream or full-fat coconut milk for an ultra-rich, decadent sauce. The coconut milk adds a subtle, lovely sweetness.
- Turkey & Sage (Hello, Thanksgiving!): Use leftover shredded turkey and swap the thyme for rubbed sage. A splash of dry white wine in place of some of the broth takes it over the top.
- Lightened-Up Version: Use a lean protein like shredded chicken breast. For the sauce, swap the butter for olive oil, the flour for 2 tablespoons of cornstarch (slurry with a little cold broth first), and use unsweetened almond milk. You still get all the creamy comfort with fewer calories.
Chef Emily’s Kitchen Notebook
This recipe is a living thing in my kitchen! I’ve made it in a rush using frozen “seasoning blend” veggies (onions, carrots, celery—total lifesaver), and I’ve made it fancy with a splash of white wine reduced with the broth. It never fails. One funny fail? The first time I made it, I got distracted and added the peas with the raw carrots. Let’s just say I ended up with mushy, army-green peas. Not appetizing! Now I’m militant about adding frozen peas at the very end to keep their sweet pop and vibrant color. The recipe has evolved to be forgiving, but that’s one lesson that stuck. Also, this filling freezes like a champ! Cool it completely and store in airtight containers for up to 3 months. Thaw overnight in the fridge for a future instant comfort meal.
FAQs & Saving Dinner Disasters
Q: My sauce is too thin! What did I do wrong?
A: No worries, this is an easy fix! The most common cause is not cooking the flour-enriched roux long enough before adding liquid. Simply let the mixture simmer uncovered for a few more minutes; it will continue to thicken. If it’s still too loose, make a “slurry”: mix 1 tablespoon of cornstarch with 2 tablespoons of cold water or broth until smooth, then whisk it into the simmering filling. It should thicken up within a minute.
Q: Can I make this ahead of time?
A> Absolutely! Prepare the filling completely, let it cool, and store it in an airtight container in the fridge for up to 3 days. Reheat gently on the stove over medium-low heat, adding a splash of broth or milk if it seems too thick.
Q: What’s the best way to cook the chicken for this?
A> For ultimate ease, a rotisserie chicken is your best friend. To cook it yourself, I love poaching boneless breasts: place them in a saucepan, cover with broth or water, bring to a simmer, cover, turn off the heat, and let sit for 15-20 minutes. They come out perfectly juicy and ready to shred.
Q: My sauce is lumpy. Can I save it?
A> Yes! First, stop cooking and take the pan off the heat. An immersion blender is the quickest fix—just give it a few pulses. If you don’t have one, carefully pour the filling into a traditional blender, blend until smooth, and return it to the pan to finish with the chicken and peas. A fine-mesh strainer can also help push out lumps in a pinch.
Nutritional Information (A Peek at the Goodness)
Here’s a general breakdown for the filling only (one serving, without biscuit/toast), based on using whole milk and average-sized chicken breasts. Remember, this is home cooking, not lab science—values can vary based on your specific ingredients and substitutions!
- Calories: ~420
- Protein: ~35g (Excellent for keeping you full and satisfied!)
- Fat: ~20g (This includes the wholesome fats from butter, chicken, and milk, which carry flavor and help absorb vitamins from the veggies.)
- Carbohydrates: ~18g (Mostly from the nutritious vegetables and the small amount of flour used for thickening.)
- Fiber: ~3g (Thanks to those carrots, celery, and peas!)
To lighten it up, see the variations above. To make it more substantial, pair it with a whole-grain biscuit or a side of roasted vegetables. Food is about nourishment and joy—this dish delivers on both!
Final Thoughts: Your New Go-To Comfort Food
And there you have it, my friend—your ticket to a 30-minute comfort food paradise. This Skillet Chicken Pot Pie Filling is more than just a recipe; it’s a reminder that the best meals don’t have to be complicated to be incredible. They just have to be made with a little intention (and maybe a shortcut or two, because we’re all human).
I hope this becomes a trusted recipe in your rotation, the one you turn to on busy nights, chilly evenings, or anytime you need a guaranteed dose of deliciousness. Remember, the kitchen is your playground. Taste as you go, tweak it to your liking, and make it yours.
If you make it, I’d love to hear how it turned out! Tag me on social @TastyChow or leave a comment on the blog. Nothing makes me happier than seeing your creations. Now, go enjoy that well-deserved,