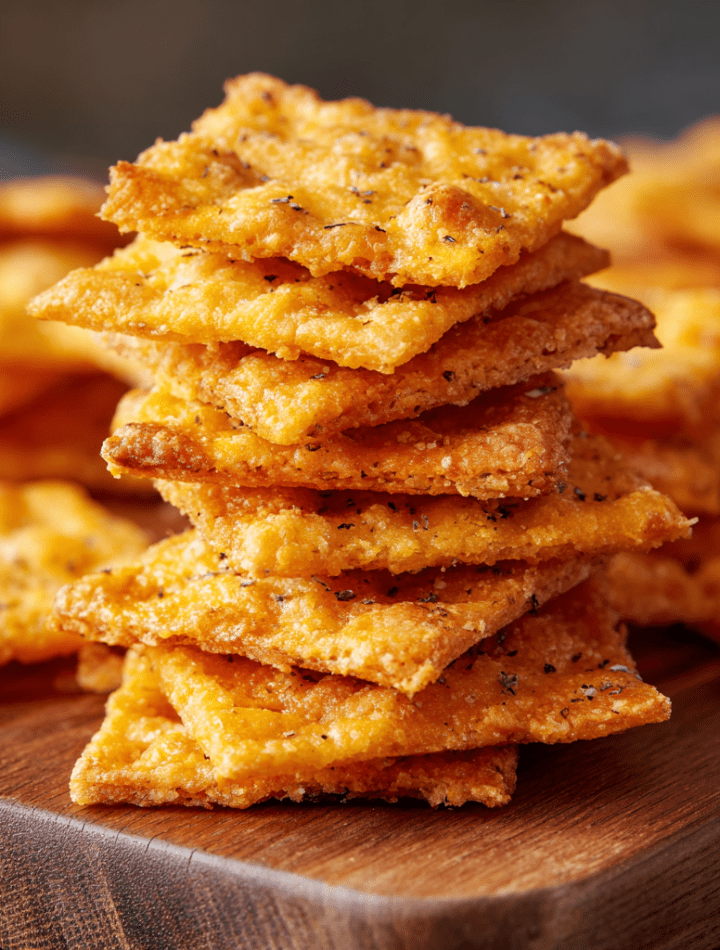
Sourdough Cheez-It Crackers: Your New Favorite Snack Obsession
Hey there, my fellow flavor fanatic! Let’s be real for a second. Is there anything more dangerously snackable than a box of Cheez-Its? That iconic orange square, that satisfying crunch, that bold, cheesy punch… it’s a snack cabinet legend for a reason. But what if I told you we could take that classic and make it even better, right in our own kitchens?
Get ready to fall in love, because these Homemade Sourdough Cheez-It Crackers are about to become your new go-to. We’re talking about a snack that’s everything it should be—sharp, cheesy, perfectly crisp, and totally, utterly addictive. But we’re adding a secret weapon: a tangy twist from your sourdough discard. That’s right, we’re giving that often-wasted starter a glorious, cheesy purpose!
With a punch of ranch seasoning and the power of real, honest-to-goodness cheddar cheese, these little squares are a massive flavor upgrade from the store-bought kind. They come together in under an hour and are perfect for lunchboxes, epic grazing boards, or those 3 PM cravings that demand something spectacular. So, tie on your favorite messy apron, and let’s make your kitchen smell like a cheesy, crunchy dream.

The Happy Accident That Started It All
This recipe has a special place in my heart because it was born from a classic “kitchen sink” moment. Picture this: It was a lazy Sunday afternoon. My sourdough starter, Bubbles, was looking a little sad and hungry in the fridge, and I had a half-eaten block of extra-sharp cheddar staring back at me. I was craving something salty and crunchy, but the thought of going to the store made me want to take a nap on the kitchen floor instead.
I remembered my grandma’s cheesy straws and thought, “What if I just… mash everything together?” I threw the cheddar, the discard, a pat of butter, and a generous sprinkle of my homemade ranch seasoning into the food processor. I crossed my fingers, pulsed it into a dough, and rolled it out. The moment I pulled the first golden-brown, bubbling batch from the oven, I knew we had something magical. The tang from the sourdough cut through the rich cheese in a way that made my taste buds sing. It was a happy accident that turned into a permanent staple in my snack rotation, and I am so thrilled to share it with you.
Gathering Your Cheesy, Tangy Gear
This is where the magic starts! The ingredient list is short and sweet, but each one plays a starring role. Here’s what you’ll need and why it matters.
- 226g (8 oz) Sharp Cheddar Cheese, chopped: This is the heart and soul of the cracker! I insist on a block of cheese that you grate or chop yourself. The pre-shredded stuff has anti-caking agents that can mess with our perfect, melt-in-your-mouth texture. The sharper the cheddar, the bigger the flavor punch. Trust me on this one.
- 85g (a heaping ⅓ cup) Sourdough Discard: Our secret weapon! Using your unfed, “discard” starter adds a wonderful tangy depth that makes these crackers truly special. It doesn’t need to be bubbly and active, but it shouldn’t be hoochy or smell off. Chef’s Insight: The hydration of your starter can vary. If your dough feels too wet, add a tablespoon of flour. If it’s too dry, add a teaspoon of water.
- 28g (2 tablespoons) Unsalted Butter, chopped: Butter is our best friend for achieving that irresistible, flaky crispness and rich flavor. Using unsalted lets us control the salt level perfectly.
- 5g (½ tablespoon) Ranch Seasoning: This is the flavor booster! It adds that herby, savory, “what is that amazing taste?!” quality. Use your favorite store-bought blend or make your own with dried dill, parsley, garlic powder, and onion powder.
- 5g (1 teaspoon) Salt: A must for balancing all the rich, cheesy flavors. We’re enhancing, not overpowering.
- 65g (½ cup) All-Purpose Flour: This is the structure-builder that brings our dough together. It gives the crackers their body and helps them get super crunchy.
- Flaky Sea Salt, for topping (optional): A little sprinkle on top before baking gives you those delightful salty bursts that take the final product to a 10/10.
Let’s Make Some Magic: The Step-by-Step Guide
Okay, team! Ready to transform these simple ingredients into snack-time royalty? It’s easier than you think. Let’s do this together, step by step.
- Pulse the Dough: Grab your trusty food processor. Add your chopped cheddar, sourdough discard, chopped butter, ranch seasoning, salt, and flour all at once. Now, put the lid on and pulse it! Start with short pulses, scraping down the sides if needed, until the mixture starts to clump together and form a shaggy ball. Chef’s Hack: Don’t over-process it! We just want it combined. If you don’t have a food processor, you can grate the cold cheese and use a pastry cutter or your fingertips to work it all together in a bowl. It’s a bit more of an arm workout, but it works!
- Chill Out: Turn the dough out onto a piece of plastic wrap. Use your hands to press and form it into a flat disc—this makes rolling it out later so much easier. Wrap it up tightly and pop it in the fridge for at least 20 minutes. Why we chill: This step is non-negotiable! It firms up the butter, making the dough easier to roll thinly and preventing the crackers from spreading too much in the oven. We want crisp, not puffy.
- Roll and Cut: Once your dough is nicely chilled, preheat your oven to a cozy 350°F (175°C). Line a baking sheet with parchment paper. Lightly flour your work surface and rolling pin. Roll that dough out thin—I’m talking about a serious ⅛ of an inch thick. This is the key to that signature cracker crispness! Then, use a pizza cutter, a sharp knife, or a fluted pasta wheel to cut the dough into small, adorable squares. Chef’s Tip: A skewer or the tines of a fork are perfect for poking that classic “Cheez-It” hole in the center of each square. It’s cute and functional, as it helps steam escape for an even crisp.
- Bake to Perfection: Carefully transfer your little squares to your prepared baking sheet. They don’t need a ton of space between them as they don’t spread much. Now, if you’re using it, give them a light shower of that flaky sea salt. Slide them into the oven and bake for 14-16 minutes. You’re looking for golden-brown edges and a firm, crisp feel. Keep a close eye on them—ovens can vary, and they can go from perfect to overdone in a flash!
- The Cool Down: This might be the hardest part. When you pull those gorgeous, golden crackers from the oven, you have to let them cool completely on the baking sheet. I know, the aroma is intoxicating! But if you try one now, it might seem a bit soft. As they cool, they firm up into the perfect, snappy crunch we’re dreaming of. Patience is a virtue, especially when cheese is involved.
How to Serve Your Homemade Masterpiece
Okay, the crackers are cool, and you’ve taste-tested at least six (for quality control, of course). Now, how do we serve these beauties?
The simplest way is also the best: piled high in a big bowl for everyone to grab by the handful. But if you want to get fancy, they are the absolute star of any charcuterie or grazing board. Pair them with sliced salami, creamy brie, sweet grapes, and some grainy mustard for the ultimate snack spread.
They’re also a dream packed into lunchboxes for a special treat, or set out with a bowl of tomato soup for dipping. Honestly, I’ve been known to stand in front of the open fridge at midnight, munching on them straight from the container. No judgment here.
Get Creative! Flavor Twists & Swaps
Once you’ve mastered the base recipe, the fun really begins! This dough is a fantastic canvas for your culinary creativity. Here are a few of my favorite twists:
- The Smoky Sensation: Swap out half of the cheddar for an equal weight of smoked gouda. The result is a deeper, campfire-kissed flavor that is absolutely incredible.
- Spicy Kick: Are you a heat-seeker? Add a generous pinch (or two!) of cayenne pepper or smoked paprika to the food processor with the other dry ingredients. It gives the crackers a warm, tingling finish that keeps you reaching for more.
- Everything Bagel Vibes: Before baking, brush the rolled-out dough very lightly with water or an egg wash and sprinkle generously with everything bagel seasoning. Savory, seedy, and sensational.
- Extra Cheesy & Savory: For an even bigger umami bomb, mix in a tablespoon of nutritional yeast with the flour. It adds a deep, savory, cheesy note that’s completely dairy-free, making the cheese flavor pop even more.
- Gluten-Free Friend: You can easily make these with a 1:1 gluten-free all-purpose flour blend. The texture might be a touch more delicate, but they’ll be just as delicious!
A Few More Thoughts From My Kitchen to Yours
This recipe has evolved so much since that first lazy Sunday experiment. I’ve learned that rolling the dough between two sheets of parchment paper eliminates the need for extra flour and makes cleanup a breeze. I’ve also found that a double batch is never a bad idea—these crackers disappear faster than you can say “more cheese, please!”
One of my favorite kitchen memories is the time I was making these for a friend’s party and my dog, Biscuit, managed to snag a whole disc of unbaked dough off the counter. The look of pure, cheesy triumph on his face was both horrifying and hilarious. So, learn from my mistake: guard your dough discs with your life!
Your Cheesy Cracker Questions, Answered!
Let’s tackle some common questions to make sure your cracker-making journey is smooth sailing.
Q: My crackers came out a bit puffy and soft, not super crisp. What happened?
A: This usually means one of two things! First, you might not have rolled the dough thin enough. Get it as close to ⅛ inch as humanly possible. Second, the dough might not have chilled long enough. A good, solid chill is crucial for preventing puffiness.
Q: Can I make these without a food processor?
A: Absolutely! Just grate your cold cheese on a box grater. Then, in a large bowl, use a pastry cutter or your fingertips to work the grated cheese, butter, sourdough discard, and dry ingredients together until it forms a crumbly dough. It takes a little more elbow grease, but it works perfectly.
Q: How should I store these, and how long do they last?
A: Once completely cool, store them in an airtight container at room temperature. They’ll stay perfectly crisp for up to a week… if they last that long! You can also freeze the baked crackers for up to 2 months.
Q: My dough is too sticky to roll! Help!
A: No worries! This can happen if your starter was very hydrated or your kitchen is warm. Just sprinkle a little extra flour onto the dough and your rolling surface until it’s manageable. A great trick is to roll it out between two sheets of parchment paper to avoid sticking altogether.
Nutritional Information (Because We’re Curious!)
I’m all about balance—enjoying those decadent, cheesy treats while knowing what’s in them. Since these are made with real, whole ingredients, you can feel good about snacking on them! This is a general estimate per serving, and values can change based on the specific brands of ingredients you use.
- Prep Time: 10 minutes
- Chill Time: 20 minutes
- Cook Time: 15 minutes
- Total Time: 45 minutes
- Servings: 6
Estimated per serving: 190–210 calories | 15g fat | 8g carbs | 6g protein
The majority of the calories and fat come from the fantastic cheddar cheese and butter, which is what gives these crackers their incredible flavor and texture. They’re a satisfying, protein-packed snack that beats most processed options hands down!
You Did It! Now, Go Forth and Snack
Look at you, you brilliant kitchen wizard! You’ve just created a batch of the most incredible, cheesy, tangy, crunchy homemade crackers. I am so incredibly proud of you for taking the time to make something special from scratch.
This recipe is a beautiful reminder that the best foods often come from a little experimentation and a whole lot of love. I hope these Sourdough Cheez-It Crackers bring as much joy to your kitchen as they have to mine. They’re more than just a snack; they’re a little square of homemade happiness.
So, grab a cold drink, pile those crackers high, and savor every single bite. You’ve earned it. And remember, I’m always here in your corner, cheering you on in all your culinary adventures. Now, let’s chow down!
With love and a full cookie jar,
Emily