Your New Favorite Bite-Sized Party Trick
Hey there, friend! Let’s be real for a second: is there anything more joyful than a dessert that’s as beautiful as it is delicious? One that makes you do a little happy dance when you see it? I’m convinced that the best treats are the ones that look like they came from a fancy patisserie but are secretly a total breeze to make in your own kitchen. And that, my fellow food lover, is exactly the magic of these Strawberry Cheesecake Bites.
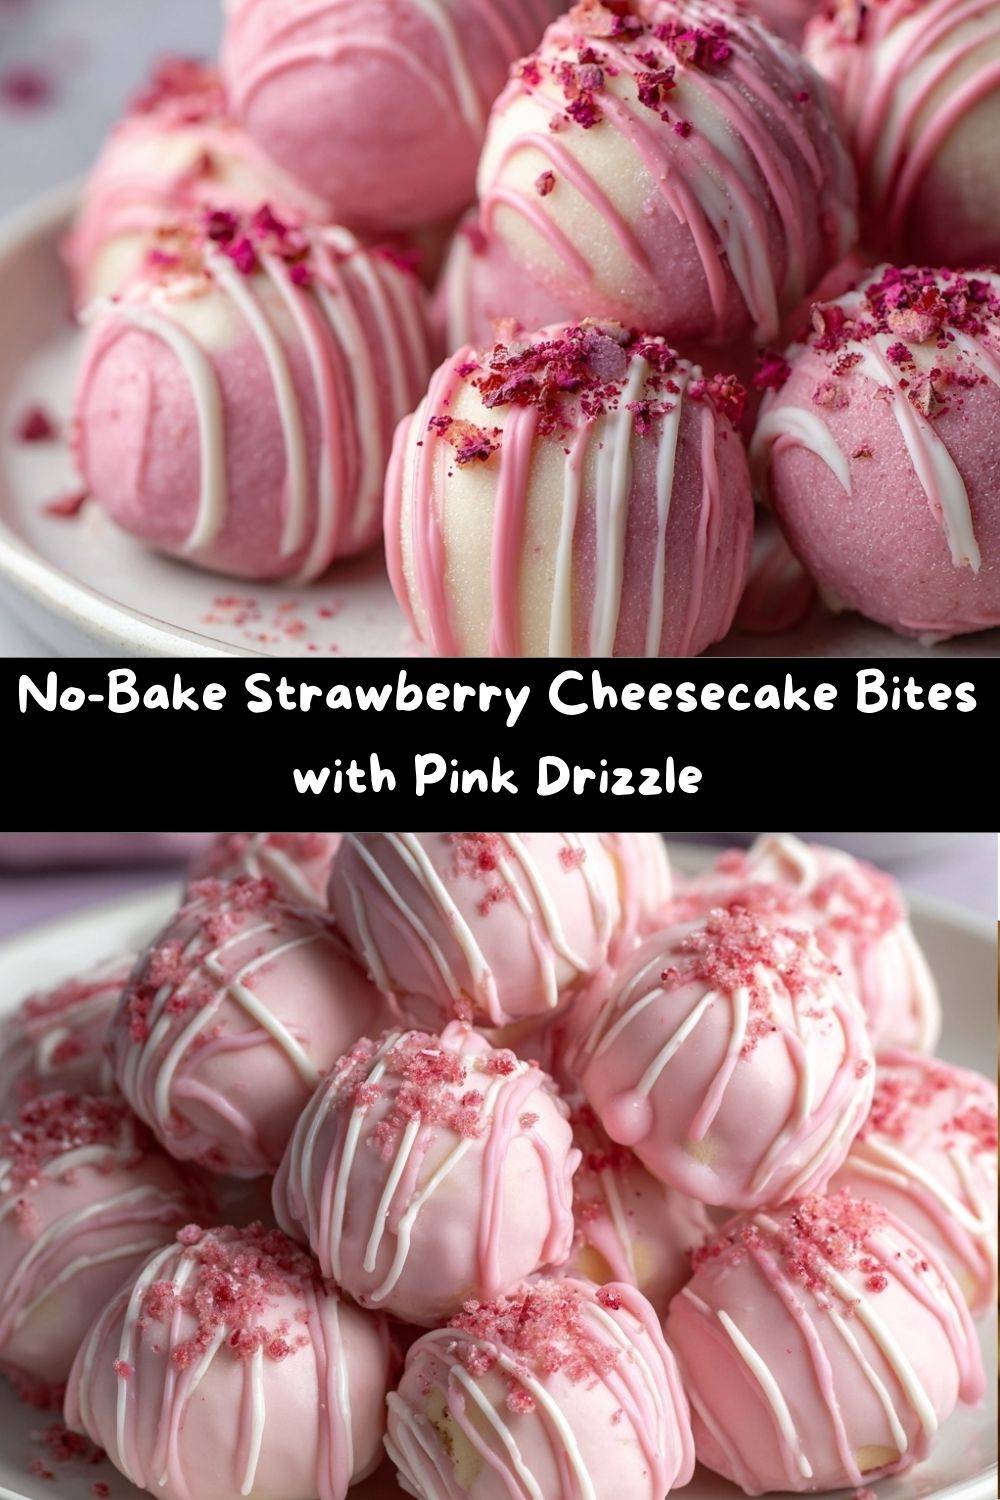
Imagine this: a creamy, no-bake cheesecake center bursting with the sweet-tart flavor of fresh strawberries, hugged by a sleek pink candy coating, and finished with an elegant white drizzle. They’re like the most adorable, pop-able little truffles, but they taste like a slice of the creamiest cheesecake you’ve ever had. I created these for a baby shower a few years back, and they were such a smash hit that they’ve become my go-to for bridal showers, birthday parties, or just when I need a pretty pick-me-up on a Tuesday afternoon. The best part? You don’t even have to turn on your oven. We’re letting the fridge do all the hard work today. So, tie on your favorite apron (the one with the strawberry print, perhaps?), and let’s make some magic happen.
A Sprinkle of Nostalgia: Where It All Began
This recipe always takes me right back to my grandma’s linoleum-floored kitchen. She wasn’t a fancy chef, but she was a wizard with simple ingredients. Her signature move was a “cheater’s” strawberry cake she’d make for us grandkids using a box mix and a hefty glug of strawberry soda. It was my absolute favorite. The first time I bit into one of these cheesecake bites, it was like a flavor flashback to those warm, sticky summers at her house. I wanted to capture that same nostalgic, fruity joy but in a new, elegant form. Using the dry cake mix in the filling is my little nod to her—a clever hack that packs a powerful punch of strawberry flavor without any artificial taste. It’s a reminder that the most beloved recipes often start with a sweet memory and a whole lot of love.
Gathering Your Happy Ingredients
Here’s the beautiful part: you only need a handful of simple ingredients to create these stunning little bites. Let’s break them down, because knowing your ingredients is the first step to kitchen confidence!
- 8 oz (≈225 g) Cream Cheese, room temperature: This is the heart and soul of our cheesecake filling. Pro Chef Tip: Please, please ensure it’s fully softened to room temperature! This is non-negotiable for a silky-smooth, lump-free filling. If it’s cold, you’ll end up with tiny cream cheese bits that just won’t incorporate properly.
- 1 tsp Vanilla Extract: Our flavor enhancer. It adds a warm, aromatic depth that makes the strawberry flavor sing. For a real treat, try using vanilla bean paste—you’ll see those beautiful little specks throughout your bites!
- ½ tsp Fine Salt: Don’t skip this! A pinch of salt is the secret weapon that balances the sweetness and makes all the other flavors pop. It’s the difference between “yum” and “WOW.”
- 1 box (≈15 oz / 430 g) Strawberry Cake Mix (dry): This is our brilliant flavor shortcut! Using the dry mix gives us that perfect, nostalgic strawberry taste and helps thicken our filling into a rollable “dough.” Substitution Tip: Not a fan of strawberry? Any cake mix flavor works here! Funfetti for a birthday, chocolate for a decadent twist, or lemon for a zesty kick.
- 12 oz (≈340 g) Pink Candy Melts or Pink Melting Wafers: This is what creates that gorgeous, smooth, pastel-pink shell. I highly recommend using wafers (like Ghirardelli or Wilton) over pure chocolate, as they are specifically designed for melting and setting with a perfect snap. Chef Insight: They’re also more forgiving and don’t require tempering!
- Optional: 2–4 oz (≈60–115 g) White Chocolate or Almond Bark for Drizzle: This is for our fancy finishing touch! The white drizzle against the pink shell is just *chef’s kiss*. Almond bark is a great, easy-to-melt option.
- Optional: Freeze‑dried Strawberry Bits or Sprinkles for Decoration: A little texture and a lot of pretty! Crushed freeze-dried strawberries add a wonderful tartness and a natural look, while sprinkles are just pure fun.
Let’s Get Rolling: Your Step-by-Step Guide
Ready to create? Follow these steps, and you’ll be a cheesecake bite pro in no time. I’ve packed this section with all my favorite kitchen hacks to ensure your success!
- Create the Cheesecake “Dough.” In a medium-sized mixing bowl, beat the softened cream cheese, vanilla extract, and salt together with a hand mixer (or in your stand mixer with the paddle attachment) on medium speed until it’s completely smooth and creamy. Scrape down the sides of the bowl to make sure everything is incorporated. Now, with the mixer on low, gradually add the entire box of dry strawberry cake mix. Chef Hack: I like to add it in 3 or 4 parts to avoid a giant cloud of pink powder! Mix until a soft, uniform dough forms. It will be slightly sticky, and that’s okay. If it feels too soft to handle, just pop the whole bowl into the fridge for about 30 minutes—this makes rolling a breeze.
- Shape Your Bites. Line a baking sheet with parchment paper. Using a tablespoon-sized cookie scoop or a regular spoon, portion out the dough. Roll each portion between your palms to form a smooth ball. Pro Tip: If the dough is sticking to your hands, lightly dampen them with a bit of water or wear disposable food-safe gloves. Place each ball on the prepared baking sheet. Once they’re all rolled, it’s time for a chill session! Slide the entire tray into the fridge for at least 1 hour, or until the balls are very firm. This step is crucial for a successful dip later!
- Melt the Pink Coating. Place your pink candy melts in a microwave-safe bowl. Microwave them in 30-second intervals on 50% power, stirring vigorously between each interval. Chef’s Golden Rule: Do NOT overheat them! They hold their shape even when mostly melted, so keep stirring until the residual heat smooths everything out. If the coating seems too thick, you can add a tiny teaspoon of coconut oil or paramount crystals to thin it to a perfect dipping consistency.
- The Big Dip! Remove a few cheesecake balls from the fridge at a time (keeping the rest cold). Drop one ball into the melted coating. Use a fork or a dipping tool to swirl it around, ensuring it’s completely covered. Lift it out, gently tap the fork on the edge of the bowl to remove excess coating, and then slide it back onto the parchment-lined tray. Little Trick: If you get a little “foot” of chocolate at the base, you can use a toothpick to swirl it back into the ball for a cleaner look. Repeat with all the bites.
- Drizzle and Decorate. Melt your white chocolate or almond bark using the same careful melting method. Transfer it to a small zip-top bag, snip off a TINY corner, and drizzle artistic lines back and forth over all the pink bites. While the drizzle is still wet, sprinkle on your crushed freeze-dried strawberries or fun sprinkles. This is your moment to be a pastry artist!
- The Final Chill. Return the tray to the fridge for a final 15-20 minutes, or until the coating is completely set and has a satisfying snap when you bite into it.
How to Serve These Pretty Little Gems
Presentation is half the fun with these bites! I love arranging them on a beautiful white platter or a tiered cake stand—it really makes that pink and white color scheme pop. For a party, you can place them in pretty pastel paper liners to make them easy to grab. They’re the perfect sweet ending to a brunch spread, a gorgeous addition to a dessert table, or a delightful homemade gift. Pack them in a cute box tied with a ribbon, and you’ve just made someone’s day. They pair wonderfully with a glass of bubbly Prosecco, a cup of hot coffee, or simply with a big smile.
Get Creative! Fun Flavor Twists
Once you master the basic recipe, the flavor world is your oyster! Here are a few of my favorite ways to mix things up:
- Chocolate-Covered Cherry: Use a devil’s food cake mix for the filling. Before rolling the balls, press a single maraschino cherry (well-drained and patted dry) into the center, then encase it in the chocolate “dough.” Dip in dark chocolate coating. Divine!
- Lemon Bar Bites: Swap the strawberry cake mix for a lemon one. Add a teaspoon of lemon zest to the filling for an extra zing. Dip in yellow candy melts and drizzle with white chocolate.
- Cookies and Cream: Use a classic white or chocolate cake mix. After combining the filling, stir in ½ cup of crushed Oreo pieces. Dip in dark chocolate and sprinkle with more Oreo crumbs.
- Key Lime Pie: Use a white cake mix and add 2 tablespoons of key lime juice along with the cream cheese. Dip in green candy melts and sprinkle with graham cracker crumbs for that classic “crust” flavor.
Chef Emily’s Notebook
This recipe has seen a few hilarious iterations in my kitchen. The first time I made them, I was impatient and didn’t chill the balls long enough. Let’s just say my first few “dips” turned into pink puddles with cream cheese swirls—a delicious mess, but not the pretty picture I was going for! I’ve learned that patience is the true secret ingredient. Over time, I’ve also started adding that tiny pinch of salt, which was a total game-changer. It’s funny how the smallest adjustments can elevate a recipe from great to unforgettable. Don’t be afraid to make it your own—that’s where the real joy of cooking lives!
Your Questions, Answered!
I’ve gotten so many messages about these bites over the years. Here are the answers to the most common questions:
- Q: My coating is too thick and clumpy! What did I do wrong?
A: This usually means the candy melts got a little too hot. You can try stirring in a teaspoon of coconut oil or vegetable shortening to thin it out. Next time, remember to melt on lower power and stir, stir, stir! - Q: Can I make these ahead of time?
A: Absolutely! They are the perfect make-ahead treat. You can store the finished bites in an airtight container in the fridge for up to 5 days. You can also freeze the uncoated balls for up to 2 months. Just thaw them in the fridge before dipping. - Q: My cheesecake balls are too soft to roll. Help!
A: No worries! This just means your cream cheese was a bit too warm or your kitchen is toasty. The fix is simple: just chill the mixing bowl of “dough” for 30-60 minutes before you try rolling. It makes all the difference. - Q: Can I use real strawberries instead of cake mix?
A: I don’t recommend using fresh fruit puree here, as the extra moisture will prevent the filling from setting up properly. The dry cake mix is key for texture and concentrated flavor. For a more natural approach, you could try blending a tablespoon of freeze-dried strawberry powder into the cream cheese with a plain cake mix.
A Quick Note on Nutrition & Storage
Let’s keep it real—these are a dessert, through and through! They’re meant to be savored as a special treat. Each bite is roughly estimated to contain around 140 calories, 7g of fat, 15g of carbohydrates, and 2g of protein. The most important info is how to keep them delicious! Storage is simple: Always keep them in an airtight container in the refrigerator. They’ll stay perfect for up to 5 days. The cold fridge is what keeps that coating snappy and the filling firm and creamy. You can also freeze them for longer storage—they thaw beautifully in the fridge.
You Did It!
Look at you, you brilliant kitchen rockstar! You’ve just created a stunning, professional-looking dessert that’s going to wow everyone who tries it. I hope these Strawberry Cheesecake Bites bring as much joy to your kitchen as they have to mine. Remember, cooking is about the journey—the little messes, the big triumphs, and the shared smiles around the table. So, take a bite, savor that creamy, strawberry goodness, and feel proud of what you’ve made.
With love and a full heart,
Emily