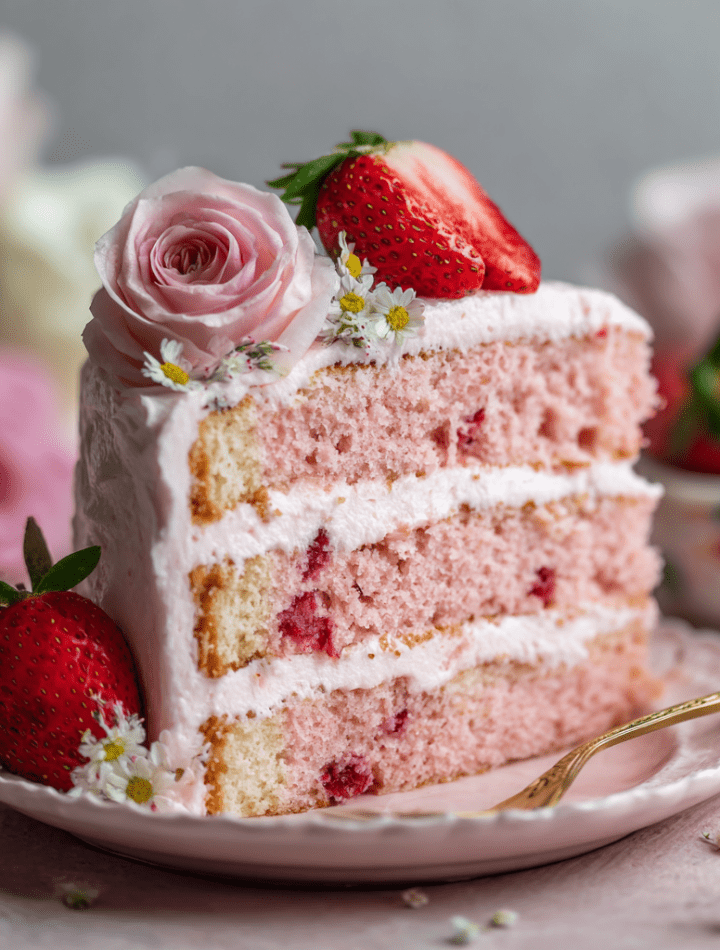
Strawberry Rose Layer Cake: Your New Go-To Showstopper Dessert
Hey there, friend! Pull up a chair and let’s talk about cake. Not just any cake, but the kind of cake that makes people stop mid-sentence, fork hovering in the air, just to say “Wow.” The kind that feels like a celebration in every single bite. I’m talking about my absolutely gorgeous Strawberry Rose Layer Cake.
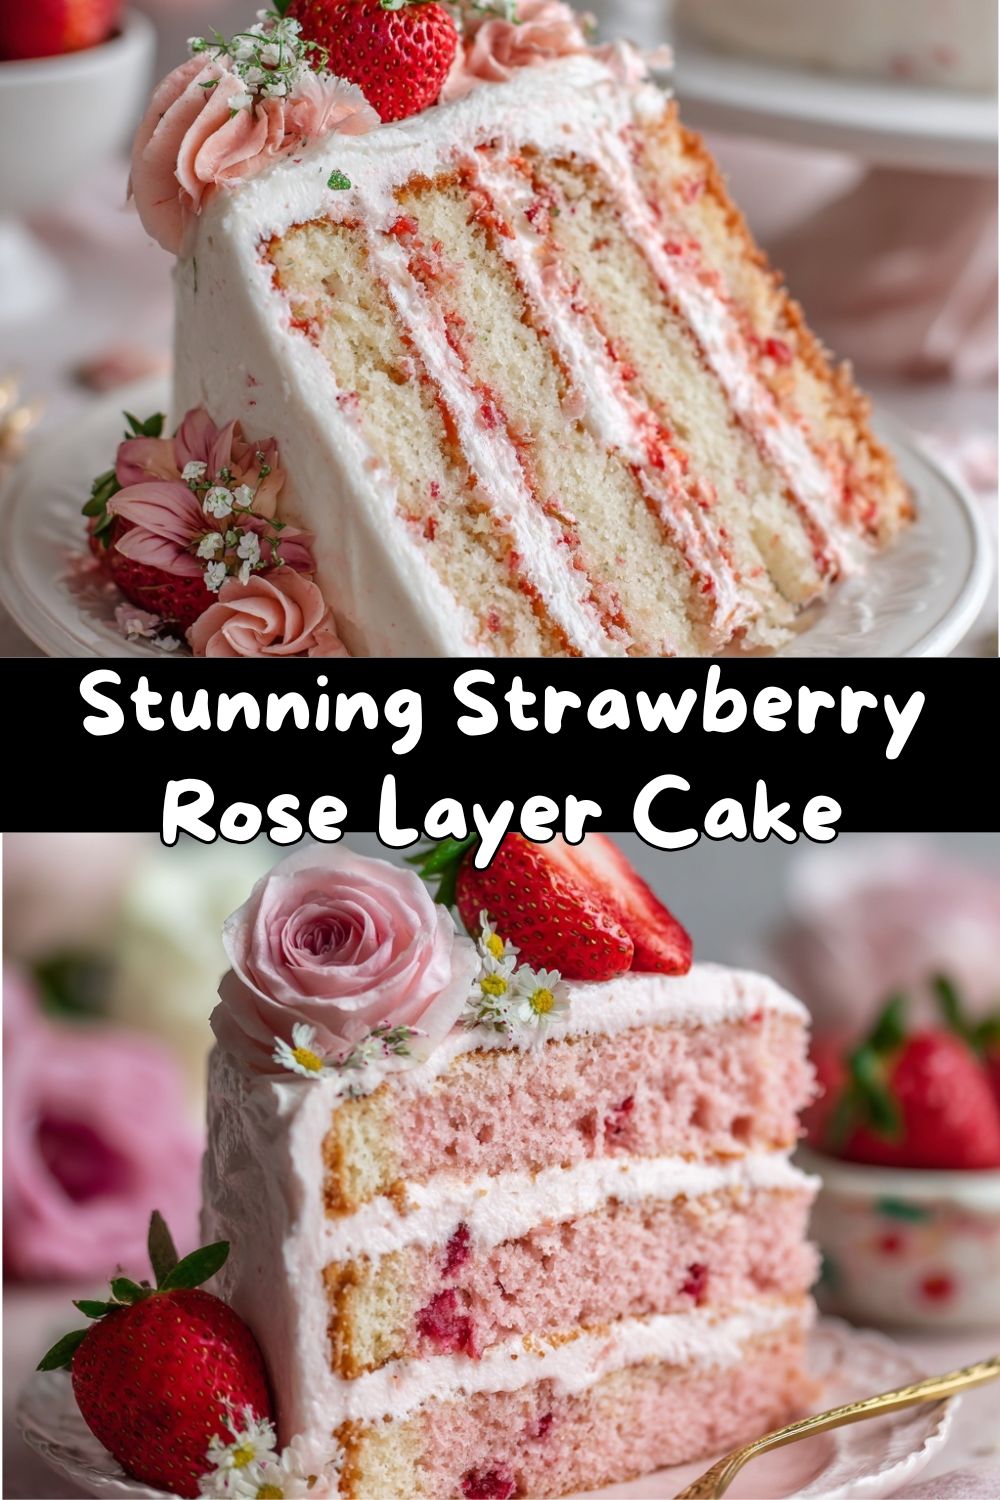
This isn’t just a dessert; it’s an experience. Imagine the sweet, sun-ripened flavor of strawberries holding hands with the delicate, romantic whisper of rose. It’s soft, it’s moist, it’s piled high with the silkiest, tangiest cream cheese frosting you’ve ever tasted. This cake is what happens when you decide that a regular Tuesday deserves a little magic, or when you want to bake all your love into layers for someone special.
I know floral flavors can sound a little fancy or intimidating, but trust me—this cake is as approachable as it is elegant. The rose water is a gentle background note, a soft perfume that lifts the strawberry flavor to something truly extraordinary. It’s a flavor combo that feels both nostalgic and completely new. So, whether you’re planning a birthday, an anniversary, a bridal shower, or just a “treat yourself” afternoon, this is the recipe. Let’s preheat those ovens, put on our favorite apron (the messy one is fine!), and make something stunning together.
The Cake That Almost Wasn’t: A Kitchen Memory
I have to confess, this cake was born from a happy little kitchen accident. Years ago, I was testing a classic strawberry cake for my grandma’s birthday. She adores anything berry-filled. In my classic Emily-style frenzy (think: three recipes going at once, flour definitely on my nose), I reached for the vanilla extract and grabbed the wrong bottle. You guessed it—rose water.
I didn’t realize my mistake until I took the first bite of the finished cake. My heart sank for a second… and then soared. It was incredible! The rose didn’t overpower; it complemented the strawberries in a way I’d never imagined. It tasted like the essence of a spring garden. My grandma, who has the discerning palate of a five-star critic (as all grandmas do), took one bite, her eyes lit up, and she said, “Now this tastes like a celebration.” That moment of serendipity stuck with me. It reminded me that sometimes the best creations come from embracing our happy little mistakes. Every time I bake this cake now, I think of her and that wonderful, fragrant surprise.
Gathering Your Flavor Builders: The Ingredients
Here’s everything you’ll need to build this masterpiece. I’ve added my little chef notes to help you understand the “why” behind each item and give you some easy swaps!
For the Strawberry Cake:
- 2 ½ cups all-purpose flour: The sturdy yet tender foundation of our cake. For a slightly lighter crumb, you can swap ½ cup with cake flour.
- 2 ½ teaspoons baking powder: Our lift agent! Make sure yours is fresh for the best rise.
- ½ teaspoon salt: The flavor enhancer. It balances all the sweetness and makes the strawberry pop.
- ½ cup unsalted butter, softened & ½ cup vegetable oil: The dynamic fat duo! Butter gives incredible flavor, while oil guarantees that unbeatable, moist texture that stays soft for days. Don’t skip this combo.
- 1 ¾ cups granulated sugar: Sweetness and structure. We use a bit more sugar than some cakes to balance the tart berries.
- 4 large eggs, at room temperature: They bind, leaven, and add richness. Room temp eggs incorporate much more smoothly!
- 1 tablespoon vanilla extract: The warm background note that makes all baked goods taste more “complete.”
- ½ cup whole milk & ½ cup sour cream: Team Moisture! The sour cream adds a delightful tang and tenderizes the crumb like a dream. Full-fat Greek yogurt works in a pinch.
- 1 cup finely chopped fresh strawberries OR strawberry puree: The star! Fresh, ripe berries are ideal. If using puree (just blend berries until smooth), the cake will have a more uniform pink color and intense flavor.
- Optional: Pink gel food coloring: A tiny drop can boost that lovely strawberry blush. Gel is best as it doesn’t thin the batter.
For the Rose-Water Cream Cheese Frosting:
- 8 oz full-fat cream cheese, softened: The tangy, creamy base. Full-fat is non-negotiable for stability and flavor.
- ½ cup unsalted butter, softened: Combined with cream cheese, it creates a frosting that’s pipeable, stable, and lush.
- 4 cups powdered sugar, sifted: Sweetens and thickens. Sifting prevents lumps for a silky-smooth finish.
- 1 teaspoon rose water (adjust to taste): Start here! Rose water potency varies by brand. We’ll add it slowly and taste as we go—you want a gentle floral hint, not a soapy perfume.
- ½ teaspoon vanilla extract: A classic pairing that rounds out the floral edge.
- Pinch of salt: The secret weapon to cutting the sweetness and making the flavors sing.
Let’s Bake! Step-by-Step Instructions (With All My Chefy Secrets)
Follow these steps, and you’ll have perfect layers. I’m chatting you through every part!
- Prep Like a Pro: Preheat your oven to 350°F (175°C). Now, grease AND line three 8-inch round cake pans with parchment paper circles. This double security system is your guarantee of effortless release. Trust me on this.
- Mix the Dry Team: In a medium bowl, whisk together your flour, baking powder, and salt. Give it about 30 good whisks to aerate and combine. Set this aside.
- Cream the Butter & Sugar: In your stand mixer or a large bowl with a hand mixer, beat the softened butter, oil, and granulated sugar together on medium-high speed for a full 3-4 minutes. We’re not just mixing; we’re creaming until it’s pale, fluffy, and almost white. This incorporates air, which is key for a light cake.
- Incorporate the Eggs & Vanilla: Add your room-temperature eggs one at a time, beating well after each addition. Scrape down the bowl! Then beat in the vanilla. Your mixture should be gloriously smooth and emulsified.
- Combine Wet & Dry (The Chef’s Way): With the mixer on low, add about one-third of your dry flour mixture. Mix until just combined. Now, add ALL of the milk and sour cream, mixing until mostly blended. Follow with the remaining flour in two additions, mixing just until no dry pockets remain. Overmixing at this stage leads to a tough cake. Be gentle!
- Fold in the Strawberries: Take the bowl off the mixer. Using a flexible spatula, gently fold in your chopped strawberries or puree (and food coloring if using) until evenly distributed. The batter will be thick and beautiful.
- Bake: Divide the batter evenly between your three prepared pans. I use a kitchen scale for perfect layers, but eyeballing works too! Smooth the tops. Bake for 25-30 minutes. The cake is done when the tops spring back lightly to the touch and a toothpick inserted in the center comes out with a few moist crumbs (not wet batter).
- The Most Important Step – COOL: Let the cakes cool in their pans on a wire rack for 15 minutes. Then, run a knife around the edges, invert them onto the rack, peel off the parchment, and let them cool COMPLETELY before frosting. I’m serious! Warm cake melts frosting into a sad puddle.
- Make the Dreamy Frosting: While the cakes cool, beat the softened cream cheese and butter together until completely smooth and creamy, about 2 minutes. Gradually add the sifted powdered sugar on low speed (to avoid a sugar cloud!), then increase speed to combine. Add the vanilla, salt, and ½ teaspoon of the rose water. Beat for 2-3 minutes until fluffy. TASTE. Want more rose? Add the remaining ½ teaspoon, a few drops at a time, beating and tasting after each addition.
- Assemble Your Masterpiece: Place your first cake layer on a plate or cake stand. Dollop a generous amount of frosting and spread it evenly to the edges. Repeat with the second layer. Add the final layer top-side-down (this gives you a perfectly flat top!). Spread a thin “crumb coat” of frosting over the entire cake and chill for 15 minutes to lock in crumbs. Then, finish with the remaining frosting, smoothing or swirling as you like.
- Decorate & Shine: Top with fresh strawberries, edible rose petals, or a simple sprinkle of freeze-dried strawberry powder. Step back and admire your work!
How to Serve This Stunner
Presentation is part of the joy! Use a sharp, thin-bladed knife (dip it in hot water and wipe dry between slices) for clean cuts. This cake is rich, so I find thin slices are perfect. Serve it on pretty plates with a cup of Earl Grey tea, a glass of chilled Prosecco, or simply a cold glass of milk for the ultimate comfort. It’s a total showstopper as the centerpiece of a dessert table—expect oohs and aahs.
Make It Your Own: Delicious Recipe Variations
Love this recipe? Here’s how to twist it!
- Lemon Rose Twist: Add the zest of one lemon to the cake batter and use lemon juice instead of milk. It creates a bright, vibrant strawberry-lemon-rose flavor that’s absolutely divine.
- Vanilla Bean Simplicity: Not a rose fan? Simply omit the rose water and add the seeds from one vanilla bean pod (or an extra teaspoon of extract) to the frosting for a pure Strawberry Vanilla Cake.
- Berry Medley: Replace half the strawberries with raspberries or blackberries in the puree for a deeper, mixed-berry flavor profile.
- Dairy-Free & Vegan-Friendly: Use your favorite plant-based butter and milk. For the eggs, a commercial egg replacer or flax eggs work well. For the frosting, a thick, high-fat vegan cream cheese alternative will do the trick!
- Mini Cake Adventure: Bake the batter in 24 cupcake liners for about 18-20 minutes. Frost each one for gorgeous, individual Strawberry Rose Cupcakes.
Chef Emily’s Notes & Kitchen Stories
This cake has been my signature celebration dessert for years, and it’s evolved in small ways. I used to use only butter, but adding oil was a game-changer for moisture. I also started using a combination of puree and chopped berries for the best of both worlds: intense flavor and little juicy pockets. The biggest lesson? Don’t rush the cooling. I once tried to frost a slightly warm layer in a time crunch… let’s just say it turned into a delicious “naked cake” because the frosting slid right off! Now I use the cooling time to tidy up and brew a cup of tea. Patience is a secret ingredient.
Your Questions, Answered: FAQs & Troubleshooting
Q: My cake is dense/gummy. What happened?
A: This usually means the batter was overmixed after adding the flour, or the baking powder is old. Always mix wet and dry ingredients just until combined, and check your leavener’s expiration date!
Q: Can I use frozen strawberries?
A> Absolutely! Thaw them completely, drain the excess liquid (you can reduce this liquid into a syrup for brushing on the cake layers if you’re feeling fancy!), and chop or puree as directed.
Q: My frosting is too soft/runny. How can I fix it?
A> First, ensure your butter and cream cheese were just softened, not melted or greasy. If it’s still soft, chill the mixing bowl and beaters for 10 minutes, then re-whip. You can also add a little more sifted powdered sugar, ¼ cup at a time, until it firms up.
Q: The rose water tastes like soap/perfume. Did I use too much?
A> Potency varies wildly by brand. Always start with less (½ tsp), taste, and add drop by drop. The flavor should be a subtle background note. If it’s too strong, you can try to balance it by adding a bit more cream cheese, vanilla, or a squeeze of lemon juice to the frosting.
Nutritional Information (Approximate)
Here’s a rough breakdown per slice (based on 12 servings). Remember, this is a celebratory treat meant to be enjoyed mindfully and shared with loved ones!
- Calories: ~420
- Total Fat: 20g
- Saturated Fat: 10g
- Cholesterol: 85mg
- Sodium: 180mg
- Total Carbohydrates: 56g
- Dietary Fiber: 1g
- Sugars: 39g
- Protein: 4g
Final Thoughts from My Kitchen to Yours
Baking this Strawberry Rose Layer Cake is more than just following a recipe; it’s an act of creating joy. It’s about the scent of strawberries filling your kitchen, the satisfaction of stacking those perfect layers, and the pure happiness of sharing something beautiful and delicious with people you love. Don’t be intimidated by the layers or the floral note—this cake is built for bakers of all levels. So go for it! Embrace the process, maybe even make your own happy little “mistake,” and most importantly, have fun. I can’t wait for you to try it. Now, go make something delicious—and be sure to tag me if you do! Happy baking, friend.
With love and a sprinkle of sugar,
Emily