Let’s Jump on This Delicious Bandwagon!
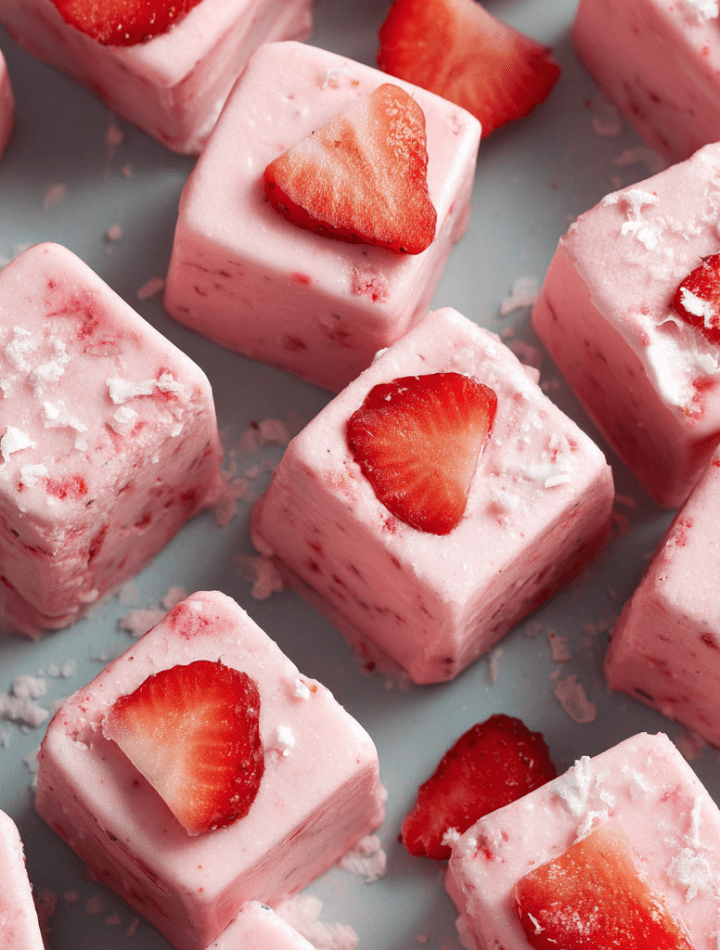
Hey, friends! Chef Emily here. Raise your hand if your social media feed has been taken over by adorable, bite-sized frozen treats lately. 🙋♀️ Mine too! First it was whipped coffee, then baked oats, and now… the glorious, simple, utterly genius Strawberry Yogurt Ice Cube.
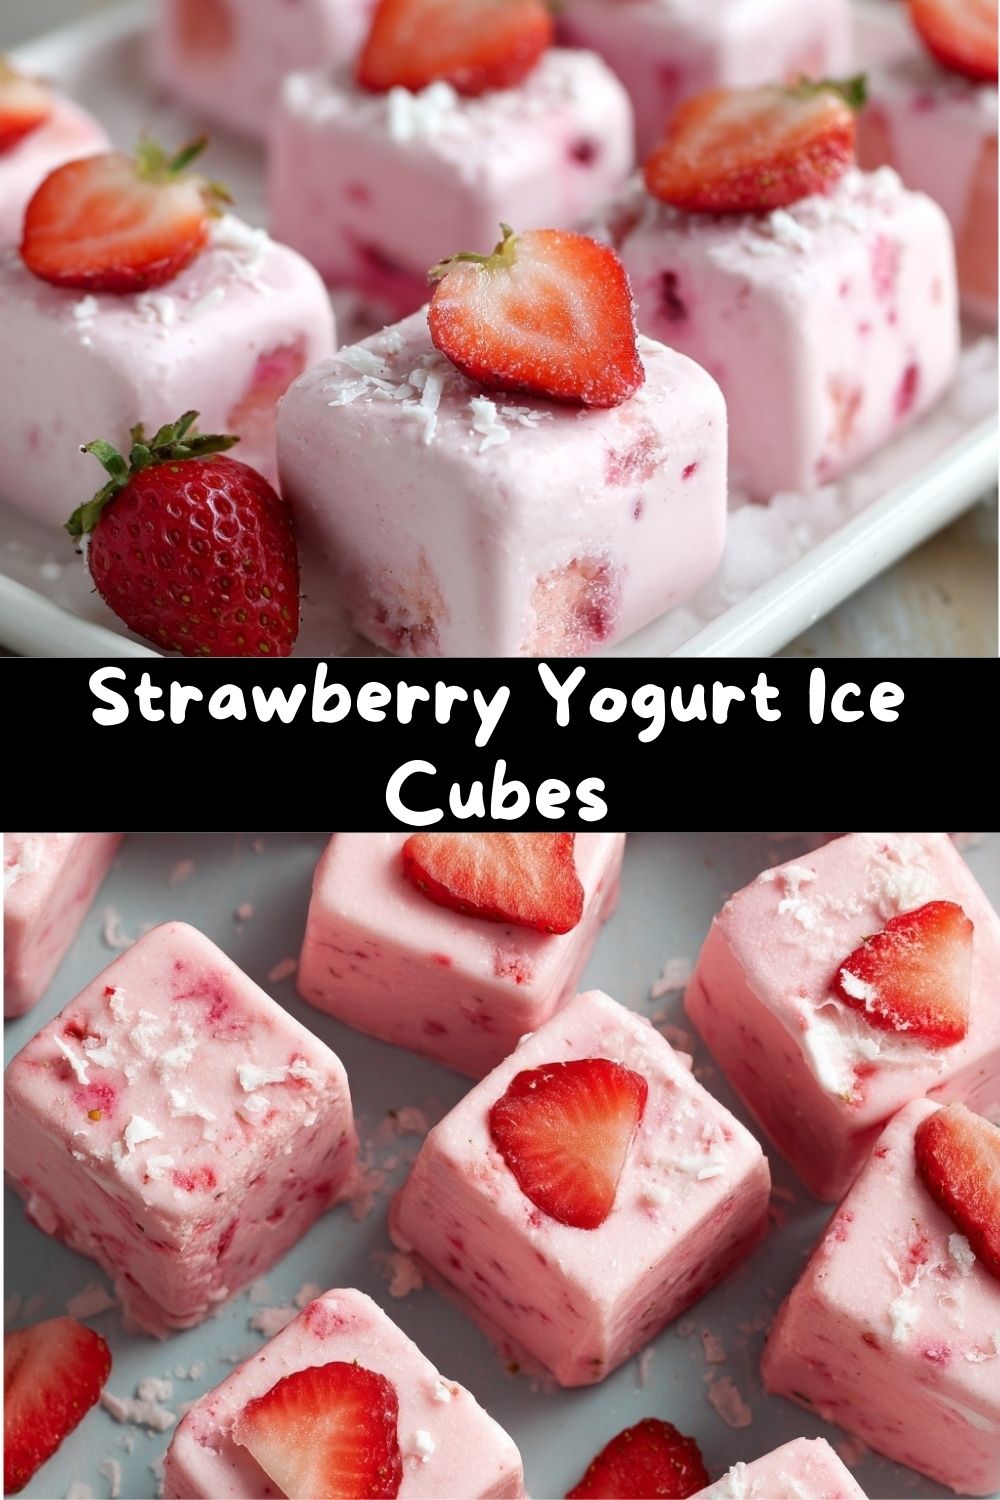
I’ll be the first to admit I sometimes side-eye a viral food trend. (Remember the cloud bread era?) But this one? This one stopped my mid-scroll and made me sprint to the kitchen. We’re talking about blending juicy strawberries into creamy yogurt, freezing them into perfect little pops, and having a stash of the most satisfying snack known to humankind right at your fingertips.
These aren’t just cute; they’re a total game-changer for hot afternoons, lunchbox surprises, or when you need a sweet bite that won’t derail your day. They’re cold, creamy, packed with protein, and taste like a strawberry cheesecake you can eat by the handful. Intrigued? I knew you would be. Let’s ditch the complicated recipes and get back to the pure, joyful basics. Grab your blender and your favorite ice cube tray—we’re making magic.
My Love Affair with Frozen Treats (It All Started with Grandma)
This trend hit me right in the nostalgia. Long before fancy gelato shops, my summer happiness came from my grandma’s “fancy ice cubes.” She’d mix leftover peach juice or mashed berries into a little sour cream or whipped topping (it was the 90s!) and freeze them in her old metal tray. To me, they were gourmet jewels.
I’d sit on her porch swing, legs swinging, slowly letting each tiny, frosty cube melt on my tongue while she told stories. It wasn’t about the ingredients; it was about the feeling—the creativity of using what you have, the anticipation of waiting for them to freeze, and the shared joy of a simple, cold treat on a hot day.
These strawberry yogurt cubes are the grown-up, healthier, and even more delicious version of that memory. They capture that same spirit of playful, no-fuss kitchen fun. Every time I pop one out of the tray, I get a little flash of that porch swing and a big smile. Food memories are the best, aren’t they?
Gather Your Simple, Star Ingredients
Here’s the beautiful part: you likely have everything you need already. This is a blueprint for joy, so feel free to play!
- 1 cup fresh strawberries, hulled and chopped – The star! Ripe, red berries give the best flavor and natural sweetness. Frozen work in a pinch—just thaw them first so you don’t water down the mix.
- 1 cup Greek yogurt – I use full-fat plain Greek yogurt for ultimate creaminess and a protein punch. The tang balances the sweet berries perfectly. Chef’s Insight: Greek yogurt is thicker than regular, so your cubes stay creamy, not icy. Vanilla yogurt is a great shortcut if you want extra sweetness!
- 1–2 tablespoons honey or maple syrup – Optional, but recommended. Taste your berry-yogurt blend before freezing. If your strawberries are super sweet, you might skip it. I love a tablespoon of raw honey for its floral notes. Maple syrup keeps it vegan!
- 1 teaspoon vanilla extract – Also optional, but a game-changer. This is my secret weapon! It rounds out the flavors and makes the whole thing taste like dessert. Pure vanilla extract, please!
Fun Topping Bar (Go Wild!)
- Mini chocolate chips – A no-brainer. They add little bursts of chocolatey goodness.
- Crushed granola – For a crunchy texture that’s just *chef’s kiss*.
- Coconut flakes – Toasted or not, they add a tropical vibe.
- Chia seeds or hemp hearts – A sneaky sprinkle of extra nutrients.
- A tiny drizzle of melted peanut butter – Trust me on this.
Let’s Make These Little Bites of Heaven: A Step-by-Step Guide
This is so easy, you’ll have it memorized after one batch. Here’s how we get from fruit to freezer fame:
- The Perfect Blend. Toss your chopped strawberries, yogurt, sweetener (if using), and vanilla into your blender or food processor. Now, here’s my pro tip: blend until completely, utterly smooth. We’re not going for a chunky smoothie texture. A silky-smooth puree ensures each cube is uniform and luxuriously creamy. Give it a good minute of blending, scraping down the sides as needed.
- Taste and Tweak (The Best Part!). Dip a spoon in! Does it make you do a happy dance? If not, adjust. Need more sweet? Add a bit more honey. Want more berry flavor? Toss in a few more strawberries. This is your creation.
- Choose Your Mold. Grab a clean ice cube tray or silicone mold. Silicone is my MVP here—pop-out perfection every time. If you’re using a plastic tray, a quick spritz of cooking spray can help, but it’s not always necessary with this creamy mix.
- The Fill-Up. Pour your gorgeous pink puree into the molds. For less mess, I use a small measuring cup with a spout or even a piping bag. Fill them almost to the top, but not overflowing.
- Top It Off (Optional but Fun!). Before freezing, sprinkle on your toppings! A few mini chips, a pinch of granola. This presses them in so they stick. You can also do this after freezing with a drizzle of melted chocolate for a different effect.
- The Big Freeze. Carefully transfer the tray to a flat spot in your freezer. Let them set for at least 3 hours, but ideally overnight. Patience, my friend! You want them solid.
- The Grand Reveal. Once frozen, remove the tray. If using silicone, just flex and pop them out. For plastic, run the bottom of the tray under warm water for just 5-10 seconds to loosen. They should release easily! Transfer the cubes to a freezer bag or airtight container. They’ll keep happily for up to 2 months… if they last that long!
How to Serve Your Yogurt Ice Cubes (So Many Ways!)
The fun doesn’t stop at popping them straight from the freezer (though that’s a solid 10/10 move). Here’s how to level up:
- The Straight-Up Snack: Let a few cubes sit on a plate for 2-3 minutes to soften slightly. They become like mini frozen yogurt bites. Perfect for portion control!
- The Smoothie Booster: Toss 3-4 cubes into your morning blender instead of fresh yogurt and ice. They’ll make your smoothie extra cold, thick, and flavorful.
- The “Fancy” Dessert: Arrange a few cubes in a small bowl. Drizzle with honey, sprinkle with crushed pistachios, and add a fresh mint leaf. Instant restaurant-worthy dessert!
- The Lunchbox Hero: Pack a small reusable container with 4-5 cubes. By lunchtime, they’ll be the perfect slushy, creamy treat for kids and adults alike.
- The Cocktail/ Mocktail Mixer: Drop a couple of cubes into a glass of lemonade, iced tea, or even prosecco for a fruity, creamy twist that slowly flavors your drink.
Mix It Up! 5 Delicious Twists on the Trend
Once you master the basic formula, the flavor world is your oyster! Try these swaps:
- Blueberry Lemon: Use blueberries and add the zest of one lemon to the blend. So bright and fresh!
- Peach Vanilla: Swap strawberries for ripe peaches (canned in juice, drained, work great off-season). Double the vanilla. Taste of summer!
- Chocolate Peanut Butter Banana: Use a ripe banana instead of berries, add a tablespoon of cocoa powder and a tablespoon of peanut butter to the blend. Unreal.
- Dairy-Free/Vegan: Use a thick, creamy plant-based yogurt (coconut or cashew-based are fantastic) and maple syrup. It works perfectly!
- “Cheesecake” Style: Add a tablespoon of cream cheese to the blender with the strawberries. Thank me later. For a topping, crush up graham crackers and sprinkle on before freezing.
Emily’s Kitchen Notebook
Confession time: My first batch? I got impatient and tried to pop them out after 90 minutes. Let’s just say I had a very delicious, very pink smoothie puddle instead of cubes. Lesson learned! Freezing is not a step to rush.
This recipe has evolved in my kitchen from a “let’s try this trend” to a staple. I now keep a batch of the plain strawberry and a batch of the chocolate-peanut butter banana in the freezer at all times. They’ve saved me from countless afternoon vending machine trips and have been a lifesaver for quick, healthy snacks for my niece and nephew.
The biggest hack? Making a double batch. It takes literally two more minutes of effort, and you’re set with snacks for weeks. Go big, you won’t regret it.
Your Questions, Answered!
- Q: Why are my cubes icy and not creamy?
A: This usually means the mixture wasn’t blended smoothly enough, or you used a regular (non-Greek) yogurt which has more water. Next time, blend until supersmooth and use thick Greek yogurt or strain regular yogurt through a cheesecloth for an hour first. - Q: Can I use frozen fruit?
A: Yes, but thaw it completely and drain any excess liquid first. Otherwise, you’ll add too much water to the mix, leading to icy cubes. - Q: How do I store them so they don’t stick together?
A: After popping them out, store the cubes in a single layer in a container, or in a freezer bag with the air pressed out. If they’re fully frozen, they shouldn’t stick too much. - Q: My cubes are too tart/sour! How can I fix it?
A: No worries! Let the cubes thaw just enough to be mashable. Mash them all back into a bowl, whisk in a little more honey or maple syrup, and re-freeze. It’s a great learning moment for your palate for next time.
Nutritional Information*
*Please note: This is an estimate for 3 plain strawberry yogurt ice cubes (approx. 1 oz each), based on using full-fat plain Greek yogurt and 1 tbsp honey. Values will change with substitutions and toppings.
- Calories: 60
- Total Fat: 1.5g
- Saturated Fat: 1g
- Cholesterol: 5mg
- Sodium: 15mg
- Carbohydrates: 8g
- Fiber: 0.5g
- Sugars: 6g (Includes 4g natural sugar from strawberries & yogurt)
- Protein: 4g
These little guys are a fantastic source of protein and calcium from the yogurt, and vitamin C from the strawberries. They’re a satisfying snack that balances sweetness with substance!
Final Thoughts from My Kitchen to Yours
And there you have it! The viral Strawberry Yogurt Ice Cubes, demystified and delivered with a whole lot of love from my messy kitchen to yours. What I adore most about this trend is its accessibility. It doesn’t require special skills or equipment, just a desire to make something joyful and delicious.
This recipe is a reminder that the best foods are often the simplest. They’re the ones that bring a bit of cool relief, a moment of sweetness, and a spark of creativity to your day. I hope you’ll give them a try, make them your own with the variations, and maybe even start a new little food tradition of your own.
If you do make them, I’d LOVE to see your creations! Tag me @TastyChow on Instagram so I can cheer you on. Now, go freeze something fabulous!
With love and a fully stocked freezer,
Emily 🍓❄️