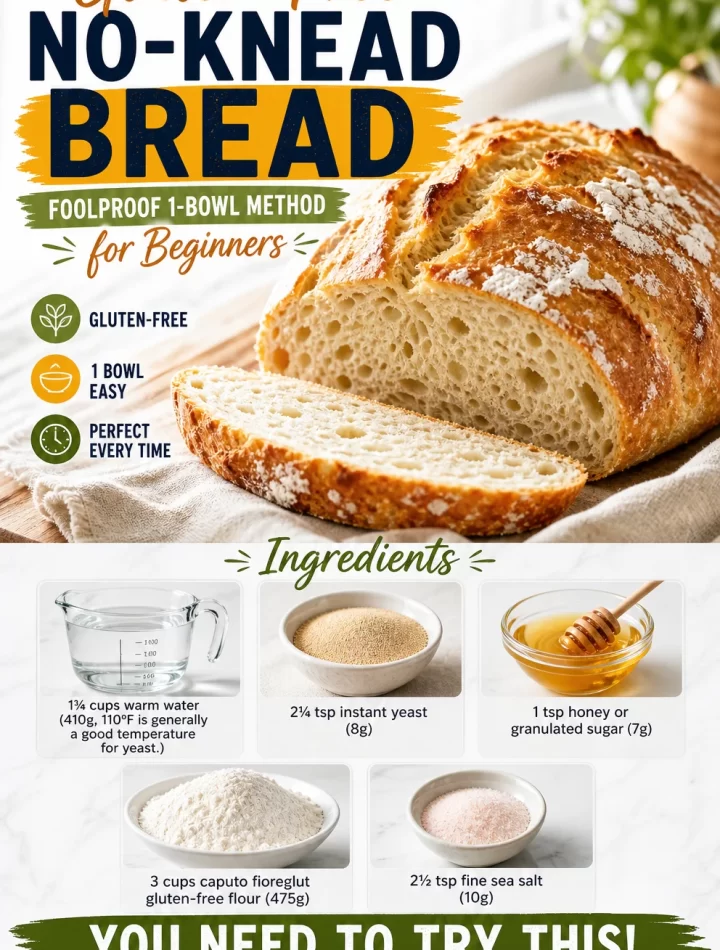
Gluten-Free No-Knead Bread: A Simple Recipe for Deliciousness!
Hey there, fellow food lovers! 👋 Today, I’m bursting to share something really special with you all—Gluten-Free No-Knead Bread! If you’re like me and have a soft spot for freshly baked bread, this recipe is a game changer. Imagine the warm, crusty exterior giving way to a soft, airy crumb, all while being completely gluten-free. You won’t just be baking bread; you’ll be creating memories, filling your home with that irresistible aroma, and delighting friends and family without any fuss. Plus, the best part? No kneading involved!
Let’s Dough It Together!
You might be wondering, “What’s the deal with no-knead bread?” Well, let me tell you—it’s all about simplicity and patience. This style of bread uses time rather than elbow grease to develop gluten-free dough into a delightful loaf. So grab your apron, and let’s dive into a baking adventure that even beginners can master!
Personal Story: The Bread that Brought Us Together
I’ll never forget the first time I baked bread with my Grandma. It was a chilly Saturday morning, and we were cozied up in her small kitchen, flour dusting the counters like a light snow. She taught me that baking isn’t just about following a recipe; it’s about creating an atmosphere of love, laughter, and often, trial and error. Every loaf we pulled from the oven brought the family together, whether it was for Sunday brunch or a quiet evening at home.
Fast forward to today, where I’ve swapped Grandma’s traditional bread recipe for my gluten-free twist. With so many of my friends going gluten-free these days, I knew I had to come up with something that could recreate those cherished moments around the table. This no-knead bread is not just a recipe; it’s a piece of my heart that I get to share with all of you.
Ingredients: Everything You Need to Get Started
Here’s what you’ll need to whip up this delicious Gluten-Free No-Knead Bread:
-
Gluten-Free Flour Blend:
- Look for a blend that contains xanthan gum for better texture. You can make your own mix if you prefer, or substitute with almond flour for a nutty flavor.
-
Warm Water:
- The warmth activates the yeast for that perfect puffiness. Be careful not to use water that’s too hot, as it can kill the yeast.
-
Active Dry Yeast:
- Make sure your yeast is fresh for the best rise. Substitute with instant yeast if that’s what you have on hand; just skip the activation step before mixing.
-
Salt:
- A vital ingredient for flavor. If you’re watching your sodium intake, consider using a lower-sodium variety or even salt alternatives.
-
Honey or Maple Syrup:
- This adds a touch of sweetness that balances the flavors. If you’re vegan, maple syrup is the perfect replacement.
-
Olive Oil:
- This helps keep the bread moist and gives it a lovely flavor! You can swap it with melted coconut oil if you’re after a different profile.
That’s it! With these key ingredients, you’ll be well on your way to baking up a storm.
Step-by-Step Instructions: Homemade Bread Made Easy
Now, let’s get to the fun part—baking! Here are your step-by-step instructions for making this delightful bread:
-
Mix the Dry Ingredients:
In a large mixing bowl, whisk together the gluten-free flour blend, salt, and active dry yeast. This simple step ensures that the yeast is evenly distributed throughout the flour, promoting a lovely rise.Chef Tip: Use a whisk! It incorporates air into the mix, giving your bread a lighter texture.
-
Combine Wet Ingredients:
In a separate bowl, mix warm water with honey (or maple syrup) and olive oil. Stir until combined. -
Mix It All Together:
Pour the wet ingredients into the dry mixture. Stir until fully combined and the dough is stretchy and smooth. -
Let It Rise:
Cover the bowl with a clean kitchen towel or plastic wrap and let it rise in a warm spot for 1-2 hours. The goal is for the dough to roughly double in size.Chef Hack: If your kitchen is on the cooler side, preheat your oven to 200°F (93°C) for a few minutes, then turn it off and place your dough inside to rise.
-
Shape the Dough:
Once risen, gently flour your work surface with gluten-free flour, and transfer the dough to it. Don’t overwork it! Shape into a rustic round loaf. -
Final Rise:
Place the shaped dough on parchment paper and cover it with a towel for an additional 30-60 minutes. The bread will continue to rise a little more! -
Preheat Your Oven:
Preheat your oven to 450°F (232°C). Place a cast-iron skillet or Dutch oven inside while it heats (not necessary, but this creates a great crust). -
Bake It Up:
Carefully remove the hot skillet from the oven and lift the parchment paper with the dough into it. This will keep the steam in and create a beautiful crust. Cover with a lid and bake for 30 minutes. -
Finish Baking:
Remove the lid and bake for an additional 15-20 minutes until the crust is golden brown.Chef Insight: The internal temperature of the bread should reach 200°F (93°C) for doneness!
-
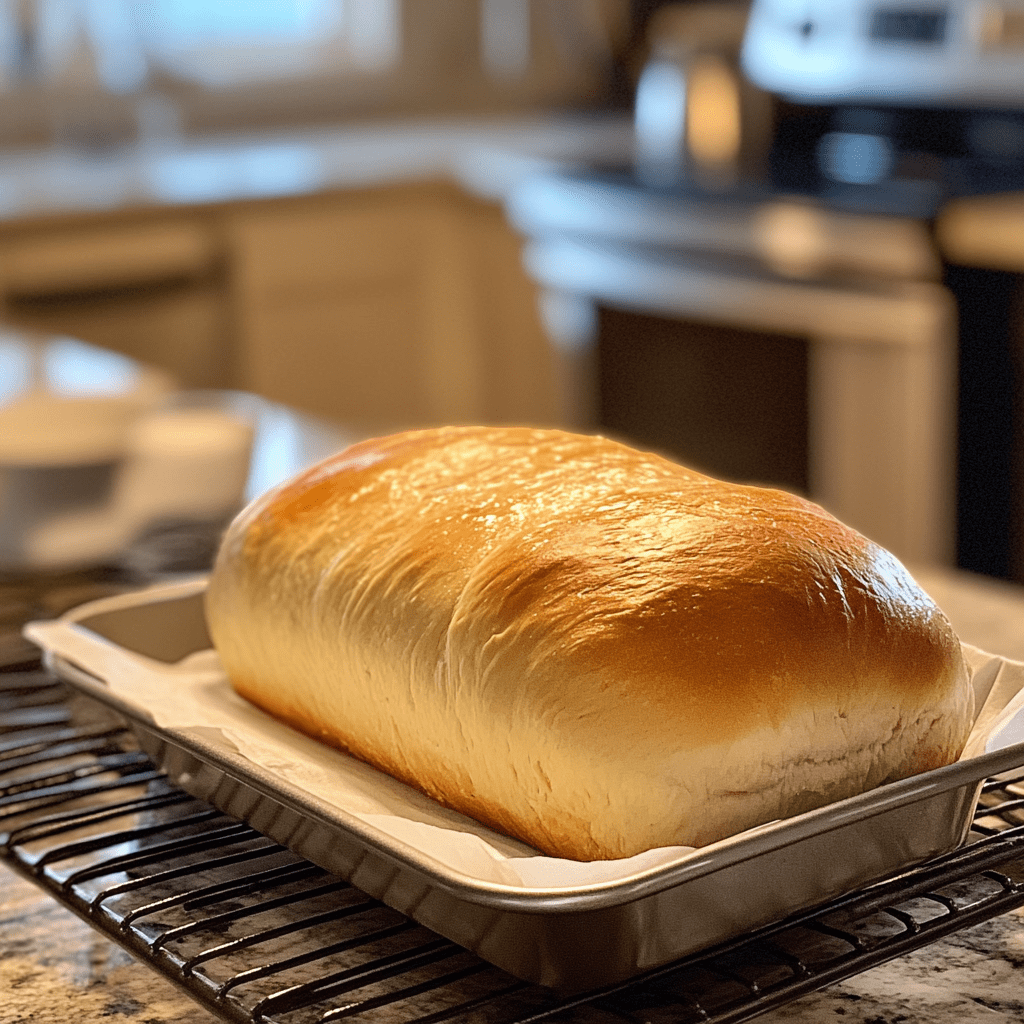
Cool It Down:
Once out of the oven, transfer the bread to a cooling rack and let it cool completely before slicing. This helps the internal crumb set perfectly.
Serving Suggestions: Plating Your Masterpiece
Now that you’ve got this beautiful loaf of Gluten-Free No-Knead Bread, how do you serve it? I love slicing it warm and spreading a generous pat of herb-infused butter or organic cream cheese on top. It’s perfect for a cozy dinner alongside a hearty soup or salad, or make it the star of brunch with a side of your favorite jam.
For a fun twist, try toasting slices of the bread and topping them with smashed avocado, a squeeze of lime, and a dash of chili flakes. Oh, and don’t forget to pair it with a steaming cup of coffee or herbal tea!
Recipe Variations: Get Creative!
While this no-knead bread is fantastic as is, here are some variations you can try out to mix things up a bit:
-
Herb-Infused Bread:
Add dried herbs like rosemary, thyme, or Italian seasoning to the dry ingredients for an aromatic twist. -
Cheesy Version:
Fold in shredded cheese (like cheddar or parmesan) into the batter before the final rise for a rich and savory flavor. -
Nutty Delight:
Incorporate sunflower seeds, pumpkin seeds, or chopped walnuts into the dough for added texture and flavor. -
Sweet Twist:
Add a handful of finely chopped dried fruit (like cranberries or apricots) or chocolate chips for a dessert-version of the loaf! -
Spicy Kick:
Mix in red pepper flakes for a bread with personality—great for serving alongside chili or spicy dishes.
Chef’s Notes: The Evolution of My No-Knead Bread
When I first started dabbling with gluten-free recipes, I encountered a mountain of failures. Dancing around the kitchen with flour flying all over, there were misshapen loaves, overly dense bricks, and a couple of “what was I thinking” moments. Each failure, however, brought me closer to perfecting a recipe that could evoke those fond memories of Grandma’s kitchen while accommodating modern dietary needs.
What I love about this no-knead method is how forgiving it is—it’s a perfect way to bake bread without needing to worry about getting things perfect. So don’t fret; embrace the chaos and enjoy the delicious results!
FAQs and Troubleshooting
1. My dough didn’t rise. What could have gone wrong?
Make sure your yeast is fresh! Also, check that your water wasn’t too hot or too cold. If your dough isn’t rising properly, consider giving it more time in a warm, draft-free spot.
2. The crust is too hard. How can I fix that?
Ensure you’re adding enough liquid or moisture during the baking process. You can also bake with a lid on for the first half of baking, then remove it for the second, allowing some steam to escape.
3. Why did my bread come out dense?
Dense bread can often be a result of not enough liquid or over-mixing. Make sure you’re measuring accurately and gently mixing to keep the air in the dough.
4. Can I freeze leftover bread?
Absolutely! Wrap the sliced or unsliced bread in plastic wrap and then in foil, or store in an airtight freezer bag. Thaw at room temperature or toast directly from frozen.
Nutritional Info
This Gluten-Free No-Knead Bread is not only delicious but also contains wholesome ingredients. While I don’t have the exact nutritional breakdown (that can vary based on your specific ingredients), here’s a rough estimate per slice (based on 12 slices):
- Calories: ~120
- Protein: ~3g
- Carbohydrates: ~20g
- Fiber: ~2g
- Fat: ~3g
This bread can easily fit into a balanced diet, providing energy and satisfaction for any meal!
Final Thoughts: Let’s Bake Together!
There you have it, friends—your go-to guide for creating a marvelous loaf of Gluten-Free No-Knead Bread! I hope you find joy in the process of making and sharing this deliciousness with others, just like I do. Remember, cooking is all about having fun, experimenting, and sometimes even making a mess.
So go ahead, embrace your inner baker, don your favorite apron, and get that delicious aroma wafting throughout your home. And don’t forget to let me know how your baking adventure turns out—I can’t wait to hear about the memories you create around your kitchen table!
Happy baking! 🍞💕 — Chef Emily
Print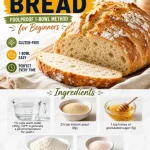
Gluten-Free No-Knead Bread
- Total Time: 60 minutes
- Yield: 12 slices 1x
- Diet: Gluten-Free
Description
A simple and delicious recipe for gluten-free no-knead bread with a warm, crusty exterior and soft, airy crumb.
Ingredients
- 3 cups Gluten-Free Flour Blend (with xanthan gum)
- 1 ½ cups warm Water
- 1 packet Active Dry Yeast (2 ¼ teaspoons)
- 1 teaspoon Salt
- 2 tablespoons Honey or Maple Syrup
- 2 tablespoons Olive Oil
Instructions
- Mix the Dry Ingredients: In a large mixing bowl, whisk together the gluten-free flour blend, salt, and active dry yeast.
- Combine Wet Ingredients: In a separate bowl, mix warm water with honey (or maple syrup) and olive oil. Stir until combined.
- Mix It All Together: Pour the wet ingredients into the dry mixture. Stir until fully combined and the dough is stretchy and smooth.
- Let It Rise: Cover the bowl with a clean kitchen towel and let it rise in a warm spot for 1-2 hours.
- Shape the Dough: Once risen, transfer the dough to it and shape into a rustic round loaf.
- Final Rise: Place the shaped dough on parchment paper and cover it with a towel for an additional 30-60 minutes.
- Preheat Your Oven: Preheat your oven to 450°F (232°C) with a cast-iron skillet inside.
- Bake It Up: Carefully place the dough into the hot skillet and cover with a lid; bake for 30 minutes.
- Finish Baking: Remove the lid and bake for an additional 15-20 minutes until the crust is golden brown.
- Cool It Down: Transfer the bread to a cooling rack and let it cool completely before slicing.
Notes
For added flavor, consider including herbs or shredded cheese. Wrap leftover bread tightly to freeze.
- Prep Time: 15 minutes
- Cook Time: 45 minutes
- Category: Bread
- Method: Baking
- Cuisine: Italian
Nutrition
- Serving Size: 1 slice
- Calories: 120
- Sugar: 3g
- Sodium: 200mg
- Fat: 3g
- Saturated Fat: 0.5g
- Unsaturated Fat: 2g
- Trans Fat: 0g
- Carbohydrates: 20g
- Fiber: 2g
- Protein: 3g
- Cholesterol: 0mg
Keywords: gluten-free, bread, no-knead, baking, easy recipe