Create Delicious Rice Ball Lunch Boxes That Will Make Lunchtime the Best Time!
Hey there, food enthusiasts! 👋 Today, we’re diving into a fun and fulfilling journey as we learn to make the adorable and utterly delicious rice ball lunch boxes! This isn’t just any dish; it’s a charming way to bring together creativity, flavor, and a sprinkle of nostalgia into your meals.
Introduction
Picture this: It’s a sunny afternoon, and you’re getting ready to pack your lunch for a picnic with friends or a busy day at work. What’s the ultimate thing that would bring a massive smile to your face? Well, for me, it’s a rice ball (or onigiri, as our Japanese friends call it). Shaped like little clouds and filled with delightful surprises, rice balls have this incredible ability to transport you back to simpler times—those carefree days of childhood when your mom lovingly packed your lunch with these delicious treasures.
Rice balls are incredibly versatile, inviting endless opportunities to express your culinary creativity! They’re the epitome of balance: not just savory or sweet, but a perfect blend of various flavors and textures. From tangy pickles to savory meats, creating a rice ball is like composing a delicious symphony in your kitchen! Today, I’m excited to walk you through my version of rice ball lunch boxes, perfect for kids and adults alike. Say goodbye to boring sandwiches and hello to a delicious world of rice balls!
Join me as we embark on this foodie adventure, exploring the heartwarming stories, easy-to-follow recipes, and useful tips that will make your meals shine. So, let’s gather around and get ready to roll some rice balls that’ll make your taste buds dance!
Personal Story
I still remember the first time I helped my grandmother make rice balls when I was about eight years old. We spent an entire Saturday afternoon in her cozy kitchen, the delightful aroma of freshly cooked rice filling the air. Grandma was a master at crafting these little treats, and she had a way of turning something simple into an event!
As I watched her carefully mold each ball into shape, she regaled me with stories of her childhood in Japan, where rice balls would often find a place in lunch boxes. I was captivated—mostly by her stories, but also by how she transformed plain rice into these joyful, lively snacks. We laughed when I accidentally fluffed the rice too fiercely, sending little grains flying everywhere. But Grandma just giggled, saying, “Well, you’re just adding seasoning with your enthusiasm!”
This memory instilled so much joy and love for cooking in my heart. Now, as I create my own rice ball lunch boxes, I feel her spirit guiding me, reminding me that cooking is about happiness, connection, and, of course, a little pinch of fun!
Ingredients
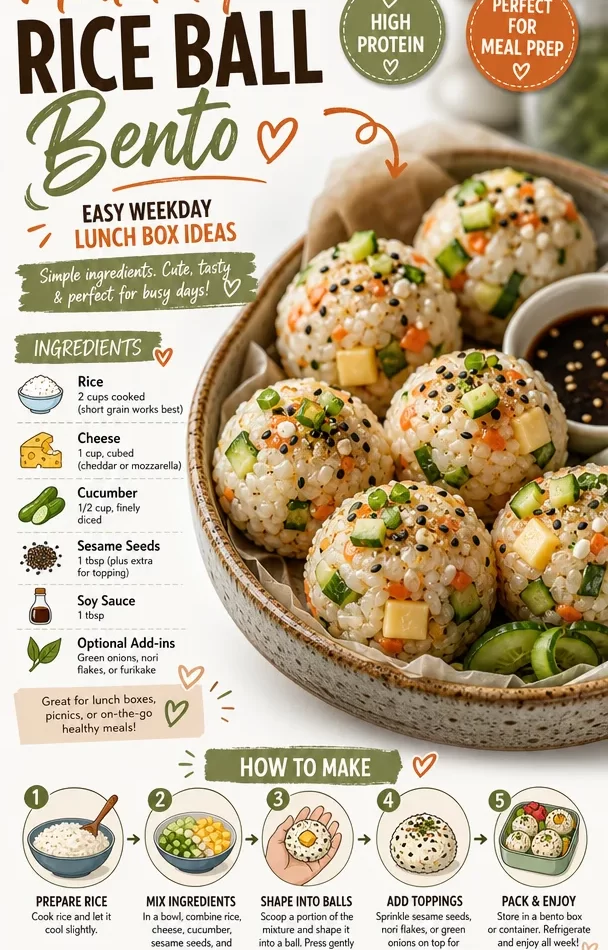
To create your dreamy rice ball lunch boxes, you’ll need the following ingredients:
-
Short-Grain Rice: Ideal for making sticky rice balls that hold their shape. If you can’t find short-grain, medium-grain rice works too! Just steer clear of long-grain as it tends to be less sticky.
-
Nori (Seaweed Sheets): These are essential for wrapping your rice balls and adding a salty kick. If you’re looking for alternatives, try using lettuce leaves or even chiffonaded spinach for a fresh touch!
-
Filling Options:
- Cooked Salmon: A classic filling that adds richness. You can swap in tuna or chicken salad if needed.
- Pickled Plum (Umeboshi): This tangy delight is a traditional choice—great for adding a zesty punch! A dollop of pesto can be a fun substitute.
- Vegetables: Consider using cooked carrots, peas, or even avocados; they add a pop of color and nutrients.
-
Sesame Seeds: These seeds are fantastic for topping your rice balls, adding a nutty flavor. For a different twist, try crushed peanuts or sunflower seeds.
-
Soy Sauce: A drizzle enhances all the flavors. Use tamari or coconut aminos for a gluten-free option.
-
Salt: A pinch is required for flavoring, but be sure to use it sparingly if you’re watching your sodium intake!
Step-by-Step Instructions
Let’s get our hands a little sticky and make some scrumptious rice balls step-by-step!
-
Cook the Rice:
- Rinse 2 cups of short-grain rice under cold water until it runs clear. This removes excess starch and ensures your rice balls are sticky enough.
- Cook according to package instructions, usually involving a 1:1.25 ratio of rice to water in a rice cooker or pot. Let it steam for about 10–15 minutes after cooking, covered.
-
Prepare the Filling:
- While the rice cooks, prepare your fillings. If using salmon, flake it into small pieces. If using pickled plums, remove the pit and chop finely.
- For vegetables, steam them until tender and season lightly with salt.
-
Moisten Your Hands:
- Once the rice is cooked, allow it to cool slightly—about 10 minutes. This is crucial; you don’t want to burn your fingers!
- Slightly wet your hands with water to prevent sticking—this is key for keeping the rice from clinging to your skin.
-
Shape the Rice Balls:
- Take a small handful of rice (about 1/4 cup). Press it into your palm to create a small cup.
- Place a spoonful of your chosen filling in the center and cover it with more rice, molding it into a ball shape. Aim for a nice, tight squeeze so it holds together but avoid mashing it flat!
-
Wrap in Nori:
- Cut your nori sheets into strips (about 2 inches wide). You can wrap a piece around the middle—this not only looks stylish but adds that perfect umami flavor too!
- If your rice balls are particularly soft, try using a small square of nori as a base to help hold them together.
-
Sprinkle and Serve:
- Finally, roll your rice balls in sesame seeds for that delightful crunch. Feel free to get creative! Sprinkle some furikake (a Japanese seasoning) or even crushed seaweed on top!
Serving Suggestions
Serving your rice ball lunch boxes is all about showcasing their charm! Here are some tips to present them beautifully:
-
Bento Box Style: Arrange rice balls in a colorful bento box, interspersed with colorful vegetables like cherry tomatoes, cucumber slices, or carrot sticks. This not only looks appealing but adds a nutrient boost!
-
Dipping Sauces: Offer small containers of soy sauce or spicy mayo on the side for extra flavors. Just be sure to keep the dips separate if you’re packing for lunch!
-
Garnishes: A sprinkle of edible flowers or fresh herbs can elevate the visual appeal. Plus, they bring a fresh essence to the dish!
Recipe Variations
Here are a few fun twists to customize your rice ball lunch boxes based on your preferences:
-
Sweet Rice Balls: Swap savory fillings for sweet options. Try using sweetened coconut flakes and a little brown sugar mixed in with the rice. You can even add chocolate chips for a delightful dessert twist!
-
Spicy Tuna: Mix canned tuna with spicy mayo (and a dash of Sriracha if you’re feeling bold) for a quick sushi-inspired filling.
-
Vegan Delight: For a plant-based option, load your rice balls with avocado, cucumber, and a sprinkle of sesame seeds. The creaminess of the avocado is divine!
-
Herbed Chicken: Use leftover rotisserie chicken mixed with herbs and cream cheese for a delectable filling. It gives a rich taste without any fuss!
-
Mediterranean Twist: Substitute traditional ingredients with olives, feta cheese, and roasted red pepper for a fresh take!
Chef’s Notes
Oh boy, what a journey it’s been with rice balls! I’ve had my fair share of flops (think exploding rice balls that went splat rather than round). But it’s all part of the process! Each time I make these little bundles of joy, I learn something new—like the importance of not overfilling (who knew?), or the right temperature for making sticky perfection.
Over the years, I’ve enjoyed experimenting, sometimes even hosting rice ball nights where friends and family can customize their own. It turns into a delightful bonding experience, filled with laughter and flavors!
FAQs and Troubleshooting
-
Why are my rice balls falling apart?
- Ensure that you’re using short-grain rice, which is stickier. If your rice is too dry, add a little water, and if too wet, let it cool before molding!
-
Can I make these ahead of time?
- Absolutely! For best results, keep them in an airtight container in the fridge for up to 3 days. Consider wrapping them in plastic wrap to maintain freshness.
-
What if I don’t like nori?
- No problem! Substitute with lettuce leaves for a fresh wrap or simply omit it altogether—those rice balls will still taste fantastic.
-
Can I freeze rice balls?
- Yes! Just wrap them tightly and store them in a freezer-safe bag. When ready to enjoy, let them thaw in the fridge overnight and reheat in the microwave or oven.
Nutritional Info (If applicable)
These delightful rice balls can be nutritious and fun! On average, one rice ball (without fillings) contains approximately:
- Calories: 200
- Carbs: 43g
- Protein: 4g
- Fat: 0.5g
- Fiber: 1g
Of course, the nutritional values will vary depending on your fillings and portion sizes. If you choose to include vegetables, meats, or specific sauces, it’s a good idea to adjust the counts accordingly. They can also be a great source of healthy carbs and, with the right fillings, pack a protein punch!
Final Thoughts
There you have it—your complete guide to crafting those delightful rice ball lunch boxes! I hope you feel inspired to create these little food gems filled with love, joy, and creativity. Not only will they brighten up your lunch, but they also serve as a reminder that cooking is about sharing joy and connection—one rice ball at a time!
So, grab your ingredients, gather your favorite fillings, and get rolling! Remember, there’s no right or wrong way—just lots of delicious possibilities. Happy cooking, and I can’t wait to see how your rice ball lunch boxes turn out. Don’t forget to share your adventures and tag me as you embark on this tasty journey! 🍙🥳
Print
Delicious Rice Ball Lunch Boxes
- Total Time: 50 minutes
- Yield: 4 servings 1x
- Diet: Vegetarian (optional fillings can be non-vegetarian)
Description
A charming way to bring together creativity, flavor, and nostalgia with cute and versatile rice ball lunch boxes.
Ingredients
- 2 cups Short-Grain Rice
- Nori (Seaweed Sheets)
- Cooked Salmon (or tuna/chicken salad)
- Pickled Plum (Umeboshi) or pesto
- Vegetables (e.g., cooked carrots, peas, avocado)
- Sesame Seeds
- Soy Sauce (or tamari/coconut aminos)
- Salt
Instructions
- Rinse 2 cups of short-grain rice under cold water until it runs clear.
- Cook according to package instructions (1:1.25 ratio of rice to water).
- Prepare your fillings while the rice cooks, flaking salmon and chopping pickled plums.
- Moisten your hands with water to prevent sticking after the rice cools for about 10 minutes.
- Take a small handful of rice and press it into your palm to create a small cup.
- Place a spoonful of filling in the center and cover it with more rice.
- Wrap in nori strips for style and umami flavor.
- Roll your rice balls in sesame seeds before serving.
Notes
Use short-grain rice for best results. You can customize fillings to preference.
- Prep Time: 30 minutes
- Cook Time: 20 minutes
- Category: Lunch
- Method: Boiling and Shaping
- Cuisine: Japanese
Nutrition
- Serving Size: 1 rice ball
- Calories: 200
- Sugar: 1g
- Sodium: 200mg
- Fat: 0.5g
- Saturated Fat: 0g
- Unsaturated Fat: 0g
- Trans Fat: 0g
- Carbohydrates: 43g
- Fiber: 1g
- Protein: 4g
- Cholesterol: 0mg
Keywords: rice balls, lunch boxes, onigiri, Japanese cuisine, easy recipes