No Knead Gluten Free Bread: An Amazing Ultimate Recipe
Hey there, fellow food lovers! If you’ve ever scoured the aisles for gluten-free goodies only to come home disappointed or if you’ve steered clear of baking bread due to the fear of kneading, fret not—today, we’re diving into a game-changing No Knead Gluten Free Bread recipe that will make your taste buds dance with joy! Let’s gather our ingredients and get to baking some irresistible bread that’s perfect for sandwiches, toasting, or enjoying fresh out of the oven.
Personal Story
I remember the first time I tried my hand at making gluten-free bread. It was during a cozy winter evening when the chill in the air made staying indoors imperative. My sister, who had just discovered she was gluten intolerant, was craving a hearty slice of bread to accompany her homemade soup. I thought, “How hard could it be?” Oh, little did I know!
I scoured the internet for recipes, mixing and measuring an array of ingredients, only to land on dough that seemed more like pancake batter than bread. After one too many unfortunate loaves that tasted like cardboard, I finally uncovered the secret: a no-knead method using gluten-free flour. The concept felt revolutionary! As I mixed the ingredients and watched the dough rise, I found joy in creating something delicious. When my sister took that first bite, the look of pure delight on her face made all the kitchen misadventures worth it. That moment solidified my mission to help others find success in the gluten-free baking world.
Ingredients
Let’s gather our ingredients! Here’s what you’ll need:
-
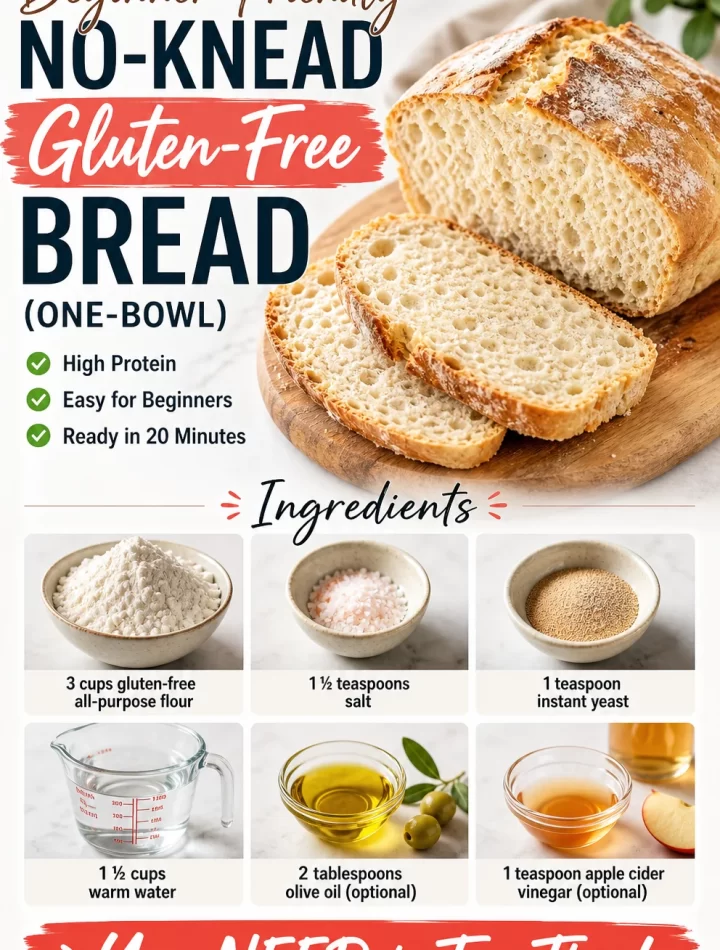
Gluten-Free All-Purpose Flour: This is the backbone of our bread. Look for blends made with rice flour, tapioca flour, and potato starch for the best results. If you need a substitution, you can try a homemade blend, but make sure it includes xanthan gum for elasticity.
-
Baking Powder: The magic leavener that helps the bread rise. Be sure to check your baking powder is gluten-free; most brands are, but it’s always good to confirm!
-
Salt: A vital ingredient that enhances the overall flavor of the bread. Feel free to use sea salt or kosher salt—both work well.
-
Ground Flaxseed: This provides a lovely nutty flavor and acts as a binding agent. If you’re out of flax, you can substitute it with chia seeds or even a store-bought egg replacer if you’re not vegan.
-
Water: Warm water activates the yeast and helps to hydrate the flour to create a nice dough. Make sure it’s warm to the touch, not hot!
-
Yeast: You can use active dry yeast or instant yeast. If you’re unsure, instant yeast is easier since it doesn’t require proofing—a total win for busy bakers!
-
Olive Oil: Adds moisture and flavor to our bread. Feel free to swap for melted coconut oil or melted butter if you prefer.
Step-by-Step Instructions
Now that we have everything ready let’s dive into the step-by-step process. Trust me; you don’t want to miss any of these tips!
-
Combine the Dry Ingredients: In a large mixing bowl, whisk together 3 cups of gluten-free all-purpose flour, 1 tablespoon of baking powder, 1 teaspoon of salt, and 2 tablespoons of ground flaxseed. This step is crucial—mix well to ensure everything is evenly distributed, avoiding any clumps of baking powder. Remember, a well-mixed dry mixture means a well-risen bread!
-
Mix the Wet Ingredients: In a separate bowl, combine 1 ½ cups of warm water, 1 packet (2 ¼ teaspoons) of yeast, and 2 tablespoons of olive oil. Stir gently and allow it to sit for about 5-10 minutes until it becomes frothy. This step is often referred to as “proofing” the yeast. If your mixture doesn’t foam up, your yeast might be expired—time for a new packet!
-
Combine Wet and Dry Mixtures: Once frothy, pour the yeast mixture into the dry ingredients and stir with a wooden spoon until a thick, sticky dough forms. You’re not aiming for a smooth texture—this dough is meant to be rustic! If you feel it’s too dry, don’t hesitate to add an extra splash of warm water.
-
Let it Rise: Cover the mixing bowl with a damp kitchen towel and let your dough rise for about 1 hour at room temperature. This will allow the yeast to do its magic, creating air bubbles that will give your bread lift and a chewy texture.
-
Prepare for Baking: Preheat your oven to 375°F (190°C). Grease a baking dish or line it with parchment paper. If you’re feeling fancy, you can use a Dutch oven for an even crustier exterior.
-
Shape the Dough: Once risen, gently transfer your dough into the prepared dish. With wet hands (to avoid stickiness), smooth out the top and form it into a nice shape. If you want an artisan-style look, score the top with a sharp knife in a few diagonal lines.
-
Bake That Bread: Place your loaf in the preheated oven and bake for 45-50 minutes, or until the top is golden brown and cracks sound hollow when tapped. The amazing aroma wafting through your home is just a delightful bonus!
-
Cool and Slice: After removing the bread, allow it to cool in the pan for about 10 minutes before transferring it to a wire rack to cool fully. This step is essential—slicing too early can yield a gummy interior!
Serving Suggestions
You’ve done all this hard work, and it’s time to enjoy your masterpiece! Slice your gluten-free bread and serve it warm with a generous spread of butter or your favorite jam. Nothing beats that first bite of fresh bread! It’s perfect alongside hearty soups, or you can use it for delicious sandwiches—think classic grilled cheese or a veggie-packed club sandwich! For a breakfast treat, toast up some slices and drizzle with maple syrup or top with avocado for a delicious twist.
Recipe Variations
Now that you’ve mastered this no-knead gluten-free bread, let’s explore some fun variations! Here are a few ideas to switch things up:
-
Herb and Garlic Bread: Add 2 tablespoons of dried herbs (like rosemary or thyme) and a teaspoon of garlic powder to the dry ingredients for a fragrant twist.
-
Cheesy Goodness: Mix in 1 cup of shredded cheese (like cheddar or mozzarella) for a cheesy bread that pairs wonderfully with soups.
-
Sweet Cinnamon Raisin Bread: Add ¼ cup of sugar, 1 tablespoon of cinnamon, and 1 cup of raisins to the dough to create a delightful breakfast option.
-
Nutty Seeds: Toss in a mix of your favorite seeds—like sunflower, pumpkin, or chia—into the dough for an added crunch and nutritional boost.
-
Savory Sun-Dried Tomatoes and Olives: Fold in chopped sun-dried tomatoes and pitted olives for a Mediterranean twist that’s bursting with flavor.
Chef’s Notes
Baking gluten-free can sometimes lead to unexpected surprises, and I’ve had my fair share of those! I recall one instance where I attempted to add xanthum gum to my dough only to realize I had grabbed a spice blend instead! The resulting dough was a slippery mess but ended up tasting surprisingly good with a touch of added spice! This is just a gentle reminder that sometimes being flexible in the kitchen can lead to delightful discoveries. Also, remember that not all gluten-free flours behave the same, so feel free to experiment with different brands until you find your perfect fit!
FAQs and Troubleshooting
-
Why did my bread not rise?
- If your bread doesn’t rise, double-check that your yeast is active. Also, be mindful of the temperature—if your kitchen is too cold, try placing the dough in a slightly warm spot to encourage rising.
-
My bread turned out too dense. What happened?
- Dense bread could be a result of too much flour. Make sure you’re using a proper scoop and level technique or even consider weighing your flour for accuracy.
-
Can I freeze this bread?
- Absolutely! To freeze, allow the bread to cool completely, then wrap it tightly in plastic wrap and aluminum foil. It’ll keep well in the freezer for up to 3 months.
-
How do I store leftovers?
- Store your leftover bread in an airtight container at room temperature for up to 3 days. For longer storage, slice and freeze as mentioned above.
Nutritional Info
While the exact nutritional information will vary depending on the specific brands of ingredients used, here’s a general idea per slice (assuming about 12 slices per loaf):
- Calories: Approximately 120
- Carbohydrates: 24g
- Protein: 3g
- Fat: 2g
- Fiber: 2g
This makes for a delightful and relatively guilt-free indulgence that you can feel good about!
Final Thoughts
So, there you have it—my ultimate no-knead gluten-free bread recipe that anyone can master, filled with nostalgic memories and delicious possibilities! Bake this bread when you need a warm hug after a long day, or serve it to friends at a brunch gathering. If you take away anything from this, remember that the kitchen is all about experimenting and enjoying the process.
I can’t wait to hear about your bread-making adventures! Whether it’s your first time or you’re a seasoned pro, let’s continue to explore the flavorful world of gluten-free baking together. Happy baking, and don’t forget to enjoy the journey along the way! 🍞❤️
Print
No Knead Gluten Free Bread
- Total Time: 65 minutes
- Yield: 12 slices 1x
- Diet: Gluten Free
Description
An easy no-knead gluten-free bread recipe that is perfect for sandwiches, toasting, or enjoying fresh out of the oven.
Ingredients
- 3 cups gluten-free all-purpose flour
- 1 tablespoon baking powder
- 1 teaspoon salt
- 2 tablespoons ground flaxseed
- 1 ½ cups warm water
- 1 packet (2 ¼ teaspoons) yeast
- 2 tablespoons olive oil
Instructions
- Combine the dry ingredients: In a large mixing bowl, whisk together the flour, baking powder, salt, and flaxseed.
- Mix the wet ingredients: In a separate bowl, combine the warm water, yeast, and olive oil. Allow it to sit until frothy.
- Combine the wet and dry mixtures: Pour the yeast mixture into the dry ingredients and stir until a thick, sticky dough forms.
- Let it rise: Cover the bowl and let the dough rise for about 1 hour at room temperature.
- Prepare for baking: Preheat the oven to 375°F (190°C) and grease a baking dish.
- Shape the dough: Transfer the dough to the prepared dish and smooth out the top.
- Bake that bread: Bake for 45-50 minutes until golden brown.
- Cool and slice: Allow cooling in the pan for 10 minutes before transferring to a wire rack to cool completely.
Notes
For an artisan-style look, score the top of the loaf before baking. You can also freeze the bread for up to 3 months.
- Prep Time: 15 minutes
- Cook Time: 50 minutes
- Category: Bakery
- Method: Baking
- Cuisine: American
Nutrition
- Serving Size: 1 slice
- Calories: 120
- Sugar: 0g
- Sodium: 400mg
- Fat: 2g
- Saturated Fat: 0g
- Unsaturated Fat: 1g
- Trans Fat: 0g
- Carbohydrates: 24g
- Fiber: 2g
- Protein: 3g
- Cholesterol: 0mg
Keywords: gluten-free, bread, baking, no-knead, easy recipes